While oil paint is often considered an artist's paint, acrylic is a super popular medium for beginners and professionals alike. Why? It dries quickly, is water soluble, versatile and can be used on a variety of surfaces such as canvas, paper, cardboard and many more. In this tutorial we will discuss the advantages and disadvantages of painting with acrylic paints on paper, as well as the different types of paper you can explore with acrylic paint to your heart's content. We will also discuss the best way to prepare paper for acrylic paint.
Why use paper for acrylic paint?
Well, acrylic is one type of paint that fits almost all frames when it comes to suitable surfaces you can paint on: canvas, cardboard, paper and even some more obscure options. We won't go into detail about the advantages and disadvantages of each type of surface you can use, but we will say that paper has many advantages. One of the most attractive factors is that it is cheap, depending on the type of paper you buy, it can be much more affordable than canvas. It's also relatively lightweight and portable compared to other options, which is especially useful if you want to paint outside.
Features when painting with acrylic on paper
How to write with acrylic on paper? Surely this type of drawing has its own characteristics, you think. And yes, you are right, drawing on paper has its own characteristics, just like drawing on canvas.
First of all, let's talk about brushes. What should they be? And are the brushes you used to paint with acrylic on canvas suitable?
Of course, acrylic brushes are suitable for painting both on paper and on canvas, cardboard, wood, etc.
You can purchase synthetic or nylon painting brushes and use them to paint with acrylic paints on paper. If you want to try different techniques and effects, I advise you to take several brushes of different shapes and sizes. This way you will diversify your painting and be able to create beautiful paintings.
By the way, different brushes are also needed to make it more convenient to paint in certain techniques.
So, here is the minimum set of brushes that you can purchase now to try your hand at acrylic painting:
- flat brush
They are needed both for filling large areas of canvas/paper and for applying rough strokes using the impasto technique. Flat brushes with a beveled tip are also ideal for drawing small details.
- round brush
You can also draw small details with it, and if the brush is thin, you can draw various lines.
- fan brush
This brush is perfect for shading and when working with different colors and shades - for the convenience of mixing several colors on the palette.
You can buy all these brushes in my art supply store! See the catalog - nyshop.pro/product-category/brushes/. I would like to note that I am 100% satisfied with the quality of my products, because I personally have been using them for many years)
Texture
Texture is another characteristic to consider when choosing paint. The smoothness of your paper will determine how well the paint adheres to the surface. The degree to which the paper absorbs paint is also determined by the consistency of the paint you apply to the paper. Ultimately, it's a matter of experimenting, gaining experience, and understanding how ink works on different types of paper.
Types of paper for acrylic paint
Watercolor paints are essentially a thinned-out version of acrylic paints, so there's no reason why you can't use watercolor paper for your acrylic paintings. Many artists do this and get great results because watercolor paper is so absorbent. The trick is to choose paper that's heavy enough to avoid warping the page from using thin ink, because no one wants that. Thicker paper also handles the density of thicker paint better. If you use thick paper, you will eliminate the possibility of paint cracking. The same principle applies to drawing paper or cartridge paper; choose thicker options.
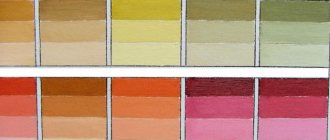
Watercolor paper varies in texture. You can buy smoother hot-pressed paper and rougher cold-pressed paper with a more jagged texture. Which paper you choose depends on the style of your painting; we recommend experimenting with different types of paper before committing to your final piece of art so you know what to expect.
How to choose paper for acrylic: types of canvases and their specifics
Craftsmen who have been working with acrylic for many years use canvas. They are made from cotton or linen. The canvases are mounted on a wooden stretcher. Their main advantage is that the paint quickly “sticks” to the canvas.
Before you start working with fabric canvases, it is better to master acrylic painting on paper. Once your strokes are confident and clear, you can move on to the next level.
In the meantime, we will tell you which paper is ideal for painting with acrylics.
The first option is a sketchbook. This is an album equipped with thick sheets of paper. You can create sketches and sketches in it. When using acrylic, it is important to watch how much water you add to the paint. If there is too much water, the paper will become covered with waves.
The second option is watercolor paper. If you plan to create washes and voluminous silhouettes by adding a lot of water, then choose this foundation. The only caveat is that you should avoid painting with acrylic on this type of paper using the impasto technique. When you turn the work horizontally, the paint may “float” slightly. This will affect the overall impression of the work.
The third option is glossy cardboard. This is a material for artists who prefer to paint for hours and put all their creative power and energy into every stroke.
Let's say right away that glossy cardboard is specific. To make a line or stroke more expressive, you will have to apply several layers of acrylic, dose the addition of water and make sure that its surface does not wrinkle.
The fourth option is unprimed cardboard. It is prohibited to paint with paints containing water, since the “base” is instantly deformed. Choose this option if you have learned to work with thick acrylic.
And the fifth option is primed cardboard. It is resistant to moisture. But this does not mean that you can add as much water as you like to the paint. You need to make sure that the acrylic does not turn into a watery mass, otherwise it will blur on the canvas.
Summer motif in the landscape
Residential houses with a garden are often added to the depiction of nature. Since in the summer many city residents go out to relax and admire the countryside. Simple step-by-step instructions are suitable even for children.
Work plan:
- A horizon line is drawn separating the sky from the earth;
- Clouds and the sun are drawn from above;
- On the left, tree trunks are drawn in the foreground;
- The branches are being drawn;
- The crown of the trees is drawn according to the type of clouds, so that there is splendor;
- An eraser is always at hand to clean up the necessary areas;
- There will be a house on the right, you need to remember how to beautifully draw its details;
- Two rectangles are drawn, with a roof on top of them.
Next you should start drawing specific details: a pipe on the roof, windows, a door. Extra lines are erased.
You can draw a picket fence from the house, through which the grass can be seen. The resulting drawing can be left as is, or you can decorate it.
What can you paint with acrylic?
Having mastered the technique of painting with acrylic paints, you can create any painting, be it a light landscape with airy clouds or a portrait of a loved one. An individual T-shirt design and even wall painting will be beautiful. Standard waterproof acrylic paints can also be used for drawing beautiful patterns on nails - for example, for a French-style manicure. They are applied directly over shellac. If you are creating children's toys, then acrylic is perfect for drawing eyes on a textile doll.
Basic principles of acrylic painting
Acrylic painting can be airy and transparent - like watercolor, dense and bright - like gouache, voluminous and rich - like oil. Beginners should first make a sketch in pencil, and then cover the drawing with paint. The easiest way is to take a wide brush or palette knife and fill the background with broad strokes, and then add small details.
To see the pencil sketch, you can add more water to the palette and create a light, translucent watercolor background, and then gradually paint over it. The more water you add, the lighter and more transparent your brushstrokes will be.
Brushes should be washed frequently and thoroughly. When acrylic dries, it becomes viscous, resulting in rough brush strokes. Do not leave dirty brushes: they will dry out unnoticed and become hopelessly damaged.
Use a spray bottle of water to keep your palette moist to keep your paints from drying out longer. But under no circumstances splash water on the paper: it will get wet and go in “waves.”
Leave the finished drawing on the table until completely dry. Carefully put the remaining clean paint that was not used during the painting process back into the jars. And if you need to take a short break during your painting session, simply cover your palette with cellophane or cling film.
Bananas
It is quite simple to imitate fruits lying on the table; there is no need to use special techniques for depicting objects. You can use 3D pens and markers to create a drawing.
Drawing technique:
- Place two bananas on a piece of paper, take a simple pencil and trace the outlines.
- Now you will need a black marker; draw parallel lines around the image of the banana, thus creating a three-dimensional image. The more lines you draw, the more realistic the picture will be.
- Take yellow paint and paint the gaps across two lines.
- Use green paint and fill in the remaining gaps. The drawing will look realistic even on a regular piece of notebook paper.
You can see more detailed instructions for performing work using this technique using the example of an alien’s hand in the video (or you can use your hand, just trace your palm and fingers with a pencil, and then follow the video instructions):
Tips and tricks to help with acrylic painting
Acrylic dries quickly. Do not keep jars or tubes open while painting. It’s better to put the required amount of acrylic of all the shades that you plan to use in your work on the palette, close the containers tightly and open them next time only when the paint on the palette runs out.
To prevent the paint from drying out longer, use special acrylic solvents. Add a drop of thinner to the palette as you mix colors to achieve the desired shade. This will increase the drying time of the paint and make it more flexible.
When purchasing paints and solvents, ask how these types and brands fit together.
Acrylic has good covering properties (almost like gouache or oil). This means that you can paint with it in several layers to correct a bad part of the drawing. Unlike watercolor, acrylic allows you to paint with light shades over a dark background.
When drying, acrylic becomes noticeably darker. How much depends on the quality of the material and the manufacturer. Therefore, choose a shade that is a half-tone lighter than you need (add a drop of white when mixing shades). After drying, evaluate the result and, if necessary, darken the drawing.
What else is often used for acrylic painting?
As I already said, acrylic can be used in many areas - from art and painting, to wall decoration in an apartment and nail art in manicure.
Let's consider each option in order.
Paint with acrylic on fabric and clothes
In addition to paintings, acrylic paints are widely used in the textile industry. Acrylic painting on fabric has existed for many decades and is divided into machine (industrial) and manual.
Of course, you and I are more interested in hand painting. The range of acrylic paints today is very diverse, so you can create your masterpiece directly on your clothes or accessories.
Jackets, jeans, scarves, bags, gloves - everything can be painted with acrylic!
But in any case, no matter how well the paint holds, you need to consider how often you will wear the item, wash it, etc. Therefore, when choosing clothes for painting with acrylic paints, pay attention to the material from which the item is made.
As a rule, natural fabrics withstand washing much better and hold dyes well than synthetic ones.
To apply the design evenly and accurately, use a stencil. If you are afraid of ruining the thing, do not start drawing right away, practice and make a couple of trial options on a piece of unnecessary fabric. Plus, this way you can check in advance how the paint will behave after washing such fabric.
also paint on glass
Frequent items for painting are glasses, vases and plates. Especially for this, there are acrylic contours - paint in tubes with a special elongated spout, which can be used to create voluminous lines or dots.
For painting or drawing on glass, try to take products of solid colors so that nothing distracts you from your work and does not merge with the color of the paint. First, try sketching the design on paper, then transfer it to glass. Also, do not forget to degrease the surface before applying paint so that it lays evenly and does not roll off. The same applies to ceramic products.
In addition to the fact that acrylic paints can be painted on canvas, they have found application on a larger surface - on the wall.
Wall painting in our time is a solid and profitable business. Many artists have already practiced in their homes and friends' homes and have moved on to the commercial side.
Wall painting is very popular in establishments, cafes, various photo studios and children's and youth creativity centers.
Just as in the case of canvas, any wall surface will need to be first prepared: remove uneven surfaces with a spatula, sand, clean, and then cover with primer before applying acrylic paint. When planning to paint with acrylic on wood , remember that this material is very good absorbs moisture, therefore, you must first cover the tree with a layer of soil.
In general, painting on wood is a very ancient technique, since people mastered this material earlier than metal or any other of the above. Remember ancient boxes and watches, with different patterns and subjects. Sometimes a whole world created with paints could fit on the lid of a small box.
Using acrylic, you can now create your own unique hand-painted product!
To preserve the design for many years, I also recommend that you coat the finished wooden product with a finishing varnish.
Each artist decides for himself what is best to paint on with acrylic paints. Acrylic is a universal paint, and we live in a time when the range of materials is so accessible and diverse that it would be unforgivable not to try every technique and type.
Choose the surface that you love and create your own unique masterpieces with acrylic paints!
Source
Tags
How to draw a portrait. Draw your business draw an even one Try to draw and forget to draw proportional ones How to draw a portrait How to draw a nose how to draw on How to draw a drop How to draw a drop How to draw a drop The method of drawing requires the technique of drawing with a pencil Drawing with gouache Drawing techniques with which for drawing people Basics of drawing simple skills of drawing a circle Features of drawing specific ones for drawing. for drawing anime. pencil drawing drawing with a pencil we pencil drawing of shapes with a pencil .drawing pencil Pencil for the hands of a pencil and the figure with a pencil to shade with a pencil of average people with a pencil.
articlesphotoscommentsanswerlightshouldauthorwedeemproducts
How to paint with watercolors correctly
Beloved by many artists, young children and fairly experienced adults, watercolor can be used for painting in a variety of techniques. Even a novice artist can easily understand how to learn to paint with this magical paint. Beginners will be able to quickly master drawing techniques, and professionals will have inspiration and a whole galaxy of new ideas.
There are 7 basic watercolor painting techniques for beginning artists.
Paint with a flat brush
First, you need to draw an image of a square or triangle so that the beginning and end of the layer are marked. Then choose darker shades. Immediately use the upper left corner. Gently touch the brush to the paper, draw a line straight to the top right corner and draw a masterpiece!
Left-handers should draw in the reverse position - starting from the right corner.
Gradient
Start drawing with a square or rectangle. Choose a darker shade by mixing on the palette. Next comes a layer of light shade, it will merge with the previously drawn one to achieve an interesting combination of color transitions.
Glaze
Improvise, fantasize: a combination of light transparent tones will allow you to get great combinations.
You need to wait for each layer to dry.
"Wet" technique
For spectacular designs, you need to evenly distribute the moisture over the surface of the paper - this will provide a satin look. Start with the background. This drawing technique allows you to achieve a hypnotizing effect.
Dry brush painting lessons
First you need to sketch the image with a pencil. You need to apply the paint after you have removed the excess with a napkin.
No excess moisture
You will need to stock up on sponges. Excess moisture must be removed from the sheet. Do not rub the paper vigorously. This job can be done well with makeup sponges.
Technique for bleaching paint that has dried
You will need clean matter and water. It is necessary to wet the area of the drawing, gently wipe and remove any remaining moisture using a dry brush.
Workplace: table, lighting, equipment
The quality of your drawings will largely depend on how you organize your workspace. Ideally, your desktop should be located opposite the window. The more light that falls on a piece of paper, the better. Try to exercise more in daylight, which does not distort colors.
If you don’t have time to draw during the day, get a powerful desk lamp with daylight. It should be easy to adjust in height. If there is little space on the table, then choose a device that is attached to the wall.
We advise you to store your work carefully: in a few years you will be able to understand your progress. Drawings can be digitized using a scanner and stored on a computer. And also - share the fruits of your creativity with friends on social networks.