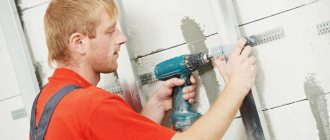
Upon completion of the renovation work, the stage of installing furniture and household appliances in the room begins. And the problem arises, how to attach heavy objects to drywall? Especially if there is empty space between the load-bearing wall and the finishing, then this is a major headache. How to attach a heavy wall cabinet with dishes to a thin wall made of fragile material, or what to do with hanging a TV? The situation is not hopeless, and there are several main types of fastening materials with which you can hang various large objects on a plasterboard wall.
In order for the repair process to proceed successfully, it is necessary to think through all the details in advance, and even at the stage of installing drywall, provide places for installing drywall.
Bookmarks
This option is excellent for fastening large and heavy objects or plasterboard finishes. The main thing is to plan at the renovation stage where and what will stand and hang.
By bookmarking we mean fastening to the main load-bearing wall or inside a light frame partition made of wooden slats or bars.
To do this, you will need a hammer drill and standard dowels with self-tapping screws (as an option, dowel-nails). Holes are punched along the intended surface and bars are secured to dowels, which are then covered with sheets of material. The main thing is to make a plan where the installed bookmarks are located, so that there are no problems with finding them when subsequently hanging furniture and equipment.
Bookmarks are wooden blocks that are laid in advance at the installation stage for later fastening of heavy objects.
Important. If there are walls made of gas or foam concrete blocks, the embedded bars should be attached not to standard plastic dowels, but to special metal “crocodiles”. Ordinary ones simply will not hold up in fragile walls, and after a while the block, under the weight of the weight of the hung object, will come off the wall.
Bookmarking is a great option, but what to do if the home is already finished or you need to rearrange or move items to other places?
The builders forgot the mortgage
Greetings, a question for people who have experience working with gypsum plasterboard.
Wall made of two layers of gypsum fiber board. A plywood frame was planned for mounting the hood, which had not yet been chosen. As a result, the builders “forgot”, now they say it will withstand it (the wall is assembled in two layers and puttied). Question: In your experience, what is the approximate weight limit for hanging a hood? (they come in 8-10 kg and 25g - depending on the type). We will assume that this hood is fastened with two self-tapping bolts. Apparently attached to the “butterflies”. Or is it still worth disassembling and adding a mortgage, so as not to worry that the hood may crash and break the stove + countertop + it’s good if it doesn’t hurt anyone?
Or is it just me being paranoid and everything is fine anyway?
- View profile
- Private message
What kind of hood is as much as 25 kilos? A 200x300 mortgage is nothing at all; according to the mind, a sheet of plywood should be attached to the profiles instead of a sheet of gypsum board.
2 sheets of gypsum board, if also glued/twisted, make a very strong wall. Most likely, they will withstand even 12.5 kg for fastening, unless of course Molly is metal. What is the circle along the hood axis in the drawing with the number 150mm? Is this what is in the photo - the outlet for the hood? Then the diameter in the photo and the dimensions of the flat boxes are not clear, but something tells me that the boxes are 120x60, and the diameter of the connection outlet is 125mm? Or am I wrong? If you are right, then open the wall and redo this porn. The socket is exactly along the axis of the hood - the hood will not stand up - the gap between the pipe and the wall is about 1cm max. If the hood output is 150, and then the gearbox is 125, then maybe it will be 25mm, but that won’t help either.
And yes. where is the hole for natural ventilation in the kitchen?
And how was the mortgage made for hanging the upper cabinets? Something about this whole structure smacks of insanity.
- View profile
- Private message
I haven’t carefully decided on the hood yet. Here is a random one (of many) - heavier, perhaps because of that glass sheet.
Mortgage 200x300 - nothing at all
I (perhaps unknowingly) believed that the main problem with fixing heavy things on a plasterboard wall is the problem of point loading and, accordingly, “breaking out” of the gypsum plasterboard at this point. I believed that even such a load distribution already greatly reduces the risk of breaking out.
What is the circle along the hood axis in the drawing with the number 150mm?
Obviously, this is an indentation on the drawing from the “dotted line” guide (in meaning, this is the height of the cabinets). You see only part of the entire drawing, so it may look abrupt and incomprehensible. The hole for the hood is 100mm in diameter. I can’t say for sure right now about the air duct box. In general, people do normal, neat things (they’re not the first to do repairs for me); they wouldn’t do outright stupid things.
And yes. where is the hole for natural ventilation in the kitchen? [Wink]
The only photo I have at hand now is old. A natural ventilation hole is naturally desirable. They “discussed” it, they also didn’t do it at first (in fact, this is the photo you see), but it became clear right away, everything was corrected.
And how was the mortgage made for hanging the upper cabinets?
In the photo you can see this mortgage: a wooden block attached to the main brick wall with the help of corners at the top and bottom (corners are quite common, I didn’t keep an eye on this, they can make a simple mortgage). When we hang the cabinets, we will drill right through the block into the main wall. The thickness of this entire additional plasterboard wall = profile thickness = 5-7cm +-
I didn’t appreciate the irony about the smell of insanity, or I didn’t understand the joke.
Thanks for the substantive answer anyway. I would be grateful for more answers and advice.
Anchor screws
Anchor screws, or anchors, are great in two situations:
- Plasterboard finishing was done using mounting adhesive, and the distance to the load-bearing walls was minimal.
- The gypsum board sheathing is made on a frame, but is located at a short distance from the main wall.
In this case, you will need a hammer drill or drill and anchor screws. The future location of the item is marked on the wall. Holes are punched according to the markings and anchors are driven in. Subsequent tightening will secure the anchor firmly in the wall.
The main subtlety of this fastening is that the hole must be punched according to the diameter of the anchor. If it is smaller, the fasteners simply will not fit, and a large diameter will not provide reliable fastening, and there will be backlash.
But the most problematic question is how to attach a shelf to a plasterboard wall if the load-bearing surface is at a distance of 100 millimeters or more.
How to attach a shelf to a plasterboard wall
In general, hanging a shelf on drywall is a very difficult task, which becomes possible if you follow the right approach. A well-organized and carried out work process using appropriate quality materials and correct weight distribution are in this case the key to success.
You can attach shelves to a plasterboard wall using special dowels. Such fasteners can be of various types, but one of their advantages is that when screwed into the wall, they begin to open, thereby forming sufficient support and taking on a significant part of the load.
What you need
To hang a shelf on a plasterboard wall you will need:
- tools for manually or mechanically creating holes in the wall;
- dowels;
- screws;
- heavy items will require anchor bolts;
- If necessary, a cementing mixture is used.
Do not forget that during drilling a large amount of dust is generated, especially considering the composition of a material such as drywall. You will need to worry about protecting the room from dust, as well as personal protective equipment when carrying out such work.
How to attach the fixing moment (fastening)
After drilling the holes for the fastenings, dowels are inserted into them, which go against the grain. After this, a screw is inserted into the dowel, for example, with brackets or hooks.
How to hang a heavy shelf on a drywall wall
You can attach a heavy shelf to a plasterboard wall by mounting it to a metal frame using special fasteners. To do this, you will need to perform a whole list of works:
- The locations of the fasteners are marked on the wall.
- Holes are drilled in the designated places, but not only through the drywall, but also directly through the profile.
- Butterfly dowels are inserted into the resulting holes and screws with fasteners mounted on them are tightened.
- The screws should not be overtightened, as long as they are able to withstand the weight of the shelf and the pressure it exerts on the wall.
How to attach heavy objects to drywall in a void
Often, plasterboard structures may be too far from the load-bearing wall, or the partition may be completely framed. In this case, anchor screws will not work, much less use standard plastic dowels. The anchors, due to the lack of support, will not provide fastening and will create a large load on the wall with its further destruction. And the plastic one will fall out immediately. What to do in this case, how to ensure that heavy objects are fastened to drywall in an almost empty space.
The use of plasterboard for cladding stairs
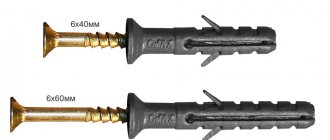
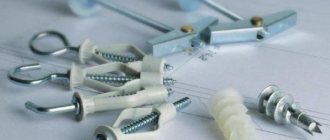
You can use special fasteners for gypsum boards specifically for problematic fastenings of heavy objects:
- Mounting on brackets or hooks.
- Four-segment dowel.
- Butterfly dowel.
- "Driva".
- Dowel type "umbrella".
- Dowel moth (Molly).
Of course, as an option, you can use a method such as attaching it to frame posts. To do this, you need to know where they are and screw the screws into the profile. But this way you can hang objects of relatively small area and weight, for example a painting.
What is the maximum weight you can hang on drywall?
The maximum load-bearing capacity of drywall depends on a number of factors:
- quality of material;
- reliability of fastening drywall to the wall;
- dimensions and weight of loaded objects.
According to builders and manufacturers, the maximum weight that drywall mounted on a wall can withstand is 55 kilograms.
Mounting on brackets or hooks
Quite a simple way. To do this, purchase brackets or hooks, which are fixed to the wall surface using self-tapping screws. The fasteners can be made on the frame stand - this way it will be stronger. The large area of the bracket will distribute the load, and this will allow the self-tapping screw to be securely secured in the drywall.
However, this method will still not be able to provide normal fastening for large furniture elements or other items.
Four-segment dowel
Due to their structure in the void, such dowels begin to fold into a knot, due to which, firstly, the load is evenly distributed, and secondly, it will not rotate and will be firmly fixed in the plasterboard wall thanks to its ribs.
To attach it, you need to make holes in the wall exactly in diameter and screw in a self-tapping screw.
Butterfly dowel
Fastening various types of shelves, lamps and chandeliers to plasterboard can be done perfectly with a butterfly dowel. The fastener itself is made of nylon. The ribs firmly fix it, which will prevent it from turning, and the side will prevent it from falling inside the walls. But the main thing is the design, which, when screwed in, opens into two halves in the form of wings, which rest against the drywall on the other side. The load is distributed and the mount is firmly secured.
The fastening method is the same as in the previous version.
"Driva"
This is a short and thick nylon type of fastener with a screw thread on the body. It is screwed directly into the drywall with a special attachment - “driva”. You can also use the traditional method by drilling a hole of 8 millimeters. Fasteners in drywall using this method can withstand a maximum load of 25–30 kilograms each.
One “drive” fastener can withstand a load of 25-30 kilograms.
"Umbrella"
Fastening heavy objects to a plasterboard wall is ideal with an umbrella-type dowel. It is made of metal and looks like either a screw or a hook. The structure opens behind the drywall and evenly distributes the load onto the surface.
The installation of such fastenings is traditional. Holes are drilled into which fasteners are inserted and a screw is screwed in. The option with a hook is an excellent solution for attaching various types of chandeliers and lamps.
A few words about installation difficulties
What problems do installers face when they have to attach heavy objects to a plasterboard wall ?
GKL strength table in accordance with sheet thickness
Plasterboard with a sheet thickness of no more than 12 mm is traditionally used for wall cladding. This material is quite durable and resistant to mechanical stress. However, installing a boiler or heating radiator, the weight of which when filled with water is more than 100 kg, is fraught with the risk that the fasteners will tear out of the casing.
By the way, with such an elegant stand, the installation of heating radiators will be more effective, since it will be possible to remove part of the load from the wall mounting
The problem is obvious, but there are simple and effective ways to solve it. If you need to hang something heavy on the wall, you can do it as follows:
- Using special fasteners and supports installed under the fixed object;
- By pre-installing mortgages for wall cladding;
- Through the combined installation of mortgages and the use of special fastening hardware.
What are the advantages and disadvantages of the listed methods?
The advantage of mounting on fasteners without installing mortgages is that the method can be applied to an already used wall. That is, if there is no immediate renovation of the room and there is no desire to dismantle the wall, this is the best option.
Among the disadvantages of the solution, I note that fastenings that are designed for heavy loads are rarely found on sale and their price is high. Well, of course, you need to know what is suitable in a particular case and what is not suitable.
Installing mortgages under the cladding is the best solution if you have to install heavy objects weighing more than 50 kg. In fact, in this case, the fastening is carried out not on drywall, but on mortgages, which, in turn, are rigidly fixed to the rough wall.
The disadvantage of this solution is that it cannot be used on walls that are already in use. That is, the mortgages need to be installed under the sheathing, which is only possible before installing the gypsum boards.
The combined option is used in cases where the dimensions of the embedded parts under the casing partially do not correspond to the location of the hinges on the mounted equipment.
Let's consider the listed methods and find out how to hang a battery on drywall or how to install other equally heavy objects.
Installation of mortgages for fastening heavy objects on gypsum boards
How to install mortgages under gypsum boards with your own hands? The installation instructions are as follows:
Location of the embeds in the wall, where the boiler will be installed
- Immediately after assembling the supporting frame, we determine the installation location of the item whose installation is planned;
- Along the width of the gap between the profiles in the sheathing, bars are cut with a thickness corresponding to the thickness of the guides;
Mortgages before sheathing with plasterboard
- Using dowel nails or anchor bolts, the bars are attached to the wall or to the profile, as in the photo;
- On the sides we attach the bars to the profile with self-tapping screws;
- Next, we sew up the frame with gypsum board sheets;
Fastening hardware for mounting a boiler in embedded parts
- After finishing the walls, we fasten the heavy object with massive screws, which will be firmly held in the thickness of the fixed bars.
I would like to draw your attention to the fact that during installation you will have to photograph the installed bars from different angles. This must be done so that when performing the subsequent installation of attachments, you will hit the bars and not the void.
The question is, why do you need mortgages if you can immediately screw long screws into the wall? There is a reason - if you hang a boiler or heating radiator on screws without placing mortgages under the wall cladding, the load on the fastening elements will be high. As a result, over time, either the fasteners become deformed, or the wall on which the installation was performed becomes unusable.
Fastening elements for installation without preliminary installation of embedded parts
Many people believe that it is impossible to simply hang anything on partitions and walls made of gypsum plasterboard, using certain types of fastening hardware. In fact, this is not so, you just need to choose the right fasteners, the maximum load of which will correspond to the weight of the equipment that you decide to hang.
Let's look at the list of fasteners and methods of their use.
Fastening hardware specially designed for use on plasterboard partitions and walls
Among the things that can be purchased, I note the following:
- Self-tapping screw for metal-to-metal plasterboard;
- Butterfly dowel with self-tapping screw;
- Screw dowel with self-tapping screw;
- Dowel “umbrella” with a bolt;
- Hartmut dowel from Knauf with bolt.
Screwing in a regular self-tapping screw for gypsum boards
An ordinary self-tapping screw for plasterboard, with which the sheets are fixed to the profile, can withstand long-term loads weighing up to 3 kg. That is, by screwing such a screw into the wall, you can hang a mirror, picture or other similar objects on it. If you tighten several screws and hang an item not on one, but on several loops, you can achieve higher installation strength.
The so-called “butterfly” from the inside of plasterboard
Butterfly dowel for hollow structures - can withstand weight up to 10 kg with single-layer wall cladding. This is an excellent solution for mounting various elements of the surroundings, starting with a mirror and ending with small shelves.
Accordingly, if you hang an object not on one dowel, but on several spaced dowels, the resistance of the fastener to weight loads will be increased.
Screwing in the screw dowel without the need for pre-drilling holes
Screw dowel with self-tapping screw - screws into the slab without the need for drilling holes. When mounted on a single-layer cladding, it can withstand a little more than 6 kg of weight load; when mounted on a double cladding, each mount can withstand a load of up to 15 kg.
The spacer part of the so-called “umbrella” from the inside of plasterboard structures
“Umbrella” dowel – a metal version of the “butterfly” dowel consists of a bolt and a metal spacer, which, when the bolt is screwed in, opens like an umbrella. When the fastening hardware is installed correctly, the umbrella dowel can withstand up to 35 kg of weight load on each fastener. With an increase in the number of fastenings, the load on the wall can be increased.
This is what the power element of the Hartmut dowel looks like, due to which fastening hardware is held on vertical structures
Rules to follow when hiding pipes
In order for the bathroom to look stylish and at the same time all systems to work properly and for a long time, you need to follow several rules:
- Use pipes with a minimum number of connections, which is ensured by proper wiring and correct placement of equipment;
- Use connections made from the same material as the pipes. At the same time, the safety margin should also be identical, or better yet, it would be higher.
- In order to have quick and convenient access to taps, valves and other elements of equipment during inspection or urgent repairs, special hatches should be provided.
Photo 2 - Plastic pipes in the bathroom
To prevent condensation from forming on pipes, insulating materials should be used. If the pipes are planned to be hidden in the wall, such insulation will also allow them to expand freely, which is especially important for hot water pipes.
Photo 3 - Insulating material for pipes
The work is ready
Self-tapping screws for drywall have served their purpose
The work is half done, because then it’s worth working on the joints and the coating on top, because you’ve already figured out which screws are needed for drywall and which screws to use for drywall. The work requires full compliance with the above rules and principles, otherwise the quality of work will be lower than it should be.
By skipping or reducing the process of each stage, difficulties will appear in the next steps. Therefore, always try to be more careful about all the work, because the result for many years should only please the owners of the premises, and not upset them.
Calculation
To ensure that there are no obstacles to high-quality installation, all the nuances need to be considered at the planning stage and compiling a list of necessary materials and fasteners.
- You need to clearly understand at what distance the fasteners will be fixed. This parameter is determined based on the weight of the structure. The standard pitch between screws is 30 centimeters. If a heavy structure is to be installed, and additional objects will be attached on top of it (shelves, paintings, a TV on drywall), then screw in the screws at a distance of 10 centimeters from each other;
- It is worth considering the size of the plasterboard sheet;
- To select the number of screws, calculate how many layers of gypsum board there will be in the finished structure.
Return to contents
Profile connectors
In addition to self-tapping screws, rivets, dowel-nails, profiles are joined together using special connectors.
Crabs. Create X-shaped or T-shaped connections of profiles.
Crab profile connector
The crabs have special latches for the profile size. For greater reliability of the connection, it is better to fasten the crab and profiles with self-tapping screws; the crabs also have holes for them.
Extension cords. If you need to increase the profile, this can be easily done using an extension cord.
Profile extension
You join two profiles through an extension and secure them with four self-tapping screws. The connection is ready.
Two-level connector. You will need it if you are planning a two-level frame made of profiles. Its function is to create X-shaped connections at a 90 degree angle.
Two-level profile connector
It goes on sale in unfolded form and, when assembled, is bent into a U-shaped element.
Side connector. Forms a T-shaped profile connection.
Side profile connector
If a side connector is not available for sale, you can use a crab by cutting off one extra side.
Corner connector. Fixes the ends of the profile at an angle of 90 degrees.
Corner profile connector
Supplied flat. Before assembling the frame, the corner is bent at the perforations. Attached to the profile using self-tapping screws.
Rivets
An alternative to self-tapping screws when installing a frame from profiles can be rivets.
Rivets and riveter
The method is excellent, the rivets hold well, nothing falls off, the head has minimal convexity. But this connection method is used much less frequently; it requires additional tools and more time.
We close the pipes using a special screen
Currently, the selection of screens in stores is quite wide. It is a frame with two guides, to which panels made of plastic or plasterboard are attached.
Photo 9 - Screen under the bath photo
The cost of the screen is low, but it looks very original and attractive. In addition, it is easy to remove, which makes access to communications quite easy. The disadvantage is the same as that of boxes and niches - it takes up several centimeters of usable space.
Cutter
A profile cutter is not a fastener, it is a tool. The fastener in this case is the profile itself. The cutter pierces both profiles at the junction, cutting out the retaining whiskers on the reverse side.
Profile cutter for drywall
The cutter has a lot of advantages over self-tapping screws and rivets - there are no costs for fasteners, there are no convex surfaces, the connection occurs instantly, and its strength is fully consistent with the design.
68 tools for working with drywall
Read
Self-tapping screws
To assemble a frame from profiles, you will definitely need self-tapping screws - for wood, if the frame guides are attached to a wooden surface, and for metal, to fasten different types of profiles together.
Self-tapping screws for fastening the profile frame. Two types of self-tapping screws are excellent for fastening the profile to each other - with a cylindrical head and with a press washer. All threads are small, for metal.
Self-tapping screws with cylindrical head
Self-tapping screws with press washer
These screws can have different coatings, tips, and sizes. Which one you choose is up to you, the difference between them is not fundamental. To assemble the frame, metal screws with a diameter of 3.5 mm and a length of 9.5 mm are used.
Self-tapping screws for fastening plasterboard sheets. To install gypsum board sheets to the frame, you will need self-tapping screws, always with a countersunk head. For a metal frame - fine thread, for a wooden frame - large.
Self-tapping screws for fastening drywall to the frame
The tip can be sharp or with a drill. A self-tapping screw with a drill is used for metal frames with a thickness of more than 0.7 mm. This way the profile does not deform and it is easier to screw in the self-tapping screw.
Tips and tricks
One of the most common fastening options is anchor bolts. Using this method of fastening allows you to ensure a strong connection and the shelf will not come off.
To create such a mount, you will need:
- Working holes are drilled at the locations of future fasteners.
- Now recessed holes are made in the monolithic load-bearing wall.
- The next step is to insert the anchors into the drilled holes.
- Anchor bolts can be used as fastenings or additional brackets can be installed on them.
For small and light objects, Driva dowels are used as an alternative. But this is acceptable in cases where the drywall is glued and not held on the frame.
Despite the apparent fragility of a material such as drywall, with the proper approach and compliance with all work conditions, it demonstrates sufficient strength to hold most pieces of furniture and other objects on the wall surface.
Characteristics of plastic pipes
Polymer pipes are a modern material often used for laying household communications. In addition to completely plastic ones, a modification reinforced with aluminum or fiberglass is actively used, which is less sensitive to temperature changes and more durable. Unreinforced pipes are only suitable for cold water systems. For installation of plastic water supply or heating systems, samples with a diameter of 20-110 mm are used. Non-standard diameter is available upon special order.
Manufacturers note that one of the main characteristics of the material is the wall thickness of polypropylene pipes: the table, often attached to the product, clearly shows the requirements for the material for water supply and heating pipelines with different loads and ambient temperatures.