When entering a room, the floor is the first thing we see after the doors. Therefore, there are always increased demands on it, and the best materials are used for finishing. But no matter how high-quality it is, an uneven surface or insufficient floor stability will destroy the expected effect. Therefore, before carrying out decorative work, laying linoleum or carpet, ceramic tiles or even painting, the floor surface must be perfectly level and stable.
DIY self-leveling floor screed
An old concrete or wooden floor can “come to life”, and potholes and chips can disappear thanks to modern fast-hardening plastic compounds. You no longer need to use old technologies and carry out special preparations; forget about complex leveling and long hardening times. Now you can make a floor screed much faster without any special knowledge using a self-leveling mixture. All you need to do is strictly follow the manufacturer's recommendations.
Decorative floor on top of a self-leveling screed
Advantages of self-leveling mixture
The composition for a self-leveling floor screed is a set of specially selected components. When the mixture is diluted to a liquid state, it acquires the ability to spread, creating a completely smooth surface. This composition of the mixture components has the property of rapid hardening, creating the opportunity to resume construction work in a short time.
Main brands of self-leveling floors and solutions used
You will not need heavy construction equipment to carry out the work.
The advantages include high levels of hardness, wear resistance, as well as a complete absence of shrinkage. Since the layer thickness is small, application in buildings with low ceilings will not affect the overall feeling of height of the room.
| Name. Short description | Packaging kg | Consumption kg/mm/m2 | Price | Strength MPa | Layer thickness in mm |
| ALFAPOL VP - finishing self-leveling self-leveling floor M200 F200 Pk5 W12 on a cement base | 25 | 1,75 | 375-471 | 20 | 2-40 |
| REAL Floor leveler, High-quality dry cement-based mortar | 25 | 1,7 | 360 | 20 | 2-80 |
| Bergauf BODEN ZEMENT MEDIUM, self-leveling floor for the final leveling of horizontal surfaces, ideal for further installation of any floor coverings (ceramic tiles, parquet, carpet, linoleum) | 25 | 2 | 289-324 | 20 | 6-60 |
| Forbo Eurobond 915, fast-hardening self-leveling floor, low shrinkage, self-leveling, quick-drying. Suitable for heated floors. For indoor use, incl. in damp areas. Withstands the load from furniture on casters. | 25 | 1,7 | 405 | 20 | 3-50 |
| Petromix PS, for leveling floors on concrete and other hard substrates in dry, damp and damp areas. Serves as a base for floor coverings (parquet, ceramic tiles, textile carpets, plastic coverings, linoleum, etc.) | 25 | 1,5 | 441-471 | 25 | 2-30 |
| The foundation will be T-42 Nipline, a self-leveling, high-strength, moisture-resistant, non-shrinking leveler on a cement-sand base using special chemical additives. | 25 | 1,7 | 342-433 | 25 | 3-30 |
| Ceresit CN 178, for the manufacture of screeds operating under conditions of low and moderate mechanical loads, incl. with constant exposure to moisture (in residential and public premises, on exploited roofs, balconies, terraces, open areas, etc.), during external and internal work, in civil and industrial construction. | 25 | 2 | 370 | 35 | 5-80 |
| Vetonit 4100 cement-based mixture for leveling concrete floors indoors | 25 | 1,6 | 520-537 | 20 | 2-30 |
| vetonit 4150, suitable for quickly leveling concrete floors and creating screeds in residential buildings, offices and public buildings. It is used for repairs and new construction under various types of floor coverings. Used in “Warm Floor” designs | 25 | 1,6 | 520-550 | 20 | 2-30 |
| Berghauf BODEN ZEMENT FINAL, self-leveling cement-based flooring for perfectly smooth surfaces. For rooms with normal and high humidity (bathroom). | 25 | 1,8 | 435-490 | 20 | 0,5-5 |
Types of alignment
If special fiberglass-based compounds are used to level a wooden floor, then for a cement coating you will need a quickly hardening mixture with the addition of some additives. As a rule, cement or dry screed, as well as a self-leveling mixture, are used to level the floor. Let's consider each of the varieties separately.
Ways to level a wooden floor
Scope of application of self-leveling screed
- Preparation for finishing the floor. It is used to remove rough coating defects by applying a thin layer of self-leveling screed from 2 to 25 mm in height.
- When installing floor waterproofing. It is used when the base is saturated with oils or other aggressive media, and when the base is a wooden covering. The thickness of this screed ranges from 25 to 60 mm.
- When installing thermal insulation.
- When creating warm floors. A self-leveling screed hides cables and water pipes of heated floors well, at the same time leveling the surface. The thickness of the layer directly depends on the height of the laid heating element, but the total height of the screed layer should not exceed 60 mm.
Self-leveling mixtures can be used when installing heated floors
Video description
The use of self-leveling mixture can be seen in the video:
Method 4 – dry screed
This option involves the use of gypsum fiber sheets. Such a screed is not monolithic. Sheets of material are mounted on expanded clay or other heat insulator with the same properties. Therefore, an insulated leveling floor screed is obtained.
At the beginning of work, the uneven base is cleaned of dirt and covered with waterproofing. Typically polyethylene is used. The film is laid overlapping and overlapping the walls. Therefore, polyethylene is used with a margin of 100 mm on each side. Additionally, edge tape is used. It is placed along the walls.
First, the expanded clay is leveled to the level of pre-installed metal guides, and then carefully compacted. Under linoleum, gypsum fiber sheets are laid in two layers. If the floor is finished with laminate, then only one row of gypsum fiber board can be installed.
The second layer of gypsum fiber sheets is fixed with glue and screws. In this case, the gypsum fiber boards of the top row are laid offset. The seams between the gypsum fiber sheets of the first and second layers should not match. Typically the offset is between 250 and 300 mm.
Types of mixtures for floor screed
Self-leveling mixtures can be roughly divided according to the main binding component or intended purpose.
Basically, during construction work, the main component of the mixture for leveling floors is cement or gypsum. There are also polymer mixtures, but they have a special scope and purpose.
Cement
For leveling and correction of concrete floors and monolithic cement screeds. To create sound- and heat-insulating floors and heated floors
Cement-based mixtures, in addition to cement and construction sand, contain polymer additives.
Designed for obtaining horizontal bases for finishing coatings, leveling concrete floors and creating a strong and level base floor, eliminating large differences and unevenness of the base (up to 30 mm)
Plasticizers give the liquid mixture increased spreadability and increase the rate of hardening. The finished floor is characterized by a high strength index. The product can be used in any room, regardless of the level of air humidity. A thin coating layer of several millimeters is achieved using a cement-based screed.
High quality leveler. Cement-sand base using polymer additives (Germany), “Wacker” (Germany), “Rhodia” (France)
Plaster
Gypsum mixtures also contain cement, but the main binding component is gypsum. Used for screeding in rooms with controlled air humidity. It is often used when leveling large differences in heights, when it is necessary to make a thick screed, sometimes the filling layer is up to 100 mm.
Self-leveling floor VOLMA-Nivelir Express
In terms of strength, gypsum screed is not inferior to cement screed, and taking into account the thickness of the layer, sometimes exceeds it.
Gypsum has high thermal conductivity, which is why it is actively used in the construction of heated floors.
Characteristics of cement and anhydrite mixtures
Mixtures can be divided according to their intended purpose:
- for rough leveling. It is used for screeds with a very uneven base or large defects, and the thickness of the created layer can reach up to 10 mm. Can be used as a base for laying ceramic tiles or laminate;
Hercules coarse floor leveler 25 kg
- for fine leveling. Scope of application: finishing, perfect leveling. Usually done by pouring a cement mixture onto an already leveled screed. The thickness of this coating is up to 5 mm. The quality of the finished floor is suitable for installation of all kinds of finishing and decorative coatings;
Fine leveler
- for difficult bases. The composition of such mixtures includes reinforcing fibers and plasticizers with special properties that give the screed additional properties: increased compressive strength, hydrophobicity, etc. Such compositions are used to install screeds on complex wood coverings, on a base with a separating layer.
Products of IVSIL company. Price list
Price
Video description
The process of preparing a semi-dry solution is shown in the video:
Thanks to its composition, the semi-dry mixture has a number of advantages:
- low percentage of shrinkage and high density, because there is no evaporation of moisture from the laid layer;
- the possibility of leveling with a minimum amount of accompanying dirt due to the low water content in the mixture;
- faster curing compared to “wet” screed;
- a slight increase in humidity in the room while laying the mixture, which allows you to perform other work and even store finishing materials that absorb water well.
High-quality leveling of floors using this method is only possible with experience. After all, the high density of the semi-dry mixture makes it difficult to fill corners. Therefore, only professionals will be able to do the job efficiently. Moreover, to simplify the process, they add plasticizers to the semi-dry screed. In addition, when performing work over a large area, specialists use a pneumatic paver.
Professionally laid semi-dry mortar Source styazhkaprof.ru
The semi-dry mixture is laid in two layers. The first backfill is compacted well, and the second is stretched with a rule and sanded. In this case, two layers are laid in a maximum of an hour. After all, hardening of the semi-dry mixture occurs during this time. 24 hours after laying the mortar, expansion joints are cut along the wall. Their depth is 1/3 of the thickness of the screed, and their width is 3 mm.
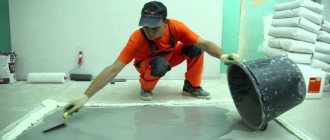
Method 3 - self-leveling mixture
This method is never forgotten when deciding how to level the floor if the height difference does not exceed 30 mm. A self-leveling or self-leveling mixture has cement as its base. The composition also includes special additives to increase the fluidity and plasticity of the solution. In addition, some mixtures contain reinforcing components to prevent the formation of microcracks.
During leveling, a high-strength or thin-layer mortar, as well as a quick-hardening composition, can be used. Manufacturers also produce special mixtures for the “Warm Floor” system. They all differ in composition.
Leveled surface using a self-leveling mixture Source oboiman.ru
Calculation of the amount of material
We calculate the amount of material
Calculating the amount of material purchased is the most important step for a person who makes his own screed. Since the material is quite expensive, purchasing even an extra bag will be burdensome, and vice versa - an insufficient amount of prepared material will not allow the work to be completed, which means that the screed layer will not be monolithic and will lose the necessary quality characteristics.
Before purchasing, carefully analyze the market for the proposed mixtures; do not neglect to carefully read the instructions printed on the packaging or on the manufacturer’s website.
Although externally similar, the compositions have different purposes, characteristics, thickness, strength, and consumption. Be sure to pay attention to the units of measurement in which the flow rate is indicated.
A mathematical calculation of the required amount of self-leveling screed can be carried out using the formula:
Material = Area * Average Thickness * Consumption * 100
Dividing the calculation result by the weight of one bag, we obtain the required amount of mixture in the bags. To correct the result, taking into account the “just in case” reserve, we multiply the resulting number by 5%. You don’t have to adjust the “margin” at all if you feel that your calculations for the required height of the applied layer are accurate.
For clarity, let's give an example. Let the room be 17 square meters. meters, and the average floor level should rise by 6 mm. Let us assume that the instructions on the packaging of the mixture indicate the material consumption - 14 kg per 1 sq. m. meter of area, and the package weight is 20 kg.
M = 17 * 0.006 * 14 * 100 = 142.8 kg
5% reserve = 7.14 kg
142.8 + 7.14 = 149.94 kg
149.94 / 20 = 7.497 ≈ 8 bags
In this way you can calculate the amount of dry construction mixture in bags. Even with such a small area and thickness of the future coating, a lot of material will be needed, which is why special attention must be paid to careful measurement and calculation of the layer thickness.
What is it for
Many people prefer to do the repairs themselves so as not to overpay the repair team for the work. This is not surprising, because now you can find many useful step-by-step instructions for leveling the floor. But even if all the recommendations are followed, a novice master can make serious mistakes, for example, skip several steps of the work process or incorrectly mix the building composition. The end result when making such mistakes is sad - the floor surface turns out to be uneven, which is why it is impossible to install laminate or ceramic tiles.
Uneven floors threaten poor-quality installation
Note! To avoid serious mistakes, you must carefully follow the instructions for leveling the floor. High-quality work will save not only money, but also time, and the finished coating will decorate your apartment or house for a long period.
Methods for determining floor unevenness
It's no secret that additional leveling may also be required for wooden floors, especially if there are gaps or gaps between the boards. Even if the subfloor is strong enough to hold together, leveling may still be necessary. The procedure is also necessary when installing the floor on an old layer of screed, the surface of which becomes rough over time. Leveling the floor will help eliminate any unevenness.
Why do you need to level the floor?
Tools and materials
The specificity of the work on creating a screed is the continuity of the pouring process. The availability of all the required devices and tools will help ensure the speed and accuracy of actions.
- Construction mixer. Needed for mixing self-leveling mass. Without mechanical mixing, the homogeneity of the solution and the speed of its preparation will not be achieved, even with an assistant. If you cannot get one, use a drill and a spiral-type belt attachment. It is this nozzle that will give a homogeneous mixture in a limited time.
Two-speed two-spindle construction mixer Interskol KMD-170/1600E-N
- Container for mixing. It must meet certain requirements: a volume of at least 20 liters, a flat bottom and rounded edges. The container must freely accommodate the solution from at least one full bag of dry mixture. You will need at least two such containers.
- Needle roller. There is no alternative tool for such a roller, so you will have to purchase one. When choosing a roller, pay attention to the length and sharpness of the needles. If you plan to pour a thick layer, a model with short needles will get bogged down in the mixture.
Needle roller
- Paintshoes. Will be needed for large leveling areas. A brush or a regular roller. For preparatory priming of the floor.
- Spatulas. You may need different sizes; they are convenient for evenly distributing the mixture spilled on the floor. It is possible that, depending on the presence of niches and the size of the room, as well as for preparing the surface, spatulas with a width of 30 to 600 mm will be needed.
A squeegee will be more convenient when distributing the solution, especially taking into account the possibility of adjusting the gap between the floor and the fill itself.
Squeegee blade size
Squeegee - a special spatula with an adjustable gap for applying self-leveling polymer floor coverings
In addition to the dry mixture, you will also need some materials for the work. When the base for the screed is concrete, you will need a primer; if it is wooden, you will need an antiseptic. The damper tape laid around the perimeter of the room should be slightly wider than the height of the future floor.
Damper tape
Putty for eliminating defects during coating preparation; it must match the base coating. When screeding the base with a separating layer, waterproofing will be needed.
Selecting tools for work
Carrying out any work, including floor screeding, involves the use of a number of tools, namely:
- Roulette.
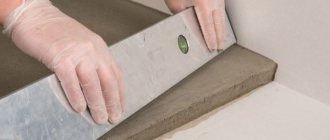
- Ruler level.
- Rake-rule.
- Knife.
- A hydraulic level, which can be purchased ready-made in a specialized store, or you can make it yourself. Half-liter plastic bottles and a flexible hose are quite suitable for these purposes. His work is based on the principle of communicating vessels.
- Putty knife.
- Roller for applying primer and waterproofing.
- Master OK.
- A construction mixer or drill with a special attachment for preparing the solution.
- A container in which the solution will be mixed (actually 30 liters).
A set of necessary tools for floor screeding
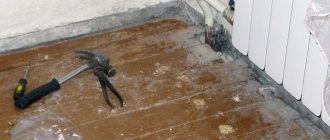
Preparing the base
Due to the small thickness of the screed, any foreign matter (shards of old concrete coating, wood chips, etc.) can ruin the entire work. The floor must be thoroughly cleaned of dust and washed from dirt. This will make it possible to see potholes, chips and cracks in the base. Loose surface particles should be removed.
Floor cleaning
If the base is a wooden surface (for example, a parquet board), you need to check individual elements for rotting, wobbling, or falling out. All imperfections in the base surface must be corrected and sealed with putty or a solution of cement and sand.
Sealing cracks in a wooden floor with putty
Check the evenness of the base with a level; if there are significant deviations in height, level it as much as possible using the same materials. The smoother the floor is after preparation, the lower the cost of the base material. When all defects have been eliminated, the floor needs to be cleaned and washed again. After drying, prime the surface taking into account the consumption indicated on the packaging.
If the primer is absorbed quickly, it means that the base has high porosity, so after the first primer layer has completely dried, apply a second one.
Briefly about the main thing
Before leveling the concrete floor, specialists determine the zero level using a bubble, laser tool or level. Then they choose the method of carrying out the work. The concrete base can be leveled using a “wet” cement-sand or semi-dry screed, as well as by applying a self-leveling mixture or fixing gypsum fiber sheets.
The materials used in all methods differ in the technology of laying on an uneven base. Professionals know this well. Therefore, their help is often used by homeowners who want to have perfectly smooth floors in their premises.
Ratings 0
Process of applying the mixture
There is nothing complicated in this process; organization is important, since you need to work at a pace and without delays. It will be difficult for an untrained worker to cope with this task alone.
Pouring the finished solution onto the prepared surface
The whole process consists of repetitive actions: kneading, pouring, leveling. These steps are repeated several times until the entire surface is covered with a self-leveling solution. You only have 6-8 minutes between kneading and finishing leveling.
In detail it looks something like this:
- The first batch is being prepared. First, water is poured into the container, strictly according to the amount indicated on the package. With the mixer running, gradually and carefully pour out the bag of dry mixture. The kneading time must be strictly observed, it is also indicated on the package, approximately 3-4 minutes. When the first batch is ready, set it aside for “ripening”, this will also take 3-4 minutes;
Kneading process
- At this time, prepare the second batch. When it is almost ready, pour the solution of the first batch into the farthest corner of the room and immediately give the container to an assistant. He, having put the second batch aside for “ripening”, begins to prepare the third;
- At the same time, you use a squeegee and a needle roller to level the surface of the spilled solution. The needle roller lifts air bubbles formed during kneading to the surface. Without doing this, they will slowly float to the surface, and when they solidify, small shells will form. When you're done, the second batch will just be ripe. And the whole process repeats.
Aligning the squeegee
Leveling the mixture with a roller
Please note that the poured solution hardens quickly. If you work without an assistant, the constant lack of time will lead to the fact that your solution will not have time to mature or you will not have enough time to properly level the poured mixture over the surface. If there is a delay, when part of the surface has already hardened and fresh solution is poured nearby, sagging will form. Which will negatively affect the evenness and quality of the finished coating.
As practice shows, it will be difficult for a beginner to make a floor screed on his own. But you need to try. Skills in this difficult matter come with experience.
DIY self-leveling floor screed
Video - Mixing and applying the solution
Preparing the base and determining the horizontal
In order for the cement screed to be installed correctly and effectively, you must first prepare the base for it. In principle, you won’t have to do anything extraordinary, and all the work will consist of thoroughly cleaning the surface and sealing possible cracks. Preparing the base for any type of screed involves cleaning the surface from debris and eliminating its deformations.
Attention! Floor screed can also be done on the ground. In this case, it is necessary to think over and protect pipes or cables passing under the floor. Ideally, they should be placed in boxes.
Whatever type of screed is preferred, it is impossible to do without defining the horizontal. That is, you need to clearly measure where the zero floor level is. It is for this purpose that a spirit level (hydraulic level) or a more modern device for a similar purpose is used - a laser level.
In the language of professionals, the zero level is called “benchmark”. It is taken out immediately in all rooms in which the screed will be performed. As a rule, the height is chosen arbitrarily, most often it is 1000-1200 mm from the finished floor area. You can start tapping in any place, and from the first mark, step by step, using a level or hydraulic level, transfer the mark to other rooms.
When leveling the floor, it is important to determine the zero level. We will tell you how to do this using various tools in the article:.
Reinforcement is one of the stages of constructing a concrete screed
Determining floor level
Before starting work, it is necessary to accurately determine the floor level. The most convenient way to do this is with a laser level: visually determine the highest point of the floor, place the device on it and turn it on. A red line will appear around the perimeter of the room; if it is continuous, you can draw markings along it with a pencil. If the line overlaps in some places, the point is selected incorrectly. The device is rearranged and the integrity of the laser line is checked again.
Determining floor level
Laser level helps to make a smooth surface
If you don’t have a laser level, you can use a water level, which is cheaper and more accessible. The marking process in this case will take longer, but the result will be almost the same. An assistant is needed to carry out the marking, since it will not be possible to hold both ends of the tube on your own. So, take a transparent polypropylene tube in your hands and fill it with water. It is very important that no air bubbles form inside the tube, and if this does occur, they should be released.
How to make markings using a hydraulic level
The marking is done as follows:
- 2 people clamp the ends of the tube in their hands and stand in the corners of one wall;
- holding your hand at a height of 30 cm from the floor, open the tubes and place them against the wall;
- as soon as the water stops, mark its level on the wall with a pencil;
- Marks are placed in the same way in opposite corners and in the middle of each wall;
- having visually identified the highest point on the floor, draw an even horizontal line from this point to the wall and make another mark;
- after that, measure the distance from the bottom mark to the top with a tape measure;
- move all the upper marking points down to the required distance;
- connect these points into one continuous line using a beat.
The marking is done as follows: take a marking cord, pour blue into the box, shake it thoroughly and pull the cord between the marks. Then, pulling it back with your fingers, they sharply release it. A smooth blue line forms on the wall, which is the new floor level.
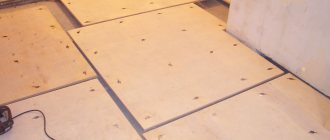
No. 5. Leveling with plywood
Another dry way to level floors is to use plywood. This method is applicable only for those rooms where there will be no significant changes in humidity during further operation. Leveling with plywood is used, as a rule, for wooden and concrete floors when the topcoat is laminate, parquet or linoleum.
Depending on the level of deformation and height differences, two main methods of leveling with plywood are used:
- installation of plywood directly on the plank floor;
- installation using lag.
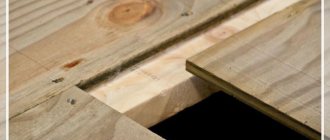
The first option is applicable when the height difference is minimal, and the unevenness is caused mainly by the deformation of correctly laid floorboards. In this case, logs will not be required - their role will be played by the tubercles of the curved floorboards. The thickness of the plywood sheets, in this case, will be 8-10 mm if the width of the main floor boards does not exceed 20 cm, and they are all uniformly deformed. If the floor consists of boards more than 20 cm wide, or not every floorboard will rest against the leveling layer, then it is better to use plywood 20 mm thick.
It is better to keep plywood sheets for several days in advance in the room where the work will be carried out. They should be treated with an antiseptic . Before starting work, the sheets are laid out on the floor in the way they will later be attached. If sheets measuring 125*125 cm are used, it is better to cut them into 4 parts for ease of work. They are laid out on the floor, moving each row relative to the previous one and imitating brickwork, leaving a gap between the sheets of 1-3 mm and a gap between the sheets and the wall of 1-2 cm for the expansion of the wood. Now all that remains is to attach the sheets to the “ridges” of the plank floor with self-tapping screws.
Sometimes sheets of plywood are laid on an already leveled concrete floor. This technique helps to achieve the most even surface possible.
The second method is used when the elevation differences are significant. Concrete and old wooden floors can be leveled using joists. Work begins with preparing the base , which is cleared of debris. If the base is a wooden floor, then it must be treated with an antiseptic. Then a layer of waterproofing is laid, which can be a polyethylene film or a special membrane. Joists and plywood are pre-treated with an antiseptic.
As a lag you can use timber with a side of 40*40, 50*50 or 60*60 mm, second grade board or cut plywood. If it is undesirable to raise the floor too much, then use not timber, but cut pieces of plywood. The logs are laid across the direction of incidence of the sun's rays in increments of 40-50 cm. Now you can install transverse jumpers, which are attached using self-tapping screws.
Next comes the most crucial moment - placing the finished sheathing at the level previously marked on the wall. For this purpose, metal wedges, roofing felt, roofing felt are installed under the logs, but most often wooden spacers are used, which will resemble point supports. Some people use sand for this purpose. After leveling, the entire system is attached to the floor, for which you can use dowels three times the length of the log thickness. The space inside the sheathing can be filled with a layer of insulation (mineral wool is often used) or with a screed made of wet sawdust and PVA glue. In the latter case, the mixture is applied in 2-3 layers, waiting for hardening for 2 days, but less thick plywood can be used. Pre-prepared and processed plywood sheets are fastened with self-tapping screws, leaving a gap of several millimeters between the sheets.
If the height differences are more than 5 cm, but less than 8 cm, then a more complex mini-lag system . Wooden pads are installed under the logs and lintels, and the height of each such supporting element is calculated separately and can be different, and this is the most difficult stage.
In general, the leveling method using plywood can be called quite fast, because you don’t need to wait for it to harden. Joists and sheets of plywood do not create such a load on the floors as concrete, so in the case of old housing stock this option is irreplaceable. But in some cases, this leveling method will require a professional approach, and will cost a pretty penny.
Using a dry screed
To level floors with dry screed you will need:
- roofing felt, glassine or plastic film;
- chipboard;
- a mixture of expanded clay and sand;
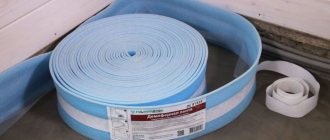
- damper tape;
- self-tapping screws;
- metal profiles;
- glue;
- rule;
- tamping;
- screwdriver
Dry screed
Step 1. Surface preparation
Prepare the rough base: remove the deteriorated coating, remove dust and debris, and blow foam into deep cracks in the floor. The recesses are filled with cement mortar and left until completely dry. Small gaps are sealed with waterproof sealant. Using a laser or water level, mark the height of the floor.
Knauf dry screed installation technology
Step 2: Waterproof the floor
Next, the base is covered with roofing felt or film, laying the material overlapping by 20 cm. The joints must be secured with tape. The waterproofing should extend onto the walls and overlap the marking line by a couple of centimeters. If necessary, foam plastic or polystyrene foam boards are laid on the film.
Floor waterproofing
Step 3. Attaching the soundproofing tape
The damper tape not only perfectly muffles sounds, but also prevents deformation of the floor covering due to temperature fluctuations. It is made of polyethylene foam and is available in rolls. The tape is cut so that its length is 10 cm greater than the length of the perimeter, and the width corresponds to the thickness of the leveling layer plus 2-3 cm. Attach the damper tape to double-sided tape or immediately purchase an adhesive-based edging material.
Damper tape
Damper tape
Step 4. Leveling the floor
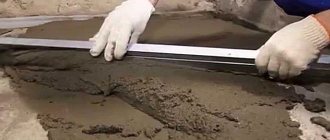
Mix the gypsum solution and use it to fix the screed beacons on the floor. The distance between the beacons should be less than the length of the rule, usually 40-50 cm. The surface of the beacons is leveled to the zero level, recessed in the solution or raising the edges of the profiles. Next, pour the dry mixture onto the floor and level it with the rule. The minimum thickness of the leveling mixture is 5 cm; If necessary, wiring is laid in this layer. After leveling, the dry screed is compacted with a tamper or a thick board, and then checked with a building level.
Lighthouses
Filling of expanded clay between lighthouses
Backfill leveling
Step 5. Installation of gypsum fiber boards
GVL slabs are an integral part of the leveling layer. They protect the dry mixture from pressing, wetting, shifting and other deformations. To avoid damaging the surface of the screed during installation, separate pieces of slabs are placed under the feet and people move only on them. These plates have grooves at the ends, making it easier to lay the material. On sheets intended for laying under walls, folds are cut. Turning the cut side of the slab towards the wall, coat the opposite edge with glue and insert the next fragment.
Samples of various options for fastening GVL slabs
To prevent the sheets from getting buried in the dry mixture, you cannot move them too much along the surface or press on the edges. In each subsequent row, the seams between the slabs must be staggered. After installation, the joints are coated with glue and then reinforced with self-tapping screws with an anti-corrosion coating. Self-tapping screws are screwed in at a distance of 10 cm from each other, and about 20 pieces are needed for one sheet. The screw caps should be deepened well into the surface of the slabs. Finally, use a sharp knife to cut off the protruding edges of the film and soundproofing tape.
Installation of GVL
Putty joints
Prices for drywall and sheet materials
Drywall and sheet materials
Do-it-yourself self-leveling floor: work process
The floor is precisely that element of the interior of any room that catches the eye first and, in many ways, predetermines the overall impression. Therefore, the highest demands are always placed on its finishing and the highest quality coatings are used, fortunately, the choice of them in our time is very wide. But, you see, no matter how beautiful and modern the coating is, if it is laid on an uneven base, then the whole effect will be “smeared”. Also, nothing good will come of it if the base for the coating is unstable - such a floor will begin to sag, creak, and ultimately will not last long.
DIY self-leveling floor
This means that before laying the covering it is necessary to ensure that the surface of the base is perfectly leveled and has the necessary stability and strength. Until recently, practically the only possible approach to this was the construction of a concrete screed using its classical technology - with special preparation, setting up a system of beacons, careful leveling, and a long period of complete maturation. Errors, especially when setting the fill level, became fatal and subsequently required large-scale rework. Nowadays, everything can be solved much easier and faster - it is quite possible to fill a self-leveling floor with your own hands, even without much experience in performing such work. The main thing is to follow the manufacturer’s technological recommendations.
But first of all, it is necessary to understand the types of self-leveling floors, their advantages and disadvantages.
When can self-leveling compounds be used?
The composition for pouring a self-leveling floor is a specially selected and balanced mixture. When diluted to the required consistency, it, possessing the properties of a liquid substance, is capable, subject to certain technological conditions, of independently creating a perfectly flat horizontal surface under the influence of gravitational forces. At the same time, the special component composition ensures extremely rapid setting of the mortar, its solidification in this horizontal position, creating a flat surface, ready for further construction or finishing work.
The semi-liquid solution, under the influence of gravity, should itself create a perfectly horizontal surface
When can this technology be used?
- In order to create a thin leveling screed directly on the concrete base, to eliminate defects (irregularities) of the old surface and prepare for laying the finishing coating. Typically, with this approach, the thickness of the poured layer is in the range of 2 ÷ 30 mm.
- For pouring a leveling “floating” screed on a separating layer, for example, on a roll or film waterproofing (optionally on oiled construction paper). This technology is justified in cases where the condition of the base does not allow pouring the screed directly onto it (for example, concrete is deeply saturated with petroleum products or oils). Another option is to pour screed onto a wooden base. In any case, the thickness of the screed varies from 30 to 60 mm (some compositions allow you to make thicker screeds).
- A similar option to the previous one is pouring screed onto a layer of insulation (for example, extruded polystyrene), when the floor requires special thermal insulation. The layer thickness is usually the same - from 30 to 60 mm.
Pouring cable "warm floor"
- Finally, such mixtures are well suited for “warm floors”, both water and electric. They allow you to reliably hide pipes (cables) and at the same time obtain a flat surface (installing ordinary beacons along the laid contours of pipes or cables is quite inconvenient). The thickness of the fill in this case depends on the diameter of the heating element - at least 35 mm above its upper edge. But the total thickness should not exceed 60 mm, otherwise this will lead to unnecessary waste of energy.
Now - about the types of self-leveling self-leveling floors based on the main, basic component. Let’s immediately “put out of the equation” polymer floors (acrylic, polyurethane, epoxy, etc.) - they have a specific area of use or intended purpose, and they also have a different, more complex filling technology. In general construction work, cement or gypsum based floors are mainly used.
Example of a cement-based mixture
- Cement-based mixtures with mandatory polymer additives-plasticizers, ensuring good spreadability of the fresh mixture and its rapid crystallization.
Such floors are distinguished by good durability and can be poured in rooms with high levels of humidity. It is cement mixtures that make especially thin leveling fills, only a few millimeters thick.
In some cases, it will be more profitable to use a gypsum-based solution
- Gypsum (or rather, gypsum-cement) mixtures are excellent for leveling floors for any type of finishing coating, but only in rooms where normal humidity conditions are created. They are often used in cases where particularly thick layers of fill (sometimes reaching even 100 mm) are needed to level out large differences. Gypsum is a good conductor of heat, so such mixtures are very popular among installers of heated floors.
Another criterion is the intended purpose of a particular type of mixture.
- Rough levelers - designed for leveling uneven bases with large differences in height or significant defects. The poured layer, as a rule, is at least 10 mm (with thinner pours, the strength of the coating will not be ensured). As a rule, final elastic coatings will require additional leveling before installation. Can be used under tiles and laminate.
- Fine leveling mixtures are used in situations where it is necessary to achieve an ideal floor surface without noticeably increasing its level. The thickness of the fill can be up to 5 mm. They are usually used on a leveled screed made using conventional technology from a cement-sand mixture, or after leveling with coarser self-leveling compounds.
- Special - they are often called mixtures “for complex bases”. Thanks to special component additives (for example, reinforcing fibers) and plasticizers, they are given specific qualities, in particular, increased compressive and bending strength, increased hydrophobicity, etc. The cost of such building mixtures is, of course, significantly higher, but the possibilities are much wider. So, this is exactly the composition that is used when pouring floors over a wooden base or over a separating layer.
Probably, all self-leveling self-leveling floors, compared with conventional concrete screed, have common advantages:
- Preparing the solution for use is not particularly difficult: there is no need to accurately measure the ingredients, everything is already arranged in the optimal composition and all you have to do is follow the instructions.
- To prepare the pour, you do not need powerful equipment (a concrete mixer) - a construction mixer or even an attachment to a regular drill is enough. The manual labor component is also kept to a minimum.
Single Rotor Construction Mixer
- The complex and labor-intensive operation of installing a beacon system to align the surface strictly horizontally is completely excluded from the technological process. In our case, everything will be done by gravitational forces. The main thing is to accurately calculate the mixture consumption per square meter of area. For control, you can use portable tripods-benchmarks.
- Since there is no beacon system, and there are no difficulties with preparing the solution, even a beginner should be able to fill the floor - of course, with the proper level of personal care and unconditional adherence to technological recommendations.
- Any concrete screed using “classical technology” is at least 25–30 mm thick, “stolen” from the total height of the room. When using thin leveling self-leveling floors, sometimes 2 ÷ 5 mm is sufficient.
- Both the small thickness of the screed and its lower density reduce the load on the floor slabs, which can be very important in multi-storey buildings.
Sometimes after two to three hours it is already permissible to move on the filled surface
- After pouring, many mixtures allow you to move on the floor within 2 ÷ 3 hours. This can give a very significant gain in the total duration of all repair work in the apartment (in the house). A flooded walk-through room or corridor will not restrict movement around the house for several days, as with a conventional screed. You can also begin the next technological operations much earlier.
Among the disadvantages, one can note the higher price of the source material. That is why it is often more profitable to carry out the basic, rough leveling using a screed, and then pour a self-leveling thin-layer floor to obtain a perfectly flat surface. However, the choice is always up to the homeowner.
What mixture and in what quantity should I buy?
What mixture should I use? Their variety is very large, and you can choose according to the manufacturer’s rating, the intended purpose, and the cost.
How not to get confused in the variety of self-leveling floors? You must read the instructions carefully!
There is no need to rush - read the instructions very carefully, since despite the external similarity, the compositions may be intended for different purposes. As can be seen from the table, the price spread can be quite significant (the indicated cost is according to the capital’s online store, as of May 15, 2015):
| Brand of mixture and manufacturer | Characteristics of the mixture | Possible pouring thickness (mm) | Compressive strength (MPA) | Consumption per 1 sq.m with a layer of 10 mm (kg) | Standard packaging (kg) | Approximate price per package (RUB) |
| Founds T-42 NIPLINE | Self-leveling leveling floor on a cement-sand base, for construction and repair work | 3 ÷ 30 | 20 | 17 | 25 kg | 395 |
| Founds T-48 MASTLINE | Universal leveling mortar with a self-leveling effect. Suitable for both preliminary and final leveling | 3 ÷ 80 | 15 | 14 ÷ 15 | 20 kg | 255 |
| BERGAUF Boden Inter Gross | Fast-hardening cement-based leveling compound, including for rooms with high humidity levels | 3 ÷ 50 | 12.5 | 14 ÷ 16 | 20 kg | 255 |
| BERGHAUF Boden Zement Gross | Cement self-leveling floor of increased strength, universal, including for work on complex foundations | 6 ÷ 50 | 20 | 18 ÷ 20 | 25 kg | 280 |
| Weber Vetonit 4100 | Self-leveling self-leveling floor for any type of premises. Well suited for electric heated floors. | 2 ÷ 30 | > 20 | 16 | 25 kg | 630 |
| Weber Vetonit 4310 | Universal self-leveling floor for all types of surfaces, incl. old tiles or wood flooring. Micro-reinforcement with fiber. Resistant to bending. | 2 ÷ 30 | > 20 | 17 | 25 kg | 1450 |
| Kesto FINISH | Self-leveling mixture for fine finishing leveling before laying decorative coverings | 1 ÷ 7 | 20 | 16 | 25 kg | 490 |
| Glims-S-Level | Self-leveling floor of increased strength, universal type - for rooms with any level of humidity | 2 ÷ 30 | >22 | 17 | 20 kg | 535 |
| Knauf Tribon | Universal self-leveling floor screed based on gypsum-cement mixture filled with quartz sand | 10 ÷ 60 | 15 | 17 | 30 kg | 290 |
And finally, when choosing and purchasing, you will need to immediately decide on the required amount of material. The task is not difficult if the base is sufficiently pre-leveled horizontally, and, in addition, it has already been planned in advance to what approximate height the layer of self-leveling composition will be poured. For any building mixture of a similar purpose, the average consumption of material per square meter of area is always indicated with a pouring thickness of 10 mm. Therefore, the mathematical calculation comes down to one formula:
M = S × h × m × 100
M is the required amount of dry construction mixture, in kilograms.
S – Area of the room being poured (in square meters)
h – Height of the poured layer, in meters (1 mm = 0.001 m)
m – Consumption of the composition specified by the manufacturer per 1 m² of area to be poured with a layer thickness of 10 mm.
Next, the resulting value will need to be divided by the weight of the composition in one factory package to get the number of bags that need to be purchased. It would be reasonable to take about another 5% reserve.
A simple example based on the data shown in the table. Let's say the floor is poured in a room with an area of 19 square meters, and the floor level rises by an average of 8 mm. The composition chosen for the work was “Glims-S-Level”. His instructions indicate consumption - 16 kg per 1 m² of area.
M = 19 × 0.008 × 16 × 100 = 243.2 kg
Let's immediately add another 5%, we get: 243.2 + 12.6 = 255.36 kg
It remains to find out the number of bags. In this case - 20 kg.
255,36 : 20 = 12,77 ≈ 13 bags
It is economically feasible to use self-leveling floors for small level differences
Obviously, even with such a fairly thin layer of material, a lot will be needed. This is another argument for how important it is to carefully prepare the base for pouring and to pre-level it using cheaper methods.
To make it extremely easy for the reader to independently calculate the required amount of dry building mixture, below is a convenient calculator that will handle this quickly and accurately.
Calculator for calculating the required amount of dry building mixture
Go to calculations
The program allows you to make calculations both based on the already known area to be filled, and on the linear parameters of the room, taking into account some of its features that affect the total area.
To enter the material consumption parameter, you should focus on the value specified by the mixture manufacturer (kilograms per square meter with a layer thickness of 10 mm).
Prices for various types of screeds and self-leveling floors
Screeds and self-leveling floors
Video: basic concepts about self-leveling floor screed
How is a self-leveling floor poured?
All work on pouring a self-leveling floor can be divided into three main components. First, the base surface is prepared for work. Then I go through two parallel stages, carried out almost simultaneously - this is preparing a solution of the required consistency and pouring it with leveling.
What you need for work
In order for the process of pouring and leveling to proceed continuously and to be carried out efficiently, it is necessary to prepare in advance all the necessary tools and devices.
- First of all, you need a mixer to mix the self-leveling mixture. Trying to mix even a small amount of it by hand is better not to try, since you won’t get the desired consistency, and it will be impossible to maintain the required pace of work. A real construction mixer is convenient for mixing. If you don’t have it, you can get by with a drill attachment.
- To mix the solution you will need a suitable container. It should hold at least a full bag of dry mixture with the appropriate amount of water, so that there is still enough space for free mixing, without splashing around. Typically, technical buckets or high basins (ditches) are purchased, always round in shape (without corners), with a flat bottom, with a capacity of at least 20 liters.
Convenient container - wide cuvette with high walls
- You will need measuring containers, since preparing the solution requires a very precise dosage of water.
- You should “arm yourself” with a set of spatulas - from narrow ones, 30 ÷ 40 mm, which will be required for preliminary repair of the surface, to wide ones, 500 ÷ 600 mm, since they are often convenient to disperse the poured solution over the floor surface.
Squeegee - most convenient for distributing the mixture over the floor surface
- Instead of a wide spatula, it will be much more convenient to use a squeegee - here it becomes possible to adjust the gap between the surface of the subfloor and the pouring level. And it will be much easier to maintain uniformity when leveling.
The needle roller cannot be replaced with anything
- A required tool is a needle roller. There are a couple of nuances to consider here. Firstly, you should not buy a roller whose needles have a teardrop shape at the end (like on a massage comb). Secondly, the length of the needles is also very important - it should be commensurate with the height of the poured layer. If the needles are too short, the roller will “sink” and get stuck in the poured mixture. If the needles are too long, the required effect of uniform distribution of the solution over the floor surface will not be achieved. It is considered optimal that the needles are 2 ÷ 3 mm longer than the thickness of the fill.
Benchmark beacon with adjustable central pin
- In the event that the thickness of the self-leveling screed being created is quite large (about 20 millimeters or more), no matter how you calculate the mixture consumption, guidelines for the upper filling level are still needed. You can resort to temporary installation of beacons from a plaster profile. It would probably be more convenient to install benchmark beacons. They can be rented from a specialized company.
- To apply the primer to the surface of the base before pouring, you need rollers with padding polyester soft bristles and brushes for hard-to-reach places.
- To cut expansion joints in a frozen floor, you need an angle grinder (“grinder”) with a stone disc.
Paint shoes can be a good help
- In some cases, paint shoes can be good helpers - special attachments for work shoes that allow you to walk on the poured surface until it sets. True, this should not be done when pouring the solution on a layer of insulation, on a “warm floor” or on a separating layer of polyethylene film.
To carry out the work, in addition to the self-leveling composition itself in the required quantity, you will need the following materials:
- Deep penetration primer - if the floor will be poured onto a concrete base.
- Antiseptic impregnation for wood - if the coating will be made on a wooden base.
Damper tape - in a roll and in the process of sticking to the wall
- Damper tape, 8 ÷ 10 mm wider than the height of the planned fill. The length of the tape should correspond to the perimeter of the room, minus the doorways.
- Repair composition for preliminary sealing of defects on the starting surface. These can be acrylic or epoxy putties, sealants, and sometimes just a cement-sand mortar (though in this case you will have to wait too long for it to harden).
- If you plan to screed on a separating layer, then you will need a waterproofing material - roofing felt or dense, at least 200 microns thick, polyethylene film. When using film, you will also need reliable construction tape to seal the overlaps of the laid strips.
- When the screed is poured onto a wooden base, it is better to use thick construction paper impregnated with tar as a separating layer.
Find out about the types and characteristics of Volma self-leveling floors, and also watch video instructions for use in our new article.
Preparing the premises for work
The preparation of the floor surface is carried out differently, depending on what type of screed is being used. However, there are general procedures for any of the cases.
- So, no matter what kind of screed is performed, the base must be well repaired. There should be no cracks left on it (especially with the prospect of further development), potholes, failures, areas of heavy pollution, areas of instability, bumps, protrusions, and other significant defects.
All unreliable areas on the old foundation are subject to unconditional removal
- Heavily oiled areas or areas saturated with other technical fluids must be cleaned to “healthy” concrete.
- Areas with crumbling, flaking bases must also be removed to form a monolithic structure.
- The cracks must be cut with a sander or manually to a depth of 20 mm and cleaned of small fragments. If a crack in concrete tends to continue, it should be crossed at both ends, as well as every 250 mm with perpendicular cuts of 100 - 150 mm.
- The protrusions must be knocked down to the general level.
- All defects are filled with repair compound and leveled to the general starting floor level.
Old screed with repair patches
- After the “patches” have hardened, they are thoroughly cleaned, dusted (using a powerful vacuum cleaner), and then the surface is primed twice with a deep-penetrating compound. The second layer is applied only after the first has completely dried.
The old base must be primed twice
- The next steps may vary slightly:
— If the pouring will be carried out by contact directly on the concrete base, then after priming, a damper tape is glued to the wall along the perimeter of the room so that it protrudes above the future screed by 8 ÷ 10 mm. After this, you can proceed to preparing the mixture.
Fundamental difference between contact screed and separating layer screed
— In the case when the screed is planned on a separating layer, a waterproofing material (roofing material or polyethylene film) is laid with an approach to the walls of 100 ÷ 150 mm. The joints must be taped for complete sealing. It is very important to expel all air bubbles from under the waterproofing layer (this applies to a greater extent to plastic film). After the material has been laid, the damper tape is glued in the same order as described above.
— If the pouring is carried out over a layer of insulation or over a “warm floor” of one or another principle of operation, then the preparation will have its own specific features, which are described in more detail in the relevant articles devoted to thermal insulation of floors or their artificial heating (they are widely presented on our portal ).
- If a wooden base is being prepared for pouring, then it must be completely stable. There should be no bending of floorboards or panels even under significant load. If necessary, repair and replacement of joists and top coverings is carried out. After this, the surface must be treated with an impregnation with pronounced antiseptic properties.
The wooden covering is repaired to absolute stability...
After it has dried, the surface is covered with a layer of construction kraft paper or plastic film. In the future, everything is the same as described above.
... and then primed and covered with tar paper
Whatever screed is used, if its thickness exceeds 10 mm, then it is advisable to lay a fiberglass reinforcing mesh over the entire surface in advance. It must be pinpointed to the base (for example, with drops of “liquid nails”) to prevent it from floating up when curling the liquid solution.
All further work will require strict adherence to the temperature and humidity conditions in the room where the pouring will be carried out. Thus, the temperature of the surface covered with a self-leveling compound must be maintained in the range from + 10 to + 25 ° C. Residual surface moisture – no more than 4%. This is checked with special devices, but it can also be checked using the “folk” method. The floor surface is covered with a square piece of polyethylene 1000 × 1000 mm, pressing its edges tightly. If after 24 hours there is no condensation on the film, you can proceed to further actions.
The room in which the pouring will be carried out must be protected from direct sunlight and drafts are not allowed.
Alignment of benchmark beacons by level
After everything is ready, you can, if necessary, install benchmark beacons by aligning the lower edge of the central adjustable pin to the required fill level. This will become a guideline when distributing the semi-liquid solution over the floor area. The installation height of adjacent beacons (usually they are placed at intervals of 1.5 ÷ 2 meters) is controlled using a conventional construction or laser level.
Prices for different types of primer
Primer
Preparing a solution for a self-leveling floor
A properly prepared solution for pouring a self-leveling floor is probably more than half the success. Conversely, neglecting recommendations or introducing “innovations”, your own or at the promptings of comrades, can radically ruin all the large-scale work done. For example, incorrect water balance or too high/low water temperature can lead to delamination of the hardened leveling screed or to poor contact with the base.
You never need to listen to anyone - any bag of dry mixture must have detailed instructions for making the solution and remembering it. The main thing is to understand the following points: the amount of water for mixing the composition (liters per bag), temperature limits, average consumption per unit area and the “lifetime” of the prepared solution.
- In order not to make mistakes with the amount of water in the process of repeatedly preparing a solution for filling a room, you can prepare a special “measure” by donating an inexpensive plastic construction bucket for this. It is necessary to accurately measure the dosage once (for example, measure out what is required according to the instructions, say, 7.5 liters per bag). Then holes are made in the side of the bucket through which excess water will simply drain. Now, even if you are not careful, it will simply be impossible to add an excessive amount of water for mixing.
- The amount of water required according to the instructions is added to the mixing container. A prerequisite is that the container must be clean and must not contain any substances other than the specific mixture. The water must also be clean - free of rust, oil, sediment or any technical additives.
- The dry mixture is gradually added to the water, with constant stirring (this way, and not vice versa).
Preparation of the solution is the most important operation!
- Mixing must be carried out continuously for at least 2 minutes, so that complete homogeneity of the composition is achieved, without any lumps or separation into water and mineral components. When mixing, special attention is paid to areas near the bottom, in the corners near the walls - undiluted mixture residues most often accumulate there.
- After intensive stirring, when the mixture is properly homogeneous, it is left to “ripen” for 2 ÷ 3 minutes. After this, stir for another minute - and the solution can be considered ready for use.
The countdown of the “lifetime” of the self-leveling composition begins. It is usually indicated in the instructions for use, and may vary slightly in one direction or another, depending on the room temperature. On average, you need to focus on 40 minutes, during which you need to have time to pour and distribute the finished composition. You can’t hesitate, you must immediately move on to pouring.
Read in the new article a review of mixtures, calculation of quantities and brief instructions for using Unis self-leveling floor.
Pouring a self-leveling floor
- You should fill the room in such a way as to provide yourself with an exit from the room, moving from the far end to the doors. It is unlikely that it will be possible to completely eliminate it, but it is necessary to minimize the movement on the freshly poured surface with its subsequent leveling - this will be extra work and there is a greater likelihood that defects will remain. As already mentioned, in some cases (with a contact screed) you can use paint squeegees - pinpoint marks are instantly covered with the solution.
- If there is a risk that the solution may overflow the threshold of the room, it is necessary to make and install a side, for example, from a strip of thin plywood or chipboard.
The finished solution is poured onto the floor surface, ...
- The solution is poured in strips over the surface of the base in compliance with approximate proportions per unit area. Immediately after this, the uniform distribution of the semi-liquid mixture begins.
... spread using spatulas, ...
- You can use spatulas for spreading - they are especially useful in tight spaces, such as small niches. In the “open space” of the room, you can also use a wide spatula, but still the optimal tool would be a squeegee on a rod of a length convenient for work.
...or using a squeegee. (In the photo - the master is working in paint shoes)
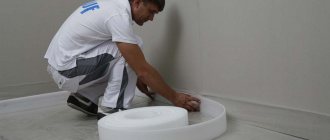
- After the solution is evenly distributed over the floor area, they begin to roll it with a needle roller. Two goals are being pursued - to displace air bubbles from the thickness of the semi-liquid but quickly solidifying composition and to additionally stimulate it to self-level under the influence of gravitational forces (to prevent stagnation).
Immediately after this, the surface is rolled with a needle roller.
- Rolling is carried out in various directions, up to a clear increase in the viscosity of the poured composition. The force of surface tension should completely tighten the marks left by the roller.
- The biggest difficulty is probably to ensure the continuity of the process, that is, of all operations performed. If possible, the room should be poured in one step to ensure both the uniformity of the surface level and the solidity of the resulting screed. Of course, if the areas are too large, this may not be feasible - then partitions are made, along which expansion joints will subsequently be cut.
Machine pouring of self-leveling mixture
During large-scale construction, mechanized preparation of the mixture and its pouring onto the surface are often used. The workers just have to manage to distribute and roll it. If the entire process is carried out manually, then it would be optimal for the work team to include at least 3 people.
For everything to work out, you need to distribute responsibilities well in the team and achieve coherence in actions.
One is exclusively engaged in mixing the solution, always being ready to give out the next “portion” for pouring. The second is responsible for pouring the solution over the surface and its primary distribution using a squeegee or spatula. And finally, the third employee of the team is armed with a needle roller and is engaged in the final distribution - rolling the poured surface.
- After the composition has been rolled, but has not yet hardened, the benchmark beacons are removed. The holes from their tripods will definitely be covered with solution.
Sex maturation and readiness dates
The composition begins to harden within an hour, and after two or three, as stated in the instructions, it will be possible to move on it. However, if there are no special reasons for rush, then there is no need to check this - it is better to give the solution 6 ÷ 7 hours, for a complete guarantee.
If everything is done correctly, you should get a flat, perfectly horizontal floor surface - this can be checked with a level in all directions.
Perfect horizontal!
While the floor matures and gains strength, a number of restrictive measures should be taken:
— prevent water or other liquids, debris, etc. from getting on it;
- avoid overheating from direct sunlight or elevated temperatures in heating radiators;
- eliminate drafts;
- To prevent the surface from drying out, it is advisable to cover it with thin polyethylene.
— accidental entry of people or pets into the room must be excluded.
The flooded floor needs to create optimal conditions for ripening
Learn about the types and technologies of pouring self-leveling floors with patterns from our new article.
When can we say the floor is ready for further finishing stages?
- At the normal temperature and humidity parameters required by the instructions for the maturation of the poured screed, after three days it will be possible to proceed to laying ceramic (porcelain) tiles, after the obligatory double priming.
- Laying of other coverings (laminate, parquet, linoleum, etc.) is possible no earlier than after 7 days. But at the same time, it is necessary to check the level of residual moisture of the poured floor and act in accordance with the recommendations of the manufacturer of the selected finishing coating.
- Pouring a self-leveling composition onto water heating circuits is allowed only after preliminary pressure testing. When filling, the pipes must be filled with coolant (to avoid deformation of the walls).
- If an electric heated floor is flooded, be sure to check that it is completely de-energized.
- In any case, both with water and electric heated floors, their test run can be carried out no earlier than 4 weeks after pouring.
Any self-leveling floor can also be considered to have fully gained strength and is ready for full use only after four weeks.
Video: master class on pouring a self-leveling floor
We set up guides - beacons
The guides, which are popularly called “beacons,” are precisely the guidelines along which the screed is aligned. The evenness of the future floor literally depends on the correctness of their installation. Metal profiles or pipes are usually used as beacons.
Important! The beacons must be rigid and even, not bend and be fixed in the desired position without any problems.
The screed must be carried out along the beacons
Installation of guides is carried out at a distance of the length of the rule rail. The beacons must be parallel to each other. And there are many ways to install them, for example: on mortar slides, using adjustable screws, etc. To level the beacons, a ruler-level is used to ensure the same level height in all directions.
You can make a cement-sand screed yourself. You can read step-by-step instructions on how to carry out the work in the material:.
DIY solutions for light screeds
The use of ready-made building mixtures for light screeds may seem like an “expensive pleasure” to some. Another case is that the necessary compounds are simply not available for sale in your region of residence, and ordering delivery costs a considerable amount.
Well, you can prepare a solution for such a screed yourself. The same cement will be used as a binder, but the filler may be different, depending on which one will be easier and cheaper to obtain. For this the following can be used:
— expanded clay of various fractions;
- expanded perlite sand or vermiculite;
— expanded polystyrene granules;
- sawdust.
Expanded clay as a filler
Expanded clay is granules obtained by firing special types of clay. As a result of this processing, a porous, air-filled structure of the material is obtained, which ensures its low density and insulating qualities.
Expanded clay is a fairly inexpensive material and is very widely used in construction.
Expanded clay is very widely used for the manufacture of finished building parts and structures, for mixing insulation and structural insulation solutions. Its fraction may be different, but the higher it is, the lower the strength indicators of the final structure.
In order for a lightweight screed to play not only a thermal insulating role, but also be able to withstand loads, it is recommended to use expanded clay with a fraction of up to 5 mm for mixing the solution. In principle, expanded clay gravel, which is sold as backfill for “dry screed,” is very suitable for this.
We will not dwell on this material in more detail here - it is comprehensively discussed in another publication.
Expanded clay as a material for coated floor screed
There are several different technologies for insulating and leveling floors using this material. They are discussed with all the details in a special publication on our portal “Do-it-yourself floor screed with expanded clay .
Vermiculite and perlite
Vermiculite is a very unusual insulating material obtained by firing special mica rocks. Under the influence of high temperatures (but without bringing it to the melting stage), the water contained in mica leads to delamination of the crystalline structure, resulting in the formation of a layered air-filled structure with a very low density - only from 60 to 130 kg/m³.
Vermiculite is difficult to confuse with other materials due to its characteristic structure
Vermiculite is very widely used for insulating building structures. It is also quite suitable for mixing solutions under light floor screed. Cement is used as a binder, and the filling is certain proportions of ordinary quartz sand and vermiculite (best with a fraction of 0.6 to 2 mm).
The result is screeds with very good heat transfer resistance, with a total density after full strength gain - from 1000 to 1500 kg/m³ (depending on the proportion of components). It is clear that the higher the density of the screed, the greater its strength characteristics.
“Formulations” of vermiculite concrete of varying degrees of density and strength are shown in the table below.
| Mortar proportions (cement sand vermiculite) | Proportion of components per 1 m³ of solution | Density of the solution, kg/m³ | Strength, kg/cm² | Coef. thermal conductivity, W/m×°С | |||
| Cement | Sand | Vermiculite | Compression | Bend | |||
| 1 / 0,5 / 2 | 495 kg | 247 kg | 865 l. | 1000÷1100 | 45 | 24,5 | 0,25 |
| 1 / 0,75 / 2,25 | 430 kg | 320 kg | 895 l. | 1120÷1180 | 35,5 | 30 | 0,28 |
| 1 / 0,75 / 1,75 | 410 kg | 307 kg | 800 l. | 1210÷1275 | 58,5 | 30 | 0,33 |
| 1 / 1 / 2 | 380 kg | 380 kg | 785 l. | 1300÷1350 | 47 | 30,5 | 0,35 |
| 1 / 1,25 / 1,75 | 365 kg | 455 kg | 740 l. | 1400÷1425 | 66 | 32 | 0,41 |
| 1 / 1,65 / 2,5 | 365 kg | 685 kg | 640 l. | 1450-1550 | 72 | 35 | 0,44 |
The disadvantage of such screeds is that vermiculite has a very high absorbency (it is even often used as a sorbent). That is, such coatings cannot be used in rooms with high humidity, or additionally very reliable waterproofing will have to be provided.
Expanded perlite sand is another material that can be used for lightweight screed filler.
Perlite is a material with similar characteristics, also obtained by firing rock. But only volcanic glass acts as a raw material.
It usually goes on sale in the form of sand, with a fraction rarely exceeding 0.5 mm. The density is markedly low, up to 150 kg/m³. Widely used, for example, for the manufacture of warm plasters. It can also be used for light screeding, but it has not gained much popularity in this “field”. Apparently, because perlite sand is quite inconvenient to work with due to its extremely pronounced “volatility”. It is very dusty, and if there is even a slight breeze, then this turns into a very serious problem. When working with it, be sure to use eye and respiratory protection.
Expanded polystyrene granules
This material, on the contrary, can be classified as the most popular for creating lightweight screed mortars. It is inexpensive, sold in bulk bags, and very light. It goes on sale under different names (“Politerm”, “Polyston” and others) or without its own name at all. This doesn't change the essence. In any case, these are granules, that is, light, 90% air-saturated balls with a diameter of 3–5 mm.
Packages of polystyrene foam granules of 0.5 m³ each. And the weight of such a bag is only 5–6 kilograms.
Ready-made self-prepared solutions after hardening can be either purely insulating (with a density of 200÷300 kg/m³) or insulating-structural (400÷500 kg/m³). This is quite enough for a screed, which will either be covered with ceramic tiles on top, or will be covered with a strong leveling filler 25÷30 mm thick.
To mix polystyrene concrete with the indicated density indicators, you can do without sand. The ingredients used are:
- Portland cement PC-400 as a binder.
- Expanded polystyrene granules.
- Water. Its balanced amount in this case is extremely important, otherwise the resulting polystyrene concrete simply will not show the expected strength values.
- An obligatory component is a special air-entraining foaming additive - saponified wood resin (abbreviated as SDO). Its proportions, including taking into account the concentration, must be strictly observed.
Saponified tree resin can be ready for use or sold in the form of more concentrated solutions.
In this case, before use, it is brought to the required 50% by diluting it with water. Preparation of the solution presents some difficulties. The fact is that an ordinary gravity concrete mixer will not be a good assistant in this matter - due to the excessive lightness of the filler, which will constantly strive to float to the surface. This means you will have to either use a forced-action mortar mixer, or mix it in a separate capacious container using a hand-held construction mixer.
Below is a calculator that will help you correctly calculate the proportions of ingredients for preparing polystyrene concrete of various densities. When working with a calculator, you should correctly understand one important nuance:
One of the initial parameters for calculations is the area of the room. When you enter it, the result of the calculation will show how much materials you need to purchase to fill a light screed in the room.
But it is hardly possible to prepare such a quantity of solution at once, due to the reasons already mentioned above. Therefore, it is advisable, after the general calculation, to also carry out a “local” one, corresponding to one batch, based on the available capabilities. For example, this could be a one-time preparation of polystyrene concrete for an area of, say, 2÷3 m². That is, based on the planned thickness of the screed and the available containers for preparing the solution, it is easy to determine the “golden mean” that will suit you from all points of view. And based on this area, which the one-time prepared mixture will cover, it will not be difficult to obtain the exact “dosage” of all the necessary components - cement, polystyrene, water and SDO.
What is a light screed?
It’s not difficult to understand – the name itself contains a hint. Given the similarity of laying and leveling, this technology involves the use of materials that have a much lower density than conventional concrete.
Concrete used in construction is usually divided into several groups according to their density level:
- especially heavy – over 2500 kg/m³;
- heavy – from 2201 to 2500 kg/m³;
- lightweight - from 1801 to 2200 kg/m³;
- light – from 501 to 1800 kg/m³;
- especially light – no more than 500 kg/m³.
The solution that is traditionally used for filling conventional screeds is located exactly on the border between heavy and lightweight compounds. In mortar consistency, its density can reach 2400 kg/m³, after complete hardening and strength gain it drops to 2150 ÷ 2200 kg/m³.
Cement-sand mixture M-150 is a very good and inexpensive material for high-quality screed. But alas, very heavy.
Even if crushed stone (gravel) is excluded from the list of fillers for indoor screeding, that is, we limit ourselves to an ordinary cement-sand mixture with a grade strength of approximately M150 (approximate proportion 1: 3), then a significant lightening effect is still not obtained. It is impossible to achieve a lower value than 1900÷2000 kg/m³ under normal conditions, without the use of any special additives.
Is this a lot or not? Judge for yourself. With a fairly insignificant screed thickness, say, 50 mm, its square meter will weigh 100 kg. That is, to fill a very small room, 10 m² (for example, a medium kitchen), you have to transport, move, lift to the floor, mix and lay a whole ton of mortar. And this load additionally falls on the interfloor ceiling, which may not be ready for it. What if there is a more serious difference in the level of the subfloor to be eliminated?
The solution is obvious - it is necessary to reduce the density of concrete by some means. How can this be achieved?
In the production of finished building materials (masonry blocks, slabs), technologies are used to create a porous, gas-saturated structure of concrete. Typical examples are the well-known aerated concrete and foam concrete products. But it is impossible to apply such technology when pouring screeds in private construction.
Prices for cement-sand mixture
Cement-sand mixture
The technology for creating the porous structure of lightweight concrete is good in the production of building materials. It will not help when pouring the screed.
This means that there remains a way through reducing the density of the concrete aggregate. Instead of traditional sand and gravel (partially or even completely), materials with a distinctly low density are used. As a result, both the entire solution and the screed created with its use are significantly lighter.
And the gain is quite significant. Judging by the ready-made materials for light screeds on sale, the density of even the heaviest of them is almost half that of ordinary concrete mortar. But this is not the limit - some compositions are 4 or more times lighter than the same DSP.
A decrease in overall density, alas, leads to a decrease in the strength characteristics of the completely hardened material. But in many cases, for screeds in residential premises this is not so critical. Some lightweight compounds require that a traditional screed (about 30 mm) be poured on top of the leveling layer they create, for example, with self-leveling compounds. But even in this case, a significant reduction in the total load on the floor is ensured.
And if we also take into account the fact that lightweight screeds have very serious thermal insulation properties and the ability to reduce the spread of noise, then it is quite obvious that in many cases this is the best option.
By the way, there is a technology that does not involve the use of cement at all. We are talking about bulk, so-called dry screeds, followed by laying sheet coverings, which become the basis for finishing the floor. They will not be considered in the context of this publication - simply because this issue has already been given special attention on our portal.
What is dry floor screed and how is it installed?
In this case, dry backfill (most often expanded clay gravel) serves as a leveling and insulating material. The process of laying such a coating is not so simple. It is presented in detail, with the application of calculation calculators and step-by-step instructions, in a special article on our portal “Do-it-yourself dry floor screed” .
So, for pouring light screeds, special ready-made dry building mixtures can be used. Another approach is to make the solution yourself. Let's consider both options.