Wooden floors remain at the peak of popularity, as they are warm and durable. However, over time, under the influence of many factors, it may begin to sag. Agree, this can cause a lot of trouble and also ruin the appearance of the floor.
Based on this, the question arises: how to properly level a wooden floor? We did some research and found out that leveling the floor with plywood is a great solution.
After reading this article, you will learn the main causes of floor unevenness and learn how to independently determine their size. In addition, you will learn what to look for when choosing plywood for leveling. And be sure to choose the option that suits you for leveling the floor.
Why level the floor?
For high-quality installation of flooring material, a level base is required. This will save you from the need to place felt or bars under equipment and furniture.
Leveling a wooden floor with plywood is necessary to remove bumps, depressions, and also to eliminate curvature in the surface area.
Almost all flooring materials react poorly to defects in the rough flooring. Laminate flooring without a prepared floor will, after some time, creak, become loose and the board will become unusable. On linoleum, after a while, without first leveling the floor with plywood, all the bumps and flaws that are under the finishing material will be visible.
Installing furniture and appliances will also have problems when placed on an uneven floor. A simple installation of a sofa can turn into a multi-hour problem with placing felt and pieces of wood under the legs for leveling.
Why choose plywood
Plywood - flooring material
Plywood is a durable, multi-layer wood material. Due to its affordable price and excellent technical characteristics, it is often used in construction.
This material is chosen as a subfloor due to many factors. Plywood has an affordable price per m2, it fits well without additional time and money spent on leveling the floor. Due to the arrangement of fibers in different directions, it is a fairly durable material. It can be used not only to obtain a flat floor, but also to make minor repairs to eliminate flaws and defects.
Glue selection
At this stage you have little choice, but remember that if you have done your prep work well, any glue will hold the plywood.
Types of glue for plywood:
- Water based glue
. This glue is environmentally friendly and odorless, but it is only suitable for plywood with good moisture resistance, for example, it can be used to secure FBA plywood. The disadvantages of water-based glue are that it takes a long time to dry, and you will have to additionally attach the plywood to dowels. - Single component solvent based adhesive
. This glue has many disadvantages: smell, flammability, it needs to be secured with dowels, the glue takes 3-5 days to dry. Despite all the disadvantages, glue is used to secure plywood, which has low moisture resistance. - Two-component adhesive
. This glue has a high level of toxicity, so personal protective equipment must be used. Bonding occurs due to a chemical reaction between the components. The glue is superior to its analogues in strength and drying speed.
How to buy plywood correctly?
Plywood of different thicknesses
When purchasing plywood used for leveling, you should take into account the following parameters:
- Brand;
- Class;
- Variety;
- Thickness;
- Manufacturer of the material.
Depending on the type of premises, preference should be given to different brands. For residential premises, preference should be given to the FC or FSF brands. This plywood is safe because it contains no phenolic compounds. For wet rooms, it is preferable to choose FSF brands. This plywood is moisture-resistant and resistant to mechanical stress.
Differences in plywood grades
The grade of plywood indicates the level of release of free formaldehyde particles into the air. There are two classes:
- E1 contains 10 mg of formaldehyde per 100 g of wood material;
- E2 contains 30 mg of formaldehyde per 100 g of wood material.
For living rooms it is preferable to buy E1.
Plywood is produced in 4 grades. Grade 1 material is high-quality plywood. The fourth grade is a material with a large number of flaws, chips and knots. Professional craftsmen recommend using grade 3 and 4 plywood for rough flooring. For the main floor, grades 1 and 2 are preferable.
Varieties and classification
The thickness of the material is selected depending on the leveling method, the curvature of the floor and the coating laid on top. Creating a subfloor for laying linoleum and carpet allows you to choose a material up to 10 mm thick. Under laminate or parquet, a plywood thickness of at least 12 mm is required to level the floor.
When choosing the thickness of plywood for the floor under linoleum, be guided by these indicators. If you choose the wrong thickness, the sound insulation will decrease and the floor will quickly become unusable.
The manufacturer determines the quality of the plywood. European manufacturers guarantee excellent quality of the produced material. But Chinese-made sheets do not always meet consumer requirements.
Floor leveling scheme
Also, plywood can have a sanded or unsanded side. If it is used as a subfloor, then it is laid so that there is a surface at the top without sanding. This will ensure good contact with the finishing material.
When using plywood as a finished floor, the top layer must be sanded for subsequent opening with varnish.
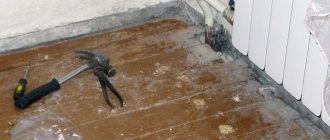
Tools for work
What tools are needed for the job?
Without the appropriate tools, it is impossible to properly level a wooden floor with plywood. To do this you will need the following devices:
- Hammer;
- Screwdriver;
- Floor level;
- Roulette;
- Hammer;
- Jigsaw;
- Screws
- Marker for marking.
It’s good if you have even minor skills in handling construction tools and materials.
General Tips
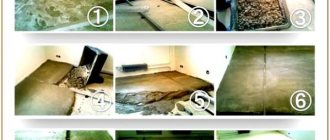
Before laying plywood, assess the condition of the base and check the floor level.
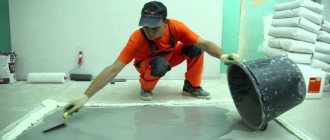
Concrete base defects and ways to eliminate them
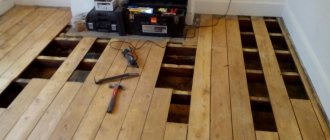
An inspection of a wooden base consists of removing creaks, replacing fasteners, updating boards in the damaged part of the floor, assessing the condition and replacing underground communications if necessary.
The concrete base is checked for defects on the surface. The level determines the curvature. Before laying plywood on a concrete base, check the surface for moisture by covering it with film for several days.
Laying on old joists
Experts report that depending on the difference in floor height, they choose the method of laying plywood sheets.
If the difference in height is up to 2 mm, there is no need to level it. Changing the floor level to 5 mm per m2 allows you to level it with plywood, laying it directly on a wooden base.
A large difference in the height of the concrete floor up to 8 cm requires the installation of strip or point lathing for leveling with plywood.
A high floor difference requires dismantling the old covering and replacing it with a new floor.
Determination of height difference
To choose the right method for correcting the surface, you need to know how uneven it is. Even if you are leveling a concrete floor with plywood, it is worth determining the height difference. This can be done using a laser level or a two-meter water level.
Video: determining the floor level in a new building
To level the floor, we determine the degree of its unevenness in this way:
- First you need to find the middle of the walls of the room and make marks on the floor, as well as mark the center of the room.
- Now we break the floor into separate squares with chalk and examine the room with a building level at least 2 meters long. We record the results.
How to level the floor with your own hands
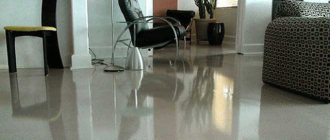
Finishing a plywood floor
Knowing the simple rules for leveling various types of floors with plywood, you can easily do the job yourself. When laying plywood as a finished floor, the sheets begin to be installed from the middle of the room. The plywood must be secured with self-tapping screws at a distance of at least 2 cm from the edge of the sheet. After the process is completed, the coating is sanded and varnished.
Creating a subfloor using plywood does not impose any special requirements on the fastening and arrangement of sheets. If two layers of material are expected, then it is laid with the sheets offset to prevent the seams of the top and bottom rows from matching. There are a number of methods for laying plywood sheets over concrete or wood floors.
Floor leveling without joists
Laying sheets without logs
It happens that a concrete floor requires not only leveling, but also insulation. For this, an option without the use of logs is suitable, which is considered one of the simplest ways to level a floor with plywood. Work with plywood material begins only after it has been kept in the room for several days to get used to the room conditions.
The base for laying and the plywood sheet are treated with an antiseptic before it is laid. To create the gap required by the technology, bars are placed around the perimeter of the room.
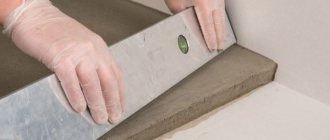
Sealing seams and irregularities
The plywood sheets are placed on the floor so that they are offset relative to each other (as when laying bricks). The material is secured with screws evenly along the protruding points of the plywood.
All fasteners and seams are covered with sealant, after which the surface is puttied.
For a wooden floor that is not loose and in good condition, you can also use plywood leveling without using joists.
Fastening with self-tapping screws
Wood plank floors are treated with sealant or putty material. It is leveled using sand or sawdust mixed with resin. A vapor barrier film is laid on top, on which plywood is already laid.
To ensure that after fixing the plywood with screws, they do not protrude above the coating, the holes are made in several approaches. First, a hole is drilled to the size of the screw, and then it is processed so that the head of the screw is level with the surface of the plywood sheet.
Leveling the floor with plywood along the support strip
Laying along joists
Leveling the floor with plywood over strip sheathing can be used for laying under laminate, tile or linoleum. This support is created using square bars and plywood sheets. The logs are laid in increments of 30-50 cm, and at a distance of 20-30 mm from the walls. The cross bars are secured to the joists in a checkerboard pattern using screws. To add rigidity, you can secure them with metal corners.
To create sound and heat insulation, wood shavings mixed with glue are poured between the sheathing. This mixture dries within 2-3 days. You can also use expanded clay or mineral wool for backfilling.
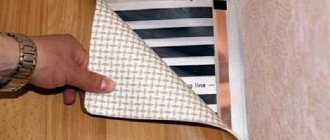
Laying insulation between joists
The plywood is secured to the support with self-tapping screws. After this, you can lay any floor covering.
Alignment by mini-lags
The method of leveling the floor with plywood over mini joists is chosen when there is a slope or the surface difference is up to 8 cm.
Adjustable joists
The floor surface is marked for the installation of bars and pads, which create an ideal structure for laying plywood sheets. This work requires careful calculations of the height of each support element with markings on the floor and preliminary fitting.
With this type of flooring, all structural elements will be of different heights. Working using this method is not difficult, but it requires a painstaking approach.
By point supports
Laying scheme using point supports
This leveling method requires supports, self-tapping screws, two layers of plywood covering and glue.
First, sheets for marking and numbering are laid out on the base. The sheets are removed and the height of the finished floor is marked on the wall.
Threads are then stretched across the room to show the height of the finished floor. Next, point supports are installed. The result will be a grid of supports that are located at a distance of 30-45 cm from each other. This method is inferior in reliability and stability to alignment using a strip support.
Alignment of logs
After checking the height of the supports with a level, secure them to the base of the floor. Then we level the floor with plywood, laying and securing the sheets to the supports.
Stage 3. Improving the quality of sheets
In total, plywood has 12-15% moisture content. You can increase the moisture resistance of plywood by impregnating it with putty based on polyvinyl acetate, which is somewhat similar to PVA glue. Do everything according to these instructions:
- Step 1. Take a sheet of plywood in your hands and saturate it on one side until stains begin to appear on the opposite side. Then on the other, only twice this time.
- Step 2. Dry the plywood horizontally for at least three days, in a dry room at normal room temperature.
- Step 3. Once the sheets are dry, treat them with wood preservative.
Advice: if you need to level the floor with sheets that are not afraid of moisture, then pay attention to the Greenboard GB3 brand (12 mm). Insulation can also be laid between them.
And the strength can be increased using acrylic varnish. Apply it in two layers, and the second only after the first has dried.
Master's recommendations
Professionals remind you that the underground must be ventilated. After laying the finishing coating and installing the baseboard, ventilation holes are made in it, which are covered with a grille for ventilation.
Depending on the finishing coat, the plywood will need to be sanded and varnished after laying. After leveling the floor, a backing made of natural or synthetic material is laid on the plywood under the parquet board.
Using plywood to compensate for differences will help extend the life of a parquet floor for many years. The advantage of this leveling is that the floor rises only to a height of up to 5 cm. This means that this method can be used even in low rooms.
Did the article help you? ( 5 ratings, average: 4.80 out of 5)
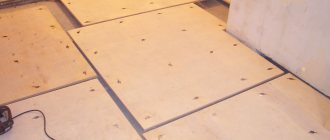
Stage 5. Format the sheets
Standard plywood sheets, as a rule, have dimensions of 125x125 cm. Here is an example of their installation:
However, many experienced craftsmen consider it necessary to saw them into four more parts to get squares with a side of 60 cm. Not only are these more convenient to work with, but they end up with much more damping seams at the joints, and this is important for compensating for moisture and thermal deformations . And the sheets themselves will be much stronger, because they are now less susceptible to deformation. But after cutting the plywood, it is important to pay attention to the ends of the workpieces - there should be no delamination in them. If there are any, then just change them; the floor will turn out to be of poor quality.
If you lay plywood in two layers, then divide the future thickness of the flooring by two:
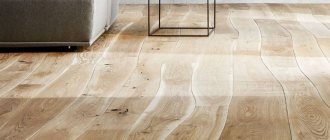
Keep the plywood sheets for several days in the room where you will lay them. Just lay them on top of each other to avoid deformation; even better, place them on edge if the sheets themselves are not too thin. This is necessary to acclimatize the sheets, but if you make a plywood floor right away, without such preparation, then the laminate laid on top will go in “waves”: the sheets will simply pick up moisture from the air, like everything that is in such a room, and this will happen natural expansion. The plywood base will swell and the laminate will begin to lift in places, breaking the fragile locks. Needless to say, the finishing coating itself will not last long under such circumstances either.
And it is also important how different the humidity and temperature were in the warehouse. So, if the difference is small or the conditions are the same, it is enough to leave the plywood in the room overnight; if the difference is from 2 to 8 degrees, it’s about three days, and if it’s larger, it’s a whole week.