Starting profile for PVC panels: dimensions and photos
It is impossible to imagine the installation of PVC panels without connecting elements that differ in shape. Such plastic parts are usually called profiles, components or moldings.
There are several types of this element, each of them intended for one purpose or another. Without the use of profiles, the design will not fully look complete, neat and solid.
And, naturally, without a starting profile, the installation of PVC panels cannot begin. Let's take a closer look at everything about the starting profile for PVC panels.
Peculiarities
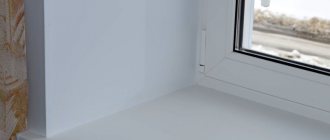
The starting plastic profile for PVC panels looks like the letter P (that is, it has a U-shape), with one side, as a rule, being slightly shorter than the other. Usually, with its installation, the installation of the structure as a whole begins, and it is for this reason that it is called initial (starting). This molding is used to cover the ends of the panels, and also in the case when PVC sheets are adjacent to door or window openings. Its use makes it possible to significantly save materials and time on installation and finishing work. Such elements have a number of advantages, and they usually demonstrate resistance to ultraviolet exposure and can avoid yellowing for up to 10 years. The material is elastic, but not brittle, which means that when cutting, the formation of cracks can be prevented. The composition is remarkable in that it contains a minimum of chalk, as well as substances harmful to the human body. Moldings can be easily installed, and due to their convenient shape, they fit perfectly even with uneven wall surfaces.
How to attach a collapsible profile to the wall
Such situations are rare, but you need to be prepared for them. Let’s say right away that fixing collapsible starting L-profiles is more difficult than ordinary ones. The second ones are simply leaned against the wall, screws with countersunk heads or dowels are screwed into the area between the plates. Of course, all work must be done level; it is advisable to first mark the location of the profile on the wall. How to fix a collapsible profile?
- Draw a line on the wall along which the profile will be installed. Please note that the mounting location must be absolutely level, otherwise the profile will bend during fixation and the appearance of the skin will deteriorate significantly. If the wall is uneven over the entire area, then tackle only this strip. Prepare some finishing putty; it is better to use gypsum-based materials. In our case, strength is not a critical indicator, the main thing is that it sets quickly. Apply it to a previously cleaned and dampened wall with a metal spatula. For gypsum putty, 30–40 minutes are enough and you can continue construction work.
- Take measurements for the height of the bathroom wall and prepare a corresponding piece of collapsible profile. You can cut it off with a mounting knife (quite inconvenient) or a grinder with a thin disk for cutting metal.
- Assemble the profile, insert the front strip into the bottom one, and click it until it stops. Before assembling, draw arrows on the invisible side; they will serve as a guide during final fastening.
- Place the profile on the edge of a flat table, drill through holes in the end surfaces. In order not to damage the table, a wooden strip 3–4 cm wide and more than a centimeter thick should be placed under the profile.
- Prepare a drill; the diameter should be 1–2 mm larger than the diameter of the screws or dowels. Drill through holes at a distance of 50–60 cm. It is necessary to drill three planes: two in the lower strip and one in the upper removable one. Make sure that the planes do not shift during drilling; all holes must completely coincide along the same axis.
- Remove the front panel from the latches; there will be holes on the perpendicular plane. Using a mounting knife, at a distance of about a centimeter on both sides of them, make cuts all the way to the side part, cut the place with the hole from below and remove it. This will expand the free area that fits into the latches of the lower part at the attachment points.
- Place the profile against the wall and mark the locations of all holes on it. Work very carefully, preferably with an assistant.
- Drill holes according to the marks. Assemble the profile, place it against the wall and insert the plastic parts of the dowels into the holes. Screw in the metal ones one by one, being extremely careful not to compress the collapsible profile with great force. After each screwed dowel, check whether the upper face plate is jammed, whether it can be pulled out and with what force. Make sure that the profile does not tilt; it should be at an angle of 90° to the wall.
Practical advice. The marks on the wall will be more accurate if you mark them with a drill through the existing holes in the profile. Let the assistant hold it motionless, while using a drill and a drill, mark the locations one by one. Do not drill deep, just go a few millimeters into the wall. Then remove the profile and drill holes to the desired depth. The depth should always be several centimeters greater than the length of the plastic parts of the dowels, otherwise they will not fit to the required length and will have to be removed and drilled again. The fact is that it is difficult to remove all the dust from the prepared hole; it is better to leave a place for it to collect while pushing the dowel.
Details
Types of profiles
In addition to the initial profile, there are other types of moldings. For example, F-shaped is used when it is necessary to beautifully “close” the joints of the ends. These could be corners where two PVC sheets meet, doors or windows, other slopes, or connections of several materials with different characteristics (for example, wallpaper and plastic panels). In other words, it is used when moving to another plane. Judging by the name, it becomes clear that such a profile for joining is shaped very much like the letter F. The next type of mounting molding is the connecting one, which is chosen if you need to connect 2 panels together. For example, this is necessary if it turns out that the height of the panel is much smaller than the wall and it needs to be “grow larger.” This profile looks like the letter H (i.e. it is H-shaped). The outer corner, as the name suggests, hides the places where the panels create right outer corners. The outer corner can be considered the outer corner, and the inner corner will mask the sheet joint at the inner corners, and always be straight.
A universal general construction corner has approximately the same technical characteristics as decorative corners. It is available on the market in different sizes - the sides can be 1-5 cm, and it is used to hide those places where the panels are connected to each other at an angle of 90 degrees. Such moldings can serve different types of corners (both internal and external), and due to their unusual design they bend in the required direction. Galtel (we are talking about ceiling plinth) is used at the joints of the ceiling, as well as at the upper borders of PVC panels. It masks such a transition and gives the overall picture completeness. This molding can be colored and thus fits perfectly into any interior. In addition to the fillets at the top, you can also see profiles called external corners. They are used when peculiar protrusions are made at the top, for example, beams or columns. Finally, interior corners on the ceiling are installed where the walls create an interior corner.
If necessary, ceiling plinths are supplemented with a connecting element. Such a detail fixes two skirting boards together at once, when one is simply not enough. It should be noted that the length of a regular skirting board is 3 meters, but in large rooms this is simply not enough. Guide rails for sheathing, according to some professionals, are also considered one of the types of profiles. The purpose of this element is the convenient installation of PVC panels. If the sheathing, like the sheets themselves, is made of plastic, then the fastening is done using special clips. Finish molding, as the name suggests, is used to secure the final panel. It will “complete” the entire structure as a whole.
How to choose the right material
At the moment, the construction market is full of 10 mm starting profiles for PVC panels made of metal and plastic. Plastic products are quite inexpensive, but they do not shine with quality. It would be simply stupid to use them for serious tasks, which is why they are most often chosen as a decorative addition. In general, if we talk about how the PVC panel and the profile are connected, it turns out that the panel is partially “recessed” into the profile and fixed in it. For this reason, in order to ensure reliable fastening, it is worth giving preference to metal molding, which can be made of aluminum or steel. Typically, metal elements are additionally treated with a special composition that can prevent the formation of rust.
If we talk about lathing slats, they can be made of wood, however, such material can be called quite capricious. Despite the savings in terms of price, this design will not be able to please the owners for a long time - the wood may begin to rot, and may also be exposed to a fungal colony or become moldy. For this reason, the choice is still made in favor of other materials.
Dimensions
The dimensions of moldings for polyvinyl chloride panels completely depend on the sheets of plastic themselves, or more precisely, on their thickness. Usually there are 4 types of profiles, which can be 0.3, 0.5, 0.8 and 1 cm in thickness. The usual profile length corresponds to 3 meters, and for a profile with a thickness of 0.3 cm the length is 2.5 meters.
Features of PVC ceiling finishing
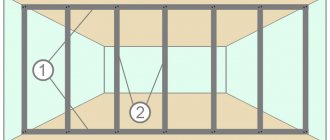
When finishing the ceiling with PVC panels, only a frame fastening method is used, which makes it possible to hide communications, as well as install any recessed lamps in the ceiling.
Suspended ceiling design: plastic panels are attached using fittings to profiles attached to the sub-ceiling. Therefore, you can assemble such a ceiling yourself.
Metal lathing for mounting plastic panels on the ceiling in the bathroom
Since plastic is the lightest material for suspended ceilings, you don’t have to worry about the ceiling collapsing on your head. To install plastic panels, you can use lightweight profiles, for example, aluminum or even plastic. Such profiles can easily withstand plastic sheets and high humidity in the room, so they can be used to install a ceiling in the bathroom. But for rooms with a normal level of humidity, you can use wooden profiles with a thickness of bars of at least 5 cm.
To make a smooth plastic ceiling, before installing the lathing, you must correctly mark the area for the suspended ceiling. To do this, measure the ceiling height in all corners of the room, starting from the window side, where a lot of light can make the ceiling visually uneven. The corner of the room where the ceiling height is the smallest is taken as orientation. From this height, measure down 5 cm and put a mark, which will be the level for attaching the starting profile. The resulting mark is transferred to other walls. According to the marks of all the walls, using lacing, a level is beaten off along which the guide profile will be attached.
If the room will have recessed lighting, then after forming the lattice frame, immediately lay the necessary communications, and only then install the panels.
Note You can place panels on the ceiling in different ways, but it is best to focus on the shape of the room and lay PVC sheets perpendicular to the length of the room; this arrangement of plastic panels will visually expand the room.
Installation of plastic panels begins from the far corner of the room. The canvases are stacked tightly in the lock to each other.
Installation of starting profile for PVC panels
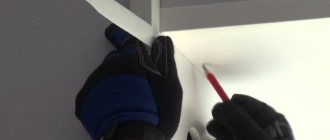
Even before the installation of auxiliary components begins, it is necessary to calculate their required quantity. Both corners and other moldings are usually sold individually. They are selected according to the shade of polyvinyl chloride, and also taking into account their thickness. The planks should be attached to nails that are treated with zinc, or simple self-tapping screws. During the fastening process, you should step back at least 0.5 cm from the edge of the element, and if we are talking about an external element, then it is glued to the plates with a special polymer composition. It is also worth mentioning that the profiles (if required) can be easily cut to the required size. To ensure that they are aligned and placed parallel to each other, use the simplest thread. Before installing the starting components, the surfaces should be cleaned of dirt and, if necessary, leveled. When using a building level, you can evaluate the quality of leveling. In general, if you are going to design a window opening, the walls should be as clean as possible of fasteners and other parts that protrude beyond the level. It is recommended to check frames and window openings for flaws and even violations.
The starting profile must be secured with self-tapping screws to the sheathing. In general, regardless of the type of profile, they should be installed in such a way that a distance of 0. meters is maintained between them - this will mask all the flaws in the coating. After this, a panel should be installed in such a profile, which will be attached to the rail. When the coating reaches the corner, it is time to use corner profiles, internal or external. Towards the end, I close the door and window slopes using an F-profile, and the joints on the ceiling are covered with plinths. If required, connecting structures can also be used. Installation occurs using staples, nails, screws or even adhesives. In the second case, it is worth remembering that the use of chemicals is possible only under specific humidity, temperature or other factors.
How to attach the starting profile for PVC panels? If the installation is carried out on the ceiling, then it is important to insert each sheet into the profile on three sides, so that its long side is in the initial molding. In order to correct all errors, use a regular screwdriver. Again, the last panel is attached so that it ends up in the profile with two sides at once. In general, a certain sequence of fixing moldings can be identified. To begin, install the elements along the common wall or ceiling perimeter, that is, the surface that needs to be decorated. Opposite elements are installed so as to maintain their location in a single plane. Otherwise, structural curvature may appear, which will affect the joining of the panels themselves, and as a result, the appearance. The first profiles are secured with screws or staples. Both internal and external corners are secured according to a similar principle.
And finally, the intermediate profiles are secured in such a way as to fasten the elements for which they are intended. Any process is completed by installing baseboards and corners for the floor/ceiling. They will ideally hide the joints and give the walls a finished appearance. It is definitely worth considering that plastic panels can transform under the influence of temperature changes. For this reason, when connecting the plastic sheet and the profile, only a small gap is left. But you shouldn’t start work at temperatures less than +10 degrees – certain elements may break. Before attaching the moldings, it is still worth choosing the further direction of laying the PVC panels.
Types of plastic panels
The building materials market offers a huge selection of plastic panels for interior decoration, which differ in size, color, and design features.
According to the area of application, PVC panels are divided into ceilings and walls . The material for finishing ceilings is more fragile and lighter than the material for finishing walls. Therefore, ceilings made of PVC panels should be installed carefully so as not to accidentally damage them with sharp objects. Wall plastic is stronger and less flexible because it contains more PVC.
Based on the type of decorative layer, PVC panels are divided into matte and glossy . The surface of the matte canvas is without any coating, so they are cheaper than glossy ones. Glossy canvases are coated with special varnishes on top, which additionally protect the plastic from exposure to the sun and moisture, so it is much easier to care for them.
What are PVC panels
Plastic panels vary in size: width, height and thickness. Plastic panels with a width of 125 mm and 250 mm are most often used, since they are easier to install. Wider canvases are less flexible, so it is more difficult to assemble a suspended ceiling from them. The thickness of the panels for walls and ceilings is different. So, for the ceiling, the optimal choice would be panels with a thickness of 6 mm and 8 mm , and for walls - 10 mm and 12 mm . The standard length of PVC panels is 5.95 mm . Panels 3 m , which means that they are cut into pieces.
Useful recommendations from professionals
In order not to make a mistake when choosing one profile or another, you should contact a store where sellers will be able to offer you ready-made kits that are ideal for the corresponding PVC panel. Otherwise, you can buy constructs that will not fit with the coating or not buy something important. When purchasing, you should definitely take into account where such molding will be applied, and depending on this, buy certain types of initial profile. For example, if you need to decorate a part of the surface where there will be no window openings or corners, then only those profiles that form the sheathing are required. If you have to decorate the ceilings, then do not forget about the ceiling skirting boards. Almost all manufacturing companies produce moldings in white, which is ideal for any type of interior. but if there is a need for multi-colored models, then you should either look for them in specialized stores, or order them individually. When choosing plastic moldings, it would be good to find those that have increased strength characteristics. If we talk about technical parameters, then you should pay attention to the groove width that is intended for the panel. To learn how to install PVC panels, watch the video.