Gypsum plasterboard (GKL) is one of the popular building materials, widely used for carrying out repair work indoors; it is used to install boxes of complex structures, install partitions, level floors, ceiling and wall coverings, and sew up niches. During installation, a profile lathing is installed, which is not always profitable or technically possible to install, so builders often have to solve the problem of how to attach drywall to a wall without profiles.
Installing drywall on a wall without a frame is carried out using several methods, the choice of which is determined by the condition of the wall surface - vertical and horizontal deviations, material of manufacture, operating conditions. Knowledge of frameless installation methods in many cases will not only save money, speed up the work, and improve its quality, but most importantly, it is much easier to do it yourself than to install metal profile sheathing under drywall.
Application of frameless technology in finishing apartments
Drywall without frame on the wall
Page navigation
Leveling the surface with plasterboard is the most popular type of repair work, characterized by speed and quality. There are 2 methods of fixing gypsum boards: framed and frameless.
Drywall without a frame on the wall is a quick, budget option that has its advantages. Methods for gluing plasterboard to the surface, as well as fixing sheets with self-tapping screws, are discussed below.
Advantages of using plasterboard
Plasterboard sheets are attached to the surface in two ways: using frame and frameless technology.
Fastening gypsum boards to a frame is more popular. In the case of interior finishing of a house made of foam blocks with plasterboard, this technology has some advantages:
- The working surface may have minor defects, which can often be observed when laying foam concrete blocks
- Finishing the walls made of foam blocks with plasterboard inside makes it possible to install additional insulation. This is very important for foam block walls
- Technological gaps, which are an integral part of the frame method, make it possible to create a vapor barrier, which is also of great importance for foam concrete walls
- When using a frame, you can easily hide all communications, including electrical wiring, behind the sheets
- Installation work is not particularly difficult, and the material itself is affordable
When is it possible to level walls with plasterboard without a frame?
To level the surface of gypsum boards, the following methods are applicable:
- Frame - the use of profiles and components to create lathing for GC sheets.
- Frameless - gluing or directly fixing the sheet to the rough surface.
Fixation of material without a profile is performed in the following cases:
- If the walls are crooked by no more than 5 cm.
- There is no need to hide wires and communications.
- In a small room (toilet, bathroom), where it is not possible to allocate centimeters for the construction of sheathing.
The lathing takes up at least 12 cm of free space in the room.
The frameless method has its disadvantages:
- There is no way to hide communications.
- There is no way to insulate the rough surface.
- In some cases, additional fixation with self-tapping screws or dowel nails is necessary.
- The plasterboard sheet becomes heavy with the glue applied, making it difficult for one person to lift it. We need to call a neighbor for help.
For relatively flat walls, it is advisable to install gypsum boards using a frameless method.
Work algorithm
Drywall must be properly fixed to the foam blocks. The key to successful and quick installation is a well-thought-out sequence of actions. Let's consider a detailed algorithm, which for convenience is divided into 3 stages.
Preparatory work
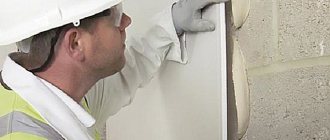
Partitions made of foam blocks can be uneven. The edges of the bricks are protruding from the walls and there are dents in some areas. To maintain a uniform plane, the material is slightly leveled. The raw material lends itself well to sawing and grinding.
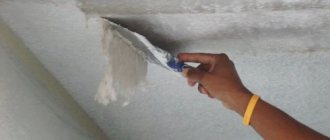
Before starting work, dust and cobwebs are removed from the foam blocks. Motes upon contact with the fixing composition reduce the stickiness of the mass. Small debris can be removed using a construction vacuum cleaner or wiped off with a damp cloth.
Leveling walls Source kraski-net.ru
Existing installation techniques
To fix gypsum boards without lathing, you can use the following methods:
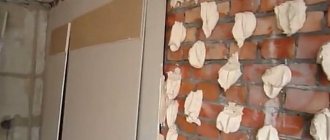
- Gluing the material to the rough base using mastic or glue. To do this, a solution is applied at the place of curvature, and it is also applied in a checkerboard pattern to the sheet. The plasterboard is applied to the wall, aligned and pressed, additionally installing a holder. There should be 10-12 mm from the floor to the gypsum board. To do this, you can put a small piece of sheathing material.
- The use of self-tapping screws and foam rubber. This method is used for large curvatures. Fixation is carried out as follows:
- make markings for the material;
- 9-12 holes are drilled on the gypsum board. Their location is transferred to the rough base;
- pieces of foam rubber are glued near these holes on the back side;
- The sleeve from the dowel-nail (plastic part) is inserted into the base according to the marks;
- The sheet is screwed to the wall with self-tapping screws.
- Combined method. Beacons are installed from below and above. The middle is filled with glue.
All methods of fixing a sheet to a rough base are applicable for various surface unevennesses.
How to cover a wall with plasterboard without a frame or profile with your own hands
Covering the base without a profile is permissible only with unevenness of no more than 2 cm. To apply this method you need materials and tools:
- a set of spatulas with various blades;
- level, rule;
- container for adhesive solution;
- glue mixture;
- primer, roller, brush;
- reinforcing tape;
- putty for gypsum board joints.
After collecting all materials and tools, preparatory work must be carried out.
To do this, the walls must be cleaned of the previous coating - paint, wallpaper, decorative plaster. The entire surface is cleaned of dust and primed.
A plumb line is suspended from the ceiling to determine the overall curvature vertically.
Next comes the preparation of drywall. If the installation is carried out alone, then the sheet of drywall should be cut for convenience. Holes for sockets and switches are cut out in the prepared material. The cut end parts of the material are chamfered using a plane or milling cutter.
On which walls can GVL be installed without a profile?
Installing gypsum boards without a profile is possible using glue if the differences are no more than 2 cm.
It is better to apply the glue in “blobs”. They are distributed evenly over the sheet, after which the material with the adhesive composition is leaned against the rough base. It is necessary to align the sheet - it must stand strictly vertically. After this, lightly tapping the plasterboard, the unevenness of the rough base is filled with glue, the excess goes beyond the boundaries. They are removed with a spatula. The sheet must be fixed with a holder for setting the glue. Only after the composition has hardened do they begin to install the next sheet.
When is it necessary to partially finish walls with wooden slats?
If the base has an unevenness of more than 2 cm, then use a different adhesive method. A grid of wooden slats is mounted on the rough surface. If there are none, then cut the gypsum board sheet into strips 10 cm wide. The strips are glued to the wall using an adhesive composition. We must wait until it dries completely. The gypsum board joints should have strips 16 cm wide - 8 for each sheet. All pasted beacons must be strictly vertical. Leveled.
The evenness of the glued beacons must also be checked using the diagonal rule.
Further:
- A continuous strip of glue is applied to the gypsum board sheet. It must be located in the place where the beacons will pass.
- Drywall swears by beacons glued to the base.
Using wooden beacon slats, the rough wall is leveled and the gypsum board is sewn up.
How to install directly on self-tapping screws: how to screw the sheets
There is another option to fasten the finishing material to the rough surface without a frame.
This is wall cladding using self-tapping screws. However, this method is applicable when the surface is flat and there are no differences. There are nuances here:
- before fastening the gypsum board with self-tapping screws, you need to check how easily the fasteners fit into the rough base;
- drywall is attached to the wall to improve sound and heat insulation;
- It is not necessary to clean the surface before fastening.
It is not difficult to screw a self-tapping screw into brickwork. Here the drywall serves as dry plaster for the base.
It is difficult to screw a self-tapping screw into concrete slabs, so dowels and nails are used. They do it like this:
- Apply gypsum board to concrete.
- They make holes in the material so that there is a hole in the base.
- The gypsum board is removed.
- The plastic part of the dowel-nail is driven into the concrete.
- Place the sheet again and screw in the self-tapping screw, which falls into the plastic sleeve.
The gypsum board is fixed on the wall. For strength, additional holes are created in the sheet and polyurethane foam is introduced through them, serving as glue.
After fixing the drywall to the surface, the joints are reinforced and puttyed.
Do I need to install an additional wall mount?
After fixing the first HA sheet to the rough surface, the adhesive composition should set. To do this, you need to secure the sheet additionally. In order not to keep the sheet near the wall for an hour or more, additional fastening is used:
- A homemade wooden device similar to a mop. To do this, the vertical stick must be at least 1.5 m, the horizontal one must be equal to the width of the sheet. The horizontal strip should be smooth so as not to damage the material. It is placed against the fixed material. Moreover, the vertical rail is fixed on the floor (so that there is a stop).
- A homemade device made from profiles is the same mop only made from profiles for sheathing under gypsum boards.
- Purchased support. It is assembled from several parts, which are made of metal pipes. The same device serves as a lifter for the sheet to the ceiling.
If you do not use a support for the material while the adhesive composition is curing, then the gypsum board may not stick or may not be fixed properly and will fall off over time.
Let's sum it up
If you need to carry out quick but high-quality repairs, you can use GVL. The material tolerates moisture well and will last for a long period. Using self-tapping screws saves money and time.
Installation can be carried out by following a simple list of works:
- prepare the room, remove all finishing materials;
- prepare tools that may be useful during the work process;
- use screwdrivers or glue to mount drywall;
- Use a level to level the material.
Drywall is laid gradually. It is important not to rush in this process, as the slightest mistakes can lead to joints appearing.
However, if joints do appear, they can be sealed with polyurethane foam. After the foam has dried, the remains are carefully cut off using a stationery knife.
Brick wall cladding: features
Brickwork has a number of features that must be taken into account when fixing gypsum boards.
- When attaching a sheet with self-tapping screws without glue, they will not last long if they get into the solution. The building has its own movements, the fasteners will be unreliable.
- When applied to cement mortar, gypsum adhesive will not have good adhesion due to the difference in composition. Eventually the glue will peel off.
- A brick wall can collect condensation if it is thin and is affected by street temperature changes. Moisture has a negative effect on gypsum boards. In this case, you need to use polyurethane foam and self-tapping screws.
There are two ways to solve the problem of installing gypsum on brick:
- In the first case, polyurethane foam is poured into the small space between the gypsum board and the base.
- In the second, foam is applied to the surface of the sheet, and then it is fixed to the surface. This case is more acceptable, since it is possible to control the amount of foam applied to the surface of the facing material.
Use foam that has the lowest expansion coefficient - for expanded polystyrene.
Installation of facing material with screws and foam:
- One sheet is drilled in 9-12 places.
- These points are transferred to the surface.
- Pieces of foam rubber are fixed with glue near the drilled holes. It serves as shock absorbers during fastening.
- Dowels are driven into the wall at the marked places.
- The sheet is fixed with screws with wide heads, and washers are placed under them. During installation, the evenness must be measured using a level and a rule.
- Stepping 1-2 cm to the side from the fasteners, holes are drilled into the gypsum board for foam insertion.
- Foam is injected into the hole in small doses. Don't forget - foam expands.
After the foam has dried (about a day), the screws are removed along with the washers. Instead, screw in regular self-tapping screws, “drowning” the caps a little.
Surface preparation
The strength and durability of the connection depends on the quality of the wall surface on which the plasterboard sheet is glued, so you should not skimp on its preparation. The methods for treating the wall before gluing the gypsum sheet are not much different when using glue, foam or dry mixtures; the main type of work when performing preparatory operations is applying a primer. Priming allows you to increase the adhesion of the adhesive to the wall, increase its strength, nail and stick dust to the surface, which cannot be removed by any of the methods of cleaning, washing, or vacuuming.
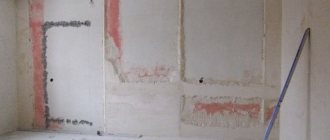
Preparing and priming walls
Let's consider preparing a brick wall for gypsum board coating using glue for further installation of ceramic tiles:
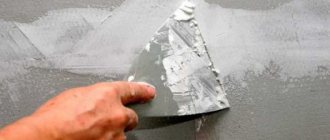
- Before carrying out work, the brick wall is inspected, all sharp bumps protruding beyond the plane are knocked down with a chisel, the surface is swept away with a soft brush, and dust is removed.
- If cracks are found in the wall, they are primed, covered with plaster mortar or filled with foam to prevent condensation from forming.
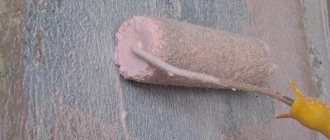
- Pour a liquid deep penetration primer solution into a container (to coat porous bricks and gas silicate blocks, use the Knauf Grundirmittel composition), take a roller with a long handle and apply the solution to the wall; use a brush in hard-to-reach places (corners).
- After the first layer has dried for the time specified in the instructions, the surface is re-coated, after which it is ready for use the next day.
Materials for finishing gypsum boards
Is it possible to attach GVL directly to a concrete wall without profiles?
The concrete wall does not have large differences, so the gypsum boards are fixed with glue.
Gypsum compositions are not used for concrete due to the incompatibility of the included elements. It is better to use acrylic glue.
Before gluing the material, the surface is prepared. Namely:
- notches are made on the concrete for greater adhesion;
- The entire wall is covered with primer.
After that:
- The gypsum board sheet is laid on flat wooden slats in front of the fixation point.
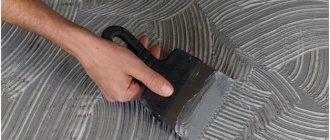
- Glue is applied to it with a notched trowel.
- The sheet is lifted, a piece of drywall is placed under it so that there is a gap from the floor and it is leveled.
- Press it to the base and secure it with a “mop” until the glue dries.
- The second sheet is fixed after the first has dried.
If the wall has a curvature, beacons made of wooden slats or cut strips of plasterboard are used.
Suitable glue
Surfaces with a porous structure are difficult to glue with conventional solutions. The compositions must tightly connect the two materials and withstand significant loads. Let's look at 4 popular options for fixation.
Knauf Perlfix
A special alabaster-based mounting adhesive is used when working with drywall. The solution has excellent adhesion, so it is used without additional fasteners. Advantages of the material:
- no smell;
- ease of preparation;
- high plasticity;
- You can level the walls.
The disadvantages of the product include a long polymerization period - 7 days. In this case, the sheets of drywall can be moved for 15 minutes, then correction is prohibited. The finished solution loses its plasticity in half an hour. The ingredients are mixed in small portions and the work is carried out as quickly as possible.
Tips and tricks
Before installing drywall on the walls, you should familiarize yourself with the tips and recommendations of the experts:
- fixation of the finishing material begins after all the electrical wiring has been done and the floor has been laid;
- To install gypsum boards, the room must be moderately damp and the temperature must be at least 10 0C;
- the walls must be cleaned of finishing and coated with primer;
- For wet rooms we use moisture-resistant plasterboard;
- the sheet of glue is heavy, so you need to invite one person to help;
- Any glue that comes out must be removed immediately.
Having performed the installation technique correctly, as well as applying the recommendations of the craftsmen, the wall surface will be smooth and ready for further finishing. A plasterboard structure will last 10-15 years if there are no sudden changes in temperature and constantly high humidity in the room.
Preparatory activities
Before you begin fastening the GVL, you should complete the required measures:
- Inspect the surface of the walls and, if necessary, identify irregularities. Defects can be eliminated using putty.
- Identify uneven corners. Concrete walls may seem smooth at first glance, but difficulties may arise during installation. Therefore, each angle is measured with a square.
- Inspect doorways and adjust if necessary using plasterboard blocks.
- Draw out the area and mark the places where the panels are attached.
- Remove old wallpaper and other types of decoration.
The sheets should be attached to clean areas without traces of mold or peeling plaster.
The surface must be dry, so the room must be dried and ventilated before starting work.
A properly prepared room is the key to quality repairs