For many years, ceramic tiles have been one of the most popular facing materials for rooms with high air humidity. The undeniable advantages of tiles remain their excellent properties, which allow you to forget about repairs for decades.
Hiring a professional to tidy up a wall is quite expensive. Also, a good specialist is not always at hand. For this reason, many property owners who want to make repairs cheaper decide to take the step of laying the tiles themselves.
This article will tell you how to properly dilute tile adhesive so that it does not lose its qualities.
Modern industry offers a very wide selection of tile adhesives. To make a choice, you need to find out the distinctive qualities and advantages of each composition.
- The standard cement mixture contains pure river sand and Portland cement. Plasticizers, acrylic, latex, and dyes give additional qualities to the glue.
- To secure large and heavy tiles, plaster moldings or other heavy structures, reinforced tile adhesive containing reinforcing elements is available for sale.
- For rooms with high humidity, such as a bathroom, sauna or swimming pool, manufacturers offer moisture-resistant tile adhesive. It cannot be diluted with plain water; a special composition is used for this.
- For finishing only interior spaces, there are mixtures in already prepared form. They are sold in sealed jars and do not require dilution. The solution contains acrylic or silicone or similar substances that change structure under the influence of the environment.
- More expensive and less popular formulations are examples of special applications. They are diluted with water, but have special properties - heat resistance or frost resistance.
Features of tile adhesive
Before mixing tile adhesive, you first need to purchase it. Currently, the range of this product on the building materials market is quite wide. Moreover, almost each has its own specific composition and dilution technology. Knowledge of the differences between some materials and others, and what advantages this or that type of glue has, will help you make the right choice.
IMPORTANT TO REMEMBER! The most common, both around the world and in Russia, is considered to be a universal cement-sand composition, on which ceramic tiles are laid using technology. Finding out how to properly dilute tile adhesive of this type is not at all difficult; you need to add ordinary water to the dry mixture and stir well until the consistency of a homogeneous mass is obtained.
Depending on the components included in the adhesive mixture, it is customary to distinguish five main types.
Universal cement-based mixtures
This type of dry mixtures for preparing an adhesive solution is the most popular. They just need to be diluted with water and placed well until a thick mass is obtained. The main component of such mixtures is a cement base mixed in a certain proportion with washed river sand. There are often cases when the manufacturer adds various additional substances and components to the mixture.
Strengthened adhesive solutions
The composition of such mixtures includes chemicals that can provide a high level of adhesion (adhesion) of surfaces, even under load. This type of mixture is intended for fastening volumetric tile elements to vertical surfaces.
Moisture-resistant adhesives
Such mixtures contain chemicals that can provide a high level of surface adhesion under conditions of high humidity. These mixtures can even be used when laying tiles and mosaics in swimming pools, since humidity does not affect their properties in any way. Their peculiarity is that they need to be diluted not with water, but with special ready-made solutions.
Polymer-based mixtures
Mixtures of this type are not intended for use as exterior finishing, as their properties are destroyed under the influence of natural factors. The convenience of their use lies in the fact that they are sold ready-made and do not require the addition of water and the mixing process.
Modified adhesive solutions
Designed for use under special conditions, they have their own narrow specialization related to operating conditions. For example, there are mixtures designed for rooms with low temperatures. They are distinguished by their high cost.
In addition to the listed ready-made mixture options, there is also the option of using homemade mixtures at home. For these purposes, it is necessary to purchase separately Portland cement and sifted river sand. Sometimes it is possible to use slaked lime as a plasticizer. Mix them in certain proportions, add water and knead the solution. Easily! Just! Fast!
In fact, the whole process of how to dilute tile adhesive for laying tiles involves mixing dry components with water or a special solution to the desired consistency and mixing the solution.
Official classification according to GOST R 56387—2015 (markings)
- C0 – adhesive for laying small tiles in dry rooms;
- C1 – with minimum requirements (adhesion from 0.5 MPa) for external and internal work;
- C2 – with increased requirements (adhesion from 1 MPa) for external and internal work;
- ***F (fast, fast) – quick-hardening (does not transfer water to the facing material, suitable for tiles with high water absorption);
- ***T (thixot-resistant) – with increased resistance to slipping (makes it possible to lay tiles from top to bottom on vertical surfaces);
- ***E (extended, expanded) - with an increased time during which the solution retains its original properties (suitable for beginners - it gives time to fix the jambs and level the tiles);
- ***S1/S2 (suppleness, flexibility) – with a high elasticity index (S1 can withstand deformations of 2.5–5 mm, S2 – more than 5 mm).
Recommendations for mixing tile adhesive
Despite the fact that the rules for preparing the adhesive mixture are often indicated on the packaging, they are usually not enough, especially for those who are doing this procedure for the first time. Therefore, we have collected advice from experienced tilers who are guaranteed to help beginners prepare a high-quality solution for laying ceramic tiles.
IMPORTANT! The glue mixture and water must be at the same temperature. To achieve this effect, it is necessary to keep the water and mixture under the same temperature conditions for several hours. To do this, you need to collect water in a container and leave it together with the dry mixture in the room.
They are all pretty simple:
- Preparing the container. The container in which you plan to carry out the mixing process must be clean, previously cleared of debris, including the remnants of the solution from the previous mixing. Since any contamination can disrupt the texture of the solution, it can also affect its chemical composition and, accordingly, its properties.
- Drinking water should be used to mix the solution. Since industrial water may contain various impurities that can negatively affect the properties of the solution. For example, acids or alkalis in water can dissolve the adhesive base.
- In cases where the solution you received turned out to be liquid or thick, but you added all the components according to the instructions. So do not rush to add additional water or mixture. Leave the solution for a short period of time, thereby allowing it to brew. And then repeat the kneading process.
- According to most instructions from the mixture manufacturers, after mixing, the solution must be left for a certain time. Be sure to follow this instruction.
When working, use gloves, a respirator and safety glasses. Since the solution has chemical components, its contact with the skin is best avoided. And when grains of cement enter the respiratory tract, they settle in the lungs. Of course, it won’t affect your health much, but protection still won’t hurt.
Laying tiles
After choosing the layout of the tiles and preparing the adhesive, you can glue the tiles to the surface.
Wall and floor tiles
The work is carried out in the following sequence:
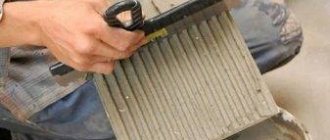
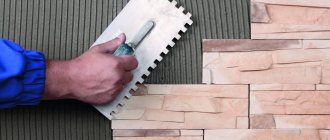
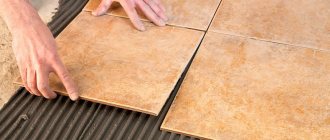
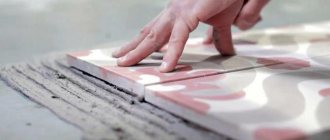
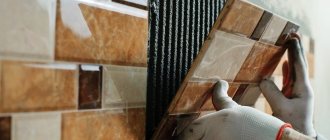
- Using a notched trowel, glue is applied to the wall. The thickness of the applied adhesive should correspond to the size of the spatula teeth.
2. You need to start work from the bottom row, placing a small support on the floor. The lower part of the first tile must be rested against a support, while at the same time leaning the product against the applied glue. There is no need to apply excessive pressure.
3. After gluing each product, you need to check its correct installation. Any deficiencies must be corrected immediately - after a while it will not be possible to make changes.
4. It is highly recommended to use plastic crosses. With their help, you can accurately maintain the width of the seam when laying tile trim.
5. The depth of laying products can be adjusted with a rubber hammer.
After you have glued the first row of tiles, you need to stop work and wait until the glue dries completely. While waiting, you can finally adjust the position of the products, remove the glue from the front of the tile before it dries, and check the evenness of the row with a building level.
After the adhesive has hardened, you can continue gluing the tiles to the wall in the second row. Upon completion of the second row, it is also worth taking a short break so that the adhesive composition sets.
You need to take short breaks after each row.
Cutting and installation of scraps
There is a high probability that after tiling the entire surface of the wall, there will be areas where solid tiles will not fit. In such areas, trimmings are used.
To cut tiles, it is recommended to use a tile cutter (alternatives are a grinder, a glass cutter). Before cutting, you need to take all the necessary measurements, taking into account the thickness of the resulting seam.
As noted above, trim should be located in those places in the bathroom that are least visible (this could be the area behind the washing machine, behind the laundry basket, near plumbing fixtures, etc.). Therefore, you need to start gluing the tile cladding from the most noticeable corners of the room (usually those located directly opposite the door).
Grouting joints
Upon completion of the installation of solid tiles and trimmings, you need to wait until the entire adhesive solution has dried (usually it is recommended to wait 2-3 days).
After the solution has dried, jointing is performed using a special grout paste or other types of grout:
- Cement.
- Epoxy.
- Silicone.
- Polymer, etc.
The choice of grout will depend on the personal preferences of the owner and the free money remaining after the repair. Cement grouts are the simplest - they need to be mixed with water before use. Epoxy and silicone are immediately ready for use. All grout compounds are presented in different color shades, so you can choose the one that best suits the design of the bathroom and the tile itself.
Grouting work is carried out as follows:
- First, the front part of the tile material and the seams themselves are cleaned from any dirt and dust.
- Then, if epoxy resin or silicone-based grout is used, the edges of the products are covered with construction tape (otherwise it will be difficult to wash off the grout from the front of the tile).
- The grout itself, regardless of the type, is applied with a spatula.
- First you need to place a little grout into the seam, deepen it, then insert a putty knife across the seam and remove the residue, which will allow you to level and deepen the seam.
- After the grout has completely dried, you need to remove the tape.
If there is no spatula, then all grouting work can be done with your finger. To do this, you need to put on a rubber glove and use your finger to push the grout directly into the seam, gradually leveling everything out. The method is simple, but with due care it allows you to get a good result in the end.
Rules: how to mix tile adhesive
Before pouring the mixture into the container, estimate the approximate amount of solution you will have and whether you will have time to use it before it hardens. You should not immediately mix the solution in large quantities, first mix a small volume and work it out, this will help you navigate the time it will take you to complete a certain volume of solution. If you leave the solution and it dries, the material will be ruined.
- Pour the required amount of water that has settled in the room into a previously prepared container. That is, it should be at room temperature. We remember!
- According to the instructions indicated on the package, measure the required portion of the dry adhesive tile mixture and pour it into the water.
- Be sure to follow the manufacturer’s prescribed ratio between the solution and water. Both components must be added in the specified proportion.
- Prepare the required amount of solution for a certain proportion of water, according to the instructions, but do not pour the mixture all at once. Add it slowly, constantly stirring the solution. This will help you make the kneading process easier, and in addition, it will eliminate the formation of lumps, which will be difficult to knead or break in the future.
- It is best to mix using a mixer, which will ensure the homogeneity of the mass. If a mixer is not available, you can make one from a regular drill by inserting the whisk of a construction mixer into it.
- The pre-prepared composition must be left for 10-15 minutes, this will allow the unbroken lumps to absorb water and thereby soften.
- After the specified time, the solution must be thoroughly mixed again.
You can verify the quality of the resulting solution using a spatula. To do this, use a tool to scoop up a small portion of the solution and turn the spatula over so that the side with the solution is down.
If the solution flows slowly, without wanting to peel off from the surface of the spatula, this is evidence of a good solution. If it drains or immediately comes off and falls, this indicates an insufficient amount of dry mixture in the composition. In this case, add a small amount of the mixture to the solution and mix it thoroughly again.
Selection rules
Adhesive for ceramic tiles - it is better to choose trusted manufacturers
The rules of choice are quite simple, if you want to do it cheaply, then both the tile and the adhesive should be of the same price group, if you want to do it efficiently, then the price of the adhesive is an order of magnitude higher than competitive offers. The principle that foreign materials are of higher quality still remains, for example, foreign construction teams even bring glue for ceramic tiles with them, since under the terms of contracts they most often give annual guarantees for their work and do not want to take risks.
I don’t want to scare you, but a counterfeit product does not perform the main task - gluing, you will do all the steps necessary for installation and follow the technology, wait until it dries completely and get a “tile fall”, since the adhesive for ceramic tiles will not provide adhesion and will simply fall off the surface along with laid material.
Therefore, when choosing adhesive for ceramic tiles, read reviews not only of an advertising nature, but also of a professional nature. Do not hesitate to ask tile sellers about how to glue the ceramic tiles you purchase from them. It is enough for manufacturers to indicate in their catalog how to properly glue ceramic tiles, and what kind of glue they recommend using. And this is not a conspiracy, this recommendation is necessary so as not to spoil the prestige of the manufacturer with poor-quality installation.
How to make your own dry mixture
If circumstances are such that there is no possibility of purchasing a ready-made adhesive mixture, then it is quite possible to prepare it yourself. To do this, you need to have Portland cement and fine sand available; if the latter comes in lumps, then they should be broken and the sand sifted through a sieve.
In addition to these two components, to add strength to the mixture, you can add PVA or silicate glue to it. You can find out how to make PVA glue at home and how long it takes for PVA glue to dry from our reviews.
The composition of the dry mixture should be the proportion: one share of cement to five shares of sand.
- Next, you should pour water into a previously prepared and cleaned container.
- Gradually add the dry mixture to the water, stirring constantly.
- Also at this moment you can add glue to the prepared solution.
Further actions are identical to those performed when preparing a solution using factory mixtures. After the solution has turned out to be a homogeneous mass without lumps, it needs to be allowed to brew and then mixed again. After this, the resulting solution is ready for use.
Preparation
Before performing work, you need to inspect the wall or floor. Uneven surfaces with cracks and old glue are not suitable for repair. It is important that the surface is smooth and free of previous coating.
These requirements apply to walls and floors. Wallpaper or newspaper must be removed. The cracks are sealed using putty. After leveling, the wall is treated with a primer.
Additional Tips
- In order to understand whether there is a sufficient amount of water in the solution, you can use the following method. Using a trowel, scoop up the solution and tilt it; if the mixture slides off in one piece, this indicates that there is not enough water in the solution.
- After the first kneading, you should check the resulting solution using a trowel. If the mixture drains, you need to wait until the solution is infused. And also use less water the next time you knead.
- A good solution should have a uniform consistency and adhere to the surface of the trowel. In this case, you can be sure that the ceramic tiles you lay will be reliably adhered to the surface.
ATTENTION! It is necessary to check the amount of water and add it before the solution is left to sit. Once it has settled, you can no longer add water. In addition, if during the work the solution begins to thicken and lumps begin to appear in it, in this case you should not add water either. You can try stirring it again, but without adding liquid.
Stages of direct mixing
You need to prepare tile adhesive in small portions, so don’t rush to avoid a poor-quality composition. It is best to first take 2/3 of water and add a whole portion of powder to it, and then gradually dilute it with the remaining liquid until the tile adhesive reaches the desired thickness. A spatula will help you check the consistency: the mass should be quite elastic, without lumps, but also not dripping from it. The resulting composition, if there is an excess of dry powder, will fall off in a layer, which is corrected by adding water. And diluted too thinly, it will flow down the trowel and hands.
How to get great results when laying tiles on a wall
The walls must be leveled before installation. There are craftsmen who manage to perform cladding on any surface. But this is rather a piece of work that not everyone can do. Therefore, let's study general techniques for arranging tile elements on the wall:
Tiling a room- The crosses mentioned above are applied between cycles, so to speak, periodically. Tiles are applied to the wall in rows. Upon completion of each, the leveling process begins. The crosses serve to ensure that the gap between each two adjacent tiles is the same anywhere in the masonry. Two crosses are used for each joint. At the bottom and at the top, horizontally and vertically.
- The rule is usually used for working with plaster.
But honestly, for leveling tiles, this is an amazing tool. It has a large extent, which often covers the entire row. Due to this, it is possible to perfectly match the cladding elements to each other. This is especially true for protruding and sunken corners. On a flat surface they are like an eyesore, impossible not to notice. The time rule is used up to the crosses. Once the row is laid, leveling begins. To track the position by elevation, temporary beacons are used, located strictly above the first and above the last tile in the row. Thus, first the outer elements are aligned, and then the core is put in order according to them. Applying tile adhesive - When laying ceramic tiles on a wall, it is necessary to ensure a contact area of 70 percent of the total surface. For work, a trowel with fine teeth along the edge is usually used. Let's explain what this means. The trowel is a flat surface with a handle on the back side. Since a significant proportion of the tools are used to work with tiles and natural stone, there is a need to quickly and easily create orderly teeth on the adhesive surface. Due to this, grip improves and the contact area increases. This is why most trowels have combs on one or two ends. Sometimes different sizes.
That's all about the tool, but there are some technological subtleties. The tiles are usually laid on an adhesive based on cement. Various plasticizers and some other impurities are added to the composition. During work, the front side of the tile will probably get dirty. That is why a vessel with water at room temperature, equipped with a small cloth, should be on hand at all times. So that you can remove excess glue from the front surface at any time.
Laying tiles
Types of adhesive materials
For the tile covering, a special adhesive is used that securely fixes the slabs to the base. The adhesive can be of several types, depending on the composition. You need to work with them in different ways, as well as clean them after cladding.
Among tile adhesives, the most popular types are:
- Epoxy - contains a resin, due to which it remains in liquid form for a long time, qualitatively fixes the tiles to various surfaces, but is quite difficult to clean.
- Cement - contains sand, cement and various additives to improve characteristics, is prepared before use, hardens relatively quickly, therefore it is easier to remove it immediately after application, it is easy to clean, but additional components in the composition complicate this process.
- Gypsum – it is quite difficult to clean due to the gypsum component; the glue fixes it very firmly and for a long time.
- Homemade - in its frozen form, this composition is relatively fragile, and it is very easy to clean it from the surface of the tile.
- Polymer - hardens quickly, has a gel structure, the main component is acrylic, which is easily removed with a suitable solvent.