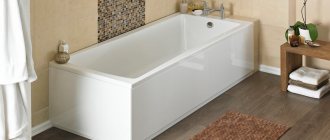
Lining in the bathroom interior
Many people, starting renovations in bathrooms, limit themselves to some standard set of finishing materials, which traditionally include: tiles, paint, wallpaper. Why not expand the list? Look how great the clapboard finish in the bathroom looks in the photo! Let's delve into the topic and try to figure out whether this decision really has the right to be or is it just a beautiful decoration?
Cladding made of clapboard
Wooden lining
Lining in the bathroom
We have known since childhood that wood does not like water, but today this postulate is not relevant and a photo of lining in bathroom design is the best proof of this. If you want to be closer to nature, please! To decorate the room, just purchase lining designed for lining baths. Are you afraid that factory processing will not be enough? Additionally, cover the finished walls with varnish and then wax. This way, not a single drop will linger on the surface.
Materials and tools for fastening the lining
When choosing lining for a bathroom, you need to pay attention to the following nuances:
- Number of ribs. The more there are, the stronger the finish will be. It is important that all ribs are intact, without deformation or damage.
- External part. This surface should not contain visual defects or irregularities. The coloring should be uniform, the patterns should be clear and bright.
- Dimensions. All lamellas must be the same in length and width. The lining must belong to the same batch.
As for the number of panels, it is determined by simply dividing the area of the surface to be finished by the area of one lamella. The result obtained is rounded up (margin for trimming).
You should also acquire the following tools:
- Hammer and screwdriver.
- Construction stapler.
- Level, tape measure.
- A jigsaw or a hacksaw for metal.
- Liquid nails or assembly adhesive.
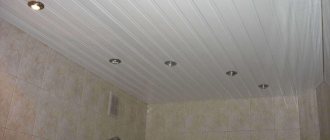
Plastic lining
Plastic lining
The optimal option for finishing rooms of similar functionality. The lining pleases with its assortment variety. The material can be found not only in different colors, but also textures and even with 3D images. Although this is a budget solution, PVC will last much longer than wood. If you make a ceiling in the bathroom from this lining, as in the photo, then it will be possible to organize overhead lighting. Flexible strips are easy to replace if necessary. To do this, you do not need to disassemble the entire structure.
It’s difficult to say for sure which option is better. Each has its own disadvantages and advantages, but if you are going to decorate the room yourself, then still choose polyvinyl chloride. It is much easier to work with plastic, and after that it will not require any special care.
Installation of sheathing under the lining
The operating procedure is as follows:
- Preparation. It is simplified to simply cleaning the base from the old coating. Irregularities need to be eliminated only in areas where the guide elements are fixed.
- Treating walls with an antifungal agent. A mandatory procedure to prevent mold and mildew from appearing under the casing.
- Installation of frame strips. It is recommended to use a metal profile in the bathroom. The first line of the profile is installed with a distance of 30-40 mm from the floor. Each subsequent strip is mounted in increments of 40-50 cm, across the direction of the panels.
- The first step is to determine where each of the frame lines will be placed: it is convenient to make marks with a simple pencil.
- According to the markings, direct hangers are installed at a distance of 60-80 cm. These elements serve as fasteners for the frame components.
Instructions on how to make a sheathing for a bathroom lining
To check the evenness of the sheathing, a rack level is used: it is important to ensure that all parts are placed in the same plane. If everything is done correctly, the top profile will be flush with the ceiling surface, which will allow you to beautifully install the top plinth.
Myths about wooden lining
Wooden lining inserts
Myth one
Moisture will deform the bar and twist it into a ram's horn. It must be said that this can happen with decoration not only in the bathroom. Warped surfaces can also appear in rooms with a completely peaceful microclimate. The reason for this will be the use of low quality material and incorrect assembly.
Myth two
The lining in a damp bathroom interior will become covered with fungus and simply rot. Such a “surprise” can affect any quality finish, even the beloved ceramics on the walls. And the reason here is not the type of material, but the non-functioning ventilation.
Myth three
The lining is not able to provide an interior whose design will please you. Well, this is a problem, excuse me, with imagination and the implementation of ideas. If you can’t come up with something original yourself, find an interesting clapboard bathroom design in the photo and bring what you see into reality. But first, think carefully about whether you should do it yourself or maybe hire specialists?
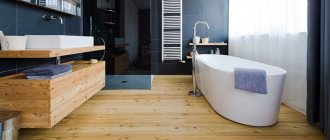
Wooden lining in the bathroom - practical and beautiful
Installing lining with glue
The procedure for installing the lining using the adhesive method:
- The first lamella is mounted in the corner, having been equipped in advance with an internal corner connection from the tenon edge.
- Next, the wall and plastic product are smeared with glue or liquid nails. In this case, you must act according to the instructions on the package. When working in the bathroom, be sure to use moisture-resistant compounds.
- It is recommended to spread the glue in small islands, indented from the edge. This will ensure that when pressing on the panel the solution will not come out.
- Having smeared the lamella, you need to attach it to the base and tap it a little. Ideally, it is recommended to secure the first lining at the top and bottom with self-tapping screws (they will subsequently be covered with a plinth).
- To fix the remaining PVC panels, the same technology is used, with the tenon of each subsequent lamella immersed in the groove of the previous one.
- The last corner lamella usually needs to be cut to width. This can be done on the side of the wall with a stationery or construction knife.
- Before gluing the last lining, its cut end is decorated with a finishing corner.
- The next wall is finished in a similar way. The first lamella is installed with a tenon in the corner.
The process of installing plastic lining with glue in the bathroom
It seems to be nothing complicated, but the adhesive method can only be implemented on a flat and solid base. Its preparation often takes more time than the installation itself.
You can watch the video for more information about gluing plastic panels to walls:
Wooden lining in the bathroom - practical and beautiful
Legends can be made about the decorativeness of such decoration. Modern manufacturers produce lining from raw materials of very different quality and value, so often the products have a truly unique texture. Of these, it is possible to create stunningly beautiful decors in the interior.
Don’t think that decorating a room with wood will look rustic and give the impression of a rural bathhouse. Designers know how to play with colors and shades. To do this, they use varnishes and tinting compounds. Look at the photo of the clapboard bathroom design, and you will understand that it is difficult to find two identical interiors .
Lining in the interior of the bathroom
Why does wood need treatment?
Wood has unique properties. If there is excess moisture in the air, it will easily absorb it and retain it until the humidity drops. Then she will give back the water. This is a big plus of the material, so a comfortable microclimate is maintained in the room. However, this is also a significant drawback. In conditions of high humidity, the tree that has absorbed water will not be able to release it and will begin to deteriorate.
Molds quickly destroy its structure. Low humidity is also not recommended for the material. It dries out and begins to warp. In addition, it is highly flammable and burns quickly. The rough surface traps dust and dirt. It is quite difficult to wash it off. Thus, without additional processing, the lining quickly loses its attractive appearance and performance characteristics.
Instagram robinwood_ufa
Instagram rima_yun
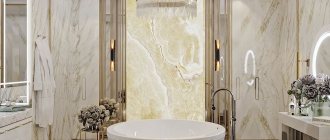
Material selection
If we are talking about selecting a material for finishing a bathroom, then the main criterion for assessing quality should be the deformation coefficient. Rocks with a high index are least resistant to resistance.
The second thing to evaluate is resistance to fungal attack. This problem is practically absent with lining made from exotic wood. Of the local species, preference should be given to oak, elm, hornbeam and larch. Look at the photo to see how the design of a bathroom with expensive lining will turn out.
Decorative inserts from lining
The lining must be made from well-dried raw materials. Otherwise, finishing even from the most expensive material will quickly lose its attractiveness.
It would be a good idea to choose different types of lining for bathroom decor. This is motivated by the fact that within the premises there are zones with varying degrees of intensity of exposure to moisture. For example, it is better to sheathe the walls near the washbasin or font:
- bamboo;
- ebony;
- iroko;
- merabu;
- cedar;
- tick.
How finishing bathroom areas with such clapboard might look like, look at the photo for the material.
There is a wide variety of lining materials
Floor finishing
In the case of finishing the walls with wood, this material is often laid on the floor. In this case, the ideal solution is a three-layer parquet board, which is treated with wax on the outside. But this option is quite expensive, and as an alternative, conventional floor boards made of stable wood with subsequent treatment are often used.
Important! When arranging the floor with boards, logs are used - a frame, which should also be protected from moisture by treating the boards with appropriate compounds.
How to install sheathing
It is important to install the paneling correctly. During installation, do not pack the strips close to each other. It is important to leave a small amount of space for free movement. After all, wood is a “living” material, and no matter how well it is processed, it will still expand when the temperature rises or is exposed to steam. The ability to do this freely will save you from violating the integrity of the joints and squeezing out individual elements.
Linings in the interior
In this aspect, the use of eurolining in bathroom decor becomes relevant. It has a wider and deeper tongue-and-groove system.
Look at the photo of European-style bathroom lining. It has stripes milled along the back surface. Compensation grooves are not needed at all for condensate drainage. Their main task is to relieve internal tension, which actually provokes torsion of the lining. Thanks to this treatment, the thin and seemingly fragile eurolining becomes a rigid material that practically does not cause deformation.
Lining in the interior
In other cases, especially when using budget types of lining, increasing the fastening points of elements can save you from extrusion and deformation of individual strips. This can be done if you reduce the pitch distance between the frame posts. The photo will show you how to properly finish a bathroom with clapboards.
Lining in the interior
To minimize the risk of damage to the finish by fungus, it is advisable to mount it vertically. In this case, water will not stagnate in the joint depressions. The transverse arrangement of stripes is permissible only in rooms with effectively functioning ventilation. Ideally, unimpeded air flow is ensured behind the casing.
What types can be used?
The meaning itself primarily refers to classic wooden lining, but plastic panels are also used in bathroom decoration. What is their difference?
Plastic
Plastic lining is similar in design to PVC panels, but differs in size. The thickness of one strip is 10 mm, width - 100 mm, length on average 3000 mm. The groove fastening system allows you to securely fit the parts to each other and secure them.
Advantages of PVC lining:
- Low price. The cost of one strip 10*300 cm varies within 50 rubles.
- Availability. Sold in all departments with plastic panels.
- A light weight. Unlike heavy boxes of tiles, anyone can handle the transportation.
- Water resistant. Suitable even for finishing showers, it is not afraid of water and moisture.
- Easy processing. It can be cut with a regular stationery knife and does not require sanding, varnish, stain or other coatings.
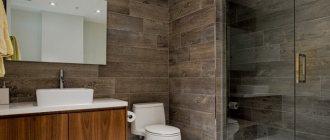
Wooden
Brushed lining, what is it?
“Interiors with brushed clapboard trim look amazing!”
Lining in the shower
Essentially - an antique-textured board. The material began to conquer markets not so long ago, since the surge of interest in vintage, retro, and classic interiors. This specific lumber is obtained from both deciduous and coniferous trees. The lining is characterized by a standard size. It is distinguished by a relief, unusually structured surface with a pronounced textured pattern.
What do interiors look like with brushed clapboard trim? Amazing! There is always a comfortable atmosphere and a subtle pleasant aroma of natural wood, which is very good for health.
Linings in the interior
The raw materials for brushing from softwood are:
- cedar;
- pine;
- larch;
- ate.
From the deciduous group, the best lining is obtained from:
- aspen;
- beech;
- oak;
- ash;
- alders
Their texture is so good that it allows you to refine the material and present it in a three-dimensional image. In addition, the raw material practically does not reject and responds well to all kinds of processing.
Using lining in the interior
Destroying stereotypes and dispelling myths
Doubts about the reliability, strength and durability of the finishing material are completely justified. Any choice should be approached responsibly, having first weighed all the positive and negative qualities of the lining.
Main problems:
- Deformation;
- The appearance of mold;
- Moisture.
Having dealt with each problem separately, you can quickly choose the appropriate option for using the lining for finishing.
What styles of bathroom interiors require wooden lining?
Today it is fashionable to live in harmony with nature, so all kinds of eco-style trends have begun to be used in home design. Wooden lining is ready to see:
- ambient;
- classic;
- Provence;
- Zen;
- Russian hut;
- American Country;
- Art Deco;
- tower
Simple shapes, rough-hewn wood, and tastefully selected additional interior details will help create a pleasant, warm environment conducive to relaxation. Extravagant finishes are obtained by combining wood shades and changing the direction of the lines. You won’t believe it, but even the simplest pine lining can turn a city bathroom into a chic spa corner. You can look at the photo to see what a stylish lining bathroom will look like.
Interior ideas
We invite you to look at a selection of photographs of bathroom interiors with wooden ceilings. Unusual ideas and non-standard design solutions will help you find inspiration for creating your own unique design.
Several ideas for using wooden lining in a bathroom interior
Lining in the interior
“The wooden lining in the bathroom design looks interesting as panels in the photo”
Strange as it may sound, in the bathroom you can decorate any surface with clapboard, including floors and furniture. Today, ideas of using painted lining in room design are being actively implemented.
Lining in the interior
Pastel gray materials can elevate the space. They will be perfectly complemented by a matching tiled floor, snow-white furniture with gilded fittings and the same standard white plumbing fixtures.
The wooden lining in the bathroom design as panels looks interesting in the photo. The upper part of the walls is painted in light colors. The ceiling is decorated with beams. A square or rectangular mirror in a wooden frame is mounted above the washbasin.
A bathroom decorated in Scandinavian style will look great. In this case, white lining is used, which is laid horizontally on the walls. A dark wood cabinet under the sink, adding a diptych in a thin black frame to the wall and properly organized lighting will help to dilute the monochrome of the decor. It will turn out quite brutal and incredibly impressive. Look for what else a Scandinavian interior in a lining bathroom might look like in the photo.
Wooden lining can be added to the room in doses, that is, it can be used to decorate only small areas of surfaces, for example, to sew up a wall in a niche behind the toilet. A bold design decision would be to decorate the shower area with wide wooden clapboard. The different arrangement of stripes on the ceiling and back wall will create an original effect of dividing the space.
What makes wood suitable for use in damp areas?
Modern advances in the chemical industry have made it possible to create effective impregnations that protect wood from excessive moisture absorption and rotting, even during constant exposure to water and high-temperature steam. The result is secured using wax and paint coatings.
At the same time, the corresponding compositions are commercially available, so by choosing one of the wood options described above, you can process it yourself. But a much better option would be to purchase finished products, processed professionally and in a factory environment.
Bathroom finishing with PVC lining
Plastic walls are less popular than tiled ones, and in vain! They make quite decent interiors. They will look great in modern and minimalism. You can choose plastic lining for bathroom design based on the photo. Its range is so diverse that it will allow you to implement the most creative projects.
Today it is possible to purchase material that imitates the texture of wood, tile or stonework. There is a lining with a pattern reminiscent of wallpaper or decorated with photo-printed images, allowing you to assemble luxurious panels. There is no question about the color scheme at all. Photos of PVC lining for the bathroom show that today it can be bought in any shade.
Plastic gets along wonderfully with other representatives of finishing materials, so incredibly interesting results can be obtained.
How to install moldings and corners
After installing the sheathing, fittings and special guides are installed, which are necessary to hide the panel joints at the corners. A PVC skirting board closes the gap between the floor and the wall.
Tip: PVC skirting board can be replaced with a piece with a box for placing electrical wiring.
To fix the guides, nails, special mounting clamps, and galvanized screws are used. For fastening to a lathing made of a metal profile, only self-tapping screws should be used.
Types of corners and moldings for installing plastic lining
Popular techniques for decorating a bathroom with plastic lining
To get a stylish and modern interior, you should use PVC lining with various prints and patterns in its design. Moreover, you can combine them at your discretion, for example, use planks with a pattern in the mirror mounting area or shower corner, and leave the rest of the space monochromatic.
Sometimes they resort to a game of contrasts and textures, alternating stripes of different colors or patterns. This perfectly adjusts the space of large rooms with low ceilings. The walls, “rushing” upward, seem to raise the ceiling and the proportions begin to seem more harmonious. You can solve the problem by decorating the ceiling with clapboard in the bathroom interior . To do this, you should choose it in a light palette and it would be nice if there was at least a simple pattern on the surface, perhaps clouds.
When studying the catalog of plastic lining, look at products with three-dimensional images. This decor will decorate any space. Volumetric walls will make it limitless. The bathroom will have its own dimension, for example, seascapes leading into the distance. The only obstacle to using such material will be the area of the room. In small spaces the effect will be lost.