Often a great idea to cover the ceiling surface with gypsum board comes up against the problem of choice. It is clear that you can use the first ceiling plasterboard that comes to hand, but if you have the opportunity to choose, it may be right to choose a more suitable material, and not one that is cheaper or simply available.
The transverse size of the sheet should not exceed 100-120 cm
Pros and cons of ceiling plasterboards
To be precise, the industry does not formally produce gypsum sheets specifically for plasterboard cladding of floors. Simply, from a fairly wide range of gypsum boards, sheet material is selected that is best suited for ceiling decoration.
Most experts classify primarily lightweight grades of plasterboard that meet at least two requirements as ceiling plasterboards:
- Small thickness of sheet cladding. On average, the thickness of plasterboard for the ceiling is 6-9 mm. All other brands are usually classified as wall and frame products;
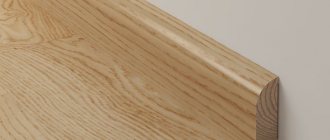
- A special shape of the end edge, which simplifies the sealing of seams in an inconvenient ceiling position of the cladding.
It cannot be said that the thinnest sheets of plasterboard are used for ceiling cladding, although most customers, without hesitation, choose a thickness of 6-8 mm, believing that this approach reduces the load on the frame or rough lining of the floor.
Edge design options
Important! The thickness of the gypsum plasterboard for the ceiling is not selected arbitrarily, but based on data about the nature of the room, the design features of the ceiling frame or sheathing and the size of the ceiling.
The advantages of the material include higher density and rigidity of the material. If a complex configuration is being built on the floor, then the use of a thin arched plasterboard sheet significantly simplifies the assembly and smoothing of curved surfaces.
The disadvantages of plasterboard cladding include an increased tendency to cracks. The small thickness of the ceiling plasterboard forces you to limit the size of one section, otherwise it becomes simply impossible to lift and install a large sheet. In addition, even with a relatively small size of ceiling plasterboard of 120x250 cm, bringing and lifting the material into the apartment along the flights of stairs becomes a real challenge.
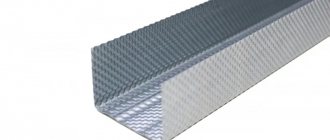
How to choose the right profile
A reliable frame is the key to the structural strength of their drywall. Therefore, you should not skimp on the materials needed for its manufacture. It is better to choose profiles from a well-known company, even if the price of the products is higher. But in this case you won’t have to worry about the quality of the metal profile.
Qualities that a profile for gypsum boards must meet:
- strength and rigidity - ensured by the thickness and proper processing of the material during manufacturing;
- reliability - it is determined by the quality of the steel;
- lightness - material that is too thick has a lot of weight and is inconvenient to work with.
Products from world leaders Knauf and Giprok have proven themselves best.
What kind of plasterboard is used for the ceiling?
The list of sheet gypsum materials for finishing the ceiling surface usually includes two main brands:
- Waterproof gypsum board sheet;
- Standard gypsum sheet with paper coating up to 1.5 mm thick.
Sometimes an arched plasterboard sheet is placed in a separate category, which, in fact, is not much different from the standard one.
For your information! An arched transition or curved surface, assembled from thin and relatively soft arched plasterboard, after wetting, easily bends during installation, and after drying, it gains the necessary rigidity and density for finishing.
In addition, in houses with a potbelly stove or cast-iron fireplace and a pipe leading through the ceiling, you can use fire-resistant GKLO grade plasterboard for the ceiling. But this is an exception to the rule rather than a common practice. Fire-resistant material is noticeably more expensive than ordinary drywall, so it makes no sense to hem the entire surface with it.
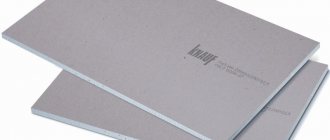
Standard plasterboard
A regular plasterboard sheet is a sandwich of cardboard or a thick three-layer paper shell with a gypsum core. The material can be cut well at the required angle with almost any tool. A standard sheet usually has a rectangular or semi-rounded end.
Working with standard material is much easier and simpler
If you plan to finish the ceiling with small pieces of plasterboard, then you can use material with straight ends; the rigidity of the section is quite enough so that the sealing at the seams does not crack under load. To finish the ceiling with full-length sheets, it is imperative to use material with one-sided rounded edges. In this case, the side with the rounding should “look” at the rough floor. After gluing the serpyanka and sealing it with putty, a kind of plaster plug is formed on the rounding, which prevents the material from peeling off.
Moisture-resistant ceiling plasterboard
Quite an expensive material, used for ceilings in limited quantities. Typically, relatively simple single-level ceilings are built from moisture-resistant plasterboard for rooms with high air humidity. This could be the bathroom or kitchen.
Waterproof grade of drywall finish
Important! GLKV ceiling plasterboard does not allow moisture to pass through only if the seams are carefully sealed, so before applying putty, glue or an acrylic primer must be applied to the cut edge of the joints.
Which drywall is best for the ceiling?
The choice of suitable material for ceiling decoration is largely determined by the operating conditions and temperature conditions of the room. For example, for complex multi-level ceiling structures, standard gypsum plasterboard is almost always used, not because technology features require it, but because of the low cost and availability of the material.
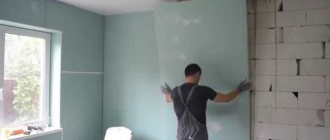
Standard plasterboard is ideal for lining wooden ceilings
Typically, in this case, the facing material is laid directly on the rough lining boards of the ceiling. This base is much stronger and stiffer than a metal profile frame, so you can use 9-12 mm thick plasterboard for the ceiling.
For finishing with water-based or water-dispersed paints, water-resistant grades of drywall are traditionally chosen. It is believed that the protective film prevents moisture from “pulling” impurities from cardboard and plaster, which can appear on the ceiling in the form of stains.
In addition, waterproof plasterboard is noticeably stiffer than standard, so if you plan to cover the ceiling with your own hands, without helpers, then perhaps this will be the best option. At the very least, it is possible to lift a sheet of drywall onto the frame without particularly worrying about its integrity.
For city apartments in panel houses, it is recommended to use a new product, the so-called acoustic plasterboard. In terms of design, this material differs from a standard plate only in the presence of perforated holes. It perfectly dampens noise of any frequency, but is extremely difficult to install on a frame.
Buy only quality material
Buyer Tips:
- Make a purchase at a large retail chain whose warehouses do not stock the goods.
- If possible, evaluate the storage conditions and microclimate of the store warehouse.
- Take the time to inspect each slab. Set aside sheets that have scratches, loose paper, dents, damaged cores, or other defects.
Determining the right type of gypsum board of the required thickness, choosing high-quality material from a well-known and reliable manufacturer, and high-quality construction work guarantee the expected result from the repair. And correctly selected sheet sizes and a drawn up plan for their installation will minimize the amount of waste and help to save significantly.
Size of plasterboard sheet for ceiling
Standard dimensions of ceiling material are shown in the table below.
The most popular sheet sizes are 120x200 cm and 120x250 cm. This does not mean that sheets 3 m long or more are not used for ceiling decoration; it is simply impossible to transport and lift sheet cladding into an apartment or house without special equipment.
For example, one plasterboard of the most popular ceiling plasterboard 120x200 cm weighs almost 18 kg. It can be lifted without much effort by one physically strong person. That is why it is often purchased for ceiling decoration in apartments.
How sections will need to be lifted to the ceiling
If a team of craftsmen will be working on finishing the ceiling, then it makes no sense to focus on the maximum size of the plasterboard; in this case, the finishing is purchased based on considerations of a more rational use of plasterboard in the ceiling finishing.
Marking
How to mark a ceiling for plasterboard when installing a suspended structure?
Ceiling assembly begins with markings
First, let's find out what exactly we have to mark.
The markings needed:
- When assembling a single-level structure, the guide fastening line;
- When installing a multi-level flow - the same lines for two or several levels;
- In addition, it is necessary to mark the axes of the sheathing profiles to which the gypsum board will be attached.
Guide fastening line
If the suspended ceiling will not be used for installing built-in lighting, ventilation wiring, etc., the top of the guides is aligned with the lowest point of the ceiling. Accordingly, the bottom of the guide, which is set according to the markings, will be spaced from this point by the width of the ceiling guide profile - 27 millimeters.
Marking can be done using a laser or water level. In the first case, the profile fastening line is drawn along the backlight using a pencil and ruler.
Marking the ceiling horizontally using a laser level
In the second, the instructions are a little more complicated:
- We place marks on both adjacent walls in one of the corners of the room;
- We transfer these marks to all corners with a water level;
- We beat off the lines between the marks with paint cord.
Captain Obviousness suggests: in the same way (adjusted for a greater distance from the ceiling) the ceiling is marked for plasterboard for the remaining levels.
Sheathing profile axes
The axes are marked parallel to one of the walls of the room (usually the one whose length is equal to or slightly less than the length of the ceiling profile) in increments of 600 or 400 millimeters. The width of the plasterboard sheet should remain a multiple of this step: only in this case will the joints of adjacent sheets be in the middle of the sheathing profile.
The easiest way to mark is to use the painter's cord we are already familiar with, using marks previously applied to the ceiling.
Colored painting cord
What thickness of drywall is best for the ceiling?
It is much more difficult to decide on the thickness of the gypsum board than on its dimensions. At a minimum, three factors must be taken into account:
- Room dimensions. The larger the ceiling area, the more flexible and uneven the frame for the ceiling finish is. Therefore, for a large room or hall, they mainly take a sheet of 9.5 mm. And if you plan a large number of embedded elements and inserts, then you may need a thicker one - 12.5 mm;
- Character of finishing. If, in addition to plasterboard, a PVC ceiling film is laid on the ceiling frame, then most of the tiers are assembled from thin 6-8 mm plasterboard;
- Total weight of the ceiling cladding. The less the load on the frame, the more durable the decorative finish will be.
Oddly enough, the last point is almost always ignored, both by masters and individual homemakers. There is an opinion that one linear meter of a profile frame can withstand up to 30 kg of drywall. This is not entirely true; the maximum load should not exceed 10 kg. If you cover the ceiling of a room of 12 m2 with ceiling plasterboard, sheet dimensions 120x250 cm, thickness 9.5 mm, then the total weight for 4 profile lines will be almost 90 kg, which gives an almost double safety margin.
With proper skill, moving the cladding is not a problem
If you use a 12 mm ceiling gypsum board, the margin will be only 15%, which means that any mistake when assembling the metal frame can cause the entire structure to break.
Tips for calculating the amount of material
Before choosing the sizes of gypsum boards and determining their quantity, you need to take measurements of the surfaces on which the sheets will be mounted. Then a surface map is drawn on a piece of paper. On the same scale, they are trying to place gypsum boards of different sizes on the plan. The main task is to place the sheets rationally, with a minimum amount of butt seams and material waste. The map will clearly show the number of sheets and in what sizes you need to purchase. To make the task easier, there are online services that will promptly present suitable options based on the individual data entered. If you don’t have time to draw up a map, buy drywall with a 10-15% margin, choose the sheet size from the standard range.
Specifications
| Property/type | GKL | GKLO | GKLV | GKLVO |
| Weight (kg per 1 m2) with sheet thickness S in mm | 1xS | 0.8-1.06xS | 0.8-1.06xS | 0.8-1.06xS |
| Density, kg/m3 | no more than 1250 | |||
| Toxicity group | T1 | |||
| Flammability group | G1 (low-flammability) | |||
| Thermal conductivity, W/m*K | up to 0.36 | 0,22 | up to 0.36 | 0,22 |
| Water absorption,% | up to 20 | up to 20 | less than 10 | less than 10 |
| Bending strength, MPa | no more than 5.5 | |||
| Brinell hardness, MPa | at least 22 | |||
To find out the sizes of self-tapping screws for fastening drywall (and not only), study this material >>>
Rules for storing slabs
The quality and technical characteristics of drywall are affected by the conditions in which it was stored and compliance with storage rules.
To prevent the material from becoming deformed or damaged, follow the following recommendations for storing gypsum sheets:
- Immediately after purchase, allow the material to sit in the room where it will be installed for at least 48 hours. During this time, the product adapts to the conditions in the room and releases excess moisture, which is absorbed during transportation in the cold season. If this is not done, the surface may become deformed after installation.
- To prevent the slabs from losing their strength and other technical qualities, do not store them near sources of thermal energy. Otherwise, the material becomes brittle and quickly breaks during installation. The shortest distance from heaters, stoves and heating appliances is 50 cm.
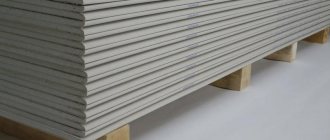
- If the slabs are stored vertically, then creases form on the lower edge that cannot be removed, and the surface becomes deformed. To prevent this from happening, store sheets only in a horizontal position. Moreover, it is recommended to lay the material on special wooden pallets, which provide natural air circulation from below.
- Do not store the product outdoors. Even in summer, condensation accumulates under the plastic film, which appears due to daily temperature changes. Moisture accumulated under the film will lead to damage to the material and deformation of the surface.
Note to the home handyman
A lot has already been written about the installation of plasterboard sheets, but I would like to clarify some points that should be taken into account when working with the material.
- Despite the price attractiveness of wooden blocks, it is better to use a factory profile for the frame. Even perfectly planed timber will twist over time, so creating a perfect, stable surface is unlikely to be possible.
- The ceiling supporting profile must have a pitch of no more than 400 mm. Sometimes they save money and make 600 mm. What does this lead to? If the quality of the plasterboard is not very good or the humidity in the room has increased, such a ceiling, instead of being flat, will begin to resemble a seascape with waves, i.e. will sag noticeably.
- The head of the fastening screw is completely recessed flush with the surface of the sheet, but it should not break through the front layer of cardboard (only press it in). A self-tapping screw that sticks out will not allow you to properly putty later, and a self-tapping screw that is too deep will tear the paper and cease to function as a fastening element.
- To avoid unexpected warping of drywall, some time after completion of its installation, all work with it should be carried out when the basic wet technologies are completed and the room has dried out. Also, for the same reason, you need to let the sheets adapt for two to three days after delivery to the site.