The most common type of finishing of kitchen walls and floors is tiling. The durable, smooth coating is resistant to impacts, water, dirt and detergents. Thanks to the decorative qualities of the material, any surface becomes elegant. Laying tiles in the kitchen is a job that even a non-professional can do. Knowing the basic rules and nuances, you can complete it quickly and efficiently.
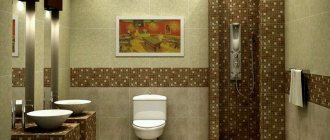
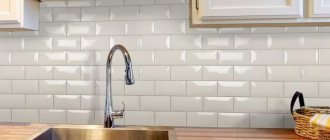
Finishing the kitchen apron and floor in the same style
Preparatory stage
Tiling is carried out after all processes that could damage or stain the finish have been completed:
- waterproofing and screed installed;
- risers were installed, communications were installed, electrical wiring was laid;
- sockets for sockets and switches are marked;
- doors and windows installed.
If work is carried out in winter, the room should not be colder than +10°C. The temperature of adhesive solutions is not lower than 15°C.
Preparation of bases for mastic and cement glue
Tiles in the kitchen are laid using waterproof compounds. It is not recommended to use gypsum mortar, which absorbs water vapor from the air and quickly loses strength.
The tiles are mounted using adhesives:
- cement with modifying additives;
- hot or cold mastics with organic binders;
- acrylic dispersions;
- epoxy or epoxy-polyurethane compounds.
Adhesives are produced in the form of dry mixtures, mixed with water, ready-made pastes or solutions, two-component materials that are combined before use.
Preparation for installation with cement adhesive includes:
- removal of old cladding;
- correction of defects and surface curvature of more than 15 mm without smoothing;
- notching concrete walls to increase adhesion to the adhesive;
- removal of dirt, stains, dust, drips.
Small irregularities will subsequently be filled with mortar, so the preparation is not so thorough and labor-intensive. If you have to glue the tiles with mastic, more stringent requirements are put forward for the base. The surface must be flat and smooth. Deviations of more than 5 mm per 1 linear meter are not allowed.
The surface for mastic glue must be perfectly flat.
If the old finish is sound, the tiles can be installed over the existing flooring. In case of severe defects, it is recommended to plaster the base with compounds containing reinforcing fiber, or lay a mesh along the wall.
Surface waterproofing
The floors are leveled before installation and covered with waterproofing. Apply coating, painting or penetrating agents. You also need to treat the lower part of the wall to a height of 15-30 cm. In case of unexpected leaks that happen in kitchens, a waterproof barrier is a necessary measure.
It is also recommended to cover the surface under the apron with waterproofing, especially if it is non-moisture resistant drywall. If water gets in, the top paper layer may peel off along with the finish.
Preparing the walls
After all the tools are prepared, you need to start preparing the working surface.
- The wall is thoroughly cleaned of the previous coating. If tiles were laid on the wall, you will need a hammer drill to remove them and the old mortar. In any case, the surface is cleaned to the plaster layer.
- You should also check the tightness of the plaster layer - the peeling elements are completely removed, after which all irregularities are sealed.
- It is important to make a perfectly even angle if the tiles will move from wall to wall.
- It is advisable to make notches in the wall so that the adhesive solution adheres better to its surface.
Advice! If there are salts, fungus or mold stains on the cleaned surface, it must be treated with a high-quality fungicide with anti-corrosion properties.
Materials and tools
To install the cladding you will need the following tools:
- Master OK;
- rubber mallet weighing 1 kg for setting tiles;
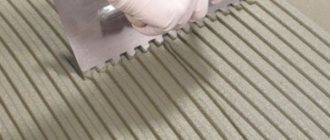
- a notched trowel for leveling the glue with a tooth height of 10 mm for elements with a side of 30 cm, 4-5 mm for smaller products;
- tile cutter or grinder with a diamond wheel;
- mixer or drill with attachment;
- roller or brush;
- tape measure, pencil;
- bubble or laser level;
- large square;
- cord breaker;
- rule;
- container for preparing glue;
- crosses for fixing the thickness of the seam or SVP system.
Wire cutters may come in handy when working. For grouting, use a trowel, sponge or cloth.
Grouting joints
A few days after the wall is completely finished, using a knife and pliers, PVC crosses are removed from all tile seams. Also, the fixing tape and the lower wood chips are removed from the bottom tile. Go along all the seams between the tiles with a sharp knife blade to remove excess glue and, if possible, deepen the seams.
The next step is to pour about one and a half glasses of water into a small bucket and add dry grout for the joints. The entire resulting mass is mixed with a spatula until there are no lumps. Next, the prepared grout is applied sequentially to all cleaned and prepared tile joints with a rubber or silicone spatula. After filling the joints, you should wait about 30 minutes for the grout to harden a little, after which you should go over the entire surface of the tiles with a dry cloth and sponge.
Attention!
It was described above how to work with cement-based grout. If the cladding is done in a bathroom or any other room with high humidity, it is recommended to use grout based on epoxy or furan resin. In this case, you need to specifically study the manufacturer's instructions indicated on the container with grout.
Options for laying tiles on an apron
It is worth highlighting three factors that influence the choice of tile laying: the customer’s wishes, the design and style of the kitchen, and location. Consider the most popular and current options for laying out tiles on the backsplash.
- “Step by step” is the most common and simplest way to lay a backsplash; one type of tile is used, it is laid joint to joint.
- “Intermixed” - another name for “offset layout” is laid out according to the principle of brickwork, each subsequent row is offset by half a tile, the result is very unusual.
- “Diagonally” is an interesting option, but more labor-intensive and cost-intensive; it can be used to visually enlarge the space, which is important for a small kitchen.
- “Chess layout” - the principle is similar to a chessboard; two types of tiles are used, always in contrasting colors.
- “Modular” is the most complex, costly in terms of materials and amount of work. You will have to pay quite a lot to the craftsman; they use three or more types of tiles of different shapes and sizes.
Preparing the base
It doesn’t matter where the tiles are laid: walls, floors, aprons, a flat surface must be provided. Therefore, a preliminary inspection is performed. If large cracks, irregularities, or potholes are found, then it is necessary to cover up the defective areas.
Tip: Leveling with glue is a good option, but its cost exceeds the price of the plaster mixture. Therefore it is not economically profitable.
As a rule, it is not difficult to remove the old facing material, plaster and install beacons for applying a new coating to ensure a smooth surface. A ready-made mixture or drywall will do.
For the floor, it is advisable to use a self-leveling mixture. But you need to wait for the screed to dry completely.
After completing the leveling of the surface, it is necessary to add a primer, as it will increase the level of adhesion of the special glue and the base. A primer with deep penetration into the structure of a wall or floor is ideal.
How to calculate tiles for a backsplash or kitchen floor
We count the tiles in rows, to do this we divide the height of the wall by the vertical size of the tile and thus get the number of rows up, and divide the width of the wall by the size of the tile horizontally and get the number of rows horizontally. The resulting numbers must be rounded up.
There are important points that need to be taken into account before you start calculating tiles for laying in the kitchen, briefly about them:
- It is important to decide how the work will be done; we wrote about possible options above in the article. Half a tile should always be counted as a whole, and be sure to count the tiles for each wall separately.
- If laying is done ''joint to joint'', increase the calculated amount by 5%; when laying diagonally, increase the amount of material to 15%.
- You need to understand whether the apron will be plain or whether there will be ornaments and inserts.
- What size are the planned tiles?
- The presence or absence of a drawing. When adjusting the pattern, a lot of scraps may come out, so increase the amount of material by 20%.
You will always find the amount of glue and grout on the packaging in the instructions; you will already know the installation area.
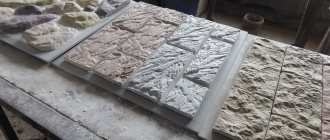
Decorative kitchen tile modules
To create a working wall in the kitchen, you can use regular ceramic tiles, or you can use special ones for aprons.
Decorative tiles
Both Russian and foreign manufacturers produce sets of tiles with sets of decorative modules.
Decorative apron
The decorative possibilities of ceramic tiles are endless, from reproducing kitchen still lifes and drawings to old paintings and entire panels.
Design tips
- The apron is an important element of kitchen design, so it must be combined with the overall style of the interior.
- It can carry an increased decorative load, but at the same time remains only a pleasant background, so it is important not to overdo it with decors.
- In color and texture, it should be in harmony with other objects and surfaces in the kitchen. For example, a matte countertop and matte “apron” tiles will go well together, and glazed tiles will go well with the glossy surface of the table.
- Light colors will visually expand the walls of the room, and some bright colored accents will refresh the kitchen.
Apron marking
A kitchen apron can have different sizes depending on the layout of the room, the location of the furniture, stove or sink. Its boundaries must extend to adjacent equipment.
The height of standard floor cabinets is 85-91 cm. The line for gluing the first row of tiles is marked 1-3 cm below the countertop. The distance from the working surface to the wall cabinets is ergonomically calculated and is 45-60 cm. This niche is usually filled with cladding. The finishing under the kitchen furniture should extend 2-3 cm. Accordingly, the width of the apron is 47-66 cm.
Marking a horizontal line.
The final dimensions are determined in accordance with the dimensions of the tile. It is advisable to place as many whole elements as possible. With this layout, there is little waste and the work moves quickly.
Mark a horizontal line on the wall using a level, cord breaker or pencil. If the material is heavy, a retaining rail - a steel profile or bar - is screwed under the bottom row.
Installation of the retaining profile.
Using a level or plumb line, beat off the vertical. To set the surface on an uneven wall, screw in self-tapping screws and pull the cords. Beacon tiles are installed on them. It is convenient to use a laser plane builder. Then you will need much less time for marking, and the likelihood of errors is reduced.
Important. If the pattern is complex or the layout is diagonal, markings are carried out for each row or even each element.
The thickness of the seams must be taken into account. As a rule, it is 1-2 mm, but in cases where the design requires it, it is increased to 5 mm.
Preparing the surface of walls and floors
The preparation of the walls largely determines how the tiles will lay and how durable the surface will be. Main stages of wall preparation:
- The old coating is removed.
- The wall must be leveled and all cracks and irregularities removed. The easiest way is to cover the wall with plasterboard. The second option is to fill the uneven areas with putty. The process will take longer, but as a result the wall will become much smoother, which is important when tiling.
- If the wall was initially flat and the old coating was not removed from it, applying regular plaster will be sufficient.
- The next stage of preparation is applying a deep penetration primer. It must dry thoroughly so that the glue does not “move off” upon contact.
Some experts recommend soaking it in water to ensure better adhesion to the adhesive solution.
Marking
Before applying the glue, the wall is marked. Laying tiles should begin from the bottom. Using a level, pencil and tape measure, draw a horizontal line from wall to wall at the bottom of the wall. The height of the line should be measured using the tile itself.
Start laying along the marked line. This will form the first row. Place the remaining materials along the first row. The distance between them is adjusted using tiled crosses, which are installed at the site of future seams.
Stages of installing tiles on the wall
Laying a tile backsplash in the kitchen begins with priming the surface, which improves adhesion to the adhesive and eliminates dust. While the wall dries, the material is sorted and cut.
Installation of the apron includes the following steps:
- preparing glue;
- laying tiles;
- grouting joints.
Mix a portion of glue in the container, which can be used before the pot life of the mixture expires. For cement compositions this is 4 hours. If ready-made mastic is used, its lifespan is calculated from the moment it is applied to the wall. Quick-drying tile compounds harden within 10-30 minutes. When installing the finish, excess mortar that appears must be removed immediately.
Mixing glue
Cement, mastic and polymer adhesives are used in different ways. In the first case, the mixture is applied to the back side of the tile and distributed evenly with a notched trowel. Place the product against the wall and press it.
When using mastics or polymer adhesives, first cover the wall with them, and then install the cladding. Due to the rapid drying of the mass, it is recommended to make a batch to finish a small area.
Cut the wall tiles using a glass cutter with a cutting roller or a diamond tip. On the front side, a furrow is scratched along the fault line, destroying the top layer of glaze. Then lay the product on a flat surface, aligning the cutting line with the edge of the stand or placing a metal rod under it. When pressed sharply, the fragment breaks off. If you need to remove a small piece, use wire cutters.
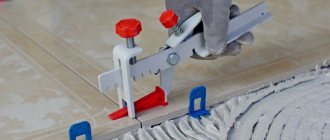
To secure joints of equal thickness, crosses are laid between the tiles. After the glue sets, they are removed with pliers.
An innovative way to create uniform seams is SVP. These are systems for leveling tiles using devices consisting of clips and wedges. The retainer is inserted between two cladding elements and clamped with a wedge. After the glue has hardened, it is removed along with part of the clip. The advantage of this mounting option is that the coating can be leveled horizontally and vertically at the same time. Disadvantage: consumables remain in the design and are not reused.
Installation of hovercraft
After the glue has hardened - 1-3 days, depending on the type - they begin to grout the joints (for more information about grouting, read the article at the link). Cement, epoxy or polyurethane fugues are used. The color is selected according to the surface design. It is advisable to check the composition for compatibility with the cladding material, otherwise the edges may become stained or unsightly stains may form.
Quick-hardening mixtures are rubbed with a spatula into the joint cavity, first in the transverse, then in the longitudinal direction. The operation is repeated 2-3 times. After 15-30 minutes, clean the surface with a damp sponge or cloth, making sure not to damage the still soft solution. After 24 hours, wipe the coating with a dry cloth.
Design project
Like any construction, laying tiles begins with the development of a project. This is perhaps the most pleasant action, but no less responsible. The bottom line is the choice of ceramic material. Manufacturers have exceeded all expectations in this regard. According to the method of covering the front part, three groups can be distinguished:
- matte;
- glossy;
- structural.
Glossy differs from matte polishing. The applied glaze is made in the form of a colored monochrome or with a simple coating pattern. However, they are increasingly being produced with complex engravings. Sometimes images are composed of elements in the form of a puzzle or in a mosaic manner. Structural tiles have a textured surface, which adds volume. A correctly laid out drawing can create a 3D effect. But such tile material makes cleaning difficult, so they try to use it in other rooms.
Using a structured (on the wall) and matte (floor) surface
What else you should pay attention to is the abrasion coefficient of PEI, which depends on the hardness of the top layer, marked with numbers from 1 to 6. For walls it does not play an important role, but on the floor you need to use PEI of at least 3. There are porcelain tiles, they itself is solid and well suited for floor cladding, and tiled ones are used for the wall.
The owners decide what the pattern will be and whether there will be one at all; they just have to pay attention that on tiles that are too light and dark, dirty places will be especially clearly visible. There are a great many combinations of colors, sets, combinations with the interior and it is not possible to consider them; you have to rely on your taste and ready-made examples.
A successful combination of design and interior
Once you have decided on the choice of tiles, you need to calculate its quantity.
Installation of floor tiles in the kitchen
Laying tiles on the kitchen floor is carried out on a strictly horizontal surface. Any deviations are leveled out with a cement-sand mortar screed.
Laying tiles on the kitchen floor, first row.
Although it is possible to level the floor horizontally, it will not be possible to correct crooked corners. Laying a decorative frieze of the correct geometry and filling the gaps in the color of the main background of the cladding will help to disguise this drawback.
The frieze will help hide the irregular geometry of the kitchen.
Important. It is recommended to dry lay the floor tiles first to get an idea of the appearance of the surface.
This is especially important when decorating the floor with complex patterns or ornaments. To lay the mosaic, templates are made, according to which small elements will subsequently be mounted.
Beacons are installed on the marked base. Apply a 15 mm thick layer of mortar to the floor area and level it. Install the tiles one by one according to the drawing, controlling the position of each element with a level.
If a template is used, it is applied to the interlayer and the cells are filled with tiles. With a grater they are forced into place. Then the pattern is removed, transferred to the next grip and the operation is repeated.
Cutting floor tiles
To finish the floor, thicker and more durable material is used than for wall cladding. Therefore, it will not be possible to cut it with a regular glass cutter.
A high-quality cut can be made:
- Using a manual tile cutter. Place the marked element on the device, aligning the fault line with the path of the cutting roller. Pass it along the surface of the tile by pulling the lever. After this, the two fragments are easily separated. In this way you can cut the product diagonally.
- Electric tile cutter. It is used to process thick, embossed or large tiles that simply cannot be handled with a manual device.
- Bulgarian. If high quality welds are not required, a conventional diamond attachment is installed on the angle grinder. To obtain a beautiful, even edge, use smooth discs designed specifically for dry cutting. When cutting, a large amount of dust is released, so it is advisable to wear a respirator or protective bandage.
Operating the equipment requires skill. Before you start cutting, it is recommended to practice on irrelevant fragments or unnecessary pieces.
Laying tiles in the kitchen is completed by grouting the joints of the flooring. Use compositions intended for wet areas. After finishing the finishing work, the floors can be used after 7-10 days.
Types and characteristics of tiles
Basically, kitchen walls are covered with ceramic tiles - they are sold at an affordable price, and also do not require special skills for installation.
An improved version of ceramic tiles is porcelain tiles, which are more wear-resistant and durable than conventional ceramics.
But ceramics still does not lose its leading position.
You can compare the pros and cons of each material in the table below.
| Characteristic | Ceramic tile | Porcelain tiles |
| Strength | High strength, however, in this parameter, ceramics are much inferior to porcelain stoneware | The material is much harder and not subject to mechanical stress |
| Appearance | Available in different colors, it allows you to create interesting compositions to diversify your look. | Looks rougher than regular ceramic |
| Waterproof | High level | High level |
| Wear resistance | Resistant to mechanical stress, but if used improperly, cracks may appear | Resistant to heavy objects, acids and chemical elements, cracks and chips are very rare |
You should choose which tile to put in the kitchen based on the principle of its use. It is better to lay porcelain tiles on the floor, and the kitchen apron looks more aesthetically pleasing if the laying is made of ceramic tiles.
Covering window slopes in the kitchen
Some people like to tile not only the floor and walls in the kitchen, but also the slopes, as we wrote earlier about how to make slopes. This process is not complicated, we prepare the slope, then prime it, then for installation we will need an outer corner into which we will drive the end of the tile. It is important that the thickness of the corner itself be greater than the tile, otherwise the tile will stick out unsightly; if the tile is 8 mm, then the corner is 10 mm.
Layout options
Of course, the options for laying tiles in the kitchen also play an important role. Or rather, the choice of one of them. In particular, the following types are worth noting:
- The first option is the familiar option of laying tiles in even rows. In this case, the tiles are laid in rows, seam to seam or staggered.
- The next option is diagonal laying, more details about which can be found in a separate article.
- Another option is modular installation. This method will require more professionalism, additional calculations, perseverance and patience.
In total, these are the main options that can be found most often. Also, more details about the layout can be found in a separate article about options for laying floors in the kitchen, which discusses all the variations.
Carpets, mosaics and other artistic images
Concluding our review, let's focus on the so-called carpet laying. It is sometimes called mosaic, by analogy with ancient drawings. But today, manufacturers offer ready-made solutions that will relieve the craftsman from the need to select tiles by color and draw up a design.
In order to get a pattern like “carpet” or “kaleidoscope”, it is enough to purchase a ready-made set in a specialized store. If the owner of the house decides to create a pattern on his own, he should first draw a draft design and calculate the number of tiles of a particular color needed to work in the kitchen.
Carpet patterns use borders, which are not only a decorative element. They create the logical completeness of the object. Therefore, when calculating, their quantity must also be taken into account.
Knowing various masonry techniques and understanding all their features, the master will create his own unique kitchen floor.
Classical traditions
Gluing tiles in the traditional (classical) way is the simplest and most reliable option for creating flooring. The tiles should be laid in even rows parallel to one of the walls, without moving the rectangles relative to each other.
For this finishing method, you can use both square and rectangular ceramic plates. In addition to a monochromatic pattern, they use a “chessboard” or ceramics with a ready-made large-format pattern, which is made up of small elements.
The advantages of this type of installation include simplicity and ease of gluing elements, speed of work and a small amount of waste.
And to keep the percentage of surplus even smaller, experienced craftsmen advise calculating the number of tiles before starting work. To do this, you can determine the area of the kitchen and the area of the tiles. Then divide them by each other, and round the resulting result to a larger integer. This will be the required amount of tiles for the kitchen floor.
Professional builders advise starting such masonry not from the corner, but from the middle of the wall. Thanks to this approach, the pattern will be uniform, without whole tiles on one side and cut tiles on the other. And even if you have to cut the tile, there will be a half on each side. And this will significantly reduce consumption and eliminate a large amount of waste.
In addition, before starting work, you need to make sure that the wall along which the first row of tiles will lie is level. If it has flaws, it is better to start installation immediately from the second row, aligning it with the cord. And next to the wall, glue the tiles in the second place, trimming the edges and aligning them according to the existing standard.
Tile like parquet
The parquet type of installation (also called “herringbone”) is suitable for an elongated room. It also looks good in kitchens with ledges, niches or with a non-standard projection on a plane. For work, use only rectangular tiles with an aspect ratio of 1:2 so that the pattern is uniform and proportional. They are placed alternately to the left, then to the right.
The tiles are located at an angle of 45 degrees to the plane of the wall, so the assembly process is quite labor-intensive and requires professional work skills from the master. When the row starts parallel to the wall, the overall pattern will turn out to be quite original. But there will be much less waste.
The material used is ceramics with a monochromatic pattern. Or with a surface imitating natural wood.
A type of parquet installation is “wicker” with inserted elements (or “herringbone with attachment”). To create it, rectangular and square elements are used. A square is inserted into the center, and rectangles are placed around it, creating a pattern similar to weaving birch bark baskets. The pattern is repeated, resulting in a very original composition.