Decorating a bathroom with tiles (ceramic tiles) is an original and budget-friendly design solution. The material is produced in several ways and is characterized by increased strength. It received the name “tile” in Germany, where one of the first large-scale production facilities was established in the city of Mettlach. It still exists and is famous for the high quality of its products, which go through a double firing procedure. In the traditional version, the tiles are square in shape. Ceramics is one of the oldest finishing materials. Not only dishes were made from clay, but also approximately identical pieces, which were used to line the walls of temples and palaces using the mosaic technique. The tiles were slightly thinner than bricks, painted and covered with a thick layer of glaze, which protected the surface from mechanical damage. The material was not used for cladding simple houses because of its high cost. The oldest find dates back to 3000 BC. and was discovered on the ruins of a settlement between the Tigris and Euphrates rivers. You can see an ancient tiled pattern on the famous Babylonian Ishtar Gate. They were erected during the reign of Nebuchadnezzar in honor of the goddess of fertility. The monument is perfectly preserved: the gates are decorated with images of mystical animals (sirrush and bulls) arranged like a mosaic, which serve as a clear example of the high level of skill of ancient artisans.
After the second discovery of mass production technology, tiles began to be used as home decor. In the Middle Ages, Italian craftsmen received the “eastern” secret of making ceramic cladding and spread their products throughout Europe. Production was established on the island of Mallorca, which gave the tile its name: “majolica”. There are several dozen options for laying tiles in the bathroom that will help create a unique design for the room. Based on the production method, tiles are classified into several types:
| Cutting. | Natural stone (usually sandstone) is cut into equal pieces. The method is considered expensive due to the labor-intensive process of processing the starting material. |
| Casting. | The tiles are obtained by firing special molds into which a mass of clay is first poured. Refers to the most ancient technologies. |
| Manufacturing using a press. | A high-tech method that allows you to obtain a dense and, accordingly, durable material. |
| By extrusion. | The clay mass is “driven” through a special machine, which presses it into molds. |
Ceramic tiles are used to finish floors, walls, “aprons”, stoves, and a special type - paving - is used to lay paths on neat city streets. In home design, tiles are commonly used in baths and kitchens. Both rooms are distinguished by an aggressive microclimate, which the material can successfully withstand.
- How to choose
- How to choose tiles according to style
- Methods of tiled layouts Direct
- Running
- Diagonal
- Modular
- Horizontal
- Vertical
- Mosaic layout
- Checkerboard laying
- Combined method
- Laying with ornaments
How to choose
Although the modern market for finishing materials offers vinyl tiles, PVC panels, and lining processed in a special way, tiles still remain uncompetitive. Before you go shopping at a hardware store, you need to develop a tile laying program and choose the right option from the variety of textures, colors and sizes. The tiles are produced in three forms:
- Square. These “cubes” have three size standards: 15x15 cm, 30x30 cm and 50x50 cm. The smallest format is used for wall decoration.
- Rectangular. Usually it has dimensions of 25x20 cm. As a rule, such floor tiles imitate parquet boards or laminate, and for walls - brick.
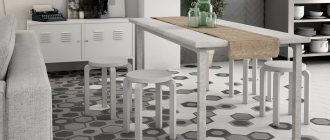
- Non-standard forms. Used in modern design trends. Honeycombs, circles, pentagons, triangles look impressive and unusual.
The composition of the tile includes clay, feldspars and quartz sand, which acts as a “frame” that retains the shape of the product during firing. The entire set of ceramic materials is classified into two groups:
- Bicottura. Tiles for cladding walls inside housing. The enamel covering it gives the surface a stylish shine. The material is durable, resistant to mechanical damage, temperature changes, and changes in humidity levels. Bicottura is easy to clean and tolerates contact with any type of household chemicals.
- Monocottura. A more durable variety, which is used to decorate walls, floors inside the house and paths in the yard. For the street, special frost-resistant models are used.
It is also possible to conditionally divide ceramic finishing materials into three subgroups:
- Porcelain tiles. Material with low moisture absorption. The characteristics of porcelain stoneware are similar to stone, and the composition is similar to porcelain.
- Cotto. A material obtained by firing red clay. Its surface is not covered with glaze and has a characteristic “rough” texture. Cotto has exclusively natural shades within the red-brown color scheme.
- Clinker. Manufactured by extrusion. It may have a glazed surface or different texture solutions. Single firing at ultra-high temperatures ensures low moisture permeability, which makes it possible to decorate not only bathrooms, but even swimming pools with this material. For them, “tiled” sets of steps, corners, and gutters are produced.
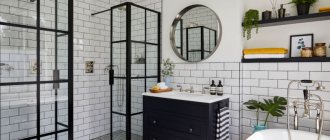
Based on texture, tiles are classified into glossy, matte and “rough”. The last type includes imitation reptile skin “turtle”, which, when backlit, looks impressive on accent walls. As for the color scheme, the variety of shades and patterns allows you to choose the option specifically for your interior. Particularly popular are blue, green, light blue tones, characteristic of the marine stylistic solution of the bathroom. They also use contrasting and bright combinations: black and white, red and gray, yellow and green. In spacious rooms, each individual area (bath, toilet, shower) is highlighted with a specific shade. In old Khrushchev-era apartment buildings, where there are small combined bathrooms, it is not recommended to experiment with color zoning, but to use tiles only in light colors, which will visually expand the boundaries of the space. Based on texture, tiles are divided into:
- Plain. Used for simple and austere interiors.
- Imitating the surface of natural materials (granite, marble, wood).
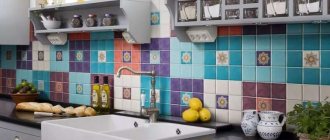
- With repeating patterns. The “patterned” surface is usually decorated with floral patterns or geometric shapes.
- Mosaic. Such tiles form a complex shade composition or a large picture on the surface.
Unusual shapes are most often embodied in clinker tiles, since the extrusion process allows the wildest fantasies of designers to be realized.
We take into account the parameters of the room
In order for the selected layout to look good in the bathroom, you need to take into account several parameters. For example, for small rooms it is better to choose tiles measuring 15x15 cm or 20x20 cm. Also consider the list of important points:
- Use small and large tiles alternately or simultaneously for spacious rooms.
- In compact bathrooms, it is better to use a material with a glossy glazed surface.
- For large rooms, laying matte tiles on the floor and in work areas is relevant.
- Avoid a lot of dark colors, they can distract attention from interesting masonry options.
- Sharp tones and contrasting transitions can be used for bathrooms with showers and rooms with irregular geometry.
- A large number of decorative borders and friezes are optimal for wide bathrooms.
On a note! If you urgently need to visualize the height of the ceiling, use vertical masonry, long friezes, and highlight the corners.
Laying tiles on the floor with a matte texture and ornament Source satu.kz
How to choose tiles according to style
For those who love classic trends, a traditional tile layout with an ombre effect is suitable. The color gradation can flow smoothly across the entire surface or have restrictions in the form of decorative borders between the shade zones. In the Provence style, they use tiles with delicate patterns and fine lettering on a white background. Country style uses a combination of plain slabs with patterned surfaces. The colors are dominated by brown and gray. In the loft style, clinker in the form of bricks with a surface characteristic of the material will look appropriate and beautiful. Minimalism gives preference to plain tiles or a combination of two neutral colors in a checkerboard pattern (black and white, gray and blue). This oriental style is also characterized by imitation marble and rough texture. In high-tech, tiles are laid in gray, black, white colors or with “silver” surfaces.
A few words about the main thing
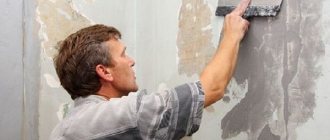
If practice is not enough, you need to start laying tiles from the least noticeable place or from the least noticeable corner. Then you already have some experience and you can “take” your work to areas that are more open to the eye.
Laying tiles is one of the most expensive construction jobs. This means that this is one of the most difficult and responsible jobs. Only after a sober assessment of your capabilities and skills can you begin to implement them.
There are times when “independent tests” necessitate a complete redo and calling in a real master. The cost of finishing bathroom walls, accordingly, doubles. And this doesn’t count the lost time and nerves.
Tile layout methods
Not only the aesthetic appearance of the finished finish, but also the material consumption depends on the layout method. The most popular styling options include the “golden” five methods: straight, diagonal, horizontal, vertical and staggered. More complex ones include mosaic, modular and checkerboard. There are also combined options; they are usually used when combining materials of different sizes, colors and textures. If you lay out the tiles in accordance with all the rules of the chosen method, the finished picture will be easily perceived visually and will emphasize the advantages of the room.
Straight
Even a novice designer can lay tiles “seam to seam”. With a direct layout, each tile in the next row should repeat the location of its neighbor from the previous one. In this case, the only thing that matters is the level foundation of the first level, on which all the others will rest. As a rule, tiled walls have a simple, but beautiful and neat appearance. The method is characterized by high material savings.
Running
With the staggered method, adjacent seams between fragments are not joined. Each subsequent row is shifted by a length equal to half the tile. This method imitates brickwork on the walls and laminate or parquet boards on the floor. The color scheme is usually selected accordingly. This type of finishing will require approximately the same amount of material as the direct method. However, you will have to tinker with cutting the fragments, since one row of two will usually start with half a tile.
The deck spread implies a diagonal arrangement of the “brick” masonry.
Diagonal
The diagonal type of laying, in turn, is classified into three types:
- Simple with respect to the seam. The result will be a composition of smooth vertical rhombuses. Every second row will end in a triangle, so you will have to cut the same number of pieces as with the staggered method.
- Laying with inserts. For this option, tiles are used in two sizes: large rectangles and small squares. Inside each four large tiles there is a small fragment.
- Laying with seam offset to the side (herringbone). Each subsequent row of tiled rectangles changes direction to the opposite. As a result, adjacent fragments lie with their short side on half of the long edge of the bottom tiles.
The more complex the type of diagonal laying, the longer the work will take. It is recommended to lay tiles offset to the side if there are material defects: deviations from 90-degree angles or discrepancies in the length and width of each fragment.
Modular
The modular method allows you to create an original seam pattern on the surface of the floor or walls in the bathroom. The essence of the method is in the name. For finishing, fragments of different sizes and sometimes colors are used. The tiles can be laid horizontally or diagonally. Compositions using two or three different modules, usually rectangular and square shapes, are relevant. The more diverse fragments there are, the more complex the resulting drawing will be. In catalogs, manufacturers usually mark tiles that allow modular installation with the designation “modulare”.
Horizontal
The method is used for rectangular tiles. With this type of installation, the wide edges are located in a horizontal plane. The practice is actively used for small rooms, which thus visually stretch to hide the lack of space. If the tile seams are barely noticeable, and only one color is used, then there is no difference between horizontal and vertical installation. To make the effect more noticeable, the spaces between the fragments are decorated with a special coating.
Vertical
The method is diametrically opposite to the horizontal one. The wide edges of the rectangular tiles are arranged vertically. The method is used when finishing rooms with low ceilings. Vertical “stripes” of seams will elongate the bathroom and visually add a couple of meters in height to it.
Mosaic layout
The mosaic effect on the entire surface of a wall or floor can add unnecessary stress to the visual perception of the room. Its combination with straight, diagonal or horizontal methods looks more organic. Under the mosaic, a separate fragment is allocated on the surface, which will act as an accent. To depict a panel on the wall, you no longer have to painstakingly assemble the picture piece by piece. Manufacturers are concerned about simplifying the task and began to produce special mesh bases that allow you to attach large mosaic modules in one fell swoop. The smaller the pieces of the finishing “puzzle”, the higher the detail of the picture.
There is a separate type of tile that imitates mosaic. Decorative “seams” are applied to the surface of a single piece.
Checkerboard laying
In the classic chess version, black and white fragments are used. The tiles can be laid in a straight or diagonal manner, depending on the preferences of the bathroom owners. Checkerboard styling is necessarily based on a combination of two different colors. In more complex compositions, a large number of shades are used within one tone or according to the principle of contrast. The arrangement of fragments is subject to strict rules and does not allow chaotic combinations. Otherwise, the result will not be a chess arrangement, but a creative disorder.
Combined method
In addition to the above methods, combinations of them are also used. Usually the combination is made within two options. The “joints” of different layouts are emphasized with contrasting seams. It is relevant to horizontally divide a small room in half by drawing an actual line. To highlight accent zones against the background of simpler layout options, complex methods of labyrinth, mosaic, offset seams or modular combinations are used. Often these areas are decorated with tiles of other colors that contrast with the neutral background solution.
DIY tile laying options
To more accurately determine the installation method, you should familiarize yourself in detail with the cladding technology of several popular options. For example, let's take the diagonal laying of standard tiles and the laying of porcelain tiles in a bandage.
Diagonal laying
What you will need for work:
- square floor tiles;
- pencil and tape measure;
- level;
- grinder and tile cutter;
- tile adhesive;
- primer;
- notched spatula.
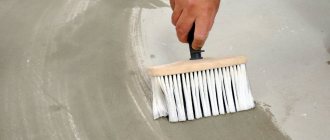
Before proceeding with cladding, it is necessary to properly level the base so that differences in height do not exceed 2-3 mm. The smoother the subfloor, the easier it is to lay and adjust the material.
The base must be dry and level
Laying diagonally should start from the corner of the wall that is best visible. In this case, the cutting of the outer rows can be hidden under plumbing fixtures or furniture. Between the wall cladding and the floor there should be a gap equal to the total thickness of the floor tiles and the adhesive layer around the entire perimeter of the room. Immediately before finishing work, the floor is treated with a primer and the composition is allowed to dry.
Step 1. Cut out the corner elements. Two tiles are laid on a dry, flat surface, face up, and joined together so that the pattern matches.
Step 2. Mark a diagonal on both tiles with a pencil (lines are drawn from one point from the joint, otherwise the lines of the drawing will not coincide). Cut the tiles with a grinder.
Marking tiles for cutting
Step 3: Take two adjacent pieces of tile and fit them into a corner, tucking the edges under the wall cladding. If they do not adjoin tightly, it means that the angle is not level enough, and the tiles will have to be cut along the edge under the wall. Mark the cutting line with a pencil and remove the excess with a grinder. Place both pieces again in the corner, join them together, and align the seam.
Trying on corner tiles
Step 4. Next, apply a whole tile and another cut half, strictly following the location of the pattern and the alignment of the seams. If necessary, trim the ends adjacent to the wall to ensure that the layout is perfectly even.
Laying whole tiles without adhesive
Laying another corner and a whole tile
Step 5. Mark a contour along the perimeter of the laid out tile with a pencil and put the material aside. Next, dilute the glue according to the instructions and apply it to the prepared base. First, the mixture is distributed over the surface in an even layer, after which it is carried out with a comb.
Applying tile adhesive
Advice. If the base of the floor has a perfectly flat plane, a comb with a tooth height of 8 mm is sufficient to form the adhesive layer, and not 10 or 12 mm, as some experts recommend. A thickness of 8 mm is enough to fill the slightest irregularities on the tiles and provide high-quality adhesion to the floor, while larger combs only increase the consumption of glue.
Step 6. Place the tiles one by one in their places, carefully pressing them to the base with your hands. Having leveled the plane, plastic crosses are inserted along the seams.
Laying tiles with glue
Crosses are inserted into the seams
Laying tiles - photo
Laying another whole tile
Step 7. Try on the next fragment, adjacent to the wall at only one corner. The tile is placed on the floor, the corner is inserted into the gap, the seams are joined and the cut line is marked with a pencil.
Step 8. After adjustment, this tile is also glued to the floor, the plane is leveled, and crosses are inserted. Excess glue at the joints is carefully wiped off.
Step 9. The next row will consist of whole tiles, so the glue is applied in a continuous strip to the desired width. Glue the tiles, strictly following the location of the pattern.
Step 10. To determine how much to cut from the corner of the next tile, you need to take it in your hands, turn the front side towards you and place it against the seam, resting the corner against the wall. Now you need to mark with a pencil the point where the tile overlaps another tile, and measure the same distance on the other side of the corner. By connecting the dots, we get a cutting line.
Marking and cutting tiles
How to apply adhesive to tiles
Step 11. In the same way, mark the remaining elements and cut the material. Be sure to leave allowances up to 5 mm wide, since the edges of the tiles will fit into the gap between the wall and the floor.
Step 12. After making sure that the cut pieces fit correctly, glue them to the floor. Here it is already problematic to apply glue to the base, so it is applied to the tile itself. To make it more convenient to insert fragments against the wall itself, you should move one of the outer tiles slightly, and then align the seams again.
You can use paper to mark the tiles
Trying on a paper part
Using the template, mark the tiles and cut off the excess
Putting the element in place
Another irregularly shaped element is cut out from the template
After installation is complete, all that remains is to grout, clean the surface and install the baseboards.
All methods for cutting tiles laid diagonally are shown in the video below.
Modern Design Concepts
Fashion is in constant motion, static is not characteristic of it, and design, as you know, is subject to this capricious lady. In the line of modern styles, ceramic tiles play the role of a luxurious element, rather than a background finish. It is popular to lay fragments of non-standard shapes (honeycombs, triangles, circles), to use surfaces that imitate the texture of natural materials, and to use handicraft techniques in a composition project. Also in demand are original drawings made in accordance with the principles of minimalism, abstractionism, and surrealism. All these options allow you not only to emphasize the stylistic features of the bathroom, but also to make its interior unique.
Laying with ornaments
Small-sized tiles are used to lay out “pixelated” compositions or complex patterns that are “stretched” through individual zones. A similar technique is considered to be “kaleidoscope”, that is, a combination of different patterns and colors on fragments. It is not recommended to decorate small bathrooms with ornaments. It looks more impressive as a zoning technique in combined rooms.
Patchwork styling
Patchwork is a method of sewing large items (blankets, carpets, pillowcases) from small scraps of various fabrics. This technique is found quite often in tile layouts. However, due to excessive diversity, it is not recommended to decorate the entire wall or floor in this way. In order for such a finish to blend organically into the interior, it is used on a separate section of the surface, which will be an accent element in the room. Combine pieces of different colors, sizes and patterns. In some versions, the “joints” are designed to imitate thread seams.
Honeycomb layout
Honeycombs - cells that bees create from wax in hives, have quietly become a popular form that is used in the design of rooms. Tiles (often clinker), imitating hexagons, are used in bathrooms and kitchen splashbacks. Usually fragments of different shades are used to create a composition with a gradation effect. Options with a transition from wall to floor look original. For example, the horizontal surface is decorated with blue and white tiles, and the vertical surface is black, in which there are pieces that have “fallen out” from above. Repeating compositions and patterns are also created from honeycombs, but preference is given to the chaotic arrangement of hexagons.
Imitation of parquet and solid boards
Laminate and parquet boards are not used in the bathroom. This “delicate” floor covering will not last long in harsh conditions. In some cases, the interior concept requires the use of only wood. It’s easy to find a way out of this situation: buy tiles in the form of tiles with a surface that imitates a wood pattern. The coating is much stronger and will not be afraid of moisture and aggressive detergents. The range of colors allows you to choose an imitation of any type of wood: from expensive rattan to the usual pine.
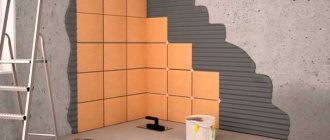
Combination of several techniques
If you want to make your bathroom original, you can use several masonry techniques at the same time. For example, the base is an imitation of brickwork, and the interior panel in the shower is in the form of a parquet board. You can use elite tiles with a beautiful figured shape. It is used to line the following areas: near the sink, faucets, and shower head riser.
Beautiful bathroom design with tiles Source dizajninterer.ru
How to draw a layout diagram
Many people believe that creating a styling project is a matter of minutes. To appreciate the scale of the work, it’s enough to pick up a pencil and get lost, not knowing where to start. It is necessary to draw a floor plan on a blank sheet of paper; the higher the detail, the easier it will be to evaluate the advantages and disadvantages of the finishing project. Then they sign the measurements, which were previously made using a tape measure. The location of the plumbing fixtures is completed. Next, the walls or floor are divided by several straight lines horizontally, vertically or diagonally, depending on the future layout. They evaluate which sector division looks more organic and erase the extra lines. Then the “mesh” of tiles on the surfaces is completed. The resulting squares or rectangles are filled with individual colors or an approximate ornament is completed.
Cross pads
To ensure that the seam sizes match and are perfectly even, special crosses are used.
- Cross pads can be of different widths, ranging from 1 mm to 5 mm.
- Crosses of 3-4 mm are used for wall tiles, and 5 mm for floor tiles.
The crosses must be of good quality and not break, otherwise they may get stuck in the seams and be difficult to get out. High-quality crosses are very elastic, but at the same time, they do not break.
How to count the number of tiles
To begin with, take measurements of the width and length (height) of the wall or floor that will be covered. The values are multiplied by each other to obtain the area. If there are “closed” areas (windows or areas for finishing with other materials), they are also measured. Then unnecessary meters are subtracted from the total area. You need to know in advance the length and width of the tiles that will be used in the finishing. By multiplying these values, its area is also calculated. Please note that seam errors are not taken into account in the calculations. Then the area of the entire room is divided by the same value of one tiled fragment. This gives an approximate number of tiles that will be needed to finish the surface. Do not forget to make a small margin within 5% of the resulting value. If fragments of different sizes are used, then the future composition is conventionally divided into equal sectors and their number is calculated. For example, with modular installation, two rectangles and one square form a fragment with equal sides. Its area is used as a finishing unit. If there are small inserts, their number usually corresponds to the number of the main tile and is also taken with a reserve.
Materials and tools for laying tiles in the bathroom
To carry out tile laying work, the master will need the following materials and tools:
- samples of tiles and decorative elements;
- grout for seams;
- tile adhesive;
- putty;
- sealant;
- measuring instruments;
- drill with mixer attachment;
- sponge;
- notched spatula;
- brush;
- tile cutter or grinder with a diamond blade;
- plastic crosses;
- smoother for grouting;
- drill bit for tiles.
Floor marking
Before marking, it is recommended to make a detailed plan, and on its basis it will be excellent to mark the floor plane. All marking strips must come out even, this prevents unevenness and distortions during finishing; here you can use a laser level.
Before gluing the tiles, it is recommended to lay them out as planned to check the straightness of the lines and the correctness of the laying plan. It is better not to ignore this step, since if any defects occur, the technician will have 20 minutes to correct them.