For many years, wall cladding with ceramic tiles has been a traditional option for interior decoration. In particular, this solution is the most popular for the kitchen, bathroom or toilet. The tile gained its recognition due to its resistance to moisture, and, in addition, its not picky in care. The tiles are quite easy to clean, have a high level of strength and do not conduct electricity. In addition, ceramics is an environmentally friendly material.
Basic characteristics when laying tiles
The material must be selected not only taking into account the intended interior - the geometry of the product must be checked.
The front side of the tile is not always absolutely flat: if the curvature or convexity does not exceed one millimeter, then such a product is quite suitable for use.
The tile must have:
- Angles 90° - this can be easily checked with a square;
- The same thickness of each element, the permissible discrepancy should not exceed one, maximum two millimeters;
- Products of the same size, discrepancies will lead to uneven seams.
Experienced craftsmen use special calibration templates, with the help of which they can sort out unsuitable specimens at the initial stage of selection.
You can remove discrepancies in height and width of up to one millimeter yourself: just put sandpaper, preferably waterproof, on a flat surface and grind the edges to the required size, but it is better to initially select tiles of the same size.
Self-preparation of the solution
You can prepare the mixture for laying tiles yourself. This doesn't mean you can't trust store-bought options. It just makes it possible to save some money.
Preparation of the solution
The most common composition used for work is cement. It serves as a base to which sand (sifted) and water are added. Their ratio may vary.
There is a standard option that is suitable for almost all types of work with tile material. For the mixture you will need:
- Cement (m400) – one part is required.
- Sand (fine fraction) - take two and a half parts.
- Water – half.
On a note! One part is taken as a conditional indicator, the container in which the set of ingredients is produced. For example, a liter children's bucket.
Preparation of tile adhesive
Mixing begins with dry ingredients. They are poured into one container and mixed. It is necessary to achieve a homogeneous composition. Next, start adding water. It is better to do this in parts, kneading each time.
Checking the quality of the prepared mixture
To make sure that the solution is reliable and of high quality, it is checked. This is done simply:
- a separate ceramic element is moistened with water (it is convenient to use a spray bottle);
- apply the prepared mixture;
- the tiles are turned over and shaken;
- a layer of cement of at least three millimeters should remain on the reverse side.
If such a result cannot be achieved, then re-mix and add the necessary ingredients (cement or sand).
When carrying out tiling work in rooms with high humidity, special tile adhesive is used. This will avoid possible problems, as well as preserve the necessary properties of the material longer.
Stages of tile laying work
Tiles can be laid:
- For cement mortar, to which PVA glue or Bustilat is added;
- For ready-to-use mastic;
- A dry mixture, which is diluted with water in a certain proportion before use.
The first method is somewhat outdated, but it is still used by old, experienced craftsmen. Modern tilers prefer ready-made dry mixtures.
Both methods have a big advantage - in the process you can correct the unevenness of the wall, while laying on mastic requires a perfectly flat surface.
Preparation
Before starting the installation process, the surface must be prepared: remove the old coating, greasy stains (sometimes it’s easier to cut them off along with the plaster), tap the wall for poorly fixed old mortar.
After this, the wall should be leveled as best as possible; laying tiles on a flat surface is much easier.
In order not to make notches, it is advisable to prime the wall surface using “Betonokontakt” or a mixture of similar composition.
First stage
There is no need to rush with the laying, since it is advisable to mark the wall first. It is not worth laying tiles from the corner, as well as from the floor line. The floor must have a strictly maintained horizontal line, and if you start laying from the corner, then at the opposite wall you will have to be content with a cut piece, that is, the masonry will be asymmetrical.
A symmetrically laid panel can only be obtained if you start work from the middle of the wall. There are two options: there can be a seam in the middle of the wall or the middle of the first tile.
- The material should be laid out on the floor in the same way as it will be located on the wall, and it is advisable to place crosses between the tiles, which will indicate the width of the seams.
- It is worth immediately clarifying that laying tiles end-to-end requires a certain skill and more precise sorting of the source material. Therefore, it is better to carry out masonry with a seam - even a person with little experience in finishing work can do this.
- Laying begins from the first row (from the bottom). To begin with, beacons made of solid tiles are glued to the wall in the corners and in the middle. The laid tiles are checked by level horizontally and vertically, and string can be pulled between the outer elements - this will make it easier to level the future masonry along the front surface.
In cases where it is required to start from a certain height, a support bar is used. This could be a flat wooden strip, a mounting profile for working with drywall: the most important thing is to maintain a strictly horizontal line and secure the supporting surface, avoiding sagging and deflection.
At this point, the preparatory procedures can be considered complete, and the main process can begin.
Main stage
The technology of laying tiles on the wall may seem simple at first glance, but it requires accuracy, attention and patience.
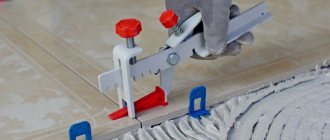
- A layer of adhesive, about 3-4 millimeters thick, is applied to the back side of the product with a wide spatula, the excess is removed with a notched trowel, the tiles are laid on the wall and lightly pressed, aligning them with the beacons.
- Crosses are inserted between the tiles, and laying continues in this order until the first row is completely laid. The appearance of the entire canvas will depend on how well it can be laid out.
- Laying in height is done in a similar way: it must be remembered that it is not recommended to lay more than three rows vertically at a time, since the canvas may “float”. The crosses are removed when the glue sets, but without waiting for it to completely harden.
- After the first three rows are completely fixed, you can continue working, raising the masonry by another three rows, and so on until the required height is reached.
The glue or solution can be applied to the product and the wall at the same time, and the craftsmen advise moistening the tile itself. But in principle, the composition can be applied to a dry surface.
Tools and materials
When choosing a cladding material for a bathroom, you must take into account the following characteristics:
- technical parameters - strength, abrasion resistance, surface smoothness or porosity, chemical resistance. Thus, ceramic floor tiles for the bathroom should be highly wear-resistant and have a non-smooth surface;
- aesthetic parameters - color, ornament, compliance with the style of the room being designed;
- size and correct geometric shape.
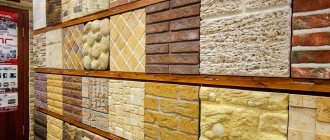
Ceramic tiles come in various types, depending on the manufacturing method:
- bicottura are glazed ceramic tiles for interior wall cladding; their surface is double fired. Metlakh tiles made from quarry clay are also double fired. Not suitable for floor coverings. Glazed ceramic tiles for interior wall cladding are very durable, but their smooth surface is not suitable for laying on the floor. The exception is relief tile glaze;
- monocottura - single-firing tiles. Durable, suitable for flooring;
- the most durable tile is clinker, usually used for laying on the floor, its appearance resembles a brick;
- mosaic – small tiles glued to a mesh;
- porcelain stoneware imitating natural stone;
- glass and mirror tiles for walls and ceilings. It is subject to mechanical stress, so you cannot lay the floor with it.
Mosaic Mirror
Clinker
Bicottura
Porcelain tiles
Monocottura
The amount of tiles is calculated as follows: you need to divide the surface area of the bathroom by the area of one element and add 10-15 percent for the margin (undercuts, defects, defects when cutting the material).
In addition to tiles, you will need the following materials:
- tile adhesive;
- primer, which should have antifungal additives;
- joint grout;
- spacers (crosses) to regulate the thickness of the joints between the tiles;
- silicone sealant;
- bathtub sealing tape;
- masking tape.
Do not forget that all materials used to make up ceramic tiles must be moisture resistant. The tools you will need are tools for applying and mixing the solution: a rubber or notched spatula for grouting, a container for primer and glue. Cutting tiles is carried out with a tile cutter, grinder or ordinary glass cutter, depending on the thickness and strength of the tile. In order to sand the edges of the tiles, you will need sandpaper. A rubber mallet is needed to tap the material so that it adheres tightly to the adhesive base. You also cannot do without a building level, a wooden strip to support the bottom row of tiles, as well as bricks, if necessary, to lay the screen space under the bathtub.
Tile cutting
Sometimes, in order for the masonry to have a finished look, the tiles are trimmed. This can be done using a manual tile cutter, although such a tool is rarely found in the arsenal of a home craftsman, so in practice, tiles are often cut with a grinder or a “bee” with a diamond wheel.
You can cut tiles using the “old-fashioned” method, using a metal rod with a carbide tip, sharpened “like a pencil.” For those who have experience working with glass, cutting tiles in this way will not be difficult.
It must be remembered that cutting is done from the glaze side, and you can break the tile only by cutting through the coating all the way to the ceramic base.
How to prepare the surface for finishing
Preparing walls before laying is a mandatory and important process that should not be skipped. Some people think that this stage can be neglected, since tiles will still be placed on top.
However, it is not. How the tiles will lay and what the quality of the work will be directly depends on the initial preparation of the work site.
Working with corners
It is not difficult to design internal corners with properly laid tiles, and there are special profiles for processing them.
It is much more difficult to design external corners, since for a beautiful joint you will have to cut the edge of the tile at an angle of 45°, and this can only be done with professional equipment.
Therefore, they do it simpler: stack the tiles on top of each other or use plastic corners.
It is better to do the work yourself under the supervision of an experienced craftsman, but in this case you will have to pay for a consultation. As an alternative, special literature can be used: everything is written in order and with illustrations, or you can watch a master class on the Internet from an experienced tiler.
Tiles for interior spaces
The selection of tiles for different rooms in the house depends on their functionality.
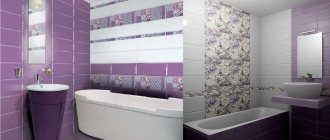
For the bathroom
Ceramic cladding is ideal for any size bathroom. For tiling the bathroom, tiles with low water absorption and high chemical resistance are used. The best option for decorative finishing of walls in rooms exposed to steam and water is glass or fine-ceramic glazed tiles made by extrusion (wear resistance group-I). Waterproof tiles can be used to cover vertical surfaces in the bathroom or just a small part of it (for example, a shower stall).
In areas that have direct contact with water, it is better to use large tiles. This reduces the number of intertwined seams, which are the most vulnerable areas of the substrate, even in the case of waterproof joint filler . The flooring in the bathroom should be made of matte, slightly rough tiles, since the combination of a smooth glossy floor and water is not safe for health.
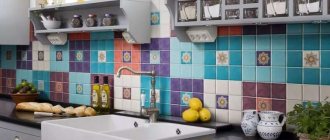
For kitchen
Both glazed and unglazed ceramic tiles with various decorations and relief textures are suitable for kitchen tiling. Handmade ceramics are also suitable.
Flooring materials must be especially durable, waterproof, with improved mechanical and chemical characteristics. This category includes vinyl tiles and ceramics (wear resistance group - III). The most vulnerable places that are exposed to the greatest aggressive influences (near the sink and refrigerator) require lining with a chemically inert material.
For kitchen walls, waterproof ceramic materials with a dense structure and increased chemical resistance are suitable. They should be less durable than for the floor, since the mechanical stress on the vertical substrate is minimal. For countertops and window sills, waterproof, chemically inert tiles are selected that are “insensitive” to high temperatures and their sharp fluctuations.
Photos of perfect wall tile installation
How to remove mold
First you need to get rid of visible mold stains. Then the wall is treated with a chemical solution against fungus or the well-known simple method - vinegar.
This is followed by thorough drying and only then should a primer with an antiseptic effect be applied.
How to rub seams
After the tiles have been laid and dried, the seams need to be grouted. This procedure is necessary not only for an aesthetic appearance, but also for protection from moisture. There are also some nuances to using grout:
- The grout mixture must be diluted in stages, otherwise there is a risk that the grout will harden before being needed.
- For the grouting process you need to use a spatula. This will make it easier to carry out this necessary process.