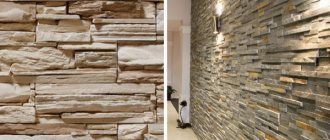
Decorating walls with decorative tiles allows you to create different textures on surfaces.
Using this material, it is very easy to create an imitation of natural stone, brick, or rubble masonry, without creating excessive load on the supporting structures.
However, like any finishing work, gluing decorative tiles is a specific job that requires adherence to technology, as well as the selection of installation mixtures. How to properly lay decorative tiles on a wall?
What is the difference between decorative tiles
Thanks to a number of positive qualities, it is one of the three best facing materials. Used for realistic imitation of: brick, wood, natural stone. It is made of gypsum, cement with the presence of sand and dyes.
Where used:
- Cement products are suitable for decorating building facades, fences or decorating various landscape designs;
- Due to the peculiarities of the material, gypsum products are used in the interior of premises.
The material has a unique relief; it is almost impossible to distinguish from brick, stone or wood. But simplified installation and durability are expected.
Advantages:
- Can be laid on any surface;
- Features an impressive finish. Easy to use to create any design;
- Combines harmoniously with wallpaper, mirror and glossy tiles, frescoes, mosaics, plaster;
- Helps to mask unevenness and other noticeable wall defects;
- Manufacturers offer a variety of color lines, different textures for all kinds of room dimensions, lighting quality and style trends;
- You can easily do the installation yourself.
But it is worth taking into account the instability to mechanical, thermal and damp influence.
Decor
This material is universal and can look organic in the implementation of a variety of different (sometimes even mutually exclusive) stylistic directions. You just need to choose the right texture and color of the coating.
Brick
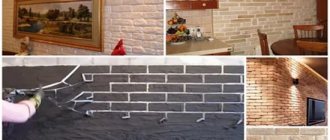
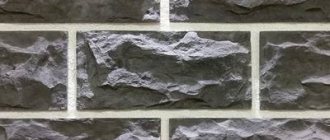
Imitation of natural brick in wall decoration has long been firmly established in design trends. Such tiles are successfully used not only in the embodiment of loft or rustic styles. Modern technologies make it possible to produce “bricks” with various nuances of palette and relief. This significantly expands the scope of their application:
- industrial styles (high-tech, loft);
- “country” (country, chalet, rustic);
- Gothic and neo-Gothic;
- English and French Provence;
- Scandinavian style;
- Mediterranean destinations.
Each of these areas implies its own requirements for the design of brick tiles. Ready-made collections from manufacturers, designed specifically for a specific interior style, will help you make the right choice.
Decorative tiles in natural shades and a warm palette (red-brown, beige, cream, vintage tones of orange and brown) are now very popular. The “brick” in white or black looks interesting, as well as all the color variations of gray.
Stone
A special atmosphere is created by decorative tiles made to look like stone. It is incomparably easier to work with than natural stone, and its range of applications is incredibly wide.
A common way is to combine a rough imitation of stonework with soft-textured accessories and furniture in soft colors. Such a contrast always looks interesting and stylish.
Other popular options:
- imitation of rock texture (in gray, brown and even white);
- granite (any sizes and shades);
- stone mass (imitation of a solid stone layer of gray or brown color).
Antique tiles
Thanks to the variety of textures and shades, decorative tiles successfully convey the effect of antiquity. At the same time, the designer is by no means limited to the Gothic or castle style. The many available collections allow you to embody the most subtle nuances of any era and movement:
- aged stone or brick in a medieval spirit (distinguished by its rough relief and natural colors);
- imitation of Roman-era stonework;
- “antique” ivory-colored cladding with unusual textures;
- monolithic tiles in gray shades, conveying the atmosphere of Romanesque fortress walls;
- for the exterior decoration of houses in the Provence style, tiles imitating aged brick in yellow and orange tones are used;
- vintage tiles in gray, red-brown and orange colors create the mood of a respectable pre-revolutionary apartment;
- in landscape design, varieties of tiles imitating antique cobblestones are especially successful (they go well with living vegetation).
Recently, cladding that conveys the texture of an ancient clay or sand coating has become increasingly in demand.
Loft
Typically, when implementing a loft style, ceramic tiles imitating brick are used. However, decorative gypsum coating feels more comfortable and warm, and it is also more pleasant to the touch. At the same time, the range of colors and textures in this case is no less wide. Decorative tiles in many cases have an even more pronounced relief than ceramics.
The basic rules of application are the same here. Spacious rooms with high ceilings and good lighting are preferred. Also, don’t get carried away with using “brickwork”, harmoniously diluting it with matching wallpaper or decorative plaster.
A win-win option would be to brick only one wall. To decorate the remaining surfaces, materials of other gray textures are used.
Also, often only certain parts of the room are decorated with brick-like tiles (window niches, doors, certain areas). This allows you to make the room brighter and more comfortable.
Castle
Due to its ambition and coldness, this style is used extremely rarely. Such a design will be harmonious in a spacious country house.
Here again, decorative tiles that look like aged brick or stone will come in handy. Imitations of monolithic stone pavement and cobblestones also look good.
It is best to choose a natural color palette, with a predominance of warm shades (brown, gray, yellow). By complementing such an interior with antique furniture and accessories made of metal and wood, you can achieve a pleasant environment that brings a feeling of security and home comfort.
Rustic
The rustic style is less gloomy and, unlike the castle style, allows some liberties in decoration. For example, in this case, rough wall cladding imitating antique stone or brick can be diversified with bright decorative wood inserts (exposed beams, plank floors, cornices), colorful accessories in ethnic and boho styles, and wicker furniture.
Tiles here are available in a variety of textures and colors. The light and warm palette is especially popular. Sometimes a variety of “tasty” tones (coffee, cream, chocolate) are also successfully used.
At the same time, decorative stone can cover only certain areas of the room, combining well with wallpaper and plaster on other surfaces.
Preparing the base
It is necessary to carry out standard wall preparation depending on the previous coating. The main thing is to ensure sufficient adhesion and a flat surface for laying decorative tiles.
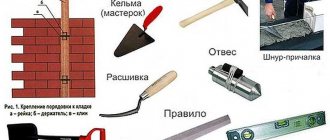
Set of tools:
- Standard and notched trowel;
- Brushes and roller;
- Rubber hammer;
- Tape measure, cord, building level, square;
- Grinder for cutting stone;
- Hacksaw for cutting metal.
These tools will help in the process of dismantling and installing decorative tiles on the wall.
The best option is a clean wall that has not previously been coated with cladding material.
Tips and tricks
Laying decorative tiles can be done independently. In this case, you should adhere to several useful recommendations:
- when calculating the required amount of tiles, it is worth adding another 10% to it (this reserve will justify itself in case of trimming or accidental damage to such a fragile material);
- the seam between stones or bricks should not be too wide, otherwise a realistic effect will not be achieved, and the use of this material will lose all meaning;
- great attention should be paid to sufficient lighting so that stone or brick walls do not make the room too gloomy;
- lighting fixtures of golden, yellow and other warm shades are preferred (the light they emit will make the room more comfortable);
- at the same time, cooler LED lighting, positioned in the right way, can highlight the interesting texture of the cladding;
- dark stone or brick should be combined with other wall coverings made in lighter and more delicate colors;
- Using tiles that are too heavy, the walls must be reinforced with construction mesh in advance.
Leveling and priming
After cleaning the outdated coating, it may be necessary to level the wall. Irregularities and cracks are sealed with gypsum plaster with the addition of reinforcement. After drying, it is carefully sanded until the surface is as smooth as possible.
What's the primer for? This will increase the adhesion of the glue and the wall. The reverse side of the decorative tile is additionally coated with an acrylic mixture.
Important: Without a primer, it is difficult to count on the durability of the cladding, even in the case of a wooden or plasterboard base.
What is needed for the job?
Disc for grinder on stone
To ensure that your work proceeds as quickly as possible and you do not have to be distracted, it is recommended to prepare all the building materials and tools in advance. To glue a decorative stone with your own hands you will need:
- square,
- drill/mixer for making adhesive mixture,
- grinder with cutting disc for stone,
- spatula, trowel or trowel,
- level,
- rubber hammer,
- paint brush,
- metal brush,
- wooden block,
- roulette,
- container for grout and glue,
- medium hard brush for smoothing seams,
- syringe gun,
- sprayer for water repellent,
- adhesive mixtures.
You need to have everything you need at hand, then the work will not seem tedious, although this process is quite painstaking! So, the first step is to complete all the preparatory work.
Glue preparation
Created according to instructions in an old container. Tile and gypsum adhesive are suitable. It is important to achieve the formation of a mass with a dense consistency based on a thick paste.
But for each stage of laying decorative tiles, it is necessary to prepare a new portion of glue. It is designed to be used for 20 - 30 minutes, since later it will dry out and become unsuitable for installation.
Beautiful examples in the interior
The combination of decorative tiles with photo wallpaper is especially interesting. They will emphasize the desired atmosphere and smooth out the roughness of the finish.
No less successfully, the roughness and coldness of the masonry is compensated by the abundance of greenery. Decorative stone goes well with it in any occasion.
Another win-win option for using such tiles is kitchen decor. Stonework will shift the emphasis away from bulky details and make familiar accessories and furniture sparkle with new colors.
Relief cladding is one of the best options for dividing any room into functional zones.
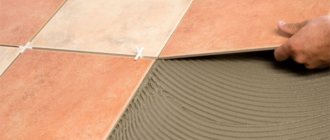
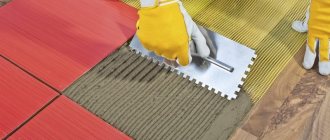
How to lay the first row
A base with an area of 1 square meter is covered with glue. A spatula is used. But additional application is required on the back side of the tile.
- Installation starts from the bottom right corner. We are gradually moving towards the top.
- To do this, we focus on a single horizon, thanks to the building level.
- To fix the result, a rod or cord is used. Almost standard tile laying is carried out.
Types of decorative finishing stone
Today there are three types of decorative artificial stone used for interior decoration:
- cement-based;
- gypsum based;
- agglomerate.
These products are very similar in appearance to natural stone, only they weigh much less (from 14 kg/m2 to 50 kg/m2). The cost is also much lower (compared to natural), especially if the manufacturer is Russian or Belarusian. The advantages include easier installation - only the front part is textured, the other three are more reminiscent of tiles or bricks.
Actually, there is another type of artificial finishing stone - clinker tiles, imitating brickwork of various types. It is made from clay using almost brick technology - fired in a kiln and glazed. The difference in thickness is 1-3 cm. This type of finishing is good in many modern interiors - from high-tech to loft.
Samples of clinker tiles to imitate brickwork
Gypsum based
Gypsum finishing stone is the most inexpensive of this type of materials. Its second advantage is that it is the lightest. This is what is used when installing on drywall, since it simply cannot withstand heavy loads. Disadvantages - it is quite fragile, hygroscopic, and can collapse if wet. Decorating a hallway with decorative stone based on gypsum is possible only if, after installation, it is treated with a special protective impregnation or acrylic-based varnish.
The format of gypsum tiles can be any - a very plastic solution allows you to get any surface and shape
Light shades in hallways do not “pressure” and do not add heaviness
Heterogeneous color adds extra volume and charm
Gypsum decorative stone in combination with a gypsum panel in the corridor - oriental style
Decorative stone stands out especially against the background of smooth walls
Different color options of one collection
Cement based
A strong and durable finishing stone is obtained from a gypsum-sand mixture. It can be washed, even with a brush and liquid detergent. Its disadvantages:
- Hard to cut. You will need a grinder with a diamond blade to reduce dust, you can wet the tiles.
- Heavy weight. This is when compared with a gypsum analogue, and compared to natural, the weight is more than half as low.
- Higher price. In the production of cement decorative stone, high-quality cement is used, and it costs a decent amount. In addition, the production technology affects the price - cement takes longer to gain the required strength (28 days), and until this moment the molded tiles must be stored somewhere, and under certain conditions (at a temperature of about 20°C and sufficient humidity of 40-50%). This means that significant areas for storage space are required, and this means additional costs.
All these shortcomings are compensated by durability and ease of maintenance, so this is one of the most common decorative stones for interior and exterior decoration.
Combination of decorative stone and wallpaper in the corridor
This type of decoration in the hallway is convenient in terms of cleaning
You can completely line the walls in the hallway with decorative cobblestones
Interesting color
Light gray is just right for a small hallway
If you decide to make such walls, the lighting should be bright
An excellent option for decorating a fashionable loft style
Artificial agglomerate stone
This type of decorative finishing stone has appeared recently. It consists of natural rocks crushed to crumbs - marble, granite, quartzite - to which polymer resins or cement are added. To obtain bright colors, a coloring pigment is added. This decorative stone looks great - interspersed with natural fragments, reflections on the edges of the crumbs... It looks really good, suitable for finishing work indoors.
Granite agglomerate Samples on the stand from one of the class=”aligncenter” width=”768″ height=”557″[/img] There can be many color options: quartz agglomerate
Painting methods
When choosing a collection made from gypsum or cement, pay attention to the method of painting. Pigment can be added to the solution, and then the entire tile will be the same color. Tints are then applied to its front surface, which give the surface a more natural look. With this technology, even when chipped, the difference will be unnoticeable, since the shades are close.
In another embodiment, the pigment is applied only to the surface. Then, if it is chipped or needs to be cut, the color will be very different.
How to veneer corners
We rely on the direct docking technique. Execution is based on the following stages:
- The tiles are laid side by side in a perpendicular manner so that the edge of at least one protrudes slightly and overlaps the edge of the adjacent decorative element;
- Trimming with a grinder is required to ensure the tile edges match perfectly. This will ensure accurate installation;
- To form a clear angle, trim is used - this is a special plastic insert.
It is good if the selected line of decorative tiles offers a special corner tile. This makes working in this place very easy.
Good preparation is the key to success!
In most cases, indoor walls are plastered, concrete or brick. If you have a wall like this, then there will be little preparatory work. It is much more difficult if there are remnants of old wallpaper or paint on the surface of the wall. Before gluing the decorative stone, all remnants of the previous finishing should be carefully removed. To do this, you can use a wire brush or spatula. The surface should be cleaned so that the adhesive has good contact with the base of the wall. A wire brush will scratch the surface, and a spatula will completely remove all possible dirt. Afterwards, you need to thoroughly prime the wall with a primer, preferably a water-based acrylic one. A roller or brush is used for this.
Acrylic primer
If the surface of the walls is wooden or plasterboard, then similar work should be done with these surfaces. However, if the decorative tiles will be glued to an adhesive composition that contains cement, then you will first need to fill in a special painting mesh, for example, based on fiberglass, then treat the surface by applying a layer of plaster.
Plaster on fiberglass mesh
When the walls are ready, it is necessary to prepare the decorative stone itself. If the stone you choose is made from gypsum, then it is advisable to also treat the back surface of the tile with an acrylic primer. All these preparatory, seemingly simple works, can speed up and facilitate the work process several times. Now you need to choose the right adhesive composition for the decorative stone.
Learning to seal joints
During the installation process, seams with sizes ranging from 3 to 12 mm could form. They are closed with glue.
Joint sealing options:
- You can seal the seams during installation, thanks to the adhesive released after pressing the tiles. After minimal drying, the seam is smoothed with a figured spatula or a wooden stick.
- The seams are carefully filled with mortar after installation. A construction syringe is used to supply the glue. After it dries, it is leveled using the same method.
Disadvantages when using gypsum tiles
Gypsum wall tiles are perhaps a better solution than stone in many ways. But when laying it, there are several pitfalls that you should be prepared for in advance.
- This is quite a heavy finish, so applying it to an unprepared or imperfect surface ends in a repair disaster, although sometimes only after a while.
- Gypsum tiles are not sold ready to install. Its preparation does not take much time and does not require specialized tools, but must be carried out carefully.
- Cutting tiles requires a simple but very unusual tool. Many people forget to prepare it before starting work.
How to avoid these pitfalls and what are other unexplained problems? Everything will become clear in a moment.
How is the finishing done?
After completion of the work, the cladding is cleaned of dirt and dust using a damp sponge or a special brush.
We proceed to coating with a protective layer of varnish impregnation. This will increase the decorative characteristics and service life.
That any varnish will do? No! As a rule, a suitable brand is offered along with the tiles. But it is worth checking on a spare decorative element, since an unsatisfactory result is possible.
- If the coating is practically not shiny, then adding a second layer in the form of a transparent acrylic varnish is required.
- If it is too shiny, then you should dilute the varnish composition with water and test again until the required effect is achieved.
Now we understand what is different, what advantages it has, where decorative tiles are used. And we figured out how to do the installation ourselves.
Application of a protective composition
Water repellent
At the final stage, a special protective composition remains to be applied to the surface of the decorative stone. This action is mandatory. It can significantly increase the service life of the cladding. In addition, using a protective layer you can give a different shade. Protective coating required:
- in places where there is a risk of moisture or, conversely, the room is consistently humid;
- if there are pets or children in the house;
- if the stone has a surface layer of paint;
- if the purchased gypsum is of poor quality.
In all these cases, a protective layer of a special composition will reliably protect the finished surface from possible damage. As for the choice of protective coating, it must also meet some important characteristics. For example, it must have increased adhesion and contain gypsum. When using it, there should be no traces left after drying.
Note!
If you want to purchase a water-repellent composition, then the best one is the one that is water-based. Such compositions are better than those containing solvents. Although in some cases, coatings that have a solvent base are more effective. This is due to the fact that they form a protective film on the surface, figuratively speaking, “concrete” the surface.
Note!
The protective coating should be applied only when the cladding is ready and the jointing is completely dry. It is applied using a spray bottle or roller/brush.
If the walls will be finished outside, it is advisable to carry out the work in dry weather.
As you can see, anyone can lay decorative stone with their own hands. There are no intricate technological processes here. If you have already completed this work, or have had a similar experience in the past, then please share your impressions at the end of this article by leaving comments.
Photo of beautiful laying of decorative tiles on the wall
How to make gypsum tiles with your own hands from plasterboard
Not every family today can afford modern renovations. And I really want to update my home. Therefore, we offer a budget option for finishing the interior walls of a house with decorative gypsum stone tiles. Watch the video at the end of the article.
To do this we need to purchase:
- the cheapest drywall;
- gypsum plaster;
- impregnation or paint as desired.
The process of making plasterboard tiles
- Mark the bricks 250*65 mm. per sheet.
- Using a hacksaw, knife or jigsaw, loosen the drywall along the lines.
- Apply a 3-5 mm layer of gypsum plaster to each tile.
- Apply texture with a sponge.
- Let the tiles dry.
The tile is ready. Wall finishing is done using glue, as well as gypsum plaster. The seams can be filled either with grout (if these are small seams) or with the same plaster.
How to glue drywall tiles to a wall
Apply a thin layer of gypsum plaster to the prepared wall and rub. Then apply a layer of plaster to the tile using a trowel with 3-5 mm teeth. Press against the wall. Between the rows either crosses are laid (for small seams) or the same drywall (for large seams). Watch detailed video instructions. You need to start gluing the tiles from the corners.
After the tiles have dried, you can use all your imagination in terms of coloring the tiles. Finally, varnish the entire wall (if necessary).
Successful examples and options
Designers offer many interesting options for decorating indoor surfaces using decorative artificial stone.
If you want to focus on the fireplace in the living room, then the entire wall near which this attribute is located can be decorated with stone cladding in the same style. It must be combined with the facing material for the fireplace itself.
To give the interior of the room some brutality, you can create a contrast between the seams and the stone. This technique involves the use of non-flashy colors to cover the walls and ceiling.
Stonework looks great in a niche. If the apartment or house has an original layout, then the appearance of the curved walls can be significantly diversified and emphasized by laying decorative stone.
Artificial stone cladding is an excellent assistant in zoning a room. For example, if a loggia is connected to a room, then you can interestingly design the transition from one part of the room to another using stone tiles.
Using decorative tiles you can decorate the walls of a bedroom located on the second floor of a wooden house. This solution looks very interesting, because the textures of wood and stone are in perfect harmony with each other. And in combination with pastel-colored textiles, they form a rather unusual ensemble.
By choosing artificial stone as a material for interior decoration, you can significantly diversify the appearance of your home and emphasize its individuality. In addition, taking into account the recommendations given above, you can decorate any room in the house in such a way that it will delight the residents every day and give aesthetic pleasure.
To learn how to lay decorative stone, watch the video below.
Stone on the facade
How to lay artificial stone. Types of coating
Before you start work, you need to choose the right finishing material. It is made on the basis of concrete and gypsum with the addition of dyes. Both types have their own advantages and disadvantages, so it is better to study their characteristics first.
The advantages of concrete products include:
high strength; durability; moisture resistance; variety of texture and color.
Laying artificial stone on the wall. Wall cladding with artificial stone
After choosing and purchasing the artificial stone you like, the next step is to take care of preparing tools, many of which may be found in the owner’s home “arsenal”. So, for work you will need to have the following tools and accessories at your disposal:
Standard set of tools for cladding work
Laying decorative stone with your own hands. Decorative stone - advantages and disadvantages
Laying decorative stone with your own hands can be done in any room. It is actively used for lining various openings, highlighting columns and partitions. Combinations with living plants and fountains look good. Of course, many believe that such finishing material is used exclusively to create a classic style. This is not true, the products look great even with newfangled trends in the design world.
On a note! If most of the room is planned to be decorated with stone, then additional lighting should be considered in advance. The fact is that such a surface can turn out to be quite gloomy. Although there is another solution - to alternate light and dark shades of the material.
Artificial stone, how to lay it. Instructions for laying artificial stone
Installation of decorative stone is a creative process. Try to approach it responsibly, then you will get an excellent result.
The stone is laid in 2 ways:
seamlesswith jointing
The installation method and adhesive compositions used for this are specified by the stone manufacturer. Laying with jointing is the most common - it allows you to save material and get creative with the decor, because The seam can be tinted in the desired color.
How to lay decorative stone. Laying decorative stone
So, this process is divided into four sequential steps, the observance of which will lead to a positive result.
At this stage, it is important to correctly mix the adhesive composition. It should be quite elastic and thick, but in no case crumbly. When gluing artificial stone, it should be pressed well. This is especially important when the stone is placed on cement mortar. Apply moderate pressure so that any remaining adhesive comes out along the entire perimeter of the tile. This will avoid voids and also provide an excellent seal. At the next stage, all connections and joints will be rusticated.
Advantages and disadvantages
Among the advantages of artificial stone are the following:
- a wide variety of finishing options not available for natural stone;
- high-quality imitation of natural stone;
- pleasant to the touch surface;
- in comparison with natural, low weight and cost;
- environmental friendliness;
- strength and durability;
- increased resistance to temperature changes.
The main disadvantage of this material is that before laying the cladding it is necessary to carefully prepare the surface. Otherwise, defects may form. Some gypsum products do not tolerate physical impact and contact with water. And inexpensive brands of artificial stone lose their original color over time.