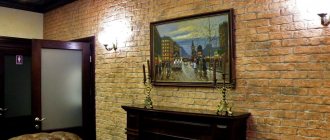
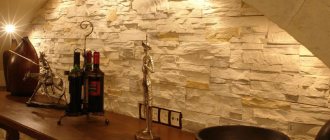
Decorative stone is widely used to decorate interiors and exteriors of buildings. Thanks to this building material, an imitation of almost any natural type of masonry (brick, slate, cobblestone) is created. In order for the work to be done efficiently, the decorative stone must be glued correctly.
Advantages and disadvantages of decorative stone
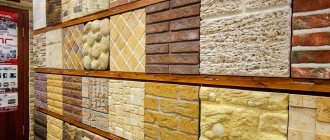
The popularity of decorative panels is due to their positive properties, the most important of which are:
- the widest range of color solutions;
- small weight;
- ease of installation;
- the ability to recreate the most accurate imitation of natural material masonry;
- environmental friendliness;
- compressive and bending strength;
- the features of the components that make up the decorative stone allow you to regulate the microclimate in the room;
- resistance to high temperatures;
- long service life;
- low cost compared to natural stone;
- Almost any available adhesive composition is suitable for installation;
- texture, pleasant to tactile contact.
The disadvantage of this building material is its fragility - if you hit it, it will crack.
Selection options
To correctly select the appropriate adhesive, you need to focus not only on quality and cost parameters, but also on a number of other parameters:
- The type of base in which the entire spectrum will rotate, and its characteristic irregularities, such as deviations in vertical or horizontal lines. In order for the surface to be uniform in thickness, different amounts of glue will have to be used for different elements;
- Tile type. Determination of the level of its hygroscopic properties. For example, with a solid granite package with a low degree of hygroscopicity, it is better to avoid using adhesives with a high water content, otherwise this will complicate the evaporation of the liquid, which will reduce the reliability of the joint between the lining and the base. As tilers say in such cases, the glue under the tile “sours”;
- Tile sizes. Taking this parameter into account allows you to accurately determine the glue consumption;
- Tile surface. When laying tiles in the kitchen or in a room equipped with electric-heat floor systems, it is necessary to use adhesive as quickly as possible.
Under the influence of temperature fluctuations, the glue can shrink or expand, which is fraught with the most negative consequences.
Tools and materials
To cover the walls with decorative stone yourself, you will need the following tools:
- rope;
- building level;
- roulette;
- saw;
- hacksaw;
- file or sandpaper;
- drill;
- a long ruler (preferably one or two meters);
- pencil;
- spatula for applying adhesive;
- brush with metal bristles;
- roller (brush) for applying primer;
- a wooden spatula with a base width of 6 to 8 cm, intended for grouting joints.
Scope of application
Much in the choice depends on how the operation will proceed in the future. For example, additional elements to increase adhesion are relevant in the case of porous coatings or fresh concrete. Additional reinforcements can be dispensed with when it comes to bases with high-quality processing and preliminary application of plaster.
Quartz sand goes better with cork bases, which have some unevenness.
Novice craftsmen will be able to quickly master mixtures with their own hands that can harden as quickly as possible and then be stored for a long time in a diluted form. The polyurethane base or epoxy resin is resistant to moisture. Glue for decorative gypsum stone with such a base can be used even in the bathroom.
Adhesive compositions
The quality of adhesion of surfaces and the service life of the cladding will depend on how correctly the glue is selected.
Installation of artificial stone can be done using the following types of compounds:
- PVA;
- dry cement mixture;
- acrylic;
- "liquid Nails";
- "Bustilat";
- thick rubbed paint;
- tile adhesive;
- putty;
- mastic
- polymer assembly sealant;
- CMC (CarboxyMethyl Cellulose).
Advice! When choosing, be sure to consider the type of base, how convenient it will be to apply a particular adhesion material and the reputation of the manufacturer.
The most popular brands of adhesive compositions used for cladding surfaces with artificial decorative boards:
- Ceresit;
- "Unice Plus";
- "Creps";
- "Acrylic";
- Confiad;
- Litokol;
- Corian.
Main characteristics of adhesive for gypsum tiles
Tiles and ceramics are part of our life. Tiles and ceramics exist everywhere we live. Sometimes we even change the tiles and ceramics in our home periodically, which entails a lot of expense.
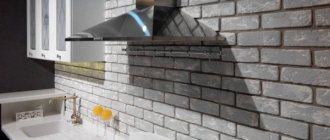
Tiles are inevitable, especially in bathrooms. Although tiles are widely used in kitchens, many experts are strongly against the use of tiles in the kitchen; tiles are not used in the kitchen; In their opinion, tiles in the kitchen should be used only where there will be a gap for the hood.
Before answering the question of what is the best adhesive for tiles and tiles, I think it is necessary to briefly explain why it is preferable to use only the leading brands for bonding tiles and ceramics:
There are so many low quality products in the market. You just need to walk into a store to see a large abundance of brands, usually not of the highest quality.
Let's say you used a bad brand for tiles. This means that after a few years you will see tiles and ceramics sticking to the wall, and after a while they will start to fall off. As a result, one fine day you may witness the destruction of the interior of your apartment.
To carry out a traditional series of finishing activities, it is enough to use dry cement, a composition of sand tiles that has numerous advantages over adhesive paste:
- A wide range of adhesive-containing products of this type;
- High efficiency, ensuring reliable gluing of tiles to the base;
- Excellent mechanical properties;
- Reasonable price.
Surface and Material Preparation
You can attach gypsum tiles to almost any surface: brick, concrete or wooden walls, metal, plaster and glass. The main requirement that will ensure high-quality installation is strength, dryness and cleanliness of the base.
Surface preparation:
- Remove any remaining old cladding. You will need to remove the glue and plaster.
- Clean the surface of the base using a wire brush.
- Apply a deep penetration acrylic-based primer to the surface. After this, leave the wall to dry according to the instructions for the primer.
Advice! If the wall is wooden, then install reinforcing fiberglass mesh.
The next step will be preparing the material for cladding. Initially, you will need to calculate the area of the cladding. The standard overconsumption of material is 10%, which must be kept in mind when calculating the required amount of material.
Preparation of material:
- Cut the artificial stone into pieces of the desired configuration and size using a saw or hacksaw.
- Clean the cut areas with a file or sandpaper to give them a natural look.
- Lubricate the back side of the stone slabs with the same primer that was used to treat the walls. Leave to dry.
- Apply paint to the facing material and let it dry. You will need to use several shades.
Gluing instructions
Two technologies are used for laying decorative stone: seamless and with jointing. It is necessary to select the best option before installation begins in order to correctly calculate the amount of material.
Important! With a seamless installation method, stone consumption increases by 10-15%.
The principle of facing work is very similar for both technologies:
- Place gypsum tiles (artificial stone) on the floor next to the facing area in the same order as they will be placed on the wall. This will give you the opportunity to see the final result of the finishing and make the necessary adjustments.
- Mark the wall surface to ensure the most accurate placement of the material.
- Carefully study the instructions for the adhesive composition and only then proceed to dilute the solution. This is important, since ready-made mixtures have a limited shelf life.
- Prepare the glue. It should turn out without lumps, not too thick, flowing, but not sticky.
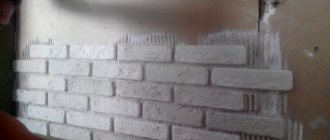
- If a cement-based mixture is used, it must be applied to the wall in a layer maximum 6 mm thick. Do not cover an area larger than one square meter at a time with glue to prevent the glue from drying out.
- Apply the solution in spots on the back side of the tiles (6-8 points each) or in wavy strips if the composition chosen as adhesive is a polymer assembly sealant.
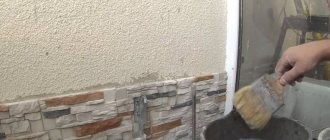
- Start gluing the decorative stone from the bottom from any corner where it will be more convenient.
- Press each tile into the wall mortar so that it extends along the edges of the piece. Press the material onto the surface as tightly as possible.
- If you choose the laying method with seams, then do not make gaps between the tiles more than one centimeter. With the seamless technique, the edges of the fragments should fit as closely as possible to each other.
- Fill the seams between the tiles with the special grout or adhesive that was used for installation. In some cases, glue squeezed out along the edges is enough to level the surface and seal the seams.
- Grind the seams after the grout or glue has begun to set, but you cannot wait until the composition has completely hardened. It should be borne in mind that the approximate time for complete hardening for various products varies from 10 minutes to half an hour.
- Treat the paneled surface with acrylic or polyurethane varnish. This will provide reliable protection from moisture and long-term operation. For the same purposes, you can use any product that has water-repellent properties.
- Complete drying of the surface covered with gypsum tiles is achieved within three to four days.
Advice! Gypsum stone is a lightweight material that is excellent for attaching to vertical surfaces. But it’s still better to start gluing tiles from the very bottom row. This will make it possible to make the lines as even as possible with a seamless installation method and prevent individual fragments from slipping.
General information
Advantages and disadvantages of decorative stone
The popularity of decorative panels is due to their excellent properties, the most important of which are:
- Wide range of colors.
- Low weight.
- Easy to install.
- The ability to recreate the most accurate imitation of masonry materials of natural origin.
- Flexural and compressive strength.
- The features of the components that make up decorative stones make it possible to regulate the indoor microclimate.
- High temperature resistance.
- Long service life.
- Low cost compared to materials of natural origin.
- Almost any available adhesive material is suitable for installation.
- A factor that is pleasant upon tactile contact.
The disadvantage of such a building material is its fragility - if you hit it, it will begin to split.
Materials and tools
To cover the wall surface with decorative stones yourself, you will need the following tools:
- Building level.
- Rope.
- Saw.
- Roulette.
- Hacksaw.
- Sandpaper or file.
- Drill.
- A long ruler (ideally one or two meters).
- Pencil.
- Spatula for applying adhesive.
- Brush with metal bristles.
- Roller (or brush) for applying the primer.
- A spatula with a base width of 6 to 8 cm, made of wood, which is intended for grouting joints.
Next, we will consider which adhesive compositions are best for “planting” decorative stone.
Adhesive compositions
The quality of surface adhesion, as well as the duration of use of the cladding, will depend on how correctly the adhesive composition is chosen. Installation of artificial stone can be done using the following types of compositions:
Dry cement mixture.- PVA glue.
- Acrylic adhesive composition.
- "Bustilat"
- "liquid Nails",
- Adhesive composition for tiles.
- Thick rubbed paint.
- Putty.
- Tile adhesive.
- Mastic.
- Assembly polymer sealant.
- CMC (we are talking about CarboxyMethyl Cellulose).
Helpful advice! When choosing a product, you should definitely take into account the type of base, how convenient it will be to apply a certain adhesion material and the reputation of the manufacturer.
How to glue decorative gypsum stone to the wall? The most popular brands of adhesive compositions used for cladding surfaces with decorative artificial slabs:
- Cerisite.
- "Yunis+".
- "Creps."
- "Corian."
- "Acrylica".
- Confid.
- Litokol.
So, let's look at how to prepare surfaces and materials.
How to paste on wallpaper
Despite its relative lightness, decorative stone is a heavy wall covering. Therefore, it is not recommended to mount it on top of wallpaper. Otherwise, there is a high risk that the gypsum panels will separate from the wall and collapse.
If the design includes a combination of wallpaper and decorative stone, you will need to leave bare areas under the panels. It is recommended to mark the walls in advance so that when installing wallpaper you do not cover the places where the decorative stone will be attached.
The surface must be prepared for wallpapering and stone installation: it is leveled and treated with a primer. The artificial stone is fixed only after the wallpaper has been pasted, and not on top of it, but on the remaining free areas of the wall.
If you need to install decorative panels on a wall whose surface is completely covered with wallpaper, follow the instructions:
- Mark with a pencil on the surface of the wall the places where you plan to install the stone, retreat 1-3 cm and outline the border. The indentation is needed so that the wallpaper slightly extends under the gypsum panels and there is no unsightly gap left between the two types of cladding.
- Using a sharp knife or blade, cut out the circled sections and remove the wallpaper in those areas.
- Prepare the adhesive solution and fix the slabs to the wall according to the instructions.
- Treat the paneled surface with a special varnish.
If for some reason you need to install the decorative stone first, and only then the wallpaper, use one of two methods:
- Attach all the slabs to the wall except the last, top row. Then glue the wallpaper, making a spade on the area under the stone. Finally, install the last row of gypsum boards.
- Lay all the slabs, without exception. Paste the wallpaper with a margin of 5-7 cm (depending on the type of trellis). Once completely dry, use a sharp knife to cut off the excess by running along the joint. Cover the resulting seam with a decorative plinth (baguette).
Advice! If you are using liquid wallpaper rather than paper, then you don’t need a spade under the slabs: the joint will already be neat.
Useful tips
Decorative stone looks good without any tricks. However, there are several secrets on how to give the final finish a designer look:
- The tiled surface looks harmonious if the sequence of laid elements of different shades and sizes is chosen correctly. When using slabs of the same size, it is necessary to accurately maintain the evenness of the lines diagonally, vertically and horizontally.
- Trimming the corners of individual fragments will give maximum attractiveness to the finish.
- The seams must be sealed with extreme care and a special bag for filling voids or a syringe gun must be used for this. The fact is that the solution that gets on the front surface of artificial decorative slabs is extremely difficult to remove.
Installation of artificial stone is simple and does not require significant costs, but work at all stages should be done as carefully as possible. In addition, you need to pay close attention to the compatibility of color shades and sizes, only in this case the finish will be pleasing to the eye.
How to treat after installation?
The entire surface is coated twice with a hydrophobic composition after the installation of adhesives and other materials is completed. As a result, the porosity of the material decreases, and you don’t have to worry about the appearance of mold and fungi. Gypsum brick is no exception.
Such elements can be coated with other compounds to improve the initial characteristics:
- Yacht varnish. One of the most durable protective coatings. But it requires certain skills when applied and can take a long time to dry.
- Varnish with acrylic base. It is characterized by increased moisture resistance, including gypsum-based ones.
- Oil varnish. Manufacturers produce it in different shades.