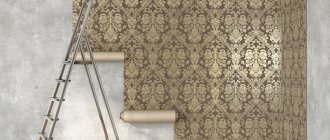
The final stage of finishing a room requires special care and accuracy from the master, since any error will be clearly visible. The junction between the wall and the ceiling is a difficult area to work with, especially if there are uneven surfaces. The use of fillets makes the task easier and makes the transition from plane to plane more aesthetically pleasing. They also go well with wallpaper, complementing each other favorably. But what should you glue first: wallpaper or ceiling plinth?
When can a fillet be attached to wallpaper?
The ceiling plinth performs decorative and masking functions: with its help, some unevenness of the ceiling is hidden. This opportunity is of great value for the home craftsman, because it is not always possible to create a perfectly flat surface. A crooked ceiling can ruin the overall appearance of a room even with perfectly aligned walls.
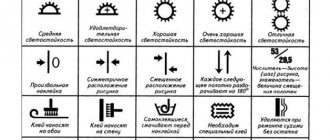
To understand whether fillets can be glued to wallpaper, you need to study the types of products produced and some physical characteristics - weight, material, width. To create such decorative elements the following are used:
- expanded polystyrene;
- Styrofoam;
- polyurethane;
- plastic;
- natural and artificial stone;
- tree;
- ceramics;
- gypsum.
You can glue skirting boards to wallpaper when the canvas is able to withstand their weight for a long time. Therefore, it is better to immediately exclude massive products and consider only light options from all varieties. The easiest way is to use baguettes made of polystyrene foam and polyurethane.
Important! Most often, putty is used to install skirting boards on the ceiling, but they need to be attached to wallpaper with universal transparent glue, which sets quickly and does not soak the canvas. “Liquid Nails”, “Dragon”, “Moment” are suitable.
The advantage of installing fillets on top of the wallpaper is the additional fastening of the joints of the strips where they most often come off - under the ceiling.
One of the disadvantages is a technical point: if decorative elements require painting, puttying or varnishing, then you need to think about protecting the pasted wallpaper from dirt.
Important! If you decide to use large-relief wallpaper, then you should immediately abandon gluing a frieze on top of it: the fastening will be unreliable, the plinth may move in waves, and gaps will be visible in the area where it fits.
What to glue with?
The choice of plinth material also affects the choice of a suitable adhesive composition:
- For foam and polystyrene baseboards, it is best to use acrylic putty. If you choose from adhesives, there must be a mark on the packaging confirming that the composition is suitable for use with the selected materials. “Titan” is universal. It does not melt the surface of the baguettes, as happens when using other adhesives;
- Polyurethane skirting boards can be glued using acrylic putty or special glue designed for this material;
- Natural wood plinths are mounted on liquid nails and additionally fixed with self-tapping screws;
- Gypsum fillets are glued to a mixture of alabaster and PVA glue. If necessary, the elements are also fixed with self-tapping screws, and after the adhesive mixture has dried, they are unscrewed and the holes are sealed with putty or alabaster. If the baseboard is too bulky and heavy, you can leave the screws, masking their heads.
In addition, you can prepare a high-quality adhesive composition yourself. You will need finishing putty from any company, water and PVA glue. Mix the ingredients as follows:
- Pour 4 parts of putty into a convenient container;
- Add 1 part glue;
- Pour in clean cold water little by little and mix thoroughly;
- The mixture should be so thick that it does not drain from the baseboard, but at the same time remains elastic, approximately like sour cream;
- Leave the mixture to sit for 5-10 minutes and stir again.
Do not prepare a large amount of glue at once, as it is suitable for use for a maximum of 2 hours. Mix the mixture only when all the baseboards are cut and prepared.
When is the frieze glued first?
Fastening heavy types of baguette requires high load-bearing qualities from the surface. Therefore, they must be glued directly to the wall and ceiling. For massive varieties (stone, ceramics, wood, gypsum), special metal fasteners are used that are mechanically installed in the ceilings.
USEFUL INFORMATION: Is it necessary to prime drywall before wallpapering: what to treat with
It should also be understood that heavy products are not able to bend under surface changes. Acrylic putty is used to compensate for gaps and eliminate cracks. Working with this material is a rather dirty process, and if by this time there is already wallpaper on the wall, it is quite difficult to save it from stains and scuffs. In addition, very often paint is applied to the frieze after installation, which also risks damaging the coating.
Conclusion: if the choice fell on a massive ceiling plinth, then wallpapering should be done after its installation and finishing.
However, you need to be prepared for the fact that making a smooth wallpaper edge without noticeable gaps will be much more difficult than using a light frieze that masks errors. Therefore, you should first glue a couple of training cuts on an inconspicuous area.
Installation nuances
On top of papered walls
First of all, let's look at how to glue a ceiling plinth to wallpaper, since this question interests home craftsmen most often.
In this case, you will need the following adhesives:
- "Moment-montage";
- Any other polymer adhesive;
- Putty mixed with PVA.
Glue moment-installation
As we can see, the choice of how to glue the ceiling plinth to the wallpaper is quite large.
The process of gluing fillets looks like this:
- first of all, you need to wait until the wallpaper has dried after pasting the walls;
- if the walls have been covered for a long time, it is necessary to wipe their upper part to remove dust;
- then you need to clean the back side of the fillets from dust or possible dirt. This should be done carefully so that they do not break;
- Next, you need to measure the walls and, according to the data obtained, cut the baseboard strips using a stationery knife;
Trimming the plank at 45 degrees
- The next step is to cut the corners at 45 degrees. If the corners of the walls are uneven, the fillets must be attached to the ceiling and markings must be applied, along which the corners are subsequently cut;
- then a thin layer of glue is applied to the planks, after which they are applied to the walls and ceiling. They need to be held in this position for a little while for the adhesive to set;
- if there are cracks in the corners, they should be sealed with putty;
- The final stage is painting the fillets. In order not to stain the walls, you must first stick masking tape along the fillets. Painting is usually done with acrylic water-dispersion paint using a regular brush.
Example of using corners
This completes the installation process.
On the wall
So, we have figured out the installation of light fillets. But how is a heavy ceiling plinth glued - before or after the wallpaper? In this case, you can first glue the decorative strips. This will simplify their further puttying and painting, since the risk of staining the walls is eliminated.
However, it is more convenient to first glue the wallpaper and then cut it, since it is very difficult to ensure an even line during the gluing process.
Applying markings to wallpaper for subsequent trimming
Therefore, first of all, let’s look at how to trim wallpaper to fit a ceiling plinth:
- First you need to attach the baseboard to the ceiling and draw a line along the bottom edge with a pencil. It will serve as a line for cutting the canvases;
- then you need to take a sharp knife, for example, a stationery knife, and draw the blade along the line. To make the cutting line smooth, you can attach a long ruler or rule to it from below;
- Next, you need to tear off the top part of the wallpaper from the wall with your own hands. To do this, you can pick them out with a spatula. You should not try to soak it, as the main fabrics may also pick up moisture.
That, in fact, is the whole secret of getting an even line of wallpaper. Now you need to glue the baseboard onto the prepared area.
Application of adhesive composition
As for glue, you can use Liquid Nails, Dragon or other polymer glue.
The gluing instructions are as follows:
- after trimming the canvases, the base should be prepared - cleaned of dust and treated with acrylic primer;
- further, as in the previous case, it is necessary to measure the walls and trim the fillets, as well as adjust them to the corners;
- then, in the same way, you need to clean the surface of the fillet from dust and apply glue. If the bar is narrow, then drops of the composition should be left on the surface in increments of 5-10 mm. The glue is applied to a wide baseboard in a zigzag pattern;
- now the plank is pressed against the wall and held until the glue sets;
- Then the fillets are puttyed and painted in exactly the same way.
Gluing fillets to unpasted walls
Now let's look at how to stick wallpaper on a ceiling plinth, i.e. under already installed fillets. The most difficult thing in this work is to glue the wallpaper evenly along the top line and at the same time match the pattern. If the wallpaper is plain, then this process is somewhat simplified.
The operating principle is as follows:
- the prepared canvas is adjusted according to the pattern so that there is a margin on top that runs over the fillet;
- After gluing, you need to cut off the remainder evenly from the top so that in the end the canvas is glued strictly under the baseboard.
In the photo - trimming wallpaper to create a fillet
It must be said that doing this work accurately is more difficult than cutting off the pasted wallpaper. Therefore, the first option is still preferable.
Here, in fact, is all the information regarding the installation of skirting boards on wallpapered walls.
https://youtube.com/watch?v=dZsddD7dTQk
How to apply wallpaper evenly under a ceiling molding?
To carefully and beautifully trim the wallpaper under the baguette, you need to do the following:
- Glue the strips with a slight overlap onto the frieze.
- While the glue is still wet, take a wide spatula (30 cm) and smoothly press the canvas to the junction with the wall. You can also use an iron ruler for these purposes.
- Then use a knife, without loosening the pressure of the tool, to carefully remove the excess. The cut should be exactly along the edge of the spatula blade.
Important! For work, use only a very sharp knife that will not tear the material. When using paint tools with snap-off blades, it is recommended to use one section per cut.
- Glue stains on the baseboard are removed with a dry, clean rag.
Advice! To feel more confident, you should practice cutting wallpaper in an inconspicuous area. You can also glue a couple of unnecessary pieces from the roll, and after stuffing your hand on them, simply remove them.
The procedure for performing repairs to the premises
Before you start renovating a room, you need to conclude that you should glue the plinth for the ceiling or the trellis first?
But, under any circumstances, the instructions for carrying out preparation work are as follows:
- All disassembly work is done indoors.
- The garbage is taken out.
- Windows, heat exchangers, and all carpentry are being replaced.
- If necessary, change the electrical wiring.
- Slopes are being made.
- The walls become smooth.
Important to know: Even with a good quality wall covering, when dismantling a covering that is already outdated, imperfections may appear on them, which will not look very nice after gluing the wallpaper.
- there may be cracks, even large gaps, between the wall and the frieze;
- it is difficult to paste wallpaper on a poorly prepared coating on the wall surface;
- The beautiful view of the plane and the entire room in general becomes worse.
- The required amount of materials is purchased.
- The plinth for the ceiling is fixed.
- Ceiling painting and frieze are done, if this is designed according to the technology.
- The trellises are glued. First of all, on the surface of the ceiling, then on the walls.
- The floors are laid, the baseboard for the floor is fixed.
How to glue the plinth for the ceiling
To carry out the work you will need:
Tools for attaching skirting boards to the ceiling surface
Materials for gluing baguette to the ceiling surface
Important to know: Before gluing the plinth for the ceiling onto the trellises, you should definitely calculate its quantity and purchase one additional strip or with a baguette margin of up to 10 centimeters for each corner on both sides. There are two installation options for the ceiling frieze:
There are two installation options for the ceiling frieze:
After taping the walls with trellises. In this case, the junction of the wallpaper with the ceiling can be perfectly hidden under a baguette. But the disadvantages of this option may be:
- there is a very high probability that the trellises can be damaged by glue, paint or tapping cord;
- during the next repair, the material will be removed along with the frieze;
- it is difficult to cover up the cracks between the fillet and the adjacent wall if there are irregularities on them;
The frieze is glued on top of the wallpaper
Before gluing wallpaper on previously leveled and primed walls and ceilings. Most professionals consider this method one of the best, its advantages:
- when replacing wallpaper, you will not need to install a new frieze for the ceiling;
- all cracks and irregularities are covered very easily;
- the possibility of staining the trellises is reduced to zero.
Important to know: The second option, although more complex, will produce a good working result. Is it possible to glue ceiling plinths onto trellises? Any owner of the premises chooses the answer to this question himself, what suits him best
Is it possible to glue ceiling plinths onto trellises? Any owner of the premises chooses the answer to this question himself, what suits him best.
How to attach a baguette on top of wallpaper
The order of work will help answer the question, what comes first: trellises or plinth for the ceiling?
The order of operations is as follows:
- Markings are made on the surface of the walls and ceiling. Plus, a beating thread or a long rule is used to level the baguette.
- A miter box is used to trim the plinth when joining the material in the corners.
Trimming the frieze at 90 degrees using a miter box
- The frieze is glued: first of all to the corners, but if there is marking, the order of work does not matter. Liquid nails are used as glue, you can use special glue, it must be applied in a thin strip to the edge of the baseboard, pressed against the wall, the remaining glue is immediately wiped off with a wet rag before the solution is too late to dry.
- The gaps that appear between the frieze and the wall, the connections between parts of the plinth, especially at the corners, are covered with silicone-based sealant or a mixture of gypsum putty with specialized glue. You need to make sure that the remains do not fall onto the trellises and the floor.
Connecting 2 strips of plinth
Important to know: Before painting the baseboard, the trellises must be sealed with tape for painting work. The order of work on gluing the frieze before gluing the wallpaper is almost the same
The sequence of work on gluing the frieze before gluing the wallpaper is almost the same.
- Final putty can be used as glue.
- There is no need to cover the walls with painter's tape before painting.
- The cracks are filled with final plaster.
The density and characteristics of the material from which ceiling plinths are made affect the order of gluing them and wallpaper. And therefore we conclude: elastic and light friezes are glued to trellises, heavy and hard friezes are attached exclusively to the surface of the wall.
Skirting for the ceiling or trellises, which comes first? This video answers this question perfectly.
Baguette and suspended ceiling
When installing a tension covering, the question of what is glued first - the frieze or the wallpaper - appears from a new perspective. The technology for fastening plinths is also changing.
USEFUL INFORMATION: Before wallpapering, what to treat the walls with: how and why to prime the walls
The most logical option seems to be in which the suspended ceiling is first installed, and then the baguette and wallpaper. In this case, there is no risk that the material on the walls will come off or become dirty or damaged during the installation of the ceiling structure and baseboards. The same procedure is followed for any types of suspended ceilings: plasterboard, slatted, Armstrong, PVC panels.
However, in this case there are risks for the already stretched fabric, so care should be taken:
- The material may be stained with glue stains during the wallpapering process.
- The adhesive for a plastic baguette can corrode the film and it will have to be replaced.
- Mechanical damage to the ceiling during the installation of fastening fittings for a heavy baguette cannot be ruled out.
If wallpaper in a room is often re-pasted, then it is most profitable to install a wide molding: the finishing will be done at a considerable distance from the ceiling, which will prevent its accidental damage.
Surface preparation
It is assumed that the gluing of baguettes begins after the walls have been leveled and painted or covered with wallpaper. If the walls are uneven, they need to be leveled (with putty, plaster, etc.), especially if you plan to glue gypsum stucco or wooden baseboards. Expanded polystyrene products can be pressed in such a way that they hide the unevenness.
Prices for baguettes
Leveling the walls with putty. Dilute the dry mixture with water according to the instructions on the package. Then, scooping a little putty onto a putty knife, fill all the holes you see with it. For an ideal surface, putty is applied to the entire surface. Level the last layer with a wide spatula, running it along the entire length of the wall.
In the same way, the section of the ceiling to which the baguette will be glued is prepared (read about). If the ceiling is completely leveled and painted, then no finishing work is necessary. If you plan to first stick the baguettes on, and then paint the ceiling along with them, then you can coat the area where the baguette will be glued with a primer.
If the baguette will not be glued end-to-end to the ceiling, but with a margin for laying the LED strip, for convenience you can mark the bottom gluing line. To do this, in each corner at a certain distance from the ceiling (for example, 3 cm), small nails should be nailed around the perimeter, to which a strong thread should be tied. Along this thread, when applying the baguette, you need to mark the bottom gluing line with a pencil.
Installation of ceiling plinth under tension fabric
When installing a frieze under an already stretched ceiling, it is recommended to avoid gluing it to wallpaper. This will reduce the risk of damage to the film or canvas and will significantly simplify the process when subsequently changing the wallpaper.
Rules for installing skirting boards:
- Installation starts from the corner. The baguette is located as close as possible to the stretch ceiling, but should not touch it.
- Decorative elements are attached only to the wall and to each other. Care must be taken to ensure that the adhesive protruding along the edges does not touch the top coating.
- If putty is used for installation, then the gaps that form at the joints of fragments of the ceiling plinth are also rubbed with it. If glue is used, a sealant can be used for these purposes.
Advice! For additional protection of the ceiling during work, a special film is stretched over it; the edges can be covered with masking tape.
The remaining installation stages correspond to the general rules for installing ceiling friezes.
USEFUL INFORMATION: Is it possible to glue new wallpaper onto an old canvas?
Pasting process
Let's take a closer look at how to glue wallpaper to the ceiling quickly and efficiently with your own hands.
The gluing process includes several basic techniques:
- for gluing paper and vinyl, glue is applied to both surfaces (both wallpaper and ceiling). The adhesive solution is distributed evenly with a brush or roller, in the direction from the central part to the edges. The glue should be absorbed for some time; for convenience, the vinyl wallpaper is folded in half inward. Meanwhile, spread the glue over the working surface of the ceiling. After 7-10 minutes, start gluing it;
- For non-woven materials, there is no need to apply glue to the canvas, only to the ceiling part. But keep in mind that the adhesive mass for non-woven wallpaper is thick. It must be applied in an even, dense layer;
- Attach the first strip according to the markings. Its edge should coincide with the drawn line;
- To ensure tight adhesion to the ceiling area, remove excess glue and prevent swelling of the canvas, smooth it out. Movements should be directed from the center to the side. To do this, use a rubber roller or wallpaper spatula;
- Apply subsequent strips butt to the previous ones;
- folds are not allowed. If they do not smooth out, then carefully separate part of the canvas and re-coat it. After that, try gluing the wallpaper again. Push excess glue to the edges of the canvas and remove with a clean cloth;
- Make sure that the edges of the canvases fit tightly and correctly to the surface of the ceiling. Go over the joints several times with a spatula. This will prevent them from peeling off in the future;
- the canvases should be 1-2 cm on the side wall. After drying, excess paper will be removed using a sharp knife;
- this way, you should get a smooth surface without blisters or noticeable wrinkles. There is no need to worry about small folds.
They will smooth out on their own as they dry.
Additional subtleties of wallpapering the ceiling are shown in the video
Professional opinion
Most experienced finishers believe that it is not worth attaching a baguette to the wallpaper, regardless of the material and weight. The plinth must be installed on the ceiling before finishing the walls. This approach simplifies all work on installation, puttying and painting of decorative elements, and also eliminates the need to take protective measures so as not to spoil the wall covering.
Inexperienced home craftsmen using this method are most often put off by the difficulties with high-quality fitting of wallpaper to the baseboard. However, experience is acquired.
Universal instructions for gluing skirting boards
So, let's start gluing the ceiling plinth correctly.
- Cut the ends of the baseboards at the desired angles. To do this, use a special device - a miter box. Place the baseboard into it and, using a hacksaw or mounting knife, make a cut at the required angle.
“Cutting skirting boards at an angle using a miter box”
"Protruding part of the corner of the room"
- Apply a thin layer of adhesive to the two longitudinal grooves on the back of the baseboard, making sure that it does not extend to the outer edges.
- Press the baseboard against the wall and hold it for as long as indicated in the instructions for using the adhesive.
- Glue the remaining skirting boards according to your design, cutting the elements to the required length and at the required angles.
“We try on and glue the plinth”
- After the glue has dried, with clean hands, cover all resulting cracks and joints with white sealant.
“Sealing cracks with sealant”
- After the sealant has dried, if necessary, paint the baseboard with acrylic paint.
We bring everything to complete perfection
Here are some more tips from experienced designers:
- a narrow ceiling molding visually increases the height of all walls, and this in turn creates the impression of a high ceiling
- vertical thin lines create an impression of severity, and a horizontal model will add dynamics
- wide models are suitable for large rooms, and they make small rooms heavier. There may even be a feeling of tightness, and therefore discomfort.
- When choosing a color, do not neglect white tones. They tend to fit in anytime, anywhere, but that doesn't mean that particular color will look best.
It's always better to experiment before making a final decision. In addition, the palette of shades and types of models allow you to choose exactly what you like.
Combine all the moments correctly so that you feel the measure and style and other design nuances. Then you will be able to achieve the most acceptable result for you.