When it comes to wallpaper, an association immediately arises with materials that are often used for wall cladding and are sold in the form of rolls. But few people know that there are more modern options - wet wallpaper, also called liquid. Of course, this definition is not correct; it more reflects the application technology. Therefore, it is acceptable to compare this product with plaster or putty.
Currently, the popularity of such finishing material is growing against the backdrop of declining demand for traditional wallpaper. This situation is easy to explain, because the “wet” version has excellent decorative and aesthetic properties.
What it is
Liquid wallpaper is a material that is used for finishing wall and ceiling surfaces. They are more similar to plaster, but different in composition. They include cellulose fiber, silk, cotton, dry glue, antiseptics, as well as various decorative impurities.
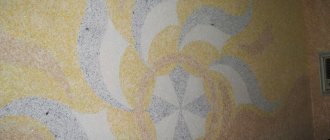
Decorative impurities are quite varied. In fact, they create such wide variety. Glitters, silk fibers, velor, silk, beads and rhinestones, as well as various dyes are used as decoration.
Decor Source moyastena.ru
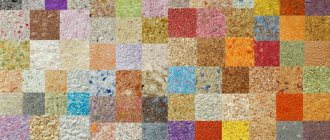
Color palette and structure Source kursremonta.ru
What substances are used for production?
To create this version of the finishing material, the following components are used:
- Adhesive base. This material is made in the form of a dry powder, which after contact with water increases in size and promotes adhesion of the decor to the concrete plane;
- Dyes. They allow you to paint the working composition in the required shade;
- Pulp of different sizes. For the production of liquid wallpaper, paper of different compositions and strengths is used. It is she who sets the texture and volume on the surface of the wall;
- Small fibers of silk threads. They provide the finished surface with shine and silky texture;
- Antiseptics and fungicides. These substances prevent the growth of bacteria and fungi on the surface;
- Decorative details in the form of mica, mother-of-pearl chips, sparkles of different diameters and mineral chips.
The material for decorating the interior space is sold in the form of a dry powder, which is pre-packaged in containers of different diameters. The shelf life of such finishing material is from 10 to 15 years.
Types of liquid wallpaper
They are divided into several types according to composition.
- Pulp.
Their main component is cellulose, that is, processed wood fibers. The coating is well suited to walls with slight unevenness; it can easily hide minor defects. In addition, this type is the most inexpensive and accessible.
The downside is that they are less aesthetically pleasing than silk ones. They also fade faster and cannot be used in rooms with high humidity.
Cellulose wallpaper in the interior Source top-1000.ru
- Silk.
The composition contains silk fibers instead of cellulose, which provides a greater degree of quality and aesthetics. They are less exposed to ultraviolet radiation, which makes them resistant to fading. More pleasant to the touch.
The disadvantages include the high cost, but it is justified - such liquid wallpaper in the room is the most wear-resistant and beautiful, they emphasize the status of the owner and create a unique style in the interior.
Example of silk wallpaper Source mykaleidoscope.ru
- Combined.
As the name implies, these wallpapers include both cellulose fiber and silk. This makes them higher quality than conventional cellulose wallpaper, but less expensive than silk.
Example of combined wallpaper Source mdr-s.ru
If we start not from the composition, but from the degree of readiness, then we can distinguish ready-to-use types of liquid wallpaper for walls or for painting.
- Ready to use.
Easy to use. The purchased composition only needs to be diluted with water according to the instructions, and you can glue it. This is the best option for those who are new to wall decoration.
- For painting.
They may have different structures and compositions, but only one color – white. You can paint them any way you like, and it is also possible to add decorative elements, but this is not possible for a non-professional.
An example of original painting of liquid wallpaper Source roomester.ru
How to breed at home
The packaging containing the dry mixture contains instructions for proper mixing and preparation of the mixture for use.
The manufacturer’s recommendations should not be violated, since their implementation guarantees the receipt of a high-quality finishing mass.
We provide only general information. The entire volume of the mixture contained in the package should be diluted at once.
Instructions for preparing the mixture
All components must be used at once. You should not divide the dry mixture - due to incorrect proportions, the material may lose its properties.
Instructions for preparing the liquid mixture:
- Prepare the required amount of water (not warmer than 30).
- Shake the packets of mixture components.
- Pour all parts of the dry mixture into a container. If a shade is needed, color is added.
- Stir the mixture with your hands until it becomes fluffy and homogeneous.
- Pour in water and stir again.
- It is not advisable to use a mixer.
- Place the mixture in a bag and leave for 6-12 hours.
The most common question is how much liquid mixture should I mix for a large room? You may need two or more packages, but they must be diluted in different containers. When the liquid wallpaper is infused, they can be combined for ease of work.
How long can it be stored diluted?
The batch can be stored for several hours. If work is delayed, transfer the liquid mass to a bag without waiting for it to dry. In this form it is stored for 10-14 days.
Advantages and disadvantages
Of course, there are many advantages of liquid wallpaper over regular wallpaper, but it cannot be said that they are an ideal wall covering.
Advantages of liquid wallpaper:
- Safety – do not contain harmful components.
- Seamless – the absence of unaesthetic seams and the need to join the pattern.
- Long service life.
- Resistance to temperature changes.
- They have sound insulation quality.
- Maintainability - water will help you easily remove and replace the damaged area with a new mixture.
- Good coverage of walls with minor defects.
- Easily glued in hard-to-reach places.
- Easy removal.
- They don't collect dust.
High-quality installation Source top-1000.ru
Disadvantages:
- Low moisture resistance - cannot be used in rooms with high humidity.
- Dry clean only.
- High price.
- Long-term installation - dry for several days.
- Low mechanical strength - easily deteriorates under mechanical stress. This means that children can easily render them unusable through careless handling, and animals can scratch or chew them. But it won’t be difficult to replace a damaged area even just spot-on.
- The color range of liquid wallpaper for walls is more modest compared to roll wallpaper.
To increase the service life, it is necessary to follow the installation technology Source oooalfa-pro.ru
How to dry after application?
To achieve the best effect, you should follow the basic rules:
- Final check for defects.
- If there are no irregularities, leave the coating for 1-3 days.
- You can open the vents and windows for ventilation.
- A strong draft is undesirable.
- The optimal room temperature is 18-25.
- Do not use heaters to speed up drying.
How long does it take to dry?
Drying time is no more than 3 days from completion of work. It depends on many factors, but not less than 24 hours.
Repair using liquid wallpaper allows you to decorate the interior in any style. This is a unique and safe material based on cellulose and silk fibers. Applying the composition yourself is not difficult, provided you prepare and follow the correct work algorithm.
Application Features
To understand whether you can stick them on yourself, it is better to familiarize yourself with the technique of decorating walls with liquid wallpaper. The technique involves several steps:
- Surface preparation: cleaning the walls from the previous layer of wallpaper, grease stains, whitewash. Removing crumbling and uneven coating. Elimination of major defects.
- Applying the finishing coat.
- Applying wallpaper directly: according to the manufacturer's instructions, dilute with water and mix in the necessary decorative elements, leave the mixture for the time indicated on the package. Then it can be applied in several ways:
Application using a spatula Source kraski-net.ru
Using a roller Source sanmarco-vernici.ru
See also: Catalog of companies that specialize in finishing materials and related work
You can apply a thin layer of coating using a special compressor Source umcos.ru
How to repair and update?
If you need to update a problem area of the coating, you should listen to the mini-instructions:
- the surface to be removed is moistened with water and soaked;
- remove the wallpaper with a metal spatula, carefully separating the damaged area;
- the wall is treated with a primer using a brush;
- after the primer has dried, the edges of the wallpaper are sprayed with water;
- using the remains of the mixture, they are soaked and applied to an empty area, masking the joints;
- after application, the wallpaper is sprayed with water again;
- if the surface was previously treated with varnish, it is applied to the adjustment area.
If the area of the surface to be pasted allows you to leave a little mixture, it is better to make sure in advance that the remains are identical and mixed with the main mass. This will make it easier to correct problem areas in the future.
Where appropriate to use
They are suitable for rooms with low humidity. Should not be used in the bathroom or kitchen work area. Well suited for decorating a living room, bedroom, corridor. Can be used in a children's room, as the material is completely safe.
But it is worth remembering that such a coating easily deteriorates under mechanical stress. Therefore, it is better to think carefully about the placement if there are animals in the house that like to chew or scratch the walls.
Liquid wallpaper can be combined with other coatings and applied to part of the wall. The use of liquid wallpaper in the interior will be discussed below.
Working with material
The process of gluing paper wallpaper is quite standard, but with the liquid version you have to work using a different technology. Therefore, to obtain the desired result, certain rules are followed.
What you need to apply it yourself
To work, you will need construction equipment and personal protective equipment (respirator, gloves, goggles).
Full list of tools:
- Plastic trowel - it is convenient to apply and apply material to the wall.
- Container for preparing the mixture.
- Spray bottle for water.
- If the room is large, it is advisable to apply liquid wallpaper using a spray gun.
Surface preparation
The durability of the coating, first of all, depends on the quality of surface preparation carried out before gluing liquid wallpaper. “Liquid” material is not intended for leveling the wall, so you need to take care of priming and cleaning the base in advance. It is possible that during the preparatory work circumstances will become clear that prevent the use of wallpaper material, and it will have to be replaced with decorative plaster or other finishing.
Depending on the condition of the walls, it is necessary to perform one or more of the following operations.
- Remove paper wallpaper from the wall and wash off the whitewash. Such coatings cannot be used as a substrate. The paint layer is checked for strength of adhesion to the walls; if peeling or peeling, the paint is removed.
- Examine the plaster. Be sure to tap the walls to look for peeling areas and other defects. If the paint and plaster are in poor condition, they are removed completely or locally, and the plaster is repaired.
- Small cracks in the plaster can be easily covered with wallpaper, while large cracks can be repaired.
- If the surface of the wall is too uneven, then you need to level the base with a layer of plaster along the beacons. Small differences will be covered with wallpaper paste.
- Places where mold or rot has settled are washed with mandatory treatment with fungicidal liquids. The rust is cleaned off. Metal products are painted over for insulation with oil paint or other insulating agent. The efflorescence is washed off and the cause of its appearance is determined. It may be necessary to waterproof the area.
- Since the wallpaper mass weighs little and is applied in thin layers, there is no need to reinforce the base. However, at the joints of structures, you can pre-glue sickle tape followed by putty.
The smooth paint layer is sanded to increase adhesion.
A primer is required before applying liquid wallpaper. For example, smooth surfaces are primed to increase adhesion. You cannot do without applying a primer in the case of wooden and porous walls.
Liquid wallpaper requires a primer with quartz sand. Typically these primers are white in color and do not require white painting. If the paint or other finishing on which a lot of liquid wallpaper is applied is not white, then for light wallpaper the wall must be painted with white paint or covered with white putty. The areas where the rust has been removed are also painted as a preventative measure.
The primer is applied in two or three passes. Each time the wall is dried.
The frames of windows, doors, sockets and switches are sealed with masking tape. The wiring is de-energized. The floor and abandoned furniture are covered with film. Although the wallpaper mass remains plastic for a long time and is washed off, it is better to take care of protection.
The most “successful” base materials:
- leveled plaster;
- fiberglass;
- clay;
- drywall (preliminarily putty the entire surface);
- primed polystyrene foam;
- concrete or stone.
Less “successful”, but also suitable after priming:
- metal;
- OSB;
- tree;
- Fibreboard, chipboard, MDF.
Liquid wallpaper compositions cannot be applied directly to plywood, since the top plywood layer “shrinks.”
Application of liquid wallpaper
Stock up on tools in advance. Applying liquid wallpaper is impossible without tools; you will need a metal or plastic (preferably transparent) grater, spatula and trowel. Compositions of a less thick consistency can be applied using rollers (ribbed or sparsely piled). If the mass is not applied manually, then you need a cartouche (texture) gun connected to a compressor.
You will also need:
- container for diluting dry mixture;
- tape measure for marking the wall (not in all cases);
- clean rags;
- roller or brush for priming;
- masking tape;
- knife for opening containers;
- water dosage measure;
- container with water.
It is advisable to apply the composition starting from the light corner towards the dark one. Finishing is carried out in daylight and artificial light.
You can apply wallpaper mass:
- mechanically;
- trowel or spatula;
- roller;
- just with your hands, immediately forming the stucco molding.
The composition, prepared in advance, is applied in sections, applying a layer of solution of 2-3 mm. The applied mass is immediately leveled. Then cover the adjacent area, achieving the same layer thickness over the entire surface. The main thing is to get a seamless finish.
In case of unsuccessful application, the composition can be further moistened and removed with a spatula. After this, a new portion of the solution is applied, comparing the thickness of the layer with the surrounding finish.
Final smoothing is best done with a plastic float. Before use, the instrument is wetted. During leveling, the grater is also moistened with water periodically. This makes it easier to achieve a smooth surface.
Let us consider in detail each of the above methods.
Plastic trowel
The tool is good because it is light. Correct application of liquid wallpaper is accessible not only to experienced plasterers, but also to beginners. The mass is applied to the trowel with a spatula, then, holding the trowel at an angle to the wall, the composition is transferred to the base. This is done in the same way as applying plaster mortar. You can even apply the wallpaper composition using a grater. If the composition sticks to the tool, the working surfaces are moistened with water.
There is no need to apply excessive pressure on the trowel. There is no need to rush. The composition can be corrected at any time: add (if necessary) dough where the layer thickness is lacking, remove excess. It can take from 12 to 72 hours for the material to set.
Periodically look at the laid coating at an angle, illuminating the surface from the side. This helps identify processing deficiencies. Against the light, voids or poorly executed transitions are clearly visible.
The application sequence is as follows:
- preparation of the composition;
- wall preparation;
- applying the mass manually;
- leveling with a grater or trowel;
- drying the coating.
With a cartouche pistol
To create a seamless coating, it is unacceptable to join together already hardened wallpaper and fresh mass when creating a finish (this is only possible during repairs). Therefore, it is better to process large-area walls using a texture gun (installing a large nozzle).
Some compositions are produced specifically for application with pneumatic tools. With the help of a mechanical assistant, the application of liquid wallpaper is accelerated. With experience, the applied mass can be laid evenly. If there is no experience, then additional leveling with hand tools will be required. The lifespan of the composition allows you to do this slowly.
For a cartouche pistol, you will need a compressor capable of delivering 2-3 atm, with a capacity of 250 l/min.
Subsequence:
- preparing the solution;
- preparation of the base;
- preparation of equipment (connection to a compressor);
- applying the composition;
- surface leveling;
- disconnecting the gun, washing and drying the device parts;
- drying the walls.
In reality, such a tool is most often used by professional finishers when working on large areas.
Drawings with liquid wallpaper
The material allows you to create various images. These can be oriental ornaments, abstract pictures, plant and floral motifs, figures of people or animals. In children's rooms, the walls can be decorated with a castle or a fairy-tale plot. Here you can completely surrender to the creative process. The technique of applying patterns on the wall with your own hands depends on the clarity of the shapes and what you ultimately want to get.
Basic techniques for creating a drawing:
- Using a stencil.
- DIY drawing.
- Relief.
Let's describe each of them.
The simplest way to apply patterns is to use a stencil. The stencil itself can be purchased or made by hand. The stencil is placed on the wall and secured with masking tape. A layer of mortar is applied on top of it and leveled with a spatula or trowel. Remove the stencil without waiting for the mass to start setting.
Another technique is artistic painting. The technique is more complicated than stenciling. If you have no experience, then you should practice separately. Fortunately, the material is easily removed, and you can try it many times.
applying wallpaper along the contour of the pattern on the wall; filling in the background of the future pattern; the result of applying the pattern to the wall
The technique is reminiscent of painting with a brush. Prepare wallpaper mass of the desired colors, with a more liquid consistency. Draw the main lines of the pattern on the wall with a pencil. The material is applied with a brush, palette knives or narrow spatula, filling the pattern.
In order not to accidentally “blur” the mass beyond the line of the pattern, you can stick a strip of masking tape on the wall along the border of the pattern.
Relief images look beautiful. Most often they are created by combining stencil techniques and modeling. Additionally, patterns can be decorated with unexpected inlays made of foil, beads and other elements, including those made specifically for your image.
Living room
Liquid wallpaper is great for decorating a living room. Thanks to the soft and pleasant-to-touch surface, liquid wallpaper in the living room interior creates an atmosphere of comfort. Silk or combined ones look especially good - they create the impression of soft textiles on the walls.
An example of using silk wallpaper in the living room Source domdom.com.ua
It is not necessary to cover the entire surface. Sometimes it is enough to select only one wall.
For the living room, the best option to emphasize the unusualness of the interior is to decorate the wall opposite the sofa Source design-homes.ru
An even more economical option is to allocate one zone.
Beautiful combination Source andromeda1.rf
For those who want a more original design, decorative inserts have been invented. As a rule, they can be ordered individually. In addition, the drawing will add unusualness to the room.
Additional decor Source sense-life.com
Interesting performance Source basketgoods.ru
Cozy living room Source prom.st
How to care for liquid wallpaper
The coating requires maintenance, but it is not at all difficult; sometimes the entire surface needs to be cleaned with a vacuum cleaner. If you use a brush attachment, just use a very soft one.
If a section of the coating is damaged, it is very easy to replace it. First, spray the damaged area with a spray bottle, then remove the layer of material with a spatula. After this, a new layer is applied and leveled.
Bedroom
Once you stick liquid wallpaper in your bedroom, its design will change significantly. The bedroom is the best place to use them. It is this room that needs comfort and softness, where you really want to relax.
Example of use in the bedroom Source spp-group.ru
If you focus on one wall, then the one where the head of the bed is located is best.
To focus on individual zones, you can adhere to this rule, but it is not necessary Source mebel-go.ru
A bright bedroom is not the best choice for everyone. If both spouses insist on different colors, liquid wallpaper in the room can be combined.
Sometimes a bedroom in dark colors looks very atmospheric Source lumetri.ru
Dark tones and sparkles add unusualness and piquancy to the room Source free-lancers.net
Examples of wet wallpaper for walls (interior photos)
Comments
0 Alexander 02/21/2021 10:56 Most likely they wrote wet ones here because some people are looking for wet wallpapers, so as not to upset people they created an article, here on the site there is essentially the same article about liquid wallpaper) Quote
0 ing 11/24/2016 10: 32 I really like the liquid wallpaper finish, but different sources say different things. Some say that they are not durable and crumble. Tell me, who did it, is it possible to paint them later in a different color?
Quote
0 Veronica 12.11.2016 21:24 Don’t you think that they look somehow... well, a little orphan-like, or what? Especially the examples in which the walls are not of a uniform color, but with geometric shapes along the plane, reminded me of elementary school. With all the undoubted convenience and simplicity, maybe it’s not worth going into completely official minimalism?
Quote
+1 Olga 11/11/2016 06:25 I’ve been looking at liquid wallpaper for a long time. Classic wallpaper is neither practical nor durable. I want to try to do this myself. How realistic is it to do this efficiently yourself?
Quote
Update list of comments
Hallway and corridor
Perhaps the most important rule when decorating these rooms is compatibility with the rest of the living rooms.
Good combination with other coatings Source homeli.ru
Often the hallway and corridor are not very lit, so it is better to choose lighter shades.
If you coat the surface with varnish, it can be washed. Source dizainexpert.ru
Golden colors add luxury. But they should be used sparingly Source lustora.ru
Liquid wallpaper goes well with regular wallpaper Source vipremonti.ru
Preparing the wall and mixture for application
Before gluing liquid wallpaper to a wall, you need to achieve uniformity of this very wall. It is prepared in the same way as for decorative plaster. In short, we remove the old coverings and level the wall. For better adhesion, cover it with a layer of primer or acrylic paint. The end result should be a smooth and white surface. If you want to delve deeper into this process, then you should read about the procedure for preparing walls for liquid wallpaper.
An example of various fillers and the patterns they create
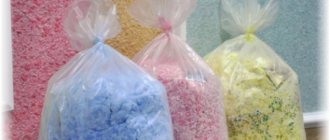
In addition to preparing the wall, you also need to take care of the working material. The finished products are already packaged in bags and sold along with decorative fillers (usually glitter). These transparent bags already contain everything you need, you just need to add water and mix. Therefore, the process of preparing the mixture is very simple.
According to the instructions, one bag of liquid wallpaper requires 6 liters of water. The dry mixture should be diluted in warm water (temperature 30-40 degrees). In this case, decorative additives are first mixed in water, and only then the liquid wallpaper itself is added. All this is mixed by hand, because if you use a drill or spatula, they will damage the composition and lead to the formation of lumps.
Liquid wallpaper must sit for 12 hours before being applied to the wall. It is most convenient to pack the finished mass back into the bags in which it was sold. Liquid wallpaper will be well preserved there, and there is essentially nowhere else to store it, except perhaps in the bathroom. The work requires a lot of material and just one container is not enough.
Over time, the liquid wallpaper will be saturated with water, and all its components will interact. The most important thing is that the glue they contain is completely softened. Now they are ready to be applied. Immediately before starting work, the solution must be mixed by hand so that it is completely homogeneous. Since this material is expensive, some people try to make it themselves. Everyone can make liquid wallpaper with their own hands, rather than buying them.
Kitchen
Although liquid wallpaper is not recommended for use in the kitchen, some still decide to do it. In this case, it is better not to use them in the work area or near water.
Some are ready to disregard the rule. It turns out great Source vseo-remonte.ru
If you coat the surface with varnish, it can be washed Source valles.top
You can always decorate the dining area Source dizainexpert.ru
Rules for preserving the durability of wet coatings
Wet wallpaper easily changes its structure under the influence of water. Therefore, the technology for preserving them in “working form” requires compliance with certain rules.
- The durability of walls finished using the wet method of applying wallpaper will only be ensured by a protective film or varnish. In this case, wet cleaning with a sponge is acceptable.
- The coatings can be cleaned with a washing vacuum cleaner.
- Small stains can be easily removed with a regular eraser.
Beautiful, modern wet wallpaper is incredibly in demand among lovers of non-standard design of their own homes. They can decorate any room in a house or apartment, surprising visiting guests with magnificent paintings. Allow yourself a little wild imagination to make life more fun!
Briefly about the main thing
Liquid wallpaper is an excellent solution for living rooms that you want to add originality and comfort. They are easy to glue and repair, and you can use them to create any design. But you shouldn’t glue them in rooms with high humidity, although it all depends on how liquid wallpaper is used in living rooms.
They will fit perfectly into living spaces, making them softer and more atmospheric. They can be used both on the entire surface and on a separate wall. Can be combined with other coatings. The highlight can be a pattern or sparkles.
Wallpaper is good for a child's room, where you can use it to draw anything. You can add textiles, beads, sparkles and fluorescent to the composition.
It is not advisable to use them in the kitchen, but if desired, the wallpaper can be varnished, this will increase its moisture resistance.
Ratings 0
Preparation of the composition
Liquid wallpaper is sold in stores in dry form. Water is poured into the mixture in advance and everything is thoroughly mixed. The exact proportions are always indicated by the manufacturer in the instructions.
The finished mass is most often poured back into a thick plastic bag and allowed to brew for 8-10 hours for full swelling.
Attention! You must understand that the dried coating will be much lighter than the wet one. This feature should be taken into account when adding coloring pigments to the solution.
Features of concrete surface preparation
If you are dealing with a concrete or plastered surface, then in this case the surface is leveled with gypsum putty. After drying, several layers of penetrating primer and at least three layers of water-based paint should be applied to the wall. This abundance of operations is associated with the high water absorption capacity of concrete surfaces.
The same recommendations will be relevant for old surfaces (for example, for the walls of “Khrushchev” high-rise buildings). After all, no one knows what they are made of, and what compositions may subsequently appear on the surface of liquid wallpaper.
Preparing old walls is the only case in which it is recommended to use alkyd enamels instead of water-based paint. Their composition is capable of creating an excellent protective layer, replacing a conventional primer.
How to prevent the appearance of yellow spots and how to deal with them?
To do this, you need to properly prepare the wall: get rid of the nails in the wall, cover the surface with an antiseptic primer, putty, and if necessary, paint the wall with white water-dispersion paint.
It is better to apply wallpaper with a plastic spatula rather than an iron one, this way you can avoid oxidation. A solution of “Whiteness” + water will help get rid of yellow spots (1 to 1, or 1 to 2 for white wallpaper and 1 to 3 for colored wallpaper.)
Advantages and disadvantages
If we talk about the general impression, some people like liquid wallpaper, others don’t. But their properties are not bad. The advantages include the following qualities:
- Seamless surface. No joints like wallpaper. Smooth surface.
- If necessary, the imperfections of the walls are smoothed out, but this increases the consumption of the composition.
- The composition is vapor permeable, that is, it does not create problems for maintaining normal humidity in the room.
- Fits well on curved surfaces of any complexity.
- Easy restoration for any type of damage. There are two possibilities:
- in case of minor damage (scratches), simply wet it, wait a couple of minutes and smooth it with a spatula;
This defect is easy to fix
If there is a change in color or a significant defect, remove the old coating and apply a patch.
Not bad qualities. What is most impressive is the high maintainability. This is good if you have pets: scratches are simply rubbed out. If you also like the appearance of this coating, you should try it.
Liquid wallpaper also has disadvantages:
- They fade under the sun. In the southern room this must be kept in mind.
- Cleaning is dry only: you can collect dust using a vacuum cleaner and a soft brush.
- It is impossible to remove ingrained dirt and grease. Just remove the contaminated piece and apply a patch.
- Doesn't fit well on all surfaces. The easiest way to work is with rough ones, the worst thing is with absolutely smooth ones (the composition “drains”).
High maintainability - this is one of the best properties of wet wallpaper - For a good result, surface preparation is necessary - leveling significant unevenness, priming in several layers. If the surface has an uneven color, painting is also needed (usually white).
- Self-application requires a lot of time.
As you can see, there are some pretty serious drawbacks. The most unpleasant thing is the impossibility of wet cleaning. This is not always acceptable in the hallway or kitchen. This drawback can be mitigated by covering the wall with varnish. It can be washed, but cannot be restored. In addition, the varnished coating loses vapor permeability, but becomes water-repellent.
Preparation of drywall surfaces
When preparing drywall for applying liquid wallpaper, it is necessary to putty the entire area of the surface to be decorated. Some people limit themselves to simply processing the joints between sheets of drywall. As a result, light stripes may appear on the outer surface of the wallpaper, which will be impossible to get rid of.
In general, the sequence of preparing drywall looks standard: applying putty, priming and processing with light water-dispersion paint (add one part of PVA glue to three parts of enamel). Do not forget about self-tapping screws that are prone to corrosion. Their caps should be coated with oil paint and an additional layer of putty.
The surface of the walls on which water stains have been noticed must be treated with oil paint. This applies to any surfaces that are used for applying liquid wallpaper (plasterboard, plaster, concrete, etc.).
