The operation of pumping equipment in an autonomous water supply system is regulated by special automation. One of the main parts that controls network parameters is the pressure switch. This device has factory settings that determine the lowest and highest limits at which the pump turns on. If it is necessary to change the indicators, the pressure switch of the pumping station is adjusted. This operation does not require the involvement of specialists; knowing the setup rules, it can be carried out independently.
Water supply network with relay
How does a pressure switch work?
Regardless of the manufacturer, the water pressure switch in the water supply system is a compact unit with two springs and electrical contacts. The hydraulic part of the device is a membrane with a piston and two springs of different sizes. The electrical part is a contact group that opens/closes the network to turn the pump on/off. All structural parts, including the terminal block, are attached to a metal base. The device has several groups of terminals:
- for connecting voltage 220V;
- for grounding;
- terminals for the pump.
On the back side there is a nut for connecting to the fitting. The device is covered on top with a plastic cover that is fixed to the screw of the larger spring. Products from different factories may be equipped with additional elements, have a characteristic shape and arrangement of components, but they all have a similar design. The sensor can be mechanical or electronic. Mechanical devices are more popular due to their low cost.
Relay design
Attention. A screwdriver or wrench is required to remove the plastic cover from the device.
Relay operating principle
The pump station pressure switch device does not require human intervention in the process of turning the pump on and off. The principle of its operation is based on changing the degree of influence on the piston, which is responsible for closing the contacts. A large spring mounted on a rod with an adjustment nut counteracts the movement of the membrane and piston. When the pressure in the system decreases due to water withdrawal, the contact platform lowers and closes the contacts. The pump turns on and begins to pump liquid.
Mechanical pressure controller
The entry of water into the accumulator leads to an increase in air pressure on the device membrane. The piston, overcoming the action of the spring, begins to displace the contact platform. This process causes electrical contacts to open. The current does not turn off immediately, but when the platform is retracted to a distance determined by the setting of the small spring. This regulator is responsible for the pressure difference. After the contacts are completely opened, the unit stops pumping water.
Information. To adjust the lower pressure level (on), a large spring is used, and to set the upper limit (off), a small spring is used.
Operating principle and device
Pressure switch device
The pressure switch was invented at the beginning of the last century. Until today, its design has changed little, and the principle of operation has not changed.
The sensor consists of the following elements:
- contact block;
- a spring that regulates the pressure difference (lower threshold);
- large working pressure springs (upper threshold);
- connection point for electrical wires;
- input for connecting a pressure gauge and safety valve;
- hole for membrane;
- on/off button;
- plastic or metal case.
In case of some breakdowns, it is necessary to replace the pressure switch, since repairing it is impractical or expensive. To do this, you need to know how to choose the right device, because manufacturers do not always supply parts for the required model. The policy is aimed at encouraging people to buy a new pump rather than repair the old one.
To select a device, you need to know its type, functionality and operating pressure - it is advisable not to lose the instructions for the pumping station. There are relays for water intake devices, air and chemical pumping control. A domestic pumping station usually works with clean water, less often with sewage or dirty liquid.
The presence of protection against overheating of the electric motor may be included in the relay circuit, but this type will cost more. If possible, it is better to buy a device with protection, since the pumping station itself is much more expensive.
There is a single-phase or three-phase relay. They are used in pumping stations to protect against dry running. This is a kind of sensor that responds to the power factor generated by the equipment. When the readings are low, the device turns off the pump. This is an additional feature, the presence of which makes the device more expensive.
To attach the new relay to the pump, you need to know the flange size. It can be indicated by the following numbers: ¼, ½, 3/8.
Some devices have a mechanical start button. It is designed to force the pressure sensor on or off. Other additional features include an unloader valve and a setting scale.
The operating range of the pressure switch must match that required by the parameters of the pumping station. In the instructions, it is usually indicated by strokes.
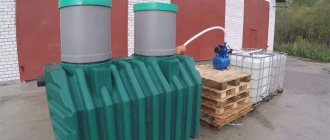
Preparation of the pumping station
When organizing individual water supply, special equipment is installed - a pumping station. It consists of two parts:
- submersible (surface) pump;
- hydraulic accumulator
A sealed tank with a rubber membrane installed inside serves to store a supply of water and maintain stable pressure in the system. Before you start setting up the pressure switch of the pumping station with your own hands, you should prepare the tank. The tank consists of a rubber bulb into which water is pumped and a chamber filled with air. The amount of air pressure affects the operation of the entire water supply system, so setting up a pumping station is necessary.
Preparation of the membrane tank begins with completely draining the water from the pipeline and the tank itself. For this purpose, the bottom tap of the system is used. Air is pumped into the empty tank; its pressure should be 10% less than the lower limit. The minimum pressure value is determined depending on the size of the accumulator:
- 20-30 l – 1.4-1.7 bar;
- 50-100 l – 1.8-1.9 bar.
After determining the pressure in the storage tank, the system is immediately filled with water; the rubber bulb must not be allowed to dry out.
Pumping station with hydraulic accumulator and sensor
Attention. Self-checking the pressure in the tank is necessary when assembling equipment from individual parts. Modern models of pumping stations, manufactured in the factory, have ready-made settings specified in the documents.
In order for the tank membrane to serve for a long time, it is recommended to set the pressure in the storage tank to 0.1-0.2 atm. lower than the minimum level in the system.
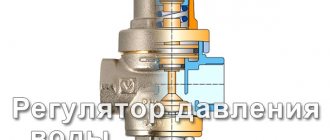
Criterias of choice
When choosing a water supply regulator, take into account its material, the technical characteristics of the specific model and the design features of the device.
Design features
Structurally, RDVs are divided into piston and membrane . Piston models practically do not wear out, but even taking this into account, they are less reliable because their mechanism is sensitive to debris and contaminated water.
A diaphragm reducer, on the contrary, is unpretentious in operation thanks to a diaphragm that divides the work into two chambers. The sealed part contains the main mechanisms. If the operating instructions are followed correctly, the gearbox will operate for a long time and reliably, but it is necessary to constantly monitor the safety of the membrane.
Regulatory requirements for apartment regulators
Regulatory requirements include the following:
- Apartment regulators must have easy access and provide a pressure not exceeding 0.3 MPa (3 kgf/cm2).
- Coverage of work output pressure up to 0.04 MPa.
- Throughput up to 0.5 l/s.
- The number of operations is at least 250 thousand, taking into account operation for up to 10 years or more.
Technical specifications
Enterprises produce RDVs with different equipment parameters.
To understand what type of device is needed for installation in an apartment, you need to study the technical specifications. This information is provided in the data sheet or in the table on the rear panel of the water regulator. It is also important to pay attention to the operating temperature of the mechanism. If there is an indication of 0–40 °C, then the reducer is intended for cold water supply systems. To supply hot water, choose a reducer with an indicator of 130 °C.
Materials and production quality
The water regulator must be made of durable metal alloys - bronze, steel, brass - with ligatures to protect against corrosion.
In order not to make a mistake when choosing a quality product, look at the price and weight of the device. Quality always costs more, and heavier weight indicates the presence of metal.
Where to install the mechanical controller?
When choosing where to connect the pressure switch to the submersible pump, you should avoid possible turbulence and pressure surges. The best option is installation near the hydraulic accumulator. The operating conditions of the device should be taken into account; the manufacturer indicates the permissible parameters of temperature and humidity in the documents. If the sensor is waterproof, it can be installed together with the storage device in a caisson. For the controller to start functioning, it must be connected to the electrical and water supply network.
It is advisable to allocate a separate electrical line for the relay, but this condition is not mandatory. A cable with a cross section of 2.5 mm2 is laid from the shield. For safety, it is recommended to install a circuit breaker with parameters corresponding to the characteristics of the pump. The device must be grounded.
The terminal block has three groups of contacts: grounding, phase and neutral from the panel, wire from the pump.
The connection is carried out as standard - the wire is stripped, inserted into the connector and secured with a bolt.
Attention. Connection to the electrical network is made according to the inscriptions indicated on the contact group.
A submersible pump with a pressure switch can be connected using a tee or fitting with five outlets. The connection is made through the nut on the back of the device. In the first case, the device is installed directly on the highway. The second option is preferable, when a five-part assembly is assembled:
- Submersible or surface pump.
- Pressure gauge.
- Hydraulic accumulator.
- Pressure meter.
- Pipeline.
Relay installation diagram
Advice. All threaded connections of the unit need to be sealed; for this purpose, sealant or FUM tape is used.
Filters are mandatory elements of the home water supply network. These devices are necessary to clean the liquid from impurities that impair the operation of equipment, including pressure switches. After connecting the sensor to the water supply and electrical network, all that remains is to adjust the pumping station yourself.
The filter can be installed before the hydraulic accumulator and automation. It will trap all large particles that could damage relay systems, membranes and rubber gaskets. But in this case, the filter for the pumping station must be cleaned regularly - severe contamination impairs its throughput. This increases the load on the pump, which can lead to premature failure. When installing a filter after the station, it will operate normally without increasing the load. By weakening the pressure, the consumer will understand that the filter element requires cleaning.
Advice from experienced specialists
It is recommended to connect the accumulator pressure switch to the electrical panel of the house via a separate line with its own RCD.
It is also imperative to ground this sensor; for this there are special terminals on it.
It is permissible to tighten the adjusting nuts on the relay as far as possible, but it is not recommended at all. A device with tightly tightened springs will work with large errors in the set Start and Stop, and will soon fail
If water is visible on the body or inside the relay, the device should be immediately disconnected from power. The appearance of moisture is a direct sign of a rupture of the rubber membrane. Such a unit must be immediately replaced; it cannot be repaired or continued to be used.
Cleaning filters must be installed in the system. It’s impossible without them. However, they need to be cleaned regularly.
Also, once every quarter or six months the pressure switch itself should be washed. To do this, unscrew the lid on the device with the inlet pipe at the bottom. Next, the opened cavity and the membrane located there are washed.
The main reason for breakdowns of the hydraulic accumulator relay is the appearance of air, sand or other contaminants in the pipes. The rubber membrane ruptures, and as a result the device must be replaced
The pressure switch should be checked for correct operation and general serviceability once every 3–6 months. At the same time, the air pressure in the accumulator is also checked.
If, during adjustment, sharp jumps in the needle on the pressure gauge occur, then this is a direct sign of a breakdown of the relay, pump or hydraulic accumulator. It is necessary to turn off the entire system and begin a full check of it.
Relay settings
The manufacturer ensures that pumping stations are set to average values:
- lower level – 1.5-1.8 bar;
- upper level – 2.4-3 bar.
Lower pressure threshold
If the consumer is not satisfied with these values, then knowing how to adjust the pressure in the pumping station, they can be changed. Having figured out how to set the correct pressure in the storage tank, we begin to adjust the sensor settings:
- The pump and relay are disconnected from power. All fluid is drained from the system. The pressure gauge is at zero at this moment.
- The plastic cover of the sensor is removed using a screwdriver.
- Turn on the pump and record the pressure gauge readings at the time the equipment is turned off. This indicator is the upper pressure of the system.
- The tap furthest from the unit opens. The water gradually drains and the pump turns on again. At this moment, the lower pressure is determined by the pressure gauge. The pressure difference to which the equipment is currently set is calculated mathematically - by subtracting the results obtained.
Attention. To obtain the correct setting, you need a reliable pressure gauge whose readings you can trust.
Having the opportunity to estimate the pressure from the tap, select the required setting. Adjustment to increase the pressure of the pumping station is carried out by tightening the nut on a large spring. If the pressure needs to be reduced, the nut is loosened. Do not forget that adjustment work is carried out after disconnecting the device from the power supply.
Attention. The setting is carried out carefully; the relay is a sensitive device. One turn of the nut changes the pressure by 0.6-0.8 atmospheres.
Upper pressure threshold
To set the optimal frequency of pump activation, it is necessary to adjust the pressure difference. A small spring is responsible for this parameter. The optimal value of the difference between the upper and lower pressure thresholds is 1.4 atm. If it is necessary to increase the upper limit at which the unit turns off, then turn the nut on the small spring clockwise. When decreasing - in the opposite direction.
Setting scheme
What effect does this adjustment have on the equipment? A reading below average (1.4 atm) will ensure a uniform supply of water, but the unit will turn on frequently and quickly break down. Exceeding the optimal value promotes gentle use of the pump, but the water supply will suffer due to noticeable pressure surges. The pressure difference of the pumping station is adjusted smoothly and carefully. The result of the impact requires verification. The scheme of actions performed when setting the lower pressure level is repeated:
- All devices are disconnected from the electrical network.
- Water is drained from the system.
- The pumping equipment is turned on and the result of the adjustment is evaluated. If the performance is unsatisfactory, the procedure is repeated.
There are limitations to consider when making differential pressure settings:
- Relay parameters. You cannot set the upper pressure threshold equal to 80% of the maximum value of the device. Data on the pressure for which the controller is designed are present in the documents. Household models usually withstand up to 5 atm. If it is necessary to increase the pressure in the system above this level, it is worth buying a more powerful relay.
- Pump characteristics. Before choosing an adjustment, you must check the equipment specifications. The unit should turn off at a pressure of 0.2 atm. below its upper limit. In this case, it will function without overload.
Troubleshooting Methods
Troubleshooting jobs can be simple or complex. In the first case, it is enough to replace the cartridges in the filter and eliminate leaks. The second option involves taking further measures if simple measures do not produce results. In this case, it is important to know how to set up the hydrophore.
More complex troubleshooting steps for pumping equipment include adjusting the pressure in the hydraulic tank and adjusting the pressure switch. In this case, you need to know what pressure should be in the water supply station.
There are several problems with the operation of a household pumping station that you can try to fix yourself.
Features of adjustment “from scratch”
If both relay springs are weakened, the pump station automation is adjusted according to the following algorithm:
- The unit is turned on to pump water into the system. The pressure level is controlled by monitoring the stream from a remote tap. If the pressure is acceptable, the pressure gauge reading is recorded and the pump is turned off.
- Having disconnected the sensor from the network, open the cover and twist the nut of the large spring until the contacts are closed.
- The box is closed and the device is turned on again. The pump is turned on and left to work until the pressure on the pressure gauge reaches a mark equal to the previous value plus 1.4 atm.
- The unit and relay are disconnected from the power supply, then the nut on the smaller spring is tightened until the contacts open. The lower and upper threshold settings are completed.
Pressure switch with pressure gauge
Deviation from equipment operation requirements
Continuous operation of the equipment, without shutting down, is noted if the automation of the pumping station is configured incorrectly. In particular, we are talking about too high set pressure values. In addition, this occurs when the engine is idling, which is not accompanied by pumping water.
Such a deviation in performance may occur for the following reasons:
- The first start of the pump was carried out without filling with water. To solve the problem, you need to pour water into the pump using a special funnel and adjust the hydrophore.
- The pipeline is damaged or an air lock has formed in the suction valve. Such a problem can only be detected by checking the entire length of the pipeline for bends, narrowings or air pockets. Identified problems should be eliminated and damaged areas replaced.
- There is no access to water for operating equipment. The solution to the problem is to find the reasons for the lack of water and eliminate them.
- Blockage in the pipeline. Simply cleaning the pipeline and removing accumulated contaminants can help fix the problem.
If the station starts working and turns off after a short period of time, then the problem may be a damaged membrane. In this case, the membrane needs to be replaced. A similar situation can occur if there is no necessary pressure in the system. Here you need to take the appropriate measurements and check the hydraulic tank for cracks or other damage.
The situation with blocking the operation of the check valve occurs quite rarely. This occurs when debris or foreign objects enter the system. The situation can be corrected by disassembling the pipeline in the problem area and removing the blockage.
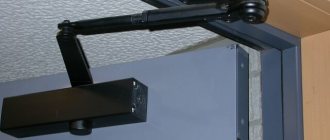
Gearbox installation
The regulator must be installed at the beginning of the pipeline fittings designed to shut off the flow of liquid, in front of the metering devices. This will achieve greater efficiency and simplify the maintenance process. In addition, meters, filters and other hydraulic equipment will be protected.
Accommodation in an apartment
Before carrying out installation work, you should correctly assemble the RDV and test the integrity of the plugs. The control device is placed between the adjustment taps in a strictly vertical position. Taking into account that the pipe runs exactly horizontally.
If you intend to use polypropylene elements, you must ensure that adapters are available. Usually they come immediately in a prefabricated kit.
The installation of the unit must include a filter mesh and a valve for controlling the liquid. The connection areas will need to be laid with FUM tape. At the end of the work, it is necessary to tighten the connecting joints. The main thing is not to overdo it and not break the nuts.
Installation in a private house
The installation process here is practically no different from that described above. The only difference is the pump, which serves to maintain the required pressure. The control device is installed in the area where the main outlet coincides with the supply network. Many manufacturers produce regulators and pumps as a set. But in some cases you will have to purchase an additional pumping mechanism.
It is quite difficult to install on your own. If you are not confident in your own experience and certain knowledge, it is better to entrust this work to specialists.
AMETHYST - 02 M up to 2 cubic meters/day.
Aeration unit AS-1054 VO-90
Main table dispenser AquaPro 919H/RO (hot and cold water)
How to adjust the water reducer in an apartment and is it really necessary?
A device that allows you to control the amount of atmosphere in the water supply is simply irreplaceable in most cases. It acts as a restraining protective factor that protects the hydraulic network from harmful fluctuations and excess load. It must be installed if at least one of the problems occurs:
- Lack of stable pressure. When tap liquid initially flows from the tap in a thin stream, but after a couple of seconds it almost knocks down the person standing near the sink - do not delay installing the unit. Sudden pressure surges become the root cause of breakdowns of household appliances and communications. In addition, such instability poses a direct danger to users (thermal burns).
- Too much water flow. In such a situation, the installation of a reduction gearbox is required. Owners of apartments on the ground floor most often encounter a similar problem. This happens because H2O is supplied to high-rise apartment buildings with great force. Otherwise, it simply will not rise to the required level and residents of the upper levels will be left without water. When a residential building is located near a pumping station, inflated indicators become commonplace. Because of this, connections fail with alarming regularity, leaks form, etc. But a custom reduction unit helps eliminate all these difficulties.
- Weak pressure. In this case, it is worth installing a device equipped with a pump. Thanks to this device, you can forever forget about the thin trickle from the tap, which prevents you from taking a normal shower, washing dishes or connecting any household appliances.
How to adjust water pressure in an apartment and remove standard settings
The need to deviate from standards may arise for a number of reasons. The main ones should be listed:
- if the consumption of water resources significantly exceeds the power characteristics of central systems and pumping complexes (low flow force);
- location on the upper levels of multi-storey buildings (lack of H2O);
- the opposite situation is when housing is located at the very bottom of the building (excess p);
- pumps do not work correctly, frequent fluctuations (jumps in indicators) occur.
In such cases, it is necessary to reconfigure the adjusting device. In addition, the pressure may change over the long period of operation of the water supply system. For example, the cross-section of pipes may decrease due to the abundance of rust and other types of internal deposits. In this situation, you will have to make adjustments more than once.
What will happen if you do not adjust the water pressure valve in the apartment, do not adjust the regulator
In the absence of timely adjustment, no particularly dangerous consequences will occur. This is if we look at the issue from a global point of view.
Low pressure will make it impossible to connect useful household appliances to the internal network, take a normal shower or wash dishes. Excessive can lead to numerous breakdowns of communications and the same equipment used in everyday life. Therefore, it is still necessary to regulate the supply in order to avoid common problems due to refusal to carry out regulatory measures.