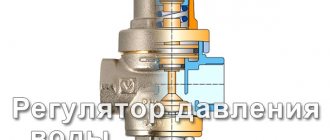
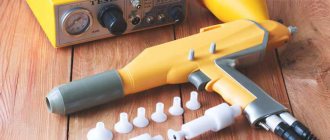
Spray guns allow you to apply paint and varnish material evenly and quickly. However, to obtain a similar result, it is necessary to ensure optimal air pressure, which pushes the paint to the surface. For this purpose, there is a pressure regulator for the spray gun, which you need to be able to adjust. More details about the features of the device and operating rules will be discussed below.
Pressure gauge for a spray gun with a regulator: types and operation
The convenience and quality of painting performed with a pneumatic spray gun largely depends on the air entering it, namely its pressure. The stability of the air flow pressure determines the shape of the torch and the degree of atomization of the mixture. Reducing the pressure reduces the size of the torch and increases the granularity of the supplied solution. To fully control the air supply and effectively use the spray gun, a special device is connected to it - a pressure gauge, which can not only show the pressure value, but also adjust it to the required limits. Next, we will introduce you to the principle of operation of a pressure gauge, show its main types and explain the rules for its use.
Features of setting up the spray gun
In order for the dye to lay evenly on the surface to be painted, you need to adjust the air and paint supply parameters. For this purpose, it is necessary to conduct several tests to determine the quality of the spray gun settings:
- To start testing, you should set the paint gun to spray mode and quickly run a stream along the unwanted surface. If the ink layer lays down evenly, it means that the ink supply pressure does not need to be adjusted. If the droplets of paint lie unevenly on the surface, then you need to use the regulator to adjust the gearbox settings.
- Turn on the device for a couple of seconds and then turn off. If traces of paint spattering are noticeable on the test stand (an unnecessary piece of material), then the pressure of the colorant must be reduced.
- Unevenness of the spot after a short release of the coloring solution means an incorrect ratio of the air-color mixture. To correct this drawback, you need to adjust the gearbox settings.
- In addition to the pressure gauge readings, you should check the condition of the needle and nozzle and the quality of their installation.
Setting up the spray gun
If the adjustment is made correctly, the paint spot when applied vertically and horizontally will have the same characteristics, and the width will correspond to the parameters specified in the instructions.
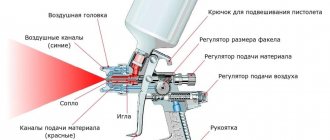
Operating principle
Devices for monitoring and adjusting pressure have many options, but since we are only interested in a pressure gauge for a spray gun, we will consider this particular, general technical variety.
The main element that determines the pressure force is a membrane or tubular spring. The sensitive elements are partially fixed in the instrument body, but also have a moving part located in the path of the air flow and connected to a special tribic-sector mechanism responsible for the rotation of the arrow. Thus, the caused deformation allows us to determine the force of pressure exerted on the part.
Speaking of painting equipment, an air pressure regulator with a pressure gauge for a spray gun are almost always combined in a single housing. In this type of device, piston-type gearboxes with a spring and diaphragm are used. A similar mechanism is used on both mechanical and digital devices.
Some subtleties of the adjustment process
During operation of a spray gun adjusted in all respects, it seems that it is not paint that is flying out of its nozzle, but a cloud of colored dust - this is what indicates that all the settings are correct.
It may be difficult to immediately set up air reducers and paint solution supply for high-quality uniform painting of the product without experience, but a few useful tips will help you cope with this task:
Nuances of the spray gun adjustment process
- If the stain lies on the test base in a figure eight pattern, this means that there is too much air pressure. It must be reduced by carefully moving the regulator lever.
- If there are many uneven dye drops on the test bench, it is necessary to add an air mixture supply. Only by experience can one determine which position of the regulator will be optimal in a given situation.
Using such tests, it is possible to achieve an optimal ratio between the operation of air supply reducers and the paint and varnish composition, ensuring uniform painting of the product.
Purpose of the pressure regulator
The main and only functions of a pressure gauge with a reducer are displaying the current pressure value and adjusting it. A clear understanding and ability to configure this parameter are very important when working with any pneumatic tool, and especially with a painting machine. The spray gun pressure regulator allows you to adjust the spray pattern of the mixture, on which the entire progress of work largely depends. Of course, calibration of the spray gun can be done without this device, but only with the hands of an experienced technician and over a long period of time. Most professional painters always install a pressure gauge in the handle of their gun for quick and accurate adjustments.
If you do not install a pressure regulator on the spray gun, and completely ignore any adjustment of the air flow, you can seriously complicate your work and reduce the final quality of the applied layer. You will be very lucky if the output pressure of the air leaving the compressor and passing through the long hose is close to the optimal requirements. However, in most cases, such luck does not happen, and the torch either takes on a figure eight shape due to excess pressure, or chaotically applies large drops of paint due to lack of pressure.
It is difficult to overestimate the usefulness of a pressure gauge in a spray gun, since this compact device significantly increases operating efficiency. It is recommended to use both professionally and amateur painting if you want to get a good result.
Inlet Pressure Setting
The pressure at the inlet to the spray gun is a parameter standardized and recommended by the manufacturer. It is always indicated in the technical documentation for the spray gun.
Let’s immediately make a reservation that it is advisable to adjust the inlet pressure using a regulator with a pressure gauge connected directly to the handle of the spray gun. Because on the path of compressed air from the compressor to the spray gun, losses of up to 1 bar, and sometimes higher, are inevitable (this depends on the length of the air line, the number of “local” resistances, the condition of the filters, etc.). A regulator connected to the handle of the spray gun will allow you to adjust the pressure more accurately.
Setting the inlet pressure using a pressure gauge-regulator
The process of setting the inlet pressure itself is quite simple.
1. Open (unscrew) the air supply and flame size adjustment screws to the maximum values. Adjusting the paint supply does not play any role in this case.
2. Then press the gun trigger so that compressed air begins to flow. At this time, rotate the air supply adjustment screw on the pressure gauge to set the recommended inlet pressure.
We remind you that for conventional pistols this value is from 3 to 4 bar; for HVLP and LVLP system guns, depending on the model and manufacturer, this value can vary between 1.5-2.5 bar (mostly 2 bar).
Adjusting the inlet pressure using a pressure gauge-regulator connected to the gun handle. 1. Fully open the air supply. 2. Fully open the torch width regulator. 3. Press the trigger. 4. Set the recommended pressure on the pressure gauge.
3. After adjusting the inlet pressure, fully open the paint supply (3-4 turns of the regulator). After making sure that all adjusting screws are open to the maximum, and the viscosity of the paint or varnish is as specified, you can begin testing. But more about tests later.
If the gun is equipped with a built-in pressure gauge
Setting the inlet pressure is even easier on advanced models equipped with built-in digital pressure gauges.
SATAjet 4000 B RP Digital with integrated digital pressure gauge
If the gun is equipped with a built-in pressure gauge. 1. Fully open the torch regulator. 2. Press the trigger. 3. Set the recommended pressure by rotating the air supply regulator on the spray gun.
If the pressure gauge is without a regulator
If the pressure gauge is without a regulator. 1. Fully open the air supply. 2. Fully open the torch width regulator. 3. Press the trigger. 4. By rotating the adjusting screw on the compressor gearbox or filter group, set the recommended pressure.
If there is no pressure gauge at all. Least accurate method
If your gun is not equipped with any measuring instruments, you can very roughly and approximately set the pressure on the compressor gearbox or filter group pressure gauge.
When choosing pressure in this case, it is important to remember that the pressure drop in a serviceable and clean filter is 0.3-0.5 atm (and in a clogged one - much more!), and approximately 0.6 a for an air hose with an internal diameter of 9 mm and 10 m long
If there is no pressure gauge at all. Least accurate way! 1. Fully open the air supply. 2. Fully open the torch width regulator. 3. Press the trigger. 4. Set the pressure on the reducer so that for 10 m of hose (internal diameter 9 mm), the pressure on the reducer is 0.6 bar more than the recommended inlet pressure of the gun.
Types of pressure gauges
In the era of technology, many different meters have appeared. Modern devices can measure atmospheric, absolute, barometric, gauge, differential and vacuum pressure. The pressure gauge for the spray gun shows the value of excess pressure and belongs to the group of general technical instruments. The most popular, for their reliability and autonomy, are mechanical indicators of the dial type. As an innovation, electronic devices with digital displays are increasingly entering the aerosol painting industry.
If the principle of operation of mechanical meters, in general, inspires confidence, then the reliability and accuracy of electronic analogues remain in question. In fact, the reliability of readings in high-quality models has a very low error (up to 0.25%). The service life, if treated with care and properly stored, is tens of years. Of course, not all devices are lucky enough to be assembled from high-quality materials according to the advanced canons of engineering, so it is worth studying the manufacturer’s reputation in advance. Pressure gauges of exemplary quality are produced under the brands SATA, DeVilbiss, INTERTOOL, STAR.
When choosing a spray gun pressure regulator, you should pay attention to the thread diameter of its connection, which can be 1/4 or 1/8 inch. In order not to use adapters, it is recommended to select a pressure gauge with a thread that matches the threads on the handle of the spray gun and on the end of the air hose.
Optimal pressure for a spray gun
Having understood the principle of operation of a pressure gauge with a regulator and clearly defined its purpose, you can safely begin operation. How to use this device and what pressure to set for the spray gun to perform high-quality painting. Depending on the design of the gun (its spray system), the value ranges within very large limits: from 1 bar to 5. The exact pressure recommended for operation is always indicated in the technical document, on the box and sometimes even on the body of the spray gun itself.
Sometimes, it is not possible to find out the recommended pressure for painting with a spray gun due to the lack of documentation and information on the Internet. This is common for cheap, mostly nameless, Chinese models. In such cases, the optimal air pressure can be determined experimentally by carrying out several test sprays. The torch of a correctly adjusted pistol has the shape of a smooth, elongated oval, with an even distribution of paint and a slight blur at the edges.
You can determine what pressure is needed for a spray gun, in approximate values, based on its spray system. The most common today are: HP (2.5-5 bar), HVLP (2.5-3 bar) and LVLP (2-2.5 bar). We described in more detail about setting up a pneumatic spray gun in a separate publication.
Testing the spray gun
There are three simple tests that allow you to evaluate the serviceability of the spray gun and the correctness of its adjustments:
- test for the correct shape of the torch imprint;
- test for uniform distribution of paint in the torch;
- spray quality test.
The main one is the first one, and we’ll start with it.
Torch imprint correctness test
To carry out the test, we need a sheet of clean paper or cardboard, previously fixed to the wall. Then we proceed as follows.
- Make sure that all adjusting screws of the spray gun are open to the maximum, and that the viscosity of the paintwork in the tank is normal.
- Bring the gun to the test surface at the distance recommended for the type of your spray gun (20-25 cm for conventional sprayers, 10-15 cm for HVLP, 15-20 cm for LVLP/RP).
- Direct the nozzle axis perpendicular to the surface of the sheet and literally press the release lever for a second.
- We look at the imprint of the torch. By its appearance you can judge how correctly the gun is adjusted.
The most effective and visual way to check the correct operation of a spray gun is to control the shape of the spray pattern. The procedure must be performed every time before staining. Test spraying is carried out on the surface of a clean sheet of paper, cardboard, mounted vertically
If the spray gun is in full working order and correctly adjusted, the torch imprint should be a clear, highly elongated oval of evenly applied paint (possibly with a slight blurring of the edges). Its sides are smooth, without any protrusions or depressions, and the paint and varnish material is evenly distributed over the entire area of the stain.
If the torch print does not correspond to the standard, the reason is often trivial - an unbalanced ratio of air supply to paint supply. So, if there is an excess of material in the center or at the edges, try reducing the supply of material by turning the screw no more than one turn and repeat the test. If the torch is shaped like a figure eight (very narrowed in the center), reduce the inlet pressure. The fingerprint takes the shape of a banana if one of the side channels of the air cap is clogged.
Read more about other reasons for incorrect spraying.
For an experienced master, not only the shape is important, but also the degree of saturation of the spray pattern (dry, normal, with smudges forming). Based on this information, you can preliminary estimate the speed of movement of the paint gun and the optimal distance to the surface to be painted.
Test for uniformity of paint distribution in a torch
We unfold the air cap or the entire spray gun so that the torch imprint becomes horizontal. We press the trigger and spray the material until the paint begins to flow down in streams. By observing the flow speed of these streams and the distance between them, we can draw conclusions about the uniformity or, conversely, unevenness of the distribution of paint in the torch.
Test for uniformity of paint distribution in a torch
For high-quality and effective painting, the material must be distributed evenly or with a slight concentration in the central part of the torch. Examples of correct and incorrect distribution of material are given below.
Please note that there are air caps specifically designed for high concentration spray in the center of the spray.
Spray quality test
To finally make sure that our gun applies the paint and varnish material evenly, we will conduct one more, final test, simulating, in fact, the painting process itself. Along the test surface at the recommended distance and at a uniform constant speed, we carry out the switched on sprayer. The size of the paint droplets in the resulting stripe can tell us something.
Spray quality test
Firstly, there is no need to try to achieve very small droplets of the same size. The droplet size depends on both the spray pressure and the fineness of the pigment. Therefore, a uniform distribution of droplets smaller than the rest over the print can be considered normal. It is also normal for the droplet size to decrease slightly from the center of the print to the top and bottom.
Remember to use the minimum required pressure to achieve a good spray. Too much pressure will lead to increased fogging, excessive material consumption and an excessively “dry” rough coating.
Tips for working with the regulator
Using a pressure gauge with a gearbox certainly simplifies the painting process, but at the same time it entails some nuances. To avoid possible inconveniences, it is recommended to adhere to the following rules:
• The best place to mount the pressure gauge is the handle of the spray gun. If a moisture separator is used, it is recommended to install it on the bottom of the pressure gauge with a male thread. This is done to obtain more accurate readings, since the filter can reduce pressure to 0.5 bar.
• The combination of a spray gun, a pressure gauge and a moisture separator forms a very cumbersome structure. It is not very convenient to work with such a device in hard-to-reach places, so it is slightly modernized by installing a short (10-15 cm) piece of hose between the handle and the regulator. The flexible element allows you to operate in tighter spaces without much reduction in pressure.
Source
How to connect?
The main thing is to make sure that the threads on the pressure gauge match the threads on your sprayer. When everything is good, you can move on to upgrading the spray gun.
- The best place for installation is the handle of the spray gun. If a moisture separator is installed, it will reduce accuracy. Then build a pneumatic system like this: air supply hose - moisture separator - pressure gauge - spray gun.
- The design may turn out to be massive, and this will lead to difficulties when working in tight spaces. To avoid this, use a short (10-15 cm) hose through which you need to connect the sprayer handle and the pressure gauge. Then cramped conditions will not become an obstacle, but you will have to work more carefully.
All elements of the system are connected to each other by thread. If not, use clamp clamps. And to check the tightness, apply soapy water to the joints. If there is an air leak, tighten the connecting nuts or replace the gasket.
Types and operation of pressure gauges for spray guns with pressure regulators
Spray guns allow you to apply paint and varnish material evenly and quickly. However, to obtain a similar result, it is necessary to ensure optimal air pressure, which pushes the paint to the surface. For this purpose, there is a pressure regulator for the spray gun, which you need to be able to adjust. More details about the features of the device and operating rules will be discussed below.
Operating principle
A pressure gauge for a spray gun includes a membrane or a tubular spring in its design; they are responsible for measuring the pressure force. Some of these parts are located inside the device and are fixed, but some parts move. The last parts are attached with a tribco-sector mechanism that rotates the hands. Thanks to them, the force of the effort is recorded.
In the device, the regulator and pressure gauge are most often connected in one compartment. Similar elements are used on mechanical and digital devices.
Types of pressure gauges
There are several types of pressure gauges on sale, which have their own characteristics. Mechanical versions with arrows are more in demand for the quality of readings and ease of use. Electronic types with a digital display are considered a newer option.
Consumers are accustomed to the accuracy of the first types and are confident in them. Due to its novelty, the second type is not so in demand; the attitude towards it is suspicious. In fact, it can be noted that electronic pressure gauges can give excellent accuracy, but this only applies to high-quality devices. They serve for a long time, but you need to choose a good quality option.
When choosing, the diameter of the thread on the connecting part is also taken into account. It comes in 1/4 or 1/8. For ease of installation on the spray gun, it is advisable to select it for a tool with a suitable diameter.
Optimal pressure for a spray gun
To correctly set the pressure level, you need to know what it should be for successful painting. The standard instructions are in the instructions for the device; they can also be indicated on the device itself.
However, inexpensive spray guns may not have such instructions. Then the optimal indicator will have to be determined through testing. Paint is applied under different pressures. For good coloring, the distribution should come out in an oval shape, leaving a blurred application at the edges.
How to adjust pressure if the recommended limits are unknown
If there are no instructions from the manufacturer, then you have to independently determine what pressure will be optimal. To achieve this, pressure is adjusted and each option is tested for quality by applying paint until the desired finish is achieved. This can be a long process.
Each option is tested for quality by applying paint until the desired finish is achieved.
Setting the spray gun inlet pressure
The required indicators are determined by the manufacturers; you need to get them for painting work. The spray gun regulator will help you adjust it more accurately, and it is recommended to install it on the handle to get the correct readings.
With regulator and pressure gauge
Setting up a pressure gauge on a spray gun is not difficult; its presence, on the contrary, helps to simplify the process. The following manipulations are carried out:
With electronic pressure gauge
The process of working with a more modern type of regulators is more convenient:
With pressure gauge without regulator
If the regulator is not installed, the process will look like this:
Without pressure gauge
With such work, it will be very difficult to establish the desired indicator. Take into account that the pressure drops in a working clean filter by about 0.3-0.5 atm, in a dirty filter the figure is higher, 0.6 atm goes through the air hose if its diameter is 9-10 mm. Actions:
If the spray gun is from an unknown manufacturer
In this case, experimental adjustment is carried out. The paint and varnish material is collected, the regulators are opened completely, and the pressure indicator is changed one by one until the desired distribution of paint on the surface is achieved. The shape should be oval, there will be a blurry mark around the edges.
What influences the correct adjustment of the air mixture supply?
To get a beautiful product when using the hardware spray painting method, you must take into account that the quality of spray painting depends on:
- nozzle diameter;
- constant level of air supply pressure. This parameter is relevant only for pneumatic and electronic units.
The diameter of the nozzle for high-quality uniform painting must be constant (if it changes, minor repair work is carried out to adjust or replace a part that has become unusable), and the air supply pressure fluctuates depending on the paint and varnish material and the base material for painting. As air pressure increases:
Spray gun design
- Productivity increases. You can paint a large surface in a short time.
- The dye spray layer is reduced, but the area to be painted greatly increases. Sometimes this requires repeated application of layers to improve the quality of work and increase the protective properties of the coloring material (for example, when processing products exposed to aggressive environmental influences).
- The efficiency and quality of work increases (the consumption of paint is reduced, which is applied in an even layer, without leaving drips or streaks).
- It becomes more convenient to work. When the dye pressure is low, you have to stand close to the wall, making many unnecessary movements, while when the dye pressure is high, spraying is carried out from a relatively large distance.
In addition, the amount of pressure determines how far you need to hold the spray gun from the base for uniform painting, because the lower the air pressure in the spray gun, the closer you need to bring the paint gun to the surface for high-quality painting.
Rules for working with a spray gun
Optimal performance parameters will vary for different spray gun models. They can be adjusted following the instructions for the spray gun. It contains a table with pressure gauge readings that correspond to the settings of the gearbox, which helps maintain constant air parameters inside the spray gun. You can set the necessary data based on the readings of the pressure gauge using the adjuster screw.
Optimal air pressure settings at the nozzle outlet vary depending on the spray gun model. But usually it is for spray guns depending on the pressure:
- high – 3 atm.;
- normal - 2.5 atm.;
- low – 2 atm.
The efficiency, uniformity and fineness of paint application depend on these parameters.
Tips for working with the regulator
The device greatly simplifies the entire process, but there are subtleties that can further help in regulating pressure. Experts recommend:
The device in question helps to carry out spray painting easily. The result, thanks to the correct pressure, will be of high quality, the layer will be beautiful. The setup itself is not difficult if you follow the steps described in the article.
How does the operation of a pressure gauge affect the spray gun?
Many craftsmen choose to use a spray gun when performing various jobs. Painting with it is characterized by such aspects as convenience, speed, and paint savings.
Significant disadvantages of its use are stains, uneven coloring or unpainted areas.
The cause of such defects may be fluctuating dye supply pressure during operation. Spray gun pressure gauges can prevent such defects from occurring.
Correct air supply setting. When spray painting using a hardware method, it is important to have an attractive aesthetic appearance at the output, so it should be taken into account that the quality of painting is directly related to the size of the nozzle (in diameter).
In addition, quality also depends on uniform and continuous air outlet pressure, which is very important for pneumatic and electrical units.
In order for the painting to be of high quality and uniformity, the size of the nozzle in diameter should not change.
If this parameter is not constant, adjust the defective part or replace it. The air release pressure depends on the base and paint materials.
What happens when the air supply pressure increases? Firstly, the speed of work is increased, that is, in a relatively short time it is possible to paint a large area.
Secondly, the thickness of paint application is reduced, but it should be noted that the size of the painting area increases.
If you process objects that are exposed to aggressive action from the outside, an additional coating layer is required to increase the protective characteristics of the paint.
Fourthly, the consumption of coloring material is significantly reduced, while it is applied in an even layer without streaks or leaking stains. This means that the quality of work improves. Fifthly, the level of convenience during work increases.
This means that with good powerful spraying, the artist can stand at a great distance from the wall, thereby not making many unnecessary body movements, which happens with little pressure on the paint material.
In this case, the person must approach and work closely with the object. The distance at which the spray gun is held from the base to obtain an even paint job is related to the amount of pressure.
The smaller the air flow, the closer you need to bring the spray gun to the object to be painted.
Depending on the type of pistol, their all-around performance will vary. This should be indicated in the instructions for use. This manual contains information with pressure gauge values that are consistent with the gearbox settings.
Using a gearbox, the air parameters inside the pressure gauge are maintained constant. You should read the factory instructions before using the pressure gauge.
In general, if necessary, you can adjust the air parameters using a screw - regulator.
The most optimal air pressure adjustment depends on the type of pressure gauge and spray gun.
But in the general case, as a rule, for high it is 3 atmospheres, for normal - 2.5, for low - 2. These values affect not only the uniformity and thickness of the resulting layer, but also the efficiency of using the dye.
Types of pressure gauges. In order to fix it in the spray gun, different pressure gauges are used depending on the model of the tool itself. Spring sensors. Simply designed, reliable, almost unbreakable.
It is the pressure gauge that is most often used in spray guns for painting surfaces. Membrane type devices. The main component of such pressure gauges is a sensitive membrane that determines the supply of air mixture and paint.
This type of device is very rarely used in paint guns. Sensors with pressure regulation. Such pressure gauges are installed on the sprayer handle.
When an auxiliary installation is installed on a painting apparatus, it only records data, but does not directly affect the operation of the sprayer itself. Digital device. A modern spray gun, which is rarely found in spray guns.
Difficulties in adjusting the device
Many people who pick up a spray gun for the first time believe that it is equipped with an adjustment mechanism that is too cunning. But the tactics of action depend only on the location of the pressure gauge:
- On the instrument itself. In this case, you need to set the data specified in the factory settings.
- A removable pressure gauge, which is an additional accessory for the spray gun. It is attached to the handle of the device. You can also configure it using the prepared table in the attached instructions.
- Regulator on an autonomous air mixture supply source. You can use any air compressor for this. The adjustment is carried out at the point where the air supply pipe is connected to the spray gun, when choosing the optimal ratio between the air flow from the compressor and the paint mixture in the spray gun.
Knowing what parameters are necessary for high-quality painting, you can easily, based on the pressure gauge readings and the nature of the test spot, select the necessary settings using the regulator. When the paint sprayer is prepared for work using this method, obtaining a beautiful and high-quality painted surface will not take much time.
What is the minimum pressure for a spray gun?
The most versatile tool for painting a car is a spray gun. With its help, you can restore both the paintwork of the entire machine and its individual element. In this article we will talk about how to choose the right pressure for painting a car when working with this device.
When working with a spray gun, it is necessary to take into account how its pressure should be adjusted for a particular type of painting. The quality of the work result will depend on this. For example, excessively high pressure leads to excessive paint consumption and smudges, very low pressure will reduce the quality of the new paintwork.
Instructions for selecting operating pressure for various spray guns
Types of paint sprayers
There are three types of paint sprayers:
To ensure optimal supply pressure when painting a car, be sure to familiarize yourself with them before work. There are three main types of control mechanisms that a spray gun typically has:
General setup rules
It seems that using a spray gun is simple - just plug it in and spray paint. However, this must be done correctly by adjusting the device. If this is not done, splashes, smudges and simply uneven application will form on the surface.
The setup consists of several steps:
Only masters can act “by eye” without using auxiliary devices. Beginners will have to carefully go through all the steps. To check if the adjustments are correct, take a sheet of masking paper for a test spray.
Torch adjustment
Adjusting the torch is responsible for the spray area. If you need to paint a large surface, you can set the maximum (close to it) value. If it is necessary to combine several colors or paint a narrow area, the parameter is reduced. The size of the torch is changed using a regulator - you need to turn it. But it is more important to understand how much the torch needs to be set.
If you turn the knob to the maximum, the spray layer may be too thin - the paint will be too dry at the edges of the surface. It is possible to overspend the material - this means extra money and mixing work. It is best to turn the regulator to maximum, and then reduce it slightly.
Usually the torch is held in a vertical position, but to paint narrow areas you can change its angle, up to a horizontal position. It is not recommended to set the torch to a weak spray - a high concentration will lead to smudges and streaks.
Inlet Pressure Setting
The pressure of paint ejection from the nozzle is determined by air pressure - it is regulated by a special valve. Too much pressure will result in a weight-bearing shape instead of an oval shape.
The boundaries will be blurred, the splashes will fly outside the contour. And weak pressure, as is easy to understand, forms a dense clot of paint, which will lay down in too thick a layer. The required pressure for the spray gun is selected as follows:
If the splashes cannot be eliminated, the spray gun “spits” instead of spraying, the device is clogged. Naturally, such a problem cannot exist with a new device.
Paint supply
The only way for a beginner to adjust his feed is through trial and error. It is reckless to set this parameter “intuitively” and then use up all the material in a matter of seconds.
No, you need to close the valve first - the paint will not spray in this position. Now turn the regulator two turns and spray on the paper. Until the trail is very close to smooth and uniform, you cannot stop. Paper absorbs liquid better than a metal body.
Distance to surface
On this issue, the masters are not unanimous - some claim a distance of 10 cm, others - up to 30 cm. The difference is explained by different models. You need to adhere to certain recommendations: 10-15 cm for HVLP, a little further for LVLP (15-20 cm), and, furthest (20-25 cm), for conventional sprayers (HP).
Types of spray guns according to international classification
The international classification of spray guns is more detailed. It identifies the following types of devices:
It should be noted that experts consider LVLP system paint sprayers to be the optimal type. Their main positive qualities:
The car must be painted in 3 layers. The pressure should be 3-4 atmospheres on average. Lower or higher values can spoil the final result of the painting work.
Adjusting the air supply on the spray gun
Proper adjustment of the device involves several procedures:
- preparation of the coloring composition;
- setting the required paint dosage (if necessary);
- regulation of air supply.
The third point is more labor intensive.
They begin to regulate the paint pressure after all preliminary work with the coloring composition. For experiments, you will need a sheet of Whatman paper or A3 paper or larger. It is fixed on the wall. All this will be required solely for adjustment and will not be required during further work.
After this, the prepared coloring liquid is poured into the spray gun and preliminary spraying is performed on a sheet of whatman paper pinned to the wall. The pressure settings are adjusted until the experimental surface is covered with an evenly thin layer and there are no streaks on it.
It is very difficult to select the ideal pressure without preliminary tests, since the required value is selected from a number of parameters: the type of paint composition, its viscosity, modification of the spray gun.
Therefore, setting the required pressure is carried out precisely by testing - through an equal supply of air and evaluating the coated surfaces. When there is no release of paint in the form of fine dust, but at the same time drops of different gradations fall on the sheet of whatman paper, it makes sense to add air. When the shape of the torch takes the form of a figure eight on the surface, this indicates an excess of air supply and increased pressure.
Read also: Railings with forging elements photo
Scheme for adjusting the spray gun torch.
The task of the tests is to find a pressure value at which the torch will take on an elongated shape without inclusions or spitting. Make sure that the coating applies equally over the entire range of the torch imprint. If this is the case, then the adjustment is considered complete and work on the body proceeds.
The whole essence of air supply regulation is always the same for any method:
- regulation via a mechanism on the spray gun;
- testing using a removable regulator that comes complete with the device, and during operation is put on its handle;
- regulation of air supply on the receiver where the hose is connected to it.
By trying it yourself, it is quite possible to figure out the air adjustment and select the appropriate pressure value for painting the car. This procedure is not so complicated if you compare it with the moment you prepare a car for painting. Already half the success is the paint and varnish composition prepared according to all the rules, the working surface and equalized pressure.
At the moment, effective spray guns that make it easier to regulate pressure and select the appropriate torch, due to their high cost, are not available to the general public.
A car owner, purchasing a spray gun for personal use, expects to use it no more than once every three years, or even all 5. Therefore, for many, it becomes more profitable to provide a service station for the car than to invest more than one thousand dollars in one device with a low utilization rate.
Therefore, use middle-class devices available at every car market. You can take an introductory tour (by studying the instructions and relying on the recommendations of “experts”) regarding the choice of a compressor and receiver (when the compressor is not built-in). Before transferring work to a car, you need to practice and conduct more than one experiment on the surface prepared for the experiments.
Some car owners choose to use homemade devices instead of purchasing a factory-made model. This is only possible when a person is aware of the intricacies of the operation of the receiver and compressor, the properties of coloring compounds and other points.
Use the tips above and do it right. Good luck choosing a model!
What parameters regulate the operation of the spray gun?
All modern types of pneumatic spray guns have three parameters that regulate their operation:
The following parameters depend on the size of the parameters: productivity, transfer coefficient, fineness of material atomization, uniformity of application.