When painting, what does the thickness of the paint and varnish material affect? How to determine the viscosity of paint for a spray gun? What are its optimal values? What type of spray gun should be used for viscous liquids? Let's try to answer these questions.
The viscosity of the paint largely determines the quality of the coating.
Viscosity units
According to the international SI system, viscosity is divided into dynamic and kinematic. The first is measured in Pa×s or cP (centi Poises), and the second in cm2/s or St (Stokes). There are also non-systemic units of measurement, such as Engler's angle.
To determine the viscosity of paint, manufacturers use the concept of conditional viscosity. This value is measured in seconds and is used mainly by manufacturers of domestic paints and varnishes. It is conditional because it depends on many factors: the diameter of the viscometer drain hole, the volume of the viscometer funnel, ambient temperature, etc.
Instruments for measuring viscosity
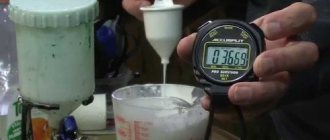
The viscosity of a liquid is determined using a viscometer. The simplest version of a viscometer is a funnel with a volume of 100 ml and a bottom hole diameter of up to 4 mm, all of which is mounted on a holder. The time in seconds during which a 100 ml liquid flows out through the hole in the funnel is the viscosity value. There are several options for funnels.
According to Russian GOST, bowls are produced for determining the viscosity of paint and varnish products VZ-246. There is a European analogue of DIN53211-87 and an American version of the FORD or ASTM D 120087 viscometer.
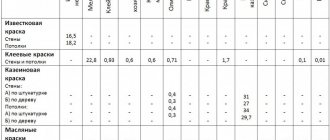
Let's look at how to determine the viscosity of paint yourself. To do this, pour 100 ml of the paint product being measured into the bowl of any of the above devices. The bottom hole must be closed. Then we open the hole and measure how many seconds it takes for the liquid to completely flow out of the bowl through the hole. Next, we compare the obtained value with the indicated optimal value on the packaging or, if necessary, with the value in the table with the optimal viscosity. It is important to remember that the viscosity value is highly dependent on ambient temperature and pressure.
Therefore, viscosity must be measured at the temperature indicated on the packaging or in the table. When measuring, there is no need to “help” the paint flow out by pushing it from the edges. In this case, the measured value will also not correspond to reality.
Instruments for determining viscosity are sold, and their cost ranges from several hundred to hundreds of thousands of rubles.
Equipment for viscous materials
How does a spray gun for viscous paints work?
How to distinguish it by appearance?
- In industrial conditions, airless spray guns are used for highly viscous materials. The piston pump supplies the nozzle not with air, but with the paint itself under pressure of up to 200 atmospheres. This type of equipment has a high dye transfer rate and a cost equivalent to the annual budget of a small African country.
The photo shows a spray gun for airless spraying.
- A more democratic option is a conventional pneumatic spray gun, in which air from the compressor is supplied not only to the nozzle, but also to a hermetically sealed paint tank. Excessive pressure forces the viscous liquid through the siphon tube.
Viscosity of different types of paint
See the table for optimal values
The modern market offers a huge number of paints suitable for treating various surfaces and having a diverse composition and characteristics. We list the main types of paints and varnishes:
- alkyd enamels - the basis of this paint and varnish material is alkyd varnishes or resins, pigments and an organic solvent;
- nitro enamels are made on the basis of colloxylin - a special type of nitrocellulose with a low viscosity index; for dilution, as well as the previous one, various solvents such as White Spirit, acetone, etc. are suitable;
- water-based paints - water-based paints, popular due to their reasonable price and low toxicity;
- acrylic paints - these paints are based on a synthetic polymer, however, they are well diluted with water;
- oil paints are diluted with drying oil or other oils. They contain toxic pigments, but the bright and long-lasting colors of these paints make them popular.
All these paints and varnishes have their own viscosity. For example, water-based paints have a conditional viscosity of 20-25 s (din), and for oil-based paint this characteristic will be 18-22 s. A paint viscosity chart is most often included with the viscosity measuring device. Organic solvents are used to thin most types of paint. It is better to choose those indicated in the specification or on the paint packaging, so as not to spoil the pigment and maintain the basic characteristics of the product. The paint should be diluted with constant stirring, for which you can use a glass rod or ruler. Do not use wooden or plastic objects for mixing. Wood may leave crumbs in the paint and it will lose its uniformity, and plastic can dissolve in organic media and spoil the paint pigment.
- Metal objects are also suitable for mixing, but you must first remove the burrs from them.
- The paint must be thinned in a clean container without mechanical damage.
- For two-component mixtures (varnishes, enamels), in addition to the solvent, a special hardener is used, which is added first.
What to do if the mixture is too liquid
If your solution has lost its viscosity due to excessive dilution, there are only two ways to return it to its former consistency.
- Add exactly the same, but thicker paint to it. If we are talking about oil, alkyd or nitro enamels, you can try adding alkyd varnish or another binding mixture used in the production of your paint to the solution.
- Let sit for several hours or days, stirring occasionally. Since the solvent tends to evaporate, a certain part of it will come out. It is advisable to increase the evaporation area and install the container in a constantly ventilated place.
As an extreme option, which will clearly affect the quality of the material, you can try cooling the paint in the refrigerator. If the color is white, you can try adding filler (gypsum, chalk, talc).
Even if your paint is too thin, the spray gun will be able to spray it, and even quite well if you install a nozzle of a smaller diameter. Therefore, you should not despair too much and resort to extreme measures.
The most common habit of everyone is to thin the paint “by eye” or as the instructions suggest. Each can of paint has a description of the recommended dilution of this material, but the temperature is different all the time and this matters. For example, for the Mobihel base, a viscosity of 15 units is suggested. For Mobihel acrylic paint, a viscosity of 17-18 is already offered. Both in the first year of painting, and in the second, I always diluted the paint, as is usually the case with everyone, “approximately”. But then it was noticed that if you guess the viscosity, then the painting goes better, and most importantly, the painting looks nicer afterwards. If it turned out “very good,” it usually meant that you got the viscosity right 100%. Usually there is no time to do this, especially when you paint over and over again, but it’s worth doing, it’s important. I learned from neighbors and painters what methods they use. There were no viscometers on sale then, and everyone invented their own method. I seem to have tried them all. What was it. Glass laboratory rods and lowering them into a container with paint. Counting the flowing drops. A ruler that is in paint. If you lift it, you can see how the stream of flowing paint is deflected. Dipping other objects into the paint and also counting the drops.
But basically this method caught on: I diluted the paint, and then tried to paint it on a test sheet of metal. Add 10-15 ml of solvent (thinner) to the tank, stirring of course and releasing the old paint. As soon as I started to like the torch, I stopped there. . But the time has come and a viscometer appeared. About the viscometer. It appeared, but for some reason I didn’t like using it. In principle, this can be explained. Each time it must be thoroughly washed in a solvent, and solvent is sometimes a waste of time for this procedure. But a dirty viscometer is no longer an accurate measurement device. Now the situation is different. I haven’t painted it for a whole year and the aim is lost, I no longer understand what kind of paint I’m painting with. Now the torch opens, now it doesn’t, and other small problems. As a result, the desire for experiments again appeared (and we love them), the goal of which is to make yourself your own personal, convenient viscometer. Convenient - it will be smaller and you will no longer need 150-250 ml of paint, 100 grams will be enough. This is exactly half a standard plastic cup. Cleaning the viscometer is now convenient! It's also convenient to measure.
What paint is suitable for a spray gun?
Almost any paint is suitable for the spray gun. However, it requires certain training to comply with the characteristics of the device.
Note!
Chipboard: what is it? Types, application features, photos, sizes, thickness, explanation, manufacturers
DIY houses made from shipping containers step by step: instructions, diagrams, pros and cons, photos, design
Working pressure in the heating system in a private house: what it should be, how to create it, instructions for adjusting it yourself
What paint viscosity is required for operation is most often indicated in the device instructions, but you can also use a table with optimal values in DIN or seconds.
How to properly dilute paint?
The viscosity of paint for a spray gun is selected based on the following characteristics
- spray nozzle diameter;
- pressure created by the device.
Typically, the paint viscosity in din or seconds required to operate the device is indicated by the spray gun manufacturers in the instructions. However, this characteristic can also be found in a table on the Internet.
Before you start working, the diluted paint is filtered to prevent small debris from entering the nozzle. Many models of spray guns have a built-in filter. However, if you don't have one, you can filter the paint through a disposable mesh filter.
Do not dilute paints and varnishes using untested methods or devices. Paint diluted to liquid kefir may turn out to be too liquid. And prepared with the help of a ruler and a bucket, it will completely differ from the desired consistency in an unexpected direction. The desired result can only be guaranteed by measuring the viscosity using a special device.
A special case
Two-component dyes stand apart - acrylic with organic solvents, epoxy, polyurethane and some others.
How to dilute these materials to working viscosity?
- First, the paint is mixed with a hardener. Of course, strictly in the proportion specified by the manufacturer: both a lack and an excess of hardener will adversely affect the strength of the coating.
- Then the viscosity of the resulting dye is checked with a viscometer and, if necessary, diluted to a working consistency.
How to measure the required amount of base and hardener?
- If the volume is small, this can be done using measuring cups.
- In large cylindrical containers it is easier to use a measuring ruler. If the height of the paint level without hardener is 40 centimeters, then to obtain a ratio of 1:4 it is enough to add it to a level of 50 cm.
Do not forget: this method will give an accurate result only in a cylindrical container. An ordinary bucket has the shape of a truncated cone, which will distort the proportions.
Two-component dyes are diluted after adding a hardener.
Optimal viscosity table in DIN
This table indicates the optimal values of conditional viscosity for paints and varnishes of various compositions. However, it should be remembered that these characteristics are given for an ambient temperature of 20°C. It is clear that there is no need to wait until the desired temperature is established. You just have to apply certain rules. As the temperature decreases, the relative viscosity increases and the paint thickens. As the ambient temperature increases, the relative viscosity increases and the paint, accordingly, becomes more liquid. This must be taken into account before working with any paint and varnish materials and adjusted accordingly.
Preparation of acrylic, base enamel and varnish
When preparing acrylic enamels and varnishes, it is important to remember that these materials are two-component (2K), which means that their curing, unlike one-component materials (1K), which dry under the influence of natural processes in the environment, occurs according to a completely different pattern - due to reaction with a hardener (polyisocyanate) - a substance for cross-linking molecules. The acrylic binder enters into a chemical reaction with the hardener, as a result of which many small molecules combine into one macromolecule - a polymer. Thinner is added to two-component materials only to achieve the required viscosity.
Polymerization of one-component alkyd enamel due to oxidation of the alkyd binder as a result of reaction with oxygen
Polymerization of two-component acrylic enamel due to the reaction between the acrylic binder and the hardener.
What am I talking about? The fact is that the material to which we add more hardener than required will never gain optimal hardness under any conditions, since the number of molecules for cross-linking exceeds the number of molecules of the acrylic binder itself. The molecular chains will not be stitched together correctly and you will have to say goodbye to hardness, and therefore gloss, forever.
Therefore, you should strictly follow the proportions of adding hardener, which are indicated by the manufacturer on the can or in the technical manual. For example, the mixing ratio with hardener is indicated as 2:1. This means that you need to mix two parts paint and one part hardener. We are talking about volume, not grams or milliliters.
The mixed components must correspond to each other in fullness. This, I think, is understandable. For example, if you take a highly filled HS varnish, you need to understand that the concentration of polymer in it is so high that the molecules actually “crack” in the jar. And if you mix it with a low-fill LS hardener, then there simply won’t be enough crosslinking material for correct crosslinking. The same thing will happen if you mix LS varnish and HS hardener. The number of cross-linking molecules is greater, which means there is nothing to hope for correct polymerization.
Let me remind you once again that:
- in one-component materials (alkyds, base enamels, 1K primers), only a thinner is added;
- In two-component materials (acrylic enamels and varnishes, 2K primers), a hardener is first added, then the mixture is brought to the desired viscosity with a thinner. There may be exceptions - this applies to “superfilled” UHS/VHS materials. No diluent may be added to them at all.
As for the proportions, they are different in different systems, but usually up to 50% hardener and 10-20% thinner are added to two-component products. 50-60% thinner is usually added to base enamels.
I repeat once again - this is approximately. With all the variety of types of enamels and varnishes, it is impossible to give one recipe for all occasions by definition. Therefore, you should always act in accordance with the manufacturer's recommendations. The proportions indicated in the technical documentation or on the can were determined through repeated laboratory tests, and therefore they must be observed.
You also need to remember that the thinner used must be linked to the temperature at which painting work is carried out.
