Everything about water supply and sewerage
Pumping stations and wastewater treatment plants
Sewer
Plumbing
Firefighters
The Admiral plant produces complete pumping stations for water supply, fire fighting and sewerage needs. Admiral plant website: admiral-omsk.ru
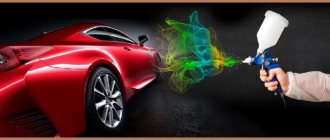
How to spray paint a car at home
Not only the appearance of the car, but also the corrosion resistance of the body, and therefore its durability, depends on the quality of the paintwork.
Most of the work associated with full or partial painting is carried out today in specialized workshops, where pneumatic spray guns make it possible to distribute the layer of substance as efficiently and evenly as possible.
How to spray paint a car at home? Obviously, such a service costs a lot, so many car enthusiasts who want to save money prefer home painting. The main tool in it is a spray can.
Let's try to figure out what advantages and disadvantages this method has, and what factors influence the final characteristics of the paintwork.
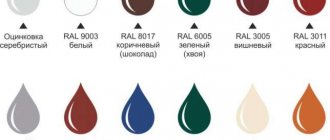
Choosing paint color
The choice of paint color should be based on three main factors:
- Compliance with the data specified in the vehicle’s technical passport - otherwise the document will have to be reissued.
- Match the color of elements that are not painted.
- Color fastness of paint.
The second and third points should be discussed in more detail. Matching the tone to the color of other elements is necessary when the coating is applied only to some body parts. Even the slightest discrepancy will be noticeable at the joints, which will lead to a significant deterioration in the appearance of the car.
Therefore, when choosing a tone, you should be guided by the manufacturer’s regulatory documentation, electronic palettes and other tools that allow you to most accurately select the color number of the paint.
Color fastness is understood as the coefficient of change in tone, firstly, when the coating dries, and secondly, during prolonged exposure to external factors, for example, ultraviolet radiation.
As a rule, inexpensive paints from little-known companies are characterized by low durability; it is better to refrain from purchasing such a product. To protect against atmospheric, mechanical and chemical influences, it is recommended to apply protective coatings at the final stage of painting.
The method for choosing a primer deserves special mention. The most widespread are white and gray tones: the first is recommended when applying light paint, the second when applying dark paint.
Sometimes a brick-colored primer is used - it is good for tones from cherry to light orange. But the main requirement for primer is high adhesive properties, not color.
Preparatory stage
The first thing you need to decide is the choice of place to paint the car. It should be spacious, bright, well ventilated, because paint fumes are very toxic.
A single garage is unlikely to work, but a two-car garage will suffice. Sometimes work can be done outdoors, but for repainting large areas this is not the best choice.
The point is dust, which will settle on a non-dried coating, especially on windy days. In summer, the smell of paint can attract small insects that will hopelessly damage the coating.
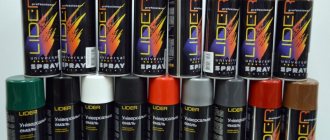
Now some tips regarding the choice of spray cans. We recommend purchasing products from large automotive or construction stores that care about their reputation and do not knowingly supply low-quality products.
Look for text or infographics on the can indicating the possibility of painting the car, read reviews regarding a specific manufacturer of aerosol paints. If there is an expiration date on the cylinder, follow it.
After shaking the can slightly, you should hear a characteristic clang - if it is absent, the paint has begun to dry. Do not buy all the cylinders at once; it is better to take one and test paint it on a sheet of metal. This way you will protect yourself from the discrepancy between the tone and quality of the paint and the required parameters.
Before you spray paint your car, you need to prepare the surface of all body parts. First of all, the car is washed with warm water using special detergents.
After the body has completely dried, it is degreased with a solvent and wiped with a clean rag. This is followed by the most important stage - the protection of elements that are not painted.
It is best to seal them tightly with masking film, but in order to save money, you can use ordinary newspapers and tape. The main thing is to ensure the required geometry of the edges of the paint.
Now let's pay attention to the damage to the body. Chips, scratches and other coating defects are puttied and sanded with fine sandpaper, unlike dents - it is better to straighten them. A layer of primer must be applied to the putty.
If corrosion appears on the surface of the parts, its foci must be treated with a special inhibitor. Deep damage must be eliminated in advance by welding or other methods that prevent further development of the source. After completion of all work, the surface is degreased again.
How to spray paint a car at home
The application of aerosol paint is usually carried out in several stages and includes a set of actions that ensure uniform thickness and structure of the layer.
The answer to the question of how to spray paint a car at home is the following sequence of actions:
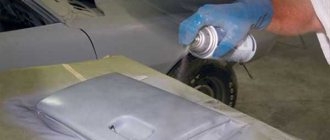
- Shake the can well, mixing its contents, and test on any smooth surface. The tone should be uniform, without drips or edging.
- Point the can at the most distant body parts, maintaining a distance of 30-35 cm, and press the sprayer, simultaneously starting to move the can along the element.
- Move the can linearly at medium speed, avoid jerking and stopping. You can paint in lines or in concentric movements, the main thing is to avoid layering.
- When the first coat of paint is applied, wait 15-20 minutes, and then repeat steps 1-3, applying the second coat of paint. These steps are repeated 2-3 more times. For a uniform transition with unpainted or already painted elements, the lower layers should not be brought to the edge by a few centimeters, and subsequent layers should be gradually brought closer to the edges.
- The drying time of the top layer will be from 20 to 30 minutes, after which they proceed to applying transparent varnish according to the method described above, with the exception of the edges - the varnish should form a transition zone, so you need to spend 10-15 seconds on “blurring” the edges.
How and how a car is spray painted
Spray painting a car is a simple process. On the parts of the body of each car scratches, chips, and small spots appear from the impact of crushed stone. Sometimes defects can be eliminated yourself; aerosols and solvents are used for this. Painting a car with a simple spray can is done according to the instructions. First, the scratched body element is removed for convenience. Spray painting your car is done in a regular garage; for this, the entire room is treated with water, dust is removed, and dirt is prevented from getting on the paint.
Advantages and disadvantages of methods
With minor damage, car owners try to avoid expensive restoration. You often spray paint your car yourself, buy the necessary materials, prepare the premises, and follow all the technologies.
- Does not require special skills or knowledge.
- The canister provides the necessary quality.
- Hard-to-reach places, bends, and irregularities are easier to treat with this sprayer.
- A uniform layer is easy to apply and does not require additional preparation.
- There is no need to distribute the paint evenly with a roller or brush.
- The cost of spray painting is less.
- There are no instructions on the can for painting cars.
- Sometimes the quality of the materials is low, so before restoring the car it is necessary to paint another object and evaluate the quality of the cladding.
- Sometimes the actual and declared shades do not match, so manufacturers recommend purchasing a batch of paint for a certain amount of work.
Colors are selected taking into account the markings; it is better to consult a specialist. Tinting is performed in professional salons using special devices. If the chip depth is insignificant, you can polish it; there is no need to repaint it again.
If the scratch has deepened to the primer or metal, more serious work is required, restoration takes time, and the completely damaged body element will have to be repainted. Spray painting a car is a step-by-step process that many car owners do on their own to save time. This method is suitable for restoring small areas; in case of serious damage, you will have to go to a service station.
Preparation
First you need to decide how to paint it. If this is painting a new bumper with a spray can, it is better to carry out the work with removal. For partial restoration, you can leave the bumper on the car and apply the compound locally. But remember that due to the complex geometric shape, it is very difficult to achieve a uniform layer. Drips may form if the bumper is painted on site.
Next we need to thoroughly wash and degrease the surface. Pay special attention to hidden places - edges and joints of the product. Bitumen stains can be removed with a special solvent that will not affect the paint layer. This way we will ensure that the surface is as smooth as possible before painting the bumper with a spray can yourself.
Preparatory procedures, how to paint correctly
If a car enthusiast tries to carry out repairs on his own, it is better not to delay the work so that the condition of the car does not deteriorate.
After damage to the protective shell, the metal oxidizes, rust appears, and the process of restoring body parts becomes more complicated. Before painting, the car is cleaned with detergents, the surface is dried, grease is removed, wipes and solvent are used for this, after treatment everything is wiped dry. To make work more convenient, the damaged part is removed.
If dismantling is not carried out, other body elements are covered with masking tape or elastic film for protection. The room is cleared of dust and dirt, and a sterile chamber is created. To prevent glare, the body element is illuminated. It is necessary to avoid exposure to sunlight on the coating until it dries. Before spraying, shake the can thoroughly.
- Sandpaper.
- Putty and primer mixture.
- Polyethylene.
- Masking tape.
- Protective elements, gloves, mask, respirator.
- The container with primer or paint is stirred for at least 2-3 minutes.
- A construction hair dryer is used to speed up the drying of the applied layer.
- To remove dust that has fallen onto the paint layer, special pastes are used.
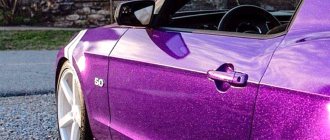
A silicone spatula is used when processing with putty or other finishing materials to keep the surface smooth. The choice of restoration method depends on the degree of damage. If the base layer of the coating remains intact, it is necessary to treat the damage with varnish and solvent to ensure a smooth transition. Primer and putty are used to deepen the scratch to the metal. If a metallic color is selected, the cladding is applied in 3 layers:
- The backing is a material similar to the base color; the layer provides the necessary shade, reduces paint consumption, and helps save money.
- The base is the main color that creates a metallic effect thanks to mica, aluminum powder and other components.
- Varnish - the 3rd layer shines and adds volume.
Technology of coating a car body with liquid rubber
The complete painting process takes several hours, followed by a day of drying. It all depends on where the liquid rubber is used, whether the entire car will be covered or only parts of it. The technology is not complicated and consists of several stages:
It is important to adhere to safety rules when carrying out painting work. A respirator, gloves and no open fire are required.
You can actually do the painting yourself or use the services of specialists. This requires additional funds, but the result will be impeccable.
Instructions for spray painting a car
At the first stage, preparation is carried out, cleaning the body, removing fat, and using anti-silicone. After this, a shade is selected taking into account the body color markings.
The rust is wiped off with sandpaper, the shine is removed, and it becomes matte. After removal, the part is puttied, sometimes the mixture is stirred with windshield washer.
- To prevent finishing materials from peeling off, a thin layer is applied gradually until the body element becomes perfectly smooth.
- Hardener is added to the mixture to make the putty dry faster.
- After the formation of a homogeneous composition, you can apply it to the surface quickly so that it does not harden ahead of time; the hardening time is 7 minutes.
- If you use all the putty in time, lumps will appear that cannot be applied to body parts.
- The material is smeared across the scratches, then smoothed lengthwise so that all voids are evenly filled.
- The suitable temperature for drying is 25 degrees.
- Using sandpaper, the hard material is leveled, and any too lumpy surface is removed with coarse grain.
- The primer in cans is applied faster; you can purchase components that are mixed according to the instructions. The liquid is mixed with a wooden object, passed through a filter, sprayed onto the part using a spray gun, the mixture is applied for two hours, then hardens. The dried coating is wiped with sandpaper or a plane.
- To ensure that the paint is sprayed evenly, the can is held perpendicular to the plane at the same distance of 30 cm at room temperature. After the first layer has dried, a second one is applied, no streaks appear.
To obtain shine, the coating is treated with a transparent varnish, at least three layers are sprayed within 20 seconds. If the procedure is not followed, defects appear:
- The facing material gradually peels off from the unprepared surface, and the restoration has to be done anew.
- Uneven application due to poor quality of the composition.
- In some places the material fades, you have to wash the cladding down to the bare metal and repaint it.
If you follow the instructions, the work will be completed without difficulty, and the paint will last long enough. The restored area is polished with a special paste to remove visible differences between the old and new coating. After polishing, the car should shine; abrasive and protective materials are used; pastes are made on the basis of Teflon or wax.
The abrasive polishing method helps to remove unevenness after applying the varnish; the paste mixture contains small particles that remove a layer 24 microns thick. The varnished surface can withstand 57 such treatments. Protective polishing is performed at the very end. Microscopic scratches left after treatment with abrasive paste are removed, and a thin protective film appears. Such methods are used for processing metal and plastic body parts.
The polish is produced in two types:
- Waxes are removed after 5-6 washes.
- Teflon ones are removed after 10-12 washes.
Polishes based on uv-20 or Teflon are more expensive, last longer, and prevent acids, alkalis and sunlight from reaching the varnish. The polishing mixture is applied in small quantities, and a suede rag is used for rubbing. The uniform layer dries in a few minutes, and a matte finish appears. Many people prefer to use polishing equipment on which the speed of the discs is regulated; it is necessary to take short breaks in work so that the coating does not overheat.
Grit p2500 is selected when processing dark paint. After moistening the polishing materials, paste is applied to the wheel, the mode is set to 1000 rpm, then increased to 1500, the machine is rubbed to a glossy shine.
Primer
The sanded putty will definitely leave pollen behind. Its presence on the surface is not at all desirable.
Therefore, once again thoroughly degrease the entire surface. After this we begin to prime the bumper.
Note! The bumper has its own primer. When purchasing, check with the seller that you need the material specifically for plastic surfaces.
Then we apply the composition in several layers. Usually the bumper is processed in two passes. Between the first and second layers you need to take a 15-minute break. Give the composition a chance to dry. After the second layer, the bumper is sent to dry. It lasts 24 hours at a temperature of 20 degrees. The process can be accelerated by using an infrared heater.
How many liters of paint do you need to paint a car?
Painting a car in a showroom is not a cheap pleasure. But you can do it on your own if you practice a little first and become familiar with the basic rules of work. It is also very important to calculate the correct amount of paint that will be needed for your car. Why this is so important and how to find out how much it costs to paint a car completely, you will find out further.
Liquid rubber for Opel. What was the cost?
Continuing today's topic about calculating liquid rubber for painting the entire car, I would like to show one job of painting a car with plastidip using a stencil. This is not a very complicated process, but it is extremely labor-intensive due to the presence of a large number of joints of liquid rubber with masking tape.
When you paint a car with liquid rubber and want to save on plastidip consumption, be sure to cover all the headlights, windows and any elements that do not need to be coated. This will greatly reduce the consumption of liquid rubber on your car.
Good preparation of a car for plasti dip painting is the difference between a professional and a beginner. See what results you can get, what clear curved lines of the painted plastidip you get on the machine.
In total, it took about 8 hours to work with rubber paint. At the same time, preparing the car, washing and drying it, gluing parts with masking tape and gluing curved lines took almost 6 hours.
Source
What to consider when calculating
If you go to the store to buy paint, you will realize that it is quite expensive. Therefore, there is no point in overpaying by buying extra goods; it is enough to make the correct calculation. At the same time, if during work it turns out that there is not enough paint, you will have to buy it additionally. But then it can be quite difficult to choose the right shade, because even in different batches they can differ.
To understand how much dye you need, you need to consider the following factors:
- car model and its condition;
- type and packaging of paint;
- the presence or absence of tools necessary for painting;
- time of year, weather conditions, location of work.
Calculating the amount of paint for painting a car
Having examined the most important points in detail, it will be much easier to understand the issue of painting.
Getting rid of defects using auto putty
After cleaning the car, you can begin applying the putty layer. It is best to use synthetic and polyester mixtures for the car. It is recommended to use a spatula with a rubber blade - this will prevent the appearance of new scratches during work. Particularly large dents should be covered with finishing putties; they are easy to work with and harden quickly.
After the entire putty area has hardened, we begin grouting. The putty should be sanded down with coarse sandpaper 120-600. When the surface takes on a beautiful smooth look, it needs to be wiped, then a primer can be applied for further painting of the car body.
How to make the correct calculations for varnish and paint
After the paint has been applied and dried, the surface is usually varnished. This helps achieve an attractive shine and improves the overall appearance of the car. Keep in mind that you need to purchase products from the same brand so that their composition and consistency are as similar as possible, and the consumption will be less.
Color also plays a big role in painting. Red, blue and yellow are the worst to apply; they consume much more. Therefore, if you want to paint the car completely, it is better to give preference to green or gray. How many layers are needed to achieve the desired result? Usually the paint is applied to the car in 2-3 layers, based on this, you need to make a calculation.
But with varnish the situation is a little different. Its calculation is carried out based on the composition. If the substance is made on the basis of synthetic resin, its consumption will be minimal. And acrylic and nitro-combined products have slightly worse coverage.
Typically, the dye is applied to the car using a spray gun. How much money you spend also depends on its model. When purchasing, pay attention to the transfer coefficient data of the spray gun. That is, some of the paint will still remain on the walls of the device, some will be consumed during the spraying process, etc. Although this is not such a large volume, it also needs to be taken into account!
How to calculate the amount of paint and varnish for painting a car
You can also use a can of paint or varnish for painting. To spray them, you don’t need any additional tools, and the quality of the aerosols is at a high level!
Usually the can contains information about how much area of the car it can be painted. But it cannot be called 100% accurate, because how much product you spend will depend on your skills, layer thickness, quality of the base, etc.
Area of use of different types of aerosol CM
Manufacturers produce paint for painting various surfaces in different types of spray cans:
- Acrylic-based composition is widely used. It covers plastic, glass, wood, ceramics, and metal.
- Stone and wood are coated with an alkyd composition This aerosol CM is widely in demand in car repair work.
- KM epoxy in a can is a restoration material, in demand in construction, it interacts with wood.
- The nitrocellulose composition decorates and protects metal, wood, glass, and ceramics.
Spray painting allows you to create a matte, semi-matte, or glossy finish on the surface, with different effects. The range of ready-to-use dye colors is very rich. If you need to create a phosphorescent coating, give the surface a chamelin effect, or imitate the texture of natural materials, then the best option for accomplishing the tasks is aerosol CM. But it can also be used to simply update decorative items. In order for your plans to be realized, you need to know how to spray paint.
Detailed information
For high-quality painting of a car you need 2-4 cans per 1 square meter. m. To find out the exact equivalent, take into account all the factors that were described above. This will help you calculate exactly how much paint you will need.
If you want to paint individual parts, the calculation for them will be as follows:
- small part (wing, door, etc.) – 0.15 l;
- middle part (bumper) - about 0.25 l;
- large part (hood) - about 0.5 liters.
When you varnish the surface, the consumption of the substance will be exactly the same. To make a two-layer application, the amount of substance must be doubled.
Based on these data, we can conclude that a medium-sized sedan needs about 2 liters of paint and the same amount of varnish.
Painting rules
We have already said that product consumption is affected by weather conditions, location of work, etc. Here are some important rules:
- the temperature of the air, painted elements, paint and varnish should be at the same level;
- You cannot heat the paint or elements of your car before painting it;
- sufficient time will allow you to avoid drips;
- In order for the paint to lay evenly, you need to use a “sticky napkin”, which will remove particles of debris and dust;
- wear a special suit and face mask
During work, adhere to painting technology so as not to waste material.
If you practice a little on old parts, you will realize that painting is not difficult. After a successful upgrade, all that remains is to thoroughly polish the car and you can get behind the wheel again!
Advice from the experts
- The first layer is applied quickly, so that the base is visible.
- The second coating is applied to the dried first coating faster, and the button with the juza moves closer to the surface. A coating with greater thickness is formed, the strips overlap each other by 50%.
- The final coat is applied more slowly. Lane overlap by 75%.
Tip: A can that was stored at a temperature below zero is heated in warm water (60°C) for 2 minutes before use.
The aerosol is shaken before each spray. The covering layer dries faster the higher the air temperature. If the top layer no longer sticks, then this does not mean that the paint inside has completely dried. Polymerization occurs in at least a day.
Painting a car body comes down to local coverage of the problem area. Work is also underway to prepare for painting. A base layer is applied and each subsequent one, within its boundaries, extends beyond the edge of the previous one.