Savig
13824 0 5
Savig June 26, 2017Specialization: master of interior finishing works. I am well versed in power tools for repair and construction. Formerly a teacher at a radio engineering college.
Applying primer to whitewash is a very risky task
Are you planning to paint a whitewashed ceiling and for some reason you don’t want or can’t wash off the whitewash? In some cases, you can get by by applying a special primer to it. What are these cases, and what solutions are suitable for them? I propose to look into all of the above issues together.
Is it possible to apply a primer to whitewash? Is it possible to paint over whitewash
There is no prohibition on painting old plaster.
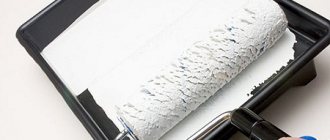
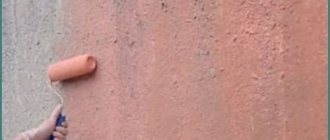
Water-based emulsion is easily applied to whitewash using a roller or spray gun. But how long the paint will last on the plaster depends on the quality of the old coating. Therefore, when renovating an apartment, many owners prefer not to undertake such work, but choose the following alternative options:
- installing suspended ceilings in an apartment over whitewash allows you not to modernize the old surface;
- Various plastic panels are introduced into the design of the kitchen and other auxiliary rooms, which are separated from the old lime at some distance.
But if a person does not have the opportunity to use modern repair methods, then all that remains is to use paints.
Then you must first make sure that there is a thin layer of whitewash on the ceiling and walls. Then the surfaces are examined for the presence of defects, cracks, and various stains. If all this is missing, then you can start painting without washing off the lime. The same actions must be performed if it is decided to use a water-based composition after whitewashing. You just need to wait for the applied lime to dry.
In what cases is it better not to paint the ceiling and walls over whitewash?
Do not paint with water-based paint over uneven whitewash.
The demand from specialists to dismantle the old coating in most cases is not caused by a desire to complicate life or add work, but by the need to protect people from future problems.
A whitewashed ceiling and walls, after treating them with water-based or acrylic paint, may simply lose their attractiveness, since under the lime coating the condition of the base, which has various defects, such as cracks and chips, depressions, is not visible.
When painting whitewashed surfaces, deformation of the new coating is possible due to unevenness of the old layer. The whitewash gets wet under the influence of the absorbed paint and then becomes sticky. In this case, lime sticks to the roller or brush and is then spread over the surface to be treated.
In addition, you will have to wash off the old whitewash in the following cases:
- There is a thick layer of plaster on the ceiling and walls. Due to its hygroscopicity, it will absorb paint, then swell, crack and collapse. In this case, the paint will bubble and become covered with cracks.
- If there are traces of leaked water on the surfaces being treated, then the paint, despite the selection of colors and textures, will stand out sharply in these places. Any attempts to correct the situation will not be successful.
- Old walls and ceilings have defects such as microscopic cracks and pits. Painting such a surface will sharply highlight these imperfections. Therefore, first you will have to work with a spatula and putty.
- Traces of mold and fungal infection appear. If you paint over them, these simple organisms quickly spread over all surfaces. Therefore, when this danger is identified, it is necessary not only to wash off the whitewash, but also to treat the room with antiseptics.
- The old coating begins to crumble spontaneously. Adding paint will speed up this process.
If at least one of these factors is identified before starting the repair, you will have to remove the old lime and then start painting.
Priming walls before whitewashing with lime. How to whitewash walls
The composition used for whitewashing is available in three types: lime, chalk, and water-based emulsion. But each finishing material has both its advantages and disadvantages.
Whitewashing walls with lime
To obtain a ready-to-use material, the lime is slaked with water. This type of whitewashing is the most popular. Among the advantages of lime it should be noted:
- good antiseptic and bactericidal properties;
- lime remains on the surface for more than three years;
- walls after whitewashing with lime tolerate moisture and temperature changes well;
- adhesion with other finishing building materials;
- the ability to fill cracks and correct minor surface defects;
- very low price.
However, along with obvious advantages, lime has significant disadvantages:
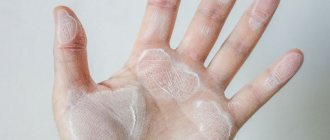
- Causes a burn if it comes into contact with exposed skin. It is necessary to use protective clothing, a respirator, and gloves;
- in the process of careless, inept work, stains, drips, and stains remain on the surface;
- lime is contraindicated for those who suffer from allergies.
Application of chalk
Along with being cheap and environmentally friendly, chalk has a number of advantages over lime:
- safe to work with;
- shades of white after application are more saturated;
- is hypoallergenic.
Chalk also has disadvantages that need to be taken into account:
- does not like high humidity. Since when interacting with water, the surface begins to crack, swell, and peel off over time;
- if used improperly, it leaves bubbles, drips, and stains on the surface;
- constantly stains and stains everything around - furniture, clothes, curtains.
Whitewashing walls with water-based paint
It would be more correct to call painting walls water-based paint. Since the composition usually contains lime, they talk about whitewashing, not coloring. In any case, this is a good alternative to chalk with a number of undeniable advantages:
- moisture resistance;
- wear resistance;
- high antiseptic properties;
- environmental Safety;
- easy to apply to the surface;
- dries quickly;
- safe to use.
The disadvantages depend on the composition of the water-based paint and its constituent polymers. For example, vinyl or latex enamel is ideal for surfaces that constantly experience high moisture and temperature changes. Acrylic under such conditions will crack and peel off like chalk.
How to prime a ceiling
The ceiling can be compared to a magazine cover - this is what we first look at when entering a room. To emphasize the beauty and aesthetics of the interior decoration of a house or apartment, special attention should be paid to the decoration of this area of space. Any professional who has repeatedly carried out repair work, when asked “Do I need to prime the ceiling before painting or wallpapering?” without the slightest doubt he will answer in the affirmative. And there are a number of reasons for this, which we will discuss in this article.
Why do you need a ceiling primer?
Primers perform a number of functions that confirm the advisability of their application:
- increase the adhesion of the base to the topcoat;
- promote uniform application of the material over the entire area;
- reduce the consumption of building materials;
- create a durable, dust-free base, ready for further decorative work.
What can be applied to whitewash. Is it possible to whitewash the ceiling using old whitewash?
Whitewashing the ceiling involves carefully removing the old decorative layer. But wanting to speed up repair work, craftsmen sometimes skip the labor-intensive and lengthy preparation process by applying new whitewash over the old one.
Having learned in advance the secrets of how to whitewash a ceiling over an old finish, you can get the desired result of a renewed surface as quickly as possible with minimal labor costs.
In what cases can old whitewash be left and in what cases not?
Unfortunately, it is not always possible to refresh a previously whitewashed ceiling.
There are a number of situations in which such work is not recommended.
So, it is prohibited to whitewash the ceiling using old whitewash:
- if cracks, peeling areas of old whitewash, stains, traces of rust and mold are found on the ceiling;
- The ceiling is uneven, covered with a very thick layer of old whitewash.
Ignoring such moments will lead to the fact that the new layer of paint will very quickly lag behind and all the work will have to be repeated again.
Whitewashing over an old decorative layer is allowed if:
- there are no cracks or other defects on the ceiling;
- the previous decorative layer is quite thin and firmly adheres to the rough surface.
How to prepare for whitewashing correctly
Before starting work, it is necessary to ensure protection of hands, eyes and respiratory tract (prepare goggles, respirator and rubber gloves). This is very important, since whitewash particles entering the body can provoke allergy attacks.
Furniture is removed from the room, or anything that could not be gotten rid of, and the floor is covered with polyethylene or thick canvas.
Attention: during the whitewashing process, the windows in the room must be closed, otherwise streaks may appear on the renewed surface.
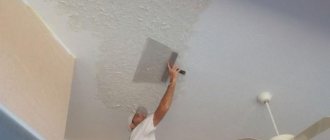
The surface of the flow is inspected for the presence of cracks and chips, all irregularities are puttied and rubbed with sandpaper.
The cleaned, prepared surface is thoroughly primed, after which you can proceed directly to applying new whitewash.
The main question is: how can you cover a ceiling that has already been painted with lime whitewash? The answer is simple - new lime mortar. It's not difficult to prepare. It is enough to mix 2 kg of dry lime, 1 tsp in a clean container. blue and 10 gr. salt (pre-mixed in water), 10 liters of water.
It is easy to check the desired consistency of the prepared solution. To do this, lower a knife into the whitewash, and if the solution does not drain from the blade, then you can safely get to work.
Algorithm of actions:
- Whitewash is poured into the tray.
- The roller is dipped into the paint, rolled out slightly onto the tray and begins to paint.
- The strokes are perpendicular to the window
- After the first layer is applied, the second is applied.
- The joints with the wall are carefully painted with a brush.
An accelerated option is to whitewash the ceiling using a spray gun. The process has its own characteristics:
- The solution should be more viscous than for a roller or brush.
- The whitewash is filtered through a sieve before being poured into the spray gun.
- Using a spray gun, the ceiling is whitewashed in three or four layers.
Worth remembering
- Chalk is never used to cover a ceiling previously painted with lime (the paint crumbles very quickly).
- Never whitewash with chalk or lime a ceiling that was previously covered with water-based paint (the whitewash will turn yellow very quickly).
- If the room has a high level of humidity, then a special composition with antifungal components is used for whitewashing.
- If the old whitewash has turned yellow, before applying a new one, the ceiling must be wiped with a rag soaked in whitewash.
- In order for the new whitewash to stick better, you need to add wood glue to it (2-3 tablespoons per liter of solution).
Strict adherence to all recommendations will help you whitewash the ceiling using old whitewash with your own hands quickly and efficiently.
Surface preparation
Before applying primer, you need to properly prepare the surface:
- it is advisable to completely remove the old coating;
- wash away traces of rust and various stains, you can treat them with copper sulfate;
- qualitatively remove all greasy stains;
- remove traces of soot;
- putty on the surface of various chips, cracks, seams, and other defects.
Primer before whitewashing with lime. 3 Write your answer:
Participant
not Lermontov
Whitewashing walls and ceilings is the most affordable and fastest way to redecorate residential and non-residential premises. True, now this method is used extremely rarely, since whitewashing has been replaced by other technologies for interior decoration. The whitewashing process itself is not complicated. If you are going to whitewash previously whitewashed walls, then you need to wash off the old whitewash. And so that its traces do not penetrate through the freshly applied one, the wash should be done carefully. To prevent the possible formation of fungus, the surface can be treated with an aqueous solution of copper sulfate or a weak solution of bleach. If whitewashing is carried out not with chalk, but with lime, then the surface does not need to be treated against fungus, since lime is already an excellent antifungal agent. If you have to whitewash a virgin wall that has not yet seen either wallpaper or paint, then the surface may have to be puttied first to eliminate various sinks, cracks and other defects in the plaster. There is a wide range of ready-made mixtures for sale for such purposes. They are suitable for both walls and ceilings. After the putty has dried, the whitewash can be applied immediately without various treatments, because the putty mass already includes all the necessary antiseptic additives. The most difficult thing to prepare for whitewashing are walls with a rich “cultural layer” consisting of several layers of wallpaper on top of several layers of paint. Such walls are still found in abundance in dilapidated and old housing stock. Before whitewashing, such a wall will have to be cleaned down to the plaster. Next, the wall is disinfected from fungus, and then you will have to resort again to eliminating defects using putty. In principle, it is not necessary to prime the surface before whitewashing. But if the wall is very old and the plaster layer is prone to crumbling, then you can prime it. In such cases, universal primers based on polyvinyl acetate resin have proven themselves well. In fact, this is ordinary PVA glue, only diluted to a more liquid state and slightly bluish with dye. Blues are added to the solution because polyvinyl acetate first gives a transparent protective film, which soon turns yellow and its yellowness can appear not only through whitewash, but also through water-based paint, and through wallpaper. That's all the tricks for preparing surfaces for whitewashing. Now about the process itself. As mentioned above, whitewashing is done with an aqueous solution of lime or chalk. To give the desired color, you can add a certain amount of tinting paste or regular gouache to the solution. When preparing the solution, you should not pour water into the powder, but sprinkle the powder a little at a time into the water, stirring constantly. Whitewash is prepared by eye. For a brush or roller a little thicker, for a spray bottle a little thinner. Apply the composition with a brush or roller, preferably in one pass. If after drying gaps are found, then passing over them again with a brush and roller will remove the first layer. For this reason, it is preferable to apply whitewash using a spray gun. This method provides a higher-quality coating that does not leave characteristic marks and allows you to apply whitewash in two or more layers.
5
Answer
Participant
ClaraZ
If the walls are already whitewashed, then there is no need to prime. Usually, the old whitewash is washed off with water, and then the still damp walls are whitewashed with a new solution. Try to make the layer even, without unnecessary filling, so that there is less work next time. In general, whitewashing is a more complex art than finishing with any new building materials; it would be nice to see in person how the craftsmen do it.
0
Answer
Participant
Pin Chesnochny
According to experts, it is necessary to apply primer before whitewashing, because this will allow the lime mortar to last for a long time, and it will adhere to the primed surface much better, that is, it will be more reliable. Priming the walls and ceiling will allow the whitewash layer not to be absorbed, but to be distributed evenly, which means it will make the work easier and will also bond the damaged areas. When doing finishing work, try (if possible) to better apply a primer before whitewashing, since the primer penetrates and is absorbed into all the cracks, creating a durable film that allows you to increase the adhesive characteristics of mineral materials several times, so the final finish will apply easily and will be of high quality.
Nuances
- Application of whitewash
The coloring composition can be applied up to three times. The best option is two times. - During one coloring session, the composition is applied in only one direction. When the paint has dried, the second layer can be applied in the other direction.
- If after two stains the entire surface is treated, then there is no point in applying a third layer. However, if unpainted areas are visible, they must be covered with paint.
Is it possible to apply putty to whitewash? Putty-whitewash
Putty-whitewash
There is a ready-to-use oil-adhesive putty-whitewash. It is used to correct defects in concrete, brick, plastered, wooden and other surfaces before painting them.
When diluted with water, it is used for whitewashing ceilings and walls indoors in dry conditions.
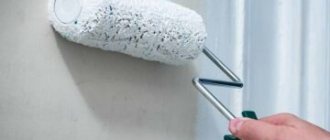
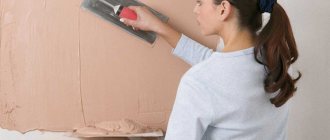
Apply oil-adhesive putty with a roller, brush or spatula (Fig. 2).
The basis of the putty-whitewash is high-quality oil drying oil and adhesives.
Rice. 2. Applying oil-adhesive putty with a spatula
Since the whitewash putty contains rheological additives, it has excellent performance properties:
– does not flow off the surface or spatula;
– glides over the surface, easily filling small defects;
– does not reach for the spatula;
– does not contain harmful substances;
– environmentally friendly;
– easy to use;
– thanks to the biocidal additives introduced into its composition, it prevents the proliferation of microorganisms.
Specifications. Appearance: thick white mass, free of foreign impurities and inclusions.
Consumption: for puttying work you will need 0.3–1 kg per 1 m2, for whitewashing – 0.1–0.15 kg per 1 m2.
Drying time for a single layer coating: 4 hours at 20 °C.
Storage: 6 months at 20 °C in packaging.
Recommendations for use. Before use, mix the putty thoroughly.
If the layer is thicker, the putty will crack after drying and will require correction of defects.
The ceiling surface is cleaned of dust, dirt, and peeling old coating.
For preparatory work, putty is applied with a spatula in a thin layer. The dried coating is sanded.
For whitewashing work, the putty is diluted with water in a ratio of 1: 1, thoroughly mixed until a homogeneous mass is obtained and applied with a brush or roller to a previously prepared surface.
When working with whitewash putty, precautions must be taken, as it is a flammable substance.
This text is an introductory fragment.
How to fix whitewash. Whitewashing walls with lime at home
Whitewashing walls: how and how to whitewash correctly
Whitewashing the walls is an important stage in any cosmetic renovation. Since the quality of the material used affects the appearance of the surface and resistance to external influences.
Advantages of whitewashing
To apply whitewash to walls, it is not necessary to undergo special training. You can understand the intricacies of the work, the undeniable advantages and disadvantages in the process of work.
Along with the accessibility of the technology for a beginner, there are a number of advantages of whitewashing over other surface treatment methods:
- Whitewashing becomes indispensable when budget funds are limited. Since the price on the market for the material is the lowest;
- ease of use. Even a schoolboy can handle whitewashing the walls and ceiling. However, it is important to adhere to technology and maintain the required proportions;
- beautiful smooth surface of a monochromatic fresh shade;
- environmental safety, absence of harmful substances that plague modern finishing materials;
- Whitewash has bactericidal properties, which allows it to be used when budgets are limited, for example, in various educational institutions, hospitals, and on private plots.
Preparation for work
Before removing old whitewash from the walls and ceiling, you need to know what was previously used - chalk or lime. The check will not take much time. It is enough to moisten the surface with water. If lime was used, the wet area will darken. Or just run your finger along the wall. If the surface was whitened with chalk, the finger will turn white. After lime it will not color.
The success of whitewashing is primarily influenced by careful surface preparation. To do this, just follow simple rules:
- empty the room of household appliances and furniture. If it is impossible to do this, you need to cover them with polyethylene film and secure it with tape to prevent it from slipping;
- if you wet a section of the wall in advance, it will be easier to remove the old layer of whitewash;
- to wash off the old layer, it is recommended to use a soap solution, plain clean water with the addition of citric or acetic acid;
- The old whitewash is removed with a spatula and collected in a special container. If this is not done, the cleanliness of the room will be at risk;
- When the old whitewash is removed, the wall is washed with a sponge to remove any residue.
- to remove stains from rust, grease, and soot, copper sulfate, soda ash, and hydrochloric acid are used;
- cracks and dents (depending on the size of the defect) are puttied or plastered;
- After removing the old whitewash and leveling the surface, an antiseptic composition is applied - a primer. You can either make it yourself or purchase it ready-made;
- After the surface has completely dried, we begin whitewashing.
How many times and when to whiten
It turns out that trees need to be whitened twice a year: in the fall, the work is done just before the frosts, when the air temperature has steadily dropped to +3. +4°C. For what? From parasites. That's exactly what he told me. I believe that we are talking about pests and pathogenic microbes located in the folds of the bark. And further. In our region, icing often occurs, and it can be quite serious. It turns out that ice never forms on wood whitened with slaked lime! In addition, it will not be gnawed by hares (if they are found in your area).