Water-based paint on chalk whitewash – is it worth applying?
When painting walls, we must take care to create the highest quality adhesion of the paint coating to the surface. Therefore, whitewash, which clearly does not contribute to such adhesion, according to the rules, must be removed.
Experts do not recommend this type of painting, since the whitewash will simply peel off the wall and remain on the roller. The only exception is that the whitewash layer is very thin and adheres very firmly.
Painting with lime mortar
In order to make a lime solution for painting the ceiling, you need:
- take 2.5 kg of lime, add 100 g of salt soaked in water and a small amount of blue;
- Having mixed all the components of the mixture, add water to them so that the final volume is about 10 liters.
Lime mortar for whitewashing
The basic rules of application are the same as for chalk and water-based paint.
Paint selection
Many people ask, is it possible to apply water-based paint to whitewash? In fact, this finishing material is the only adequate way to paint such a problematic surface. Moreover, such paint does not require the use of a primer, having the function of the latter itself. But, again, it is necessary to ensure the strength of the whitewash layer.
If you plan to apply oil paint or enamel to the whitewash, then it is better to refrain from this step, as the result will be disastrous.
How to whitewash the ceiling?
You can whitewash the ceiling:
- chalk;
- lime;
- water-based paint.
Each of these options has its pros and cons.
Table. Materials for whitewashing the ceiling.
| Material | Advantages | Flaws |
| Chalk gives the ceiling an exceptional, shining whiteness, so the room will look very good. | This material gradually crumbles, thus introducing additional dust into the room. In addition, it is not waterproof, so it is not suitable for painting a bathroom ceiling. | |
| Lime whitewash kills fungus, so it should be used in rooms where it is present. In addition, lime is resistant to moisture and is well suited for painting the ceiling in any room, including the bathroom (and this is where fungus can be found most often). In addition, lime whitewash hides minor surface defects by sealing cracks and cracks. | Lime quite often causes allergic reactions. It cannot be perfectly white, unlike chalk mortar. | |
| This type of paint has an excellent appearance, while the water-based emulsion fits very well on the old coating, it adheres perfectly to the existing whitewash and does not begin to peel off over time. | Water-based paint has only one drawback - work using it must be carried out at a temperature not lower than +5°C, but when painting the ceiling indoors, this does not matter. |
If you do not want to wash off the old whitewash, you need to keep in mind that you cannot apply lime to the chalk and vice versa - otherwise the paint will not adhere well and dirty stains will form on the ceiling.
On top of the chalk you can put a new layer of chalk or water-based paint, and the lime can be covered with the same emulsion or lime. At the same time, it must be taken into account that enamel and oil paint are absolutely not suitable for painting over an old layer of lime or chalk.
Painting the ceiling over a layer of lime or chalk
When not to paint: how to clean old whitewash from walls or ceilings
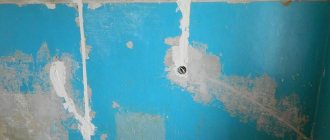
Experts still do not recommend painting without first removing the whitewash. And therefore, the ideal solution in this case is to remove the layer of this very whitewash. There is no single master class here, and it all depends on the thickness of this layer and how firmly it holds:
- Thin layer. Despite its insignificant thickness, it is very difficult to remove. Significant impact will be required, and a grinding machine can provide this;
- Medium thickness layer. If this is exactly what you get, then this whitewash will most likely hold up well. However, it’s still easier to pick it up and tear it off the wall. We use a roller with good pile, generously wetting the walls or ceiling with it;
- Thick layer . As a rule, such a layer of whitewash adheres very mediocrely, so in most cases it can be removed with an ordinary spatula, after wetting it first.
Tools
There are three main methods of applying whitewash that you can use:
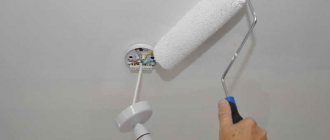
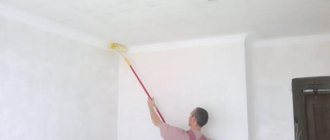
If you paint with a roller , the paint will lay down in an even layer, there will be no streaks or stains. In order to get a good whitewash using this tool, the coloring composition will need to be applied in two layers. In addition to the roller itself, you will need a container for the solution, something for mixing and a painting tray. You also need a small brush to apply paint to the areas of the ceiling at the junctions with the walls - you won’t be able to do this carefully with a roller without staining the walls.
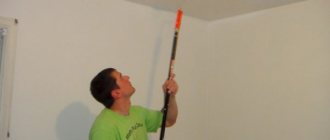
A whitewash brush can be purchased at any building materials store. It's inexpensive. While working with a brush, the paint splashes heavily, so you need to carefully protect the furniture in the apartment, as well as your eyes.
Tools for whitewashing the ceiling
Using a sprayer, whitewash can be easily applied in a very neat, even layer. If the paint will be applied by spray, you need to carefully ensure that it is free of lumps. Its consistency should be more liquid than that of whitewash, which is to be applied with a brush or roller.
Some whitewash removers
- Paste. This method allows you to rid the walls or ceiling not only of whitewash, but also of dust and dirt;
- Soapy water. The solution is prepared as follows: for 10 liters of water, take 2 tablespoons of grated soap and 5 tablespoons of soda. It is necessary to wipe the whitewash layer with this solution until it completely disappears;
- Wallpaper remover. Apply the remover to the whitewash surface and leave for a while. After this, you can work with a spatula and clean the wall.
Chalk painting
It is not difficult to prepare a chalk solution for painting the ceiling; for this:
- For 10 liters of water you need to take 5 kg of chalk and 50 g of wood glue;
- the consistency of the solution should be such that it does not flow from the knife; if the mixture flows from the blade, you need to add more chalk;
- You can add blue to the composition, in which case the ceiling will be snow-white, without a yellow tint.
Preparation of chalk solution for whitewashing the ceiling
The technology of painting with chalk is fundamentally no different from the technology of applying water-based emulsion . First, choose one of the options - application with a brush, roller or spray gun. Then, during the painting process, take your time and carefully ensure that the composition is applied in an even layer. In this case, the new look of your ceiling will definitely please you.
How to whitewash a ceiling correctly?
To find out, we recommend that you read this article. You will probably also be interested in learning how to paint a ceiling with water-based paint.
Understanding the types of paint
So, in order to understand what effect to expect from this or that coating, we need to understand what types of paints there are and what properties they have.
Lime mortar is exactly what we just looked at. Cheap, durable, with a lot of advantages and one drawback - the final surface after whitewashing is uneven and does not meet modern repair standards. Lime is sold in two types: slaked and quicklime. Quicklime is cheaper - but to pay it off, you need to suffer. And this is not so safe due to the release of a huge amount of heat upon contact with water - more than 100 0C! It is easy to work with a ready-made, slaked one, and no preliminary preparations are required.
Silicate paint - used mainly for outdoor work on plaster or stone. The paint is extremely resistant to various atmospheric conditions, it does not fade, and can be washed if necessary. The basis for production is potassium glass, so it is not so cheap and widespread. There is no need to use this paint for interior decoration, unless you need exactly these properties.
If the walls are covered with lime
Of course, it will not be possible to obtain a perfectly smooth coating without first removing the previous layer and plastering. But as a temporary measure, this method is quite suitable.
If the whitewash layer is small, and the surface is fairly smooth and does not crumble, you don’t have to rush to clean it. Water emulsion works well on lime. But it’s still better to play it safe and, to prevent the paint from crumbling, coat the wall with a primer. Cracks and potholes must first be plastered. You can get the desired color by adding colored pigment to the water emulsion.
Stage-by-stage execution of work
Let's proceed directly to painting the ceiling. Let's look at this process using the example of a bathroom. So, let's begin.
- We prepare the bathroom, remove all toilet items and, if possible, remove shelves. We cover everything that we are afraid of getting dirty with newspapers or film.
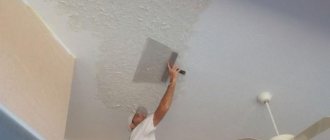
- Clean the surface of the ceiling.
- We cover the edge of the tile or wall that borders the ceiling with masking tape.
- We remove the lamp or take out the spotlights from their sockets. This is done so that we do not have any unpainted areas left.
- We treat the surface with an antifungal solution. If the fungus in the room is highly developed, we kill it with a weak solution of copper sulfate and again treat it with an antifungal compound. You can also use a liquid to clean aluminum rims to deactivate mold. It is made from various acids, so be careful when applying.
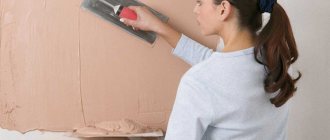
- We treat the surface with a deep penetration primer. Waiting for it to dry. Remember, do not overdo it with the primer; it should be applied lightly, without causing smudges, since the drops will subsequently be visible on the ceiling and cannot be completely painted over.
- If necessary, we fill in potholes or defects with secondary putty. We wait until it dries and sand it, after which the work with the primer should be repeated.
- Prepare water-based paint. Stir it until the composition is homogeneous, and if necessary, filter through gauze, since some paints contain undissolved particles that can spoil the surface.
- Pour a portion of the paint into the tray, moisten the roller with a few strokes and apply it to the ceiling with light movements. There is no need to press. This should be done 5-6 times to spread the paint well over the surface. To begin with, the room is painted crosswise, counting from the door or window.
- We wait about 2 hours for the first layer to dry and paint across it, that is, along the door.
That's it, dear friends, here we have answered the question of whether it is possible to apply paint to lime. If you strictly follow our recommendations, you will end up with a good, flat surface. And remember, our article is only advisory in nature and is not a direct instruction to action. Good luck!
Important points
When whitewashing the ceiling, you must take into account the specifics of the room . For example, in the bathroom you need to use a special composition that will be resistant to moisture and protect the ceiling from the appearance of fungus. Otherwise, the paint will quickly lose its appearance and may even begin to crumble quite quickly.
It is also important to remember safety while painting. In order to avoid getting whitewash into your eyes, skin and respiratory tract, you need to use safety glasses, rubber gloves and a respirator . If this is not done, the coloring composition can cause allergies or even chemical burns.