Many beginners, before starting to paint ceilings, are sure that this is an extremely simple operation - just take the paint and paint it. In reality, this operation contains a number of nuances on which the durability and quality of the finish depends. Therefore, below we will look in detail at how to properly paint a ceiling with water-based paint using a paint roller.
Painting the ceiling with a roller
How to prepare painted walls for painting?
Before you start painting walls using old paint, you need to treat the surface to be painted as thoroughly as possible, remove the old layer of paint, rust, mold, and also carefully clean the walls.
Interesting materials:
How to write Pandao? How to write to a Streamer on YouTube? How to write to gang chat? How to write to a Facebook feed? How to PM a Streamer? How to write 2 in body? How to write for what? How to write a statement about the loss of a student card? How, for example, is it separated by commas? How to decorate a Christmas tree 2022?
Surface preparation
Since this article is devoted to painting ceilings and walls, we will not go into details of surface preparation.
But if you decide to start painting, then you just need to know about the main parts of surface preparation.
- The layers remaining after whitewashing and painting previous repairs must be washed off or removed with a spatula.
- Remove layers of plaster that have peeled off or cracked.
- Prime and then seal all seams, chips and cracks with putty.
- Cover the entire surface of the ceiling with primer, then putty with finishing putty.
- Using sandpaper, clean the surface of the ceiling from uneven surfaces.
- A ceiling made of plasterboard sheets for painting can be prepared in two ways: A layer of putty is applied to the entire surface of the ceiling, which, after drying, is sanded with sandpaper.
- Only the joints and places where the sheet is screwed in with self-tapping screws are puttied; the paint is applied directly to the cardboard layer. However, this method requires applying more layers of paint.
- The surface is completely cleaned of dust and coated with a primer suitable for the selected paint.
- Cover areas that cannot be painted with masking tape.
Structural paint technology
Tip: It is better to paint a room together. In this process, one person applies paint to a wall or ceiling while another person immediately behind creates the structural design. In this case, the quality and speed of work increases significantly. To ensure that your ideas actually turn out exactly what you imagined, try creating a pattern with structural paint on a piece of plasterboard.
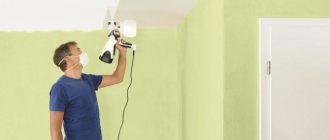
Advice: Painting of suspended ceilings must be done by professionals, otherwise there will be no guarantees for such a ceiling.
Methods for structuring paint
Roller selection
The result of the repair largely depends on the quality of the tool used to apply the paint to the ceiling surface. In most cases, this tool will be a roller. It is with this that almost the entire area of the ceiling is painted, with the exception of the corners.
The working shell of the roller can be made of various materials:
- It is not recommended for non-professionals to use the foam shell. The fact is that when using it there is a danger of the formation of multiple bubbles.
- Velor rollers are also not the best option. They need to be dipped in paint very often, which significantly lengthens the painting process. Although velor covering is quite suitable for small rooms.
- Rollers with long piles hold paint well and are therefore ideal for covering large areas. But they also have disadvantages - the resulting surface, as a rule, is not entirely smooth. And the consumption of ceiling paint when using them is higher.
- The best option for apartment renovations is a medium-length pile roller made of sheepskin or artificial wool. It is convenient and allows you to apply paint in an even layer.
When purchasing a faux wool roller, check to see if any lint is falling out. This is very important, because hairs stuck in the surface to be painted are very noticeable. Check the tassels too. The pile in them should be well fixed.
Required tools and materials
High-quality application of water-based emulsion is impossible without special tools. To perform work in the kitchen, room, bathroom or toilet, purchase:
- Roller with faux fur skin;
- Brush-flutz. Required for painting corners and ceiling surfaces adjacent to the wall. The width of the brush should be from 7 to 10 cm;
- Rectangular container with a ribbed cuvette. Used to place a single portion of material and roll out a roller;
- Mixer. Required for mixing the water emulsion;
- Paper tape. With its help, you can protect the wall surface from the ingress of material during work;
- Overalls. You will need a hat, glasses and a set of clothes.
If it is necessary to apply different colors to the wall surface, it is recommended to use different tools for each shade.
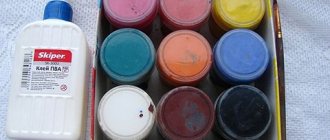
Recommendations for working with paint:
- Each paint package contains information on whether the composition will need to be diluted with water. If the manufacturer recommends dilution, then, as a rule, no more than 5-10% water is required for the consistency to take the form of liquid cream.
- The diluted composition must be used immediately, before the paint thickens. If dilution with water is not required, simply stir the paint.
- Use paint from one manufacturer of the same brand - this is a guarantee that the coating will be uniform and uniform.
- If paint tinting is required, it is better to entrust it to specialists - they will help you choose the right shade and mix the colors in the correct proportions.
General principles
First of all, you should decide on the general sequence of repairs in the room. It is recommended to paint the ceiling first, and only then proceed to arranging the walls and flooring. Otherwise, you will have to take additional measures to protect the floor and walls from drops of paint falling from above.
The ceiling painting technology itself also involves dividing the entire complex of work into several stages. It is important to adhere to the most appropriate sequence of actions to get the desired result.
The work plan is as follows:
- Selection and purchase of paint.
- Purchasing the necessary tools.
- Preparing the premises for renovation.
- Cleaning and puttying of concrete ceiling.
- Primer treatment.
- Carrying out painting work.
- Correction of errors.
These are the main stages of painting the ceiling. Let's look at each of them in more detail.
Methods of painting the ceiling
Brush painting technology
Even though painting walls and ceilings with a brush seems like a very simple method, there are many secrets that will help make the painting process better.
- Before starting work, the brush should be soaked in water for some time. But you need to make sure that the liquid only covers the bristles. This soaking will make the brush hair much softer and increase its volume, which will prevent the bristles from falling out and significantly thicken the brush.
- Using a brush lightly dipped in paint, you need to walk over a rough surface such as brick or plaster. Thanks to this, individually protruding hairs that leave streaks on the surface to be painted will be erased. Since it will be quite difficult to correct this defect after painting.
When painting with a brush, it must be constantly rotated; the bristles will wear out equally on all sides, which will ensure a better application of the paint layer. Can be applied in horizontal or vertical strokes
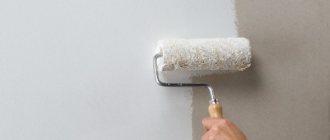
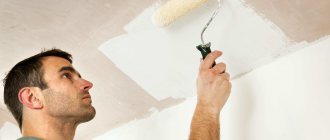
Roller painting
A roller is an almost ideal tool for painting large surfaces during work such as ceiling repairs . Unlike other devices, such as a spray gun, it does not require much practical skill and is inexpensive.
With a relatively simple technology for applying paint, the roller creates a high-quality and uniform layer.
When choosing a roller, you should pay attention to its quality. You need to “pinch” it - if you still have threads from it in your hands, then such a roller is of poor quality and will not be suitable for the job.
The rules for painting yourself are as follows:
- The surface to be painted must be cleaned of dust and primed. We strongly do not recommend using a universal primer, since when applied, the paint is absorbed differently, and most likely stains will form on your ceiling. For this purpose, you should use either a special primer recommended by the paint manufacturer, or resort to a simpler, but no less high-quality method. If you are going to work with water-based paint, for example water-dispersion paint, then it must be diluted with water in a ratio of 1:2 (take two liters of paint for one liter of water) and stir thoroughly.
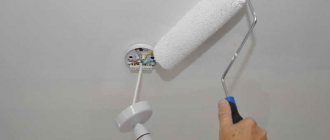
- After the primer layer has dried, you can begin painting. You should start by brushing the corners and places where the roller cannot reach.
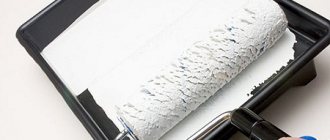
- The roller must be evenly saturated with paint. This is done using a special paint bath. The roller is dipped in paint and then rolled along the bottom of the tray. At the same time, all excess paint is removed and drained into a basin.
Tip: To take a detailed look at the entire process of how ceilings are painted, a video can be found on the Internet.
Roll the roller over the paint tray to distribute the paint.
- The first layer is applied perpendicular to the light falling from the window. You need to apply paint by pressing evenly on the roller, which is very difficult to achieve using a “telescope”. It is better to paint from a table or make a scaffold without using any extensions for the roller. From the floor it is quite difficult to see and control the quality of the layer application. The best guide on how to make ceilings for painting yourself is a video with a step-by-step description of the process. After looking through it, you will see that this is a feasible job, you just need to show a little patience and accuracy.
Options for applying the first coat of paint
- Technology of painting the ceiling with a roller
When painting the ceiling, it is necessary to apply layers one on top of the other “overlapping”, while moving parallel to the wall. Painting suspended ceilings differs only in that it may be necessary to apply more layers to hide differences in the color of putty and plasterboard sheets.
Tip: It is not necessary to wash the roller immediately after painting; if you blot it thickly with paint and wrap it tightly with plastic film, it will not dry out throughout the day. This time is more than enough for the ceiling to dry and be ready for applying the next layer.
- The last layer of paint is applied along the light falling from the window. With this method of painting, the stripes from the roller become invisible.
Method for applying the final coat of paint
In conclusion, I would like to give a few more tips:
- Ceilings to be painted must be thoroughly cleaned of dust before starting work.
- Before applying a coat of paint, the previous coat must be completely dry. In order to find out the drying time of the layer, study the instructions indicated by the manufacturer on the paint bucket.
- You cannot dry a freshly painted ceiling in a draft - this leads to the fact that the top layer quickly dries out and turns into a “crust”, while the bottom layer remains wet. If you are painting a large area and there is too much moisture in the room, you can open the window or door for 5 minutes every hour. When airing, you need to make sure that no dust gets on the fresh paint. Otherwise, your trim may lose its appearance and will have to be repainted.
- Primer paint, tinted in the same color as the structural paint, is applied to the prepared surface.
- Structural paint is applied using a spatula, stainless steel float or wide brush in one layer. Please note that you should not cover an area of more than one square meter at one time, otherwise the paint may dry out.
- When applying a layer of structural paint, it is very important to ensure that its thickness is the same everywhere, otherwise, after treating a large area, these irregularities will be very noticeable.
- Next, the surface needs to be structured. This is done using various tools, and the design of the structure depends only on your imagination.
Why water-based coating?
The simplest method of ceiling repair can be considered the installation of suspended or suspended ceilings. Before carrying out work, no preliminary preparation of the surface is required; this ceiling has an excellent appearance and a fairly long service life. But despite all the advantages, there is also a huge disadvantage - the high cost of a stretch/suspended ceiling. This is due to the high prices of the material itself, and installation is extremely difficult to do on your own, so you definitely can’t do it without involving specialists.
Whitewashing ceilings with lime or chalk emulsion was popular. It would be foolish to deny that this is the most economical and environmentally friendly option - the surface “breathes” well, so the accumulation of moisture and the appearance of mold and mildew certainly does not threaten it. But even here there are a lot of shortcomings - for example, the finished surface is far from ideal in appearance, is a source of dust and quickly becomes dirty, and wet cleaning is strictly contraindicated.
Based on all the facts listed, the most common method of finishing the ceiling is painting with water-based paint. “ Simple, cheap and cheerful” is the most accurate definition of this method:
- the price range of the material is extremely moderate;
- without exaggeration, even a teenager can carry out the work independently;
- no special tools or equipment required.
Water-based paint is a suspension of polymer particles and coloring pigment in water. When water evaporates, the solid substances of the base and dye remain on the surface and form a dense protective layer, harmless to the body and also absolutely hypoallergenic - this is another advantage of using water-based paint for finishing ceiling surfaces.
Is it possible to apply a new layer of water-based paint over the old one?
Water-based paint itself is a durable coating, but can peel off over time, especially in areas with high humidity. If this does not happen, you can apply a new layer over the old paint.
If the old material peels off in some areas, then complete removal of the entire decorative coating is required. Some craftsmen simply remove the paint with coarse sandpaper and apply a leveling putty layer to the rough surface. But it’s better not to take risks and completely remove the paint with water - water-based paint is easily removed.
What primer to use
A primer is necessary for better adhesion of the paint to the surface being painted. It allows you to avoid the appearance of cracks and blisters after the paint dries. If there is no primer, this can happen. You'll have to clean everything off and putty again. Because in order for painting the ceiling with water-based paint to be of high quality, the surface must be well primed.
The base of the primer should match the base paint. Acrylic water-based paint requires the same primer; silicone paint requires a silicone-based primer, etc. Moreover, it is advisable not to save: the quality of this composition determines how smoothly the water-based emulsion will lie on the ceiling.
Acrylic primer for the same water-based paint
There is an economical method of priming: the base paint is diluted with water (1 to 2) and the surfaces are painted with this mixture a couple of times. It's certainly better than nothing, but the primer gives a better grip.