How much paint do you need for 20 squares?
If the area of the room is already known, then it is faster and more convenient to use a paint
for Dulux walls, which will automatically calculate the required amount of mixture for single-layer painting.
For example, for a room of 20
square meters.
m. you will need approximately 3.4 liters of paint
.
Interesting materials:
What does the term Olympics mean in Ancient Greece? What does the term relevance mean? What does the term in history mean? What does testosterone mean in men? What does thyroid stimulating hormone TSH mean? What does MSW mean? What does the dot in four dots mean? What does a product of poor quality mean? What does transit mean in astrology? What does the demand for bread and circuses mean?
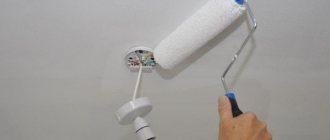
We calculate the area of walls and ceilings for painting
First of all, paint consumption for the ceiling and walls is based on the size of the room. The ceiling area is calculated by multiplying the length by the width, but it is important to consider that regardless of the materials used, at least two layers will be required to create a uniform surface.
The volume of paint for walls is calculated using the following algorithm: from the area of the walls, it is necessary to subtract the square footage of windows and doors, which will significantly reduce the amount of paint. It is also important to calculate the area of all architectural forms: arches, ledges, or niches.
How to choose paint
Many modern construction sites are equipped with special calculators that can calculate the consumption of materials, but first of all you must decide and decide what kind of paint you need.
- The water-based mixture is considered ideal for the ceiling. It is applied in an even layer, dries quickly and has good adhesion to various surfaces. If you're new to interior decorating, water-based paint is a great option. It is unpretentious, tools and hands are easy to clean after it, it is non-toxic and almost odorless.
- Acrylic paint is the second most popular, as it provides an even, good layer, dries quickly and practically does not fade in the sun. In the store you can find a wide palette of colors, so even the most fastidious designer will find a suitable shade. It is well suited for any painted surfaces, as it tightens small cracks and unevenness of the putty. It is worth considering that when acrylic dries, it always darkens a little.
- Silicone paint, due to its elasticity, can tighten small irregularities and hide traces of imperfect putty. It could be considered an ideal combination of beauty and practicality, if not for the high price.
- Silicate paint has more disadvantages than advantages. It has poor adhesion to the ceiling, so it is more suitable for walls or floors. It is not able to hide even small cracks, so the work of the putty must be perfect.
When choosing paint for the ceiling, you need to take into account not only its properties, but also its beauty, so this is a personal matter for everyone.
Calculate the required amount of paint
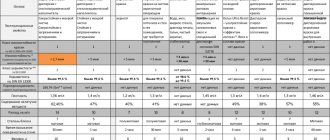
Each paint and varnish material has its own consumption rate per square meter per layer, and the manufacturer is required to indicate this information on the can.
For example, the consumption rate of a covering antiseptic per layer when applied with a brush to a sawn or planed wooden surface is 5-8 m2/liter. We can take 7 m2/liter as a practical consumption (that is, an average value close to the upper limit of the range). The consumption rate of interior paint on smooth prepared surfaces is on average 8-10 m2/liter per layer. In this case, we can take 9 m2/liter per layer as a practical consumption.
As we can see, the consumption rate for different materials and surfaces may be different. You should always follow the information provided on the label and in the technical specifications for the manufacturer's product.
And then pure mathematics. We calculate the required amount of paint using the formula:
Rules for painting wooden windows
New windows
New wooden window
New wooden frames are much easier to paint, because they do not need to be cleaned of the old coating. But this does not mean that you can immediately apply paint - the surface should be properly prepared. It is recommended to paint the frames before installation and glazing, otherwise certain areas will remain unprotected and will deteriorate faster.
It is better to paint wooden windows before installation
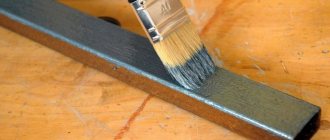
Step 1. Place the frame on a flat, clean surface and sand it on all sides with fine sandpaper. This will help get rid of unnecessary roughness, small protrusions and other defects. Be sure to handle sharp edges, slightly rounding the corners.
Step 2. Carefully sweep away the dust formed during the grinding process, then carefully inspect the frame for chips, cracks and recesses from knots. As a rule, such defects are rare in new high-quality frames, but it is necessary to check.
Step 3. Identified defects should be covered with wood putty.
Epoxy putty
Oil putty
Oil-based putty is well suited for oil paint; for others, it is recommended to use acrylic putty.
Acrylic wood putty
Before applying the composition, all recesses are once again dust-free and, if necessary, dried with a hairdryer. The putty is applied with a plastic narrow spatula, carefully filling the cracks. If the recesses are wide, the mixture is applied in thin layers no more than 3 mm thick. The intervals between application of layers are 2-4 hours, depending on the composition.
Applying putty
Advice. To seal cracks in the window frame, you can make your own putty. To do this, take dry sawdust, sift it through the finest sieve and mix with wood glue to a paste-like consistency. After applying the composition, you need to wait for it to dry completely, and then thoroughly sand the treated areas.
Making wood putty with your own hands
If the frames are made of softwood (larch, pine), resin may appear on the surface. In such areas, the paint does not adhere well, and the varnish may not adhere to the wood at all, so additional processing is necessary. Small areas with resin are easiest to cut out with a sharp knife and seal with putty. If there are a lot of resin drips, it is more convenient to use a solvent - turpentine, acetone, white spirit and others.
White Spirit
The solvent is applied with a brush to the resin and rubbed until foam appears. After this, the surface is washed with warm soapy water and dried.
Prices for different types of paint removers
Paint remover
Step 4 . After drying, the treated areas are sanded to achieve a perfectly smooth surface. Next, wipe off the dust with a damp, clean cloth and allow the material to dry again.
Frame sanding
Step 5. Clean, dry frames must be primed with protective compounds. If you plan to preserve the natural look of wood, choose colorless antiseptic primers, such as Pinotex Base, Belinka Base, Drevnokhron Ground and others.
Primer PINOTEX Base
Under oil paint, the surface of the windows can be treated with drying oil. To apply the primer, it is recommended to use a medium-width paint brush so that it is convenient to work and the composition is less splashed.
Drying oil
First, completely prime the frame from the front and sides, and when the surface dries a little, turn the structure over and process the other side. As a rule, new wood quickly absorbs the primer, and for high-quality impregnation it is necessary to prime it at least 2 times. And if the material is too porous, you will need 3 layers of primer. Maintain intervals between application of layers so that the composition is evenly distributed between the fibers.
Apply primer with a brush
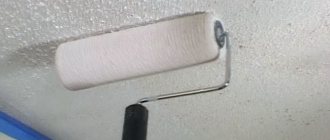
Step 6. Once the primed frames are completely dry, you can begin finishing. Choose a convenient tool (roller, spray gun or brushes), thin the paint if necessary, and start painting the frame.
Window Painting Tools
First, paint the inner corners and areas under the glass using a thin brush, then paint the smooth areas. The layer of paint should be very thin, so do not put a lot on the brush or roller, rub the composition well over the surface. Shading is done in one direction, along the bindings, so the strokes will not be noticeable after drying. Remove drips and sagging immediately, it will be more difficult to do later.
Paint frames in a well-ventilated area
Having completed the work on one side, the frame is very carefully turned over and the second side is painted. To prevent the paint from getting dirty on the bottom, you need to place two blocks of wood wrapped in film or something similar using available materials under the frame. To give the surface a uniform deep color, you will need 2 or even 3 layers of paint. Follow the time specified by the manufacturer between coats.
Advice. For painting, choose a warm, windless day in dry weather. In the heat, the paint dries quickly, the brush drags, and this interferes with high-quality shading. In wet weather, wood absorbs moisture, which leads to reduced paint adhesion and the appearance of bubbles. Well, the wind brings dust and debris, which immediately sticks to the fresh paint.
While the frames are drying, you can paint the glazing beads that you will attach to the windows, as well as other wooden elements - trim, window sills, shutters, if any.
Over old paint
Method 1
If you are not going to change the windows, but only want to update the ones you have, the procedure is somewhat different from that described above. For high-quality restoration, it is recommended to carefully remove the frame from the window frame so as not to damage anything.
Removing the sash
Step 1. First, dismantle the platbands, remove the windows from their hinges and lay them on a flat surface. Next, you should remove the glazing beads very carefully so that the glass does not crack. If window putty was used instead of glazing beads, remove it with a knife, wide screwdriver or putty knife. Be careful here as well, as the blade can easily slip and break the glass.
Removing old putty
Step 2. Since nothing is holding the glass in place, you can carefully pull them out and set them aside. Now the most difficult step is removing the old paint. There are several proven options:
- scrape everything off with a spatula;
- burn with a blowtorch;
- heat with a hair dryer;
- use washes.
Cleaning off old paint
To remove or not to remove old paint
Paint removal
The first method gives good results only if the paint is cracked and weakly adhered: it is enough to pry it from below with a blade, and the old coating will fall off in pieces.
Advice. If the paint holds very firmly, there is very little visible damage and the same composition is chosen for painting, it is not necessary to completely remove the coating. It is enough to sand the frame to remove defects.
Step 3. After removing the paint, wipe the frame with a clean rag to remove small particles and inspect the surface for damage. Rotten areas must be scraped out with a knife to a solid base, loose jumpers must be strengthened with self-tapping screws. Cracks, chips, and depressions are filled with putty.
Step 4. As soon as the putty has dried, the frame is treated on all sides with a sander or grinder with a sanding attachment. The surface must be absolutely smooth, even, without roughness.
Sand the applied putty
Step 5. The frame is primed, dried and the painting begins directly. Usually 2 layers of paint are enough if the surface is prepared correctly.
Be sure to apply primer
Applying primer
While the frame dries, the platbands are processed: the old paint is removed, sanded, and a protective impregnation is applied. Glazing beads are usually completely replaced with new ones, since they do not differ in durability. Next, they inspect the glass, replace cracked glass, and remove dirt and traces of old paint. The window frame should also be checked for damage, cracks and gaps should be sealed, and painted. Such repairs will extend the service life of wooden windows by another 10 years.
After the frame has dried, the glass is inserted first.
Glass installation
Fastening glass to a wooden frame
To ensure that there is not the slightest gap between the frame and the glass, you need to apply silicone sealant around the perimeter of the sample. To apply sealant you need a construction gun - this is the most convenient and fastest way. The sealant should be applied in a thin, even strip, without sagging. Having spread the silicone, carefully place washed and dry glass on top and press for a few seconds. Any sealant that comes out must be wiped off immediately with a damp cloth, since it is more difficult to remove when dry. Having secured one glass, proceed to the second, and so on until the end. On average, about 1 can of sealant is used for 1 window.
We insert the glass and apply window putty (instead of glazing beads)
Level the putty with a spatula
Allow the sealant to dry, after which the glazing beads are carefully filled. They act as an additional fastening for glass and perform decorative functions, since wooden windows with glazing beads look much more attractive. Now all that remains is to insert the frame back into the opening, secure it, and stuff the trim.
How to properly fasten a bead
Advice. The nails with which the glazing beads are nailed rust very quickly and leave stains on the glass, which significantly worsens the appearance of the window. To avoid this, use special copper-plated finishing nails (copper-plated).
Method 2
It is not always possible to remove the frames from their hinges and pull out the glass. In this case, you will have to work this way, taking care to protect the glass from paint. There are several options here: you can cover the glass with newspapers, treat it with soap foam, or stick on masking tape. Using tape is the most reliable and effective way. But first you need to remove the old coating from the window frame.
In such conditions, it is best to use a hair dryer or remover. Streams of warm air quickly soften the paint, and it can be easily removed with a spatula. To prevent the glass from heating up during the cleaning process, you need to use a special attachment on a hair dryer. Washing also gives a good effect; the paint quickly dissolves and is removed with a scraper. After this, the window is washed to remove the smallest particles of old paint and left to dry.
Removing paint from a window using a hair dryer
Next, the surface is sanded with sandpaper, smoothing out minor defects, cleaned of dust and the cracks are sealed with putty. After final sanding, apply strips of masking tape around the perimeter of the glass and begin priming and painting.
Protect the glass with masking tape
If splashes accidentally fall on an unprotected part of the glass, they should be wiped off immediately with a clean cloth. After applying the final coat of paint, carefully remove the tape from the glass. After the surface has dried, the tape comes off along with the paint, leaving visible marks on the frame.
Painting the frame
Removing the tape
Paint consumption for PVC windows
It’s not easy for someone who has started a renovation, because you need to take into account every detail, select the most suitable and high-quality materials, and also try to save money. In order not to spend too much, you need to know the rules for calculating consumables. This is especially true for painting materials. At first glance, it may seem that there is nothing difficult in calculating the amount of paint required. But at this stage, even seasoned experts make mistakes. To avoid mistakes, it is worth considering some features of paint consumption on a window .
First, determine the object that will be painted. Based on this, calculations of the required amount of paint will be made. The first indicator is the area of the object being painted. The second indicator is the norm that is typical for the selected type of painting material.
The paint consumption on the window also depends on what exactly you paint . For example, to paint 15 square meters of metal surfaces you will need 1 liter of paint. If you decide to paint freshly applied plaster, then expect that 1 liter of paint will cover 13.5 sq.m. To paint 9 square meters of wallpaper for painting, also prepare 1 liter of paint. And the paint consumption on a window will be from 10 to 15 grams per linear meter of window profile.
Everything can be painted, even plastic windows. At the moment, there are a huge number of useful tips for changing the color of plastic. But do not rush to listen to them, because such fastidious material often deteriorates after inept painting.
If you want to update your PVC plastic windows by painting them, then entrust this labor-intensive and responsible process to professionals, and use only materials that are created for this.
Painted PVC plastic windows will look organic in any interior if you choose the right color. One should also take into account the fact that each color carries a special energy and is capable of differently influencing a person’s mood and general condition. For lovers of peace, tranquility and those who dream of being one with nature, it is better to choose green.
If you prefer naturalness, then pastel colors will be more relevant than ever. Blue color should be chosen by those who are used to acting decisively and being a leader. Don’t forget about the preferences of children who dream of their room becoming magical. Girls will be delighted with gold or pink, while boys will prefer to look out the window in brown or blue.
For lovers of the unusual and special, the ENAMERU shade catalog has special offers: metallic colors and pearlescent shades. The client needs to listen to himself and choose the required color, and all the worries associated with the creation of painted PVC plastic windows will fall on the shoulders of specialists from specialized companies who will use unique ENAMERU paint and varnish materials for PVC windows in their work.