It is quite possible to build wooden floors in a house with your own hands. This design is considered one of the traditional options. Such floors are installed during the construction of residential buildings from almost any materials: brick, foam concrete, expanded clay blocks, and, of course, they will be relevant in a wooden house. How to make them yourself? A detailed answer to this question can be found in this article. Installation, insulation, sound and vapor barrier: we will consider the most important aspects of the work.
Interfloor, as well as attic wooden floors in a house, made of wood, are practically no different in their design features. They consist of wooden beams, as well as inter-beam filling, which is a roll made of panels or wood. Wooden beams are load-bearing structures, usually made from softwood. These could be, for example, hewn logs, boards or beams.
Conclusion
As we found out, installing wooden floors yourself is really not difficult. Moreover, they will last no less than the house itself. The only thing is that for this it is necessary to strictly adhere to the above technology (see also the article “Wooden flooring of the second floor. Technical requirements. Installation and processing. Sound insulation with insulation”).
You can find additional useful information on the topic discussed in the video in this article.
How to make a floor supported along the bottom edge of the beams
In order to make floors of this type, beams must be prepared before installation.
First, on both sides of the beam below, along its entire length, we nail 50x50 mm bars, which are called “cranial”. They serve as a support for the floor boards, and in addition they increase the area of the beam in the lower part of the section, enhancing its load-bearing capacity.
We cut the ends of the beams at an angle of 60 degrees to the base. The bevel will make it easier to lay the insulation into the beam socket and increase the area for moisture evaporation.
It is sometimes recommended to fasten these beams with anchors, as in the previous version of the design, perhaps through one. However, since applying a load to the bottom of the beam ensures the stability of the section automatically, anchors can be dispensed with.
The only thing is that until we lay the beading, it makes sense to embroider the beams with temporary spacers made of boards.
For rolling we use edged, or even better, tongue and groove boards. Since their load will only be the weight of the insulation, then for mineral wool, with a beam spacing of up to a meter, a 25 mm board will be enough.
We lay the boards along the skull blocks, close to each other, nailing them in place. We hit the nail, tilting it away from the already nailed board so that when we hit it, we knock the new board against the laid one.
Along the roll we lay a protective barrier of polyethylene film or glassine. Its task is to prevent the passage of vaporous moisture (mandatory for the attic floor) and the penetration of dust from the insulation into the room.
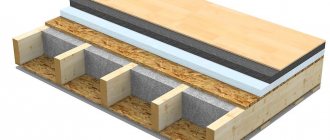
All that remains is to lay a layer of waterproofing on top of the insulation and cover it all with a dry screed or floors (see Fig. 1).
How to make a floor resting on the top edge of the beams
Such ceilings are usually made for utility rooms that are not heated. They are also suitable as attics, but for interfloor spaces they are too thick.
The beams we take are not necessarily rectangular. You can use regular logs, but be sure to remove the bark.
We place the beams strictly parallel to each other and fix them with steel anchors.
Anchors made of steel strip or reinforcement are laid into the thickness of the masonry during its construction. We attach the beam to them with nails or screws.
After the beams are mounted, lay down 40 mm thick boards, nailing them in place.
The ceiling is ready. If necessary, we insulate it, make sound insulation, cover it with a screed, or arrange the floors along joists.
I recommend: Sealing holes in the floor slab and loading from the screed
Areas of application and calculation of wooden floors
It is recommended to use ceilings on wooden beams:
- in buildings constructed of wood (frame and log);
- in country houses designed for summer use;
- in outbuildings (sheds, bathhouses, workshops);
- in prefabricated prefabricated houses.
In addition to the listed options, wooden structures for interfloor ceilings can be used in cottages intended for year-round use. Only in this case you need to use the two-row beam installation system, which we described above.
We do not recommend selecting the section of timber according to the principle “the thicker the better”. There is a simple calculation method taken from building regulations.
According to it, the height of the wooden beam must be at least 1/25 of the size of the span being covered . For example, with a 4-meter distance between the walls, you need to buy a saw log with a section height (H) of no less than 400/25 = 16 cm with a thickness (S) of 12 cm. To create a safety margin, the found parameters can be increased by 2-3 cm .
The second parameter that needs to be selected correctly is the number of beams. It depends on their pitch (the distance between the central axes). Knowing the section of the beam and the size of the span, the step is determined from the table.
Table. Choosing beam spacing
The design load of 350-400 kg/m2 indicated in the table is the maximum for the second floor. If it is not residential, then its value will not exceed 250 kg/m2.
When planning the layout of the beams, you need to take into account that the two outer ones must deviate from the end walls by at least 5 cm. The remaining beams are distributed evenly across the walls (in accordance with the selected pitch).
Selection of materials for the supporting structure
When building a house, you always need to solve the difficult question of what materials to use so that the building lasts a long time and maintains its physical parameters throughout this period? You can make the right choice only by making a series of calculations, since many properties of wood depend on the loads created during operation.
Lumber manufacturers offer several types of wood for the construction of durable load-bearing structures. The greatest preference is given to such species as aspen, linden, poplar, birch and alder. The density of the material used plays an important role in the reliability of the structure, and these types of natural materials meet the requirement.
For your information! You can get higher strength if you use laminated veneer lumber as floor beams. It consists of two boards with camellias turned in opposite directions. In this form, the beam receives high mechanical strength for bending and torsion and is less deformed under loads
.
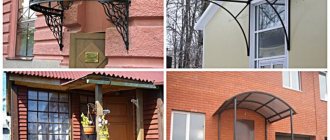
Beams can be of different shapes, but it is important that they are made from the right wood
General information
Advantages
The main advantage of wooden floors is that they are easy to lay without the use of special construction equipment.
Moreover, they can be used not only in wooden houses, but also in buildings made of the following materials:
- Brick;
- Light types of concrete;
- Ceramic blocks, etc.
Of course, you won’t be able to make an interfloor ceiling in a wooden house with your own hands alone. But two strong men with experience in construction work can easily cope with such work.
In the photo - floor beams of a wooden house
Flaws
As for the disadvantages of the design in question, these include the following points:
- Relatively low strength of wood;
- The material is highly flammable;
- Tendency to rot and parasites.
It must be said that despite all these shortcomings, if certain installation rules are observed, the interfloor ceiling made of wooden beams turns out to be strong, reliable and durable.
In what cases is it recommended to lay cold floors on the second floor?
To answer this question convincingly, we need to recall a few elementary rules of heating engineering.
- Heated air rises and accumulates under the ceiling. This is the warmest zone in the room, the air temperature here is about 5–8°C higher than at the level of 1.5 m from the floor and 9–11°C higher than on the floor. From the point of view of heating engineering, space heating by heating the floor is considered the most effective; to ensure the most comfortable temperature at a height of 1.5 m, a minimum amount of thermal energy is required. This is an axiom; there is no need to prove its correctness.
- Warm air from the ceiling of the room on the first floor automatically heats the floor of the second floor. The heat is not lost anywhere, but warms up additional rooms. Of course, if they are residential and not cold attic spaces. The question arises: why build insulated structures and, at your own expense, worsen the comfort of living, lose additional funds to heat the second floor, and remove heat from the first floor using ventilation?
Most professional builders strongly do not recommend installing insulated floors on the second floor if its premises are used as residential premises. You need to know that in addition to unnecessary losses of money and thermal energy, another problem may arise. If the technology is violated, the heat-insulating material increases its humidity, and all wooden elements are used in very difficult conditions. Heat plus moisture is an excellent environment for the development of fungi and rot on load-bearing wooden elements, and no modern impregnation can protect them for a long time. Over time, you have to deal with very unpleasant premature repairs. We hope that this information will help you make the best decisions in each specific case.
Wooden floor insulation scheme
Using boards and solid timber
In the case of using solid wooden beams or boards for flooring, the span length is chosen within 4–6 m, which is half the maximum distance when using building structures made of laminated veneer lumber. Parts made from bonded boards are often manufactured directly on the construction site.
The strength of the structure is superior to solid beams. The main advantage of the products is the possibility of constructing a composite part from several boards. Builders can independently regulate the thickness of the beam by fastening the required number of elements. The boards are connected to each other using threaded elements. Rubber or plastic washers are installed under the bolts and nuts. The elements prevent the effects of corrosion on metal embedded parts and protect the wood from cutting into the nut when tightening.
Quality criteria
You can evaluate how well the interfloor floors in a wooden house are made using the following criteria:
- There are no distortions in any direction;
- There are no distortions from the axes of structures greater than 15 mm;
- Horizontal deviations do not exceed 2 mm;
- Warping does not exceed 0.7 mm per square meter;
- There is no noise or vibration when people walk on the floor.
If the floor meets all these standards, then you have coped with the task perfectly. That, perhaps, is all the basic information regarding the arrangement of wooden floors.
Rolling flooring recommendations
In order to make the ceiling of the first floor, it is necessary to roll up. This stage of work can be carried out using a wide variety of materials.
Skating plan.
In the most common version, skull blocks are nailed along the side of the beam. Such bars should have a cross-section of 40*40 or 50*50 mm. They should not protrude below the main beam. It is on them that smooth boards will subsequently be attached, the thickness of which should be in the range of 10-25 mm. In order to line the ceiling, you can use sheets of plywood. Using sheet material, you can get a perfectly flat ceiling. The minimum thickness of plywood in this case should be at least 8 mm
It is very important to ensure that the edges of the sheets lie exactly in the middle of the beam
Instead of using cranial bars, you can make special grooves in the beams. In order to use this method, the cross-section of the beam must be thought out in advance.
As an option for flooring, the lower part of the floor elements can remain open; for this, the cranial elements are nailed not flush, but slightly higher. Thus, the flooring is carried out between the beams.
After the rolling is done, you can begin laying the floor of the second floor. If instead of the second floor there is an attic, then a subfloor is sufficient. If there is a room on the second floor, then the floor must be made of high-quality material. Wooden boards will be laid directly on the joists.