assets/from_origin/upload/resize_cache/iblock/aa9/600_450_2/aa9484f6dd2ae750740684d0f631d4f9.jpg From this article you will learn:
- What options for finishing ceilings in a house are there?
- What are the features of finishing ceilings in a house with wood?
- How to make the ceiling in a private house unique in terms of design
- How to insulate a ceiling in a private house
- What should the ceiling be like in a private house, according to experts?
- How is the cost of finishing the ceiling in a house calculated?
What images come to your mind when you think about renovating the ceiling in your home? Most often it is “white and flat”. It is customary to finish walls or floors using the latest developments in design, and your imagination is not limited by anything. Unlike other interior details, ceilings are not given due attention during renovations. Finishing this part of the room is considered the simplest stage of work. But this opinion is wrong, and in practice, the unusual design of the ceilings of any room, be it a living room, study, kitchen, children's room or bedroom, gives the room originality and originality. In our article you can find detailed information about how ceilings are finished in a house.
Ceiling height in a private house
The height determines the convenience of the room in a private home and the method of its operation. The volume of circulating air depends on it.
Minimum height
Safety standards require a minimum ceiling height of 2.4 m for a private home. In this case, it is allowed to install gas appliances: stove, boiler and water heater
This is also important from a practical point of view. Chandeliers are installed on the ceiling, and at a lower height it is uncomfortable for a person taller than 1.7 m to move around
The psychological factor is taken into account: low altitude is depressing, and causes panic in people with a fear of enclosed spaces. It introduces restrictions on the use of suspended structures and finishing
Optimal ceiling height in a private house
The optimal height for a ceiling in a private house is considered to be 2.5–2.7 m with finishing decorative finishing. There are no restrictions on choosing a larger indicator, since a small area in this case looks more profitable. This takes into account:
- service method;
- space heating;
- harmony.
Cleaning the floor will require a stable ladder. Replacing lamps in spotlights will be difficult. Great height negatively affects the comfort of the room, which is taken into account when choosing the finish and method of using the room. Heating costs will increase. To maintain a comfortable temperature of 22° under the ceiling, the air will have to be heated to 30° and higher. Heat loss through the ceiling increases, which leads to icing of the roof, the appearance of rot and fungus on the rafter system.
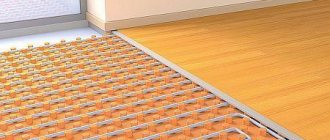
If a ceiling of 3 m or higher is required, the heating issue can be resolved by installing a warm water or electric floor. In this case, the surface is heated evenly and the air, rising, warms the entire volume of the room. In private houses with second light, where the ceiling is at roof level, convection heaters are not used. They are replaced with infrared ones or the above option with a floor.
Important! For private houses with convection water or electric heating, ceilings are not made higher than 2.7 m. This is interesting: Gluing foam plastic to concrete: disassemble it from all sides
This is interesting: Gluing foam plastic to concrete: disassemble it from all sides
Combined
This is a ceiling option for creative people with imagination. There are several types of combinations:
- 2 tension ones (opportunity to play on contrasts);
- tension and plasterboard;
- plasterboard and hanging.
The fastening mechanism is fully consistent with the selected types. The cost will also consist of their cost, directly depending on the complexity of the design.
Beam type ceilings
By design, all floors are divided into two types: beam and slab. Each of them has certain characteristics.
Beam ceilings are often found in private homes
Therefore, if you need to make your own ceiling base, you should pay attention to this type of structure. The basis of such a ceiling are wooden beams that rest on the load-bearing walls of buildings
Their cross-section depends on the distance between them, the planned load and the width of the span.
Before you begin creating the floor, you need to select the wood for the beams. They are made from both softwood and hardwood materials, but the wood must be thoroughly dried for at least 3-4 months. Before laying, beams must be checked for rot, cracks and other defects. If they are found, the material cannot be used.
Beams laid on the walls are leveled. To do this, parts of tarred boards of various thicknesses are placed under their ends. Untreated wooden wedges should not be used to level beams. The joints between elements on internal walls are reinforced with clamps or staples. Instead of a metal clamp, overlays made of boards more than 40 millimeters thick are also used.
According to fire safety requirements, the distance between the beams and the chimney must be at least 40 centimeters. When sealing the ends into the walls, they are impregnated with an antiseptic, tarred and wrapped in roofing felt. This allows you to protect the wood from rot.
To ensure the rigidity of the floor, every second beam is fixed to the load-bearing wall. Experts advise using steel anchors embedded in the masonry for this purpose. To create a rough ceiling on beams, cranial bars are used. They are attached to the sides of the base, and knurling plates are nailed to them to form a covering.
In addition to wooden beams, metal products are also used. They are smaller in size and make it possible to save on the total volume involved in covering. At the same time, metal elements have a greater load-bearing capacity, which is several times higher than that of wooden beams.
But metal beams also have disadvantages. These include susceptibility to corrosion and the inability to create effective sound insulation.
How to choose floor slabs, see details in the video:
Whitewashing and dyeing
The simplest and most budget-friendly design option listed. Its main advantages will be the ease of application of the coating and the ability to quickly restore the original appearance of the ceiling after cracks appear. However, the advantages end there and the disadvantages begin.
The main disadvantage is that the ceiling looks beautiful, but only on completely flat floors. If there are even small surface defects, they will have to be eliminated, which will entail considerable costs for leveling the floor. In addition, leveling is a very painstaking, long and rather “dirty” process.
Metal ceiling
Metal floor beams are made from low-alloy or carbon steel.
Metal beams are a more durable material than wooden beams and have a longer service life. Due to their strength, you can save space by reducing the thickness of the ceiling itself. It is worth noting that floors using metal beams are used extremely rarely; more often, builders opt for wooden floors.
The openings between the beams are filled with a mixture of lightweight concrete or wooden panels. The weight of one square meter of such flooring exceeds 400 kg.
Using metal beams with your own hands, you can cover large spans, from four meters or more. The metal floor is a non-flammable material and exhibits a high degree of resistance to various biological factors such as rot or termites.
The disadvantages of this overlap include the tendency to form corrosion in places with high levels of humidity. The ceiling made of such material has low sound and heat insulation properties. This situation can be corrected if the ends of the beams are wrapped with felt.
In most cases, a rolled profile is used as a load-bearing element: angles, I-beams, channels. During installation work, reinforced concrete slabs up to nine centimeters thick are laid between the beams. A layer of reinforced concrete screed and slag is applied on top.
For this type of flooring you will need the following materials:
- metal beams;
- prefabricated reinforced concrete slabs;
- plaster mesh;
- waterproofing materials;
- boardwalk.
In rare cases, reinforced concrete beams are used for flooring in a private house. Their disadvantage is that the work cannot be done with your own hands. The use of lifting equipment is mandatory.
Which coatings are better?
When choosing the best coating, its beauty, durability and practicality are taken into account. It is especially important to carefully select the cladding of the ceiling surface in unheated rooms and places with high humidity. There it is better to use plastic products or plasterboard structures with a suitable moisture-resistant finish.
Wooden materials can be a good option for a country house, but subject to the use of protective impregnations and a decorative finishing coating. To reduce flammability, the lining is treated with fire retardants, and to protect against damage by mold and rot - with antiseptic impregnations. To increase the resistance of the coating to moisture and dirt, the lining is painted, varnished or impregnated with wax.
Drywall gives unlimited scope in terms of design of the ceiling surface. You can make single-level and complex multi-level structures with built-in lighting and spotlights. In addition, the surface of gypsum plasterboard is finished with different materials (painted, whitewashed, covered with tiles, wallpaper, mosaics, self-adhesive film), which allows you to select the finishing material for the purpose of the room.
Two options for ceiling insulation. Advantages and disadvantages
Insulating the ceiling in a private house with your own hands can be done in two ways - from inside the room or from the outside (from the attic). Let's look at them from the positive and negative sides.
Application of different materials
When insulating from the inside, mineral wool is chosen, and for the external method, almost any insulation offered on the building materials market is suitable.
Interbeam insulation
Floor height in the house
For interior work, installation of a suspension system is required. It is also worth starting from your personal feelings whether a material similar to glass wool will suit you in the room, and how it will fit into the format of the room. During external work, this factor can be ignored.
Complexity of work
Not every person will be able to insulate the ceiling in a private house without professional skills. This especially applies to suspended structures, which must be not only reliable, but also aesthetically attractive. And external insulation will require less effort and is much easier to do.
Budget planning
There are cases when the laying of floor slabs in a house is done crookedly. The most current way to hide this misunderstanding is to create a suspended ceiling, which will lead to additional costs. For external insulation, any material for a smaller amount is suitable, for example, polystyrene foam, expanded clay or other similar materials. Let's take a closer look at some of them.
Design options
To make the coating truly reliable, you should build a rough version of the ceiling. During roughing work, the previous coating should be removed from the surface and uneven areas should be repaired, after which the primer usually begins. It is used to impart homogeneity to the structure of the base and enhance adhesion. For such work, it is better to use a deep penetration primer, applying the composition in two layers.
The rough version of the coating in a wooden house should be done in a certain sequence: this determines what appearance it will have after the completion of repair and finishing work.
- To save most of the heat in the room, you should insulate the ceiling. Mineral wool is better suited for this; it can be purchased in the form of a roll or sheets.
- For the basis of the rough version, bars are nailed to the beams using nails.
- Prepare the boards for the flooring, cut them to specific sizes, taking into account a gap of several mm. They hem the rough ceiling along the beams, while making sure that the work is carried out accurately and evenly.
- The wood material is pre-impregnated with products that will protect the wood from mold and harmful bugs. Treating the surface with fire retardants will protect wooden surfaces from fire.
After completing all work with the rough ceiling, they begin cladding. If the surface is to be painted, whitewashed or wallpapered, it is leveled with a plaster mixture. A building level and regulations are required for this work. After priming, the surface should be filled with a starting mixture, then primed again. When the preparatory work is completed, you can glue textured wallpaper or polystyrene boards.
For suspended, suspended and suspended ceilings, leveling steps are not necessary; large cracks, unevenness, and chips should only be eliminated. The surface is treated with an antiseptic and installation of the sheathing begins. For the frame, profiles made of metal or wooden slats are used. At the last stage, communications should be laid and electrical wiring should be insulated.
Let's consider current types of ceiling design in a private house.
Most often you can find options:
- single-level plasterboard ceiling covering;
- two-level plasterboard covering;
- tension covering of one- and two-level type;
- smooth whitewashed or painted surface.
In a frame building, a beam floor is used; this assembly involves the use of beams for the floor.
The following types are more appropriate here:
- suspended ceilings;
- false ceilings for painting or under panels;
- tensile structures.
In frame rooms, a false ceiling is more often used, which allows you to maintain the volume of the room. It is not difficult to decorate the ceilings in a timber house. Not all materials may be suitable for a wooden house, so a more suitable option is found for finishing.
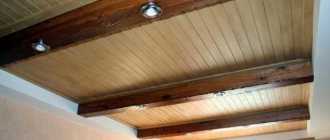
As practice shows, wood coating is one of the most popular. With its help, you can create any interior that will be combined with the decoration of the whole house. Wood is an environmentally friendly material and is harmless to health.
Wooden coverings have advantages over other ceilings:
- wooden covering retains its appearance for many years;
- it is combined with other materials (for example, stone, plasterboard or plastic);
- Wooden ceilings offer a lot of possibilities for processing (they are painted, varnished, or a pattern or ornament is applied to them).
In a log house, craftsmen advise making suspended ceilings. An alternative to this design option can be drywall. Tiles and polystyrene will look good; you can cover the base with clapboard (the most economical option) or paint it.
One of the most popular materials in construction is aerated concrete. The use of aerated concrete is advisable for interfloor slabs; it can be used to build a wall. Aerated concrete flooring can be used for flat and gable roofs. This type of flooring should not be used in houses higher than three floors.
Assembly of hydro- and vapor barrier
First, you need to decide what the room will be used for; if there is another heated room on top, then there is no point in installing heat and sound insulation on the sub-ceiling; wooden surfaces distribute noise and heat quite well. The vapor barrier is installed along the entire perimeter of the ceiling, especially well stretched in the corners, laid with an overlap, the boards are mounted overlapping. This will help protect the rough base and wooden ceiling from rotting and mold.
Ceiling vapor barrier - effective and high quality
Subtleties of laying insulation
If the insulation is installed incorrectly, it is possible to destroy the baseboards and decor, the rough ceiling, even cause a fire, for which you should slowly study the instructions so as not to confuse the sides, because the markings of different companies may contradict each other.
It is enough to cut circles of about 20 cm in the material around the planned lamp; this will create good fire safety, which is extremely important for a wooden house and wooden decorative elements. It is important to establish these places during the installation of the material - we measure the places from the wall, then put a mark on top, in the form of a circle with a diameter of 20 cm
Integrated thermal insulation reduces building energy losses
The same applies to vapor barrier, although the material is quite durable, but unstable to high temperatures, it can melt and lead to a fire, especially if the rough, facing and decor are made of untreated lining. Thus, an emphasized design can lead to dire consequences for the interior and the integrity of the room. But since the lamps and decor are not mounted to the sub-ceiling, like the wiring, it is enough to install heat-reflecting foil, 20 by 20 cm squares, on the vapor barrier below, at the mounting points. It will not be visible, but it will help preserve the interior of the room and not damage the intended design with decor.
Installing thermal insulation in a wooden ceiling
As we see, it is quite possible to make a wooden ceiling with your own hands quickly and efficiently. In addition, you can hem the rough base yourself, faster, better than many workers.
Kinds
To choose ceiling options in a private house with your own hands, you should familiarize yourself with all the methods of decoration.
There are several finishing techniques:
- Painting and wallpapering.
- Suspension and tension systems.
- Cassette ceilings.
- Panels.
- Caisson structures.
Let's take a closer look.
Painting and wallpapering
The decoration is suitable for finishing the ceiling in a private house where the height of the walls is no more than 2.5 m.
Basic Rules:
- the base surface must be perfectly smooth;
- for leveling, use starting (first layer) and finishing (last) putty;
- joints and seams are covered and sanded;
- Be sure to impregnate the base base with a deep penetration primer in 2-3 layers and dry the surface before starting facing work.
To paint the surface, water-based, acrylic, and latex paints are used. The simplest option is water-based emulsion. It does not cause allergies, does not contain harmful substances, is easy to apply and dries quickly. As for wallpaper, the choice of options is up to the owner. The main thing is that these are not heavy canvases that can quickly fall off the plane.
Wallpaper and paint are used in rooms with high humidity levels. Choose wallpaper that can be wet cleaned or washable, and paint with moisture-resistant components.
Hanging system
If you choose a suspended ceiling in a new house or one that has been used for a long time, the base plane will not have to be leveled. Differences and defects will be hidden by the frame, which is pre-formed from a wooden beam or metal profile.
The advantages of a suspended structure are the possibility of laying insulation, wires and communications into the ceiling space. However, the height of the walls cannot be lower than 2.8 m. (KM put the link. Article about ceiling insulation here.
Work on arranging the frame does not take much time. You need to find the lowest corner in the room and set the mounting height of the guide profile from it along the wall. Then move the marking points to all corners and beat them with a cord. You will get a horizontal line on the walls - the installation boundary of the guide profile. In increments of 0.6 m, a ceiling profile is attached to the ceiling under sheets of plasterboard (gypsum plasterboard), and the hangers are leveled horizontally. After preparing the frame, the ceiling is sheathed with gypsum board. If you are finishing the ceiling in a kitchen or bathroom, then it is convenient to take moisture-resistant sheets. However, the material is expensive. Therefore, experts advise finishing areas of high humidity with moisture-resistant plasterboard sheets (VGKL), and using conventional gypsum board sheets on the rest of the surface.
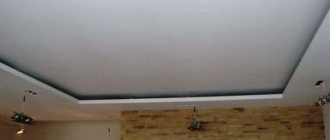
A plasterboard suspended ceiling can be multi-level, figured, with built-in lighting. Finishing options are also varied, from painting to paneling.
Cassette
The difference from a suspended ceiling is that the kit includes profiles for forming a frame and cassettes (elements) covering the sheathing. Cassette ceilings are the simplest and most convenient types of ceilings in a private home. Even a novice master can handle their arrangement.
The decoration technique is the same as hanging, and cassettes are made from different materials:
- glass;
- metal;
- tree;
- plastic.
You can choose a combined decor that combines plastic and glass cassettes or metal mirror elements with plastic ones. Requirements for the height of wall panels are from 2.8 m.
Tensioner
When choosing which ceilings are best made in a private home, take a closer look at stretch fabrics. This option requires the participation of specialists. But with a one-time investment, the owner receives a durable, durable and practical coating. It meets the requirements of quality and aesthetics.
The choice of stretch fabrics by color and texture is not limited. There are PVC fabrics, satin (a type of PVC) and woven materials. Film products can withstand large amounts of water, but cannot withstand low temperatures. Fabric ones are hygroscopic, they “breathe”, so they allow water to pass through, but they are not afraid of low temperatures.
Films can be washed, fabrics can be vacuumed, but the former can be easily cut or pierced even with a champagne cork. This will not happen with the second ones; they are difficult to cut. And if suddenly this happens, it’s easy to repair.
Satin sheets are the middle ground between PVC film and material. Ideal in appearance, the products do not allow water to pass through, but remain breathable. The only downside is the price - satin is more expensive than PVC film.
Caisson
This is a type of finishing in which the ceiling surface is a plane divided into geometrically shaped zones with a side size of up to 60 cm. It looks like structural recesses with protruding beams. The coffered ceiling is made from various materials. The combination of dark beams and light internal filling of the caisson looks beautiful.
Ceiling installation when the attic is cold
When the building is one-story, and only the roof is on top, the installation of the ceiling in a private house is carried out as follows.
Step one - filing the ceiling
. For this you need a shield made of boards. The material for it is ordinary edged or tongue-and-groove boards with a thickness of 25 millimeters or more. They are fastened “in space” using long nails, leaving minimal gaps. The tongue and groove boards are hemmed with a groove from the wall, from which the installation of the cold ceiling starts.
When deciding what to make a ceiling from in a private house, you can opt for lining it in another way - plywood or OSB, at least 15 millimeters thick (read: “Ceiling with plywood”). But it should be taken into account that in terms of one “square” this option is much more expensive and the possibility of the structure sagging under its own weight and the weight of the insulation increases.
As an alternative, in private houses of old construction, the board panel can be placed not below the beams, but laid on top of them. Thus, the height of the rooms will not be reduced, and the living space will not be reduced. If necessary, you can make a crate. You should not worry about the appearance of the rough ceiling, since finishing the ceiling in a private house will cover the surface, and the beams, painted in the desired color, will decorate the interior of the room.
Step two - vapor barrier of the ceiling
. First of all, you should take care of the vapor barrier. On the one hand, this layer should prevent the heat-insulating material from becoming damp, and on the other hand, due to radiation, it should reduce heat loss. This can be achieved using aluminum foil. Also used as a vapor barrier is foil insulation based on foamed polyethylene - this relatively recently appeared vapor barrier material for the ceiling creates an obstacle to heat loss due to both radiation and convection. When a chimney is laid in the ceiling, there must be a distance of at least 30 centimeters between the chimney and combustible material.
Step three - insulation of the floor
. The installation of a ceiling in a private house with a cold attic involves the use of insulation materials, the choice of which is huge (read: “How to insulate the attic of a private house”).
The most popular among them are:
- Mineral wool
. This material (see photo) is non-flammable and has excellent thermal insulation properties, but over time they begin to deteriorate. The fact is that even completely dry mineral wool begins to cake after a certain period. If the vapor barrier is not done well, this insulation picks up moisture and ceases to perform its intended function. It is impossible not to mention such a disadvantage of mineral wool as the presence of volatile small fibers that irritate the respiratory system. Therefore, they need to be isolated from living quarters especially carefully. The cost of mineral wool is affordable. When insulating the ceiling with mineral wool in a private house, it must be handled with care and not compacted, since the thicker the layer, the better the thermal insulation. - Basalt wool
. The ceiling in a country house is often insulated with this type of mineral wool. But there is a difference between these two materials. Basalt wool retains its shape better and practically does not cake, but, unfortunately, it can pick up moisture.
Styrofoam
. This thermal insulation material is flammable. Controversy continues regarding their release of styrene. Although foam plastic intended for insulation must meet environmental standards, in reality this indicator depends on the manufacturer. As for the thermal insulation properties, this material is excellent, since there is practically no heat loss due to air convection inside the foam layer (read: “How to insulate a ceiling from the inside in a private house”). This insulation does not change its shape and size - even after 10 years, the volume of foam sheets between the beams will not change from the moment they were laid. The material is considered non-hygroscopic and moisture-proof. There is an opinion that its use allows you to avoid making a vapor barrier at all. But thermal insulation using foam plastic is expensive and unaffordable for many consumers.
Colored
This method of decorating the ceiling is one of the most common. The materials for it are available and inexpensive, and their use is particularly simple.
perfectly flat before painting . Otherwise, the appearance of the ceiling will not please you.
Paints use oil or water-based paints. The average price of a five-liter jar is 270 rubles.
First of all, prepare the paint for use by thoroughly stirring and bringing to the desired thickness. You will need:
- special brush;
- roller with a long rod.
To paint the ceiling yourself in your new apartment, you need to prepare the base surface by leveling the original ceiling. This method of finishing the ceiling is simple and economical. And the most difficult and time-consuming part of the work is precisely preparing the base surface. The painting itself is not technically difficult. And in case of failure, you can always hire a special team, the cost of which ranges from 45 to 70 rubles. per square meter.
Important
When choosing a ceiling painting method, you also choose its disadvantages:
- Low strength (cracks may appear when the house settles);
- lack of protection in case of flooding from above.
Selection of materials for the ceiling
What materials the finished ceiling is made of has already been described. Wood is usually used to create ceiling structures in private homes.
Here, as in the case of the floor, it is not necessary to pay attention only to the strength properties of the material. For the ceiling, it is better to choose light boards with an attractive texture.
Coniferous trees, as well as maple and birch, meet this requirement.
The main parameters when choosing wood are its class and grade:
- Class A selected grade without visible defects with a smooth surface, which may have a small number of knots inside.
- Class B of the first grade - wood with minor defects, noticeable only upon detailed examination.
- Class C second grade with a rough surface and knots. Cracks may be observed on the boards.
- Class D third grade. Such material is of such low quality that it cannot be chosen as a base for a ceiling.
If your budget is strictly limited, it is not necessary to purchase a selected variety of wood. You can completely get by with class C wood, but with its preliminary treatment with antiseptic solutions and a tinting composition. This will help significantly increase the service life.
The type of wood and its quantity are chosen with an emphasis on the type of ceiling surface that will be made in a private house. So, for the simplest hemming you will need boards and timber. At the same time, the width of the boards allows you to change the design of the ceiling. The wider they are, the rougher the finished surface looks. This allows you to get a unique rustic atmosphere in any room.
The timber is selected with a cross-section that is suitable for each specific case. So, if an additional insulating layer is required, then it is worth turning to larger options so that the insulation can easily fit inside.
Important! Instead of hemming boards, sheets of moisture-resistant plywood can be used. But such a design of the ceiling in the house will require finishing.
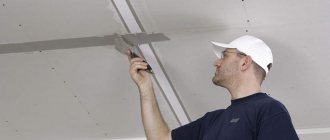
Drywall cutting method
Drywall itself is a fairly fragile material, so when working with it you need to be especially careful and careful. This is especially true in cases where it is necessary to cut a piece of the required size from a whole sheet. First, you should mark the cut locations on the sheet. It is better to use a clearly visible marker and a ruler or a long, even strip. Further along the marking, the same strip is placed and drawn along the line several times with a stationery knife, while pressing firmly on it. After the cut is deep, the sheet of drywall is taken to break. After this, carefully cut the second layer of cardboard with a knife.
A different situation arises when you need to not just cut off a piece, but cut it out, that is, make at least two cuts. In this case, you simply won’t be able to break the sheet. Therefore, proceed as follows. First, make a cut with a hacksaw for metal (with small teeth). The second cut can now be made with a knife.
Technology for installing ceilings on beams
If you want to figure out how to make a ceiling in a private house, the installation sequence given below will help you understand the specifics of the work.
Tools and materials for work
Before making a ceiling in a wooden house, prepare the following materials and tools:
- saw or jigsaw;
- hammer;
- stapler;
- screwdriver;
- cranial bars (used if the ceiling is hemmed above the bottom of the beams, the section of the bars is 5x5 cm);
- self-tapping screws (optimal length 4.5-5.5 cm);
- slats for making a supporting frame for sheathing made of plywood and other boards;
- material for filing;
- nails;
- building level;
- thermal insulation material;
- hydro and vapor barrier.
Laying vapor barrier
Before making the ceiling in the house, a vapor barrier membrane is laid. It is attached using a stapler to the supporting beams from the bottom.
For these purposes, the following materials are used:
- foil products;
- polypropylene films;
- reinforced polyethylene films;
- multilayer membranes.
Strips of vapor barrier material are attached with an overlap of adjacent elements to a width of 15 cm. The joints must be sealed with tape. To protect the film from damage, fixation is carried out through a strip of thick paper. The vapor barrier is installed on the walls to a height of 20-30 cm. All junction points are carefully insulated.
Laying insulation
After laying the film, insulation is laid on the back side (between the floor beams).
The following materials are used as a heat insulator:
- mineral wool;
- expanded polystyrene;
- Styrofoam;
- basalt wool;
- sawdust;
- expanded clay
Before installing the rough ceiling, only lightweight materials (construction wool, polystyrene foam and expanded polystyrene) can be laid on the vapor barrier membrane. Bulk insulation is poured into the gap between the beams after installing the rough ceiling.
Installation of a rough ceiling
When making a ceiling with your own hands in a private house, do not forget to mount the rough ceiling surface. It will be the basis for the finishing layer. In some cases, the rough base is used without finishing as a finishing coat.
Installation of the rough ceiling surface takes place in the following sequence:
- We attach a frame of wooden slats to the load-bearing beams on top of the vapor barrier layer. It will be the basis for the rough ceiling and support for the thermal insulation material, which is best laid after the frame is made. We make the lathing from slats with a cross-section of 3x4 cm. We attach the slats to the beams in increments of 50 cm. For fastening we use screws or nails. The frame will simultaneously serve as a ventilation gap between the ceiling itself and the ceiling lining.
- After this, we attach the selected material for making the rough ceiling. We attach plywood or ceiling slabs joint to joint so that the joint points fall in the middle of the sheathing strip. We attach the slabs to the frame with self-tapping screws, which we screw in at 150 mm increments.
- We periodically check the evenness of the surface using a building level.
After finishing the construction of a wooden house made of timber, you have to face this situation - you want to see a reliable rough foundation on top, instead of wooden beams, to implement the intended design, install decor and a spectacular interior. I didn’t have to hire craftsmen to file the ceiling; it was enough to follow the generally accepted rules to make the wooden ceiling with my own hands reliable for many years. Wooden beams are used mainly in private houses, while concrete floors are used in apartments. But it is quite possible to make a beam structure during a major renovation of the roof on the top floor; this is better than creating a concrete partition.
Wooden beams are mainly used in private homes
Trim for low ceiling
Some private houses cannot boast of a significant room height, so there it is worth giving preference to finishing that does not reduce the height of the room. This includes plastering, painting, wallpapering, stretch woven coverings or false ceilings (only without built-in lighting).
In addition, you should adhere to the following rules for choosing finishes:
- Give preference to light glossy finishes that will visually increase the height of the room.
- Do not use dark wallpaper or paints with a matte, embossed or embossed surface. This will make the room seem even lower.
- Do not use recessed lights or hidden lighting.
- Do not install multi-level structures.
- Avoid false beams and wide baseboards.
Operation of floors
If the design used beams with a large margin of safety, laid with a small step, then such an overlap will not need repair for a long time. But you still need to check the beams for strength regularly!
If the beams are damaged by insects or as a result of waterlogging, they are strengthened. To do this, the weakened beam is removed, replaced with a new one, or strengthened with strong boards.
I’ve been thinking for a long time about repairing the ceiling on my outbuilding at my summer cottage, but I still can’t get around to it. But here you need to seriously understand - I don’t really understand how the load on the beam is calculated if there are additional loads. We will need to seriously address this, most likely in the summer.
Nikolay, without special knowledge in the field of construction, you will not be able to correctly calculate the load on the beam. Too many factors and nuances need to be taken into account when making calculations. Believe me, it is practically impossible for a non-specialist to do this. First, try to at least determine the type and characteristics of the beam floors on your outbuilding. Even if you succeed, the work will stall at the calculation stage: the formulas (even their simplified versions) are too complex. My advice: leave the repair to professionals.
Good day. There is a wooden house, everything is clear to me about the first floor and floor. We'll most likely put a tarket or something similar. The second floor is only beams. A question arose for me: do I need to lay what kind of films? The house is residential, the second floor is residential. Or I’ll put insulation between the beams (since there’s some leftover, and it’s like sound insulation), and I’ll put a floor on top, a 35mm board. It seems to me that no films are needed.
General knowledge does not provide an understanding of approximate calculations of beam/floor load. Sofa + cabinet + table + 6 chairs, and 10 people = about one and a half tons - this is not a load. It’s another matter if you decide to place a brick warehouse on this floor. )
- How to lay tiles in the bathroom - step-by-step installation instructions
- Do-it-yourself laminate installation: rules and example of step-by-step work
- Installation of OSB boards - features of installation on a wooden and concrete base
Video about floor repair
We have put together a huge collection of video tutorials on repairing and laying floors
A collection of photographs showing floor design options and examples of using floor coverings
Whitewashed
Many people ask the question: “how to whitewash the ceiling in a new building?” And for good reason! After all, whitewashing is ideal for almost any interior. The main material is quicklime, the price of which is approximately 115 rubles per 30 kg. It needs to be diluted with water and strain through a sieve. To apply to the ceiling, you can use a brush, roller or spray gun. If possible, you need to opt for the latter, then the whitewash will be more uniform. Otherwise, the application process is similar to painting.
It is better to whitewash ceilings twice to achieve a more intense color.
As you can see, the answer to how to whitewash the ceiling in a new building is very simple. Let's take it and do it. Another question is that the simplicity of the work does not give a particularly impressive result.
Whitewashing the ceiling is a rather “dirty” business. Those. It is necessary to begin work on improving the apartment in a new building from this stage, otherwise you risk splashing the glued wallpaper and flooring.
Strengthening methods
Using steel plates you can strengthen beams
Steel auxiliary materials
Steel plates fixed on different sides of the beam will help strengthen wooden beams. Steel tools must be treated with a solution that prevents corrosion, otherwise they will not last long.
Carbon fiber
The material, also called carbon fiber, is a modern technology in the construction world and is actively used during beam ceiling reconstructions. It comes in the form of plates, ribbons or threads.
This plastic material is applied in several layers to a wood surface, ensuring ease of work and reliable quality, which makes it quite popular.
Prostheses made of wood or metal in the end areas
Due to variable temperatures, beams in the area of the load-bearing wall are significantly weakened. It is necessary to make the main timber beam stronger to prevent negative consequences in the future, as well as to avoid repeated reconstruction in the near future.
To do this, additional prostheses made of metal or wood are attached to the edges of the wooden base, which are placed in the brick recess of the wall, thereby providing reliable protection for the central beam.
Installation of prostheses for a rotten floor beam
Supports for load-bearing beams
This method involves placing additional support structures under the load-bearing ceiling beams to distribute the load evenly.
Additional beams
If the work is completed, but the weight is distributed incorrectly, then the finished structure must be covered with additional beams that will take on the excess weight.
It is quite possible to bring ceilings to life with your own hands, but to do this you need to familiarize yourself with the necessary information in order to minimize unpleasant moments during work, as well as build a high-quality model that will last for many years.
Wallpaper on the ceiling
Wallpaper has been glued to ceilings for quite a long time, but many have a stereotype that it looks terrible.
But if you look at a photo of modern wallpapering, you are unlikely to be horrified and will find a difference with other materials. Many types of wallpaper allow you to make ceilings unique, beautiful and aesthetically pleasing. There are three types of wallpaper that are used for such work:
Liquid wallpaper. A very simple application technology, a fairly long service life and maintainability make this material a really good option for your ceiling. The disadvantages include the high price and low moisture resistance.
Textile wallpaper. The basis for such wallpaper is vinyl wallpaper, but the front part is already covered with fabrics (silk, chintz and others), already with patterns. Such wallpaper can also be made to order, however, it will cost three times more than ordinary textile ones. They are designer, which is why their price itself is slightly higher than liquid ones.
The downside, knowing the price, is the extremely short service life. Also, this wallpaper does not tolerate mechanical stress well.
Peculiarities
The design of the ceiling depends on the room to be finished. Decorating a city apartment differs from decorating a dacha. We spend a lot of time in the house and the disadvantages of finishing will not go unnoticed. Here it is appropriate to comply with the entire chain of the technological cycle. To prepare the surface of the upper floor, you need to take a more careful approach to the choice of color and texture; special importance is attached to the types of decor.
Finishing work at the dacha depends on the conditions of use of the country house - whether the room is heated or used only in the summer, whether low temperatures and humidity will affect the ceiling covering material. A universal solution would be to sheathe the ceiling with wood if lath cladding is used in the design of the dacha. This ceiling will last for many years and, if necessary, you can simply paint it in the desired color.
When giving preference to one or another ceiling covering option, you need to take into account the size of the room. The ceiling on suspended structures will remove 5-10 centimeters of height; in low rooms it is better to paint or wallpaper the plaster. On the contrary, the dimensions of a narrow and high room can be balanced by lowering the suspension structure to the desired height. In attic rooms, up to two meters of height can be removed in this way to decorate the room in a traditional style.
The use of color and different levels in the design of the ceiling allows you to zone the room and visually influence the dimensions. A cross beam made of wood or a protruding plane of plasterboard will divide the space and expand the boundaries of the walls of a long narrow room. The same effect can be achieved if the transverse stripe is made in a contrasting color.
Dark colors should be used with caution when tinting the ceiling. They weigh down the upper part of the space
This technique is acceptable when decorating the walls with very light or white colors and the room is of sufficient height.
Some types of ceiling finishing work can be done independently; for more complex finishes it is better to invite specialists. To implement a designer exclusive ceiling, design documentation is drawn up, a design plan is drawn, a wiring and lighting diagram is drawn, and tinting sketches are prepared in relation to a specific object. Such design work is not cheap, there will be costs for high-quality materials and payment for the work of specialists, but as a result you become the owner of a unique ceiling that will surprise guests and decorate your home.
How to beautifully decorate the ceiling? - Wallpaper it!
Wallpaper on the ceiling will seem like a strange solution to many. However, it has great decorative potential for a wide variety of interior styles, and when using special types of wallpaper, it has a fairly long service life. At the same time, the price does not bite, and you can decorate the ceiling with wallpaper yourself. For the ceiling, dense wallpaper, such as non-woven wallpaper, or even glass wallpaper, which has increased strength and durability, is suitable. You can also apply liquid wallpaper to the ceiling; this will be a compromise between wallpaper and painting. And still, be prepared for the fact that the wallpaper will have to be glued or even renewed, and the loose seams will look sloppy. This type of finish is not resistant to high humidity.