Stretch ceilings are a popular type of decoration both in private homes and in city apartments. If the installation technique is followed, the result is a smooth and durable coating that does not require maintenance. To reduce costs, many people choose to do the installation themselves. Below we will conduct a master class in which we will show you step by step how to make suspended ceilings. A detailed guide will help you understand all the nuances and stages of installation.
What kind of suspended ceilings can you make with your own hands?
According to manufacturing technology, there are two types of suspended ceilings:
- Film.
- Fabric.
The main difference is the material of the canvas. In the first case, a thin polyvinyl chloride film is used, in the second, a synthetic fabric made of polyester impregnated with polyurethane. Each material has both pros and cons.
The main advantages of PVC film:
- waterproof - when flooded, the suspended ceiling retains water, and after the liquid is drained, it returns to its previous appearance;
- many color variations - more than 250 shades of various textures are available (glossy, matte, satin, textured, with patterns or photo printing);
- the ability to carry out wet cleaning - thanks to this, the ceiling is easy to care for and remove even the most stubborn stains.
Advantages of fabric sheets:
- frost resistance - polyester can withstand negative temperatures down to -50ºC without losing properties;
- large width of the canvas - 5.1 m versus the maximum 3.2 m for film, which allows you to make seamless ceilings in almost any room;
- durability - withstands an accidental blow or a flying champagne cork;
- breathability - thanks to microscopic holes in the structure of the material, the canvas does not interfere with air exchange in the room.
The disadvantages of film ceilings include low strength - PVC breaks from contact with sharp objects and does not tolerate negative temperatures. The main disadvantages of fabric canvases are the high cost and a modest selection of colors - only about 20 shades of mostly pastel colors.
Installing a suspended ceiling with your own hands is possible for both options, but there is a difference in installation technology. PVC film is preheated so that the material becomes elastic and stretches. For this, a gas heat gun is used. After cooling, the film stretches and forms a flat surface. The polyester fabric does not require heating and immediately after installation it has a finished appearance.
Previously, we have already described in detail the technology for installing a fabric stretch ceiling; in this article we will look at how to stretch a PVC fabric.
Security measures
The photo shows all the stages, but the image does not allow us to describe the work safety requirements. First things first, turn off the power to the room. There is one peculiarity here. You will have to connect a heat gun or a hair dryer. If you do not turn off the electricity and start drilling into the walls, you can damage hidden wiring, which can lead to injury and equipment breakdown.
Gas-burner:
- After connecting the cylinder, double-check the tightness of all connections.
- At the slightest noise or foreign smell, stop work immediately, even if it is not yet completed.
- Do not use expired cylinders. See the date on the packaging. If damaged, the container must be discarded.
- You need to refuel at specialized gas stations. In this case, look at the type of device and the type of gas for which the burner is adapted.
- Extending the hose is strictly prohibited. It is better to buy a new one, the length of which will be sufficient.
- The cylinder must not be placed near a heating radiator. Do not point the burner at any gas container, pipes, or connections.
Before stretching the fabric, it makes sense to wash it in advance to make it easier to do on the floor. Clean up first. In most cases, manufacturers initially treat the surface with an antistatic agent to prevent dust from settling on the surface. Abrasive powder detergents are not used. A dishwashing or glass cleaner that can dissolve fatty deposits, if any appear during transportation to the site, is suitable.
To find more information, you can go here.
The principle of installation of suspended ceilings
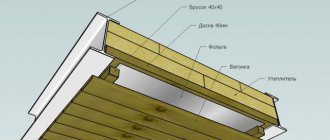
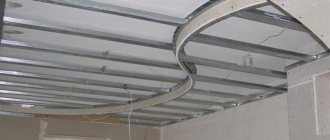
The technology of the device is as follows: the construction of a stretch ceiling is a canvas stretched over a frame made of aluminum or plastic profiles (baguettes), which are attached around the perimeter of the room. PVC film is tucked into the frame and securely fixed. Due to tension, a flat ceiling surface is formed. The fastening diagram is clearly shown in section in the photo.
Installation occurs in stages. The installation procedure is as follows:
- First, the room is measured. Then a sketch of the future ceiling is prepared with the locations of the lighting fixtures. Based on the drawing, the PVC film is cut.
- If necessary, the base is prepared for stretching the fabric.
- After this, markings are made to attach the frame and the profile is mounted.
- Next, the fixtures for the lamps are installed and the electrical wiring is laid in accordance with the installation diagram.
- Then the PVC film is heated with a heat gun, stretched and fixed in a baguette.
- After this, lighting devices are installed and connected.
- At the last stage, the installation gaps that remain at the junction of the walls and the stretch ceiling are masked.
2 Preparing the base
9 Masking joints
The cutting of PVC film is done in production, so it is better to entrust the measurement and preparation of the drawing to professionals.
The fact is that the canvas is cut exactly to the size of the room, taking into account the stretching of the material. It is important not to make mistakes in the calculations, since it will not be possible to correct the error during the installation process. The film will sag, wrinkles will form, or it will simply not stretch to the required width. The remaining steps are easy to complete on your own, the installation technology is simple, any home craftsman can do it.
A little history
The use of a new building finishing material began in the 60s in Sweden. This idea was soon picked up in Western European countries, and then it gained popularity in countries all over the world. Most of all, the French liked stretch ceilings. Subsequently, manufacturers from this particular country brought their manufacturing technology to perfection, and also proposed using PVC film for such coating.
The peak of popularity of suspended ceilings in Western Europe occurred at the end of the eighties. And to this day they are still in demand by owners planning renovations in their house or apartment. In our country, such designs first began to be used in 1994. And today they are also quite popular.
Even the ancient Greeks and Romans loved to decorate the ceilings of their homes with fabric matched to the color of the walls. As the material was used, it became covered with dust, sagged or faded. After that, it was changed again, and the ceiling looked like new.
Modern manufacturers put on the market stretch ceilings that are not at all like this. These coverings are durable, decorative vinyl polyvinyl chloride (PVC) films. Its thickness is only 0.17 mm.
How is a suspended ceiling constructed? The PVC film is stretched onto a special frame made of aluminum or plastic. After this, it is secured using special locks.
General installation rules
Film ceilings retain their properties only at above-zero temperatures, so they are installed exclusively in apartments or houses for permanent residence. PVC is equally suitable for utility rooms and living rooms. It is especially recommended in bathrooms, toilets and kitchens, since the film is not afraid of moisture, protects against leaks from above and is easy to clean compared to other types of materials.
It is recommended to install a suspended ceiling at the last stage of repair, when all finishing and construction work has already been completed. An exception is wallpaper, since when installing baguettes they will most likely get dirty, and it will be quite difficult to remove dirt, especially from textured surfaces.
There is no need to level and prepare the rough floor before installing the stretch ceiling. But if the plaster is old and crumbling, you need to remove everything that could subsequently fall onto the canvas, and then strengthen the surface.
Attention! During the process of stretching the PVC film, the room warms up to +40ºC, and next to the gun the temperature reaches +70ºC. Therefore, it is better to remove furniture, paintings and other items that may be damaged by heat.
How to measure a ceiling panel
Before stretching a suspended ceiling, you need to accurately measure its dimensions and make a drawing, which is especially important if the perimeter is not a simple rectangle, but has a more complex shape. Often the corners are at different levels.
To correctly construct the ceiling in the program, you should divide the plane into triangles, then all the calculations will be correct.
Walls and ceilings are not always smooth, and therefore use the following recommendations:
- The most convenient way to use a laser level is to place it on a tripod in the center of the room. Check each corner one by one. Start marking from the lowest. In this case, step back 3-5 cm, which is especially important if you plan to install spotlights. Make marks in the corners with a pencil.
- If there is no laser level and you have to use a tape measure, measure the height of each corner. Determine the lowest one. An indent of up to 5 cm is also made. Place a mark. Now, in the remaining corners, it is also necessary to mark the installation location of the stretch ceiling, for which the same distance is measured from the floor.
In the latter case, an error of 1-2 cm is possible, which will not be visible visually. Next, the walls are marked, and you can’t do it without an assistant. The tapping cord is stretched along which a line must be drawn.
Technology of fastening suspended ceilings
To fix PVC film, special baguettes are used, which are mounted around the perimeter of the room at a short distance from the base ceiling. There are different types of profiles for stretch ceilings. They differ in the material of manufacture, design, fastening system and installation method.
Fastening systems
For film ceilings, two methods of fixing the canvas are used:
- Harpoon . Recognized as the most reliable. To attach it to the edge of the PVC film after cutting, a curved plastic edge (harpoon) is welded. During the installation process, the edge is inserted into the baguette and clings to a special protrusion in the profile structure. The canvas is securely fixed and held on like a harpoon, which is why the fastening received its name. The remaining gap is closed with a special masking tape. There is also a gapless profile, but its installation requires perfectly smooth walls.
- Bead (wedge). The film is measured with a reserve. The canvas is tucked into the profile and secured with a special plug in the shape of a wedge or glazing bead. The excess film is then trimmed, and the gap is closed with a decorative insert.
The technology for installing ceilings with harpoon fastening requires accurate calculation of the dimensions of the canvas, otherwise there will not be enough film or the ceiling will sag. But installation is quick and easy, since the tension is calculated during cutting; you just need to insert the harpoon into the baguette. Additionally, this fastening system allows you to easily remove the covering and re-install it. This is necessary, for example, to drain water after a flood or to repair the electrical system behind the ceiling.
With glazing bead fastening, the cutting of the canvas is done approximately and mistakes are not so terrible. But adjusting the film tension manually is much more difficult and can only be done by experienced specialists. In addition, this method is non-separable. After dismantling the coating, you will have to purchase a new film.
Thus, for self-installation of a PVC stretch ceiling, it is better to choose a harpoon fastening system.
Profile types
Baguettes are made of plastic or aluminum. Metal ones are more expensive, but stronger and more durable. In rooms larger than 20 square meters, it is recommended to install aluminum ones. If the room is smaller, plastic ones will do.
Based on the place of attachment, baguettes are divided into wall and ceiling. Which one to choose depends on the height of the structure and the condition of the sub-ceiling. The minimum distance from the ceilings is achieved by the ceiling profile (2-3 cm). But in such cases it is impossible to install built-in lighting or a hidden curtain rod. And the rough ceiling must be perfectly flat and strictly horizontal, which is extremely rare in practice.
When attached to walls, more height in the room is lost, but under the canvas you can hide fixtures for lamps, power supplies or utilities. Also, the wall profile makes it easy to set the horizontal level, even with strong differences in the roughing flow.
In practice, ceiling moldings are rarely used and are used only in cases where there is no alternative. For example, there is no access to the wall due to a wardrobe or the material of the partitions does not allow the profile to be securely attached.
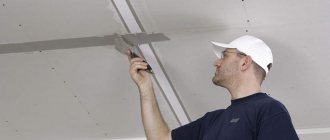
Stage 4. Finishing, installation of lighting fixtures
Finally, all that remains is to install the lighting fixtures. In order to attach a chandelier to a suspended ceiling, you need to prepare a plastic ring. At the same time, its outer diameter must be of such a size that the decorative cover of the lighting fixture hides it. A marker on the ceiling marks the mounting point of the lamp. The ring is glued so that this point is located in the center. After the glue has dried, you can make holes and install the chandelier on a hook in the ceiling.
Fabric ceilings can be painted over time with acrylic paints, creating the effect of clouds, starry skies, waves, etc.
If you did everything slowly, carefully and according to technology, stretch ceilings will serve you for many years. You will only need to replace them if you get tired of them.
It is better not to take on complex ceiling configurations (for example, with multi-level structures, sealing heating pipes, etc.) if you still have little experience. It is better to take the help of professionals.
Preparation of tools and materials
Now let's look at what you need to prepare for work. To make a suspended ceiling with your own hands, you will need the following tools:
- ladder;
- laser or water level;
- roulette;
- pencil;
- chop cord;
- hammer drill (it is convenient to use a tool with a built-in vacuum cleaner, but a regular one will do);
- drill;
- screwdriver or screwdriver;
- grinder or hacksaw;
- file;
- construction or stationery knife;
- a special curved spatula for tucking the canvas into a baguette;
- heat gun and propane tank.
Preparatory work
The first thing you need to understand is that you won’t be able to do without preparatory work.
However, if you plan to ruin the canvas, and at the same time the finishing of the walls, furniture and other contents of the room, we cannot prohibit it. If such a development of events is not included in your plans, we suggest proceeding as follows.
- 1. Be sure to remove furniture from the room - it can be damaged when the air is heated with a heat gun;
- 2. Carry out preliminary work on the walls. Depending on the finish you want, level and plaster them or install plasterboard. Attention: In the latter case, the corners at the top of the room should be smooth, not rounded.
- 3. Thoroughly clean the ceiling of the old finish: remove whitewash or traces of wallpaper, remove dirt and dust.
- 4. Be sure to treat the floors with a primer - it will prevent the development of fungus and mold even in the case of high humidity in the room.
- 5. Conduct electrical wiring.
Careful adherence to all recommendations will allow you to quickly and efficiently install a suspended ceiling without spoiling anything. Once you're sure the space is ready, make a list and head to the hardware store - it's time to stock up on tools!
Is it possible to stretch the ceiling alone?
A conventional single-level structure can be installed alone. The basic principles of installation remain the same, although it will take longer. But installing a two-level ceiling or more complex shapes will require help.
If the work is done alone, when marking, the laser level is installed on a platform stand or a special holder (a rod that is fixed directly between the floor and the ceiling). During tapping, a screw is screwed in at the marking point and a cord is pulled from it. You can also attach the rope to tape.
The second likely problem is the installation of a large, heavy chandelier by one person. It is difficult to hold and screw such a lamp at the same time. If possible, it is better to choose something simpler and lighter (a compact chandelier or built-in lamps).
Nuances and secrets of installing suspended ceilings
In the process of work, beginners often encounter various difficulties. If you do not know the nuances of installation, mistakes can lead to irreparable consequences. Let's look at the most common problems that arise during self-installation.
How to properly heat a suspended ceiling
When stretching the fabric, the distance from the heat gun to the PVC should be at least 1 m. The heat gun is not directed at one point for a long time, but smooth swinging movements are made. Heating should be uniform. Otherwise, the film may be damaged.
If the installation of a stretch ceiling is carried out by two people, one person threads the canvas, and the second stands behind and warms it up.
How to tighten a suspended ceiling
Wrinkles may form during installation. To straighten the film, do this:
- Carefully remove the harpoon on both sides of the problem area (about 30 cm).
- Warm up the fold with a gun.
- Fill the middle into the baguette.
- Then - the centers of free areas.
- Continue until the entire canvas is installed.
Attention! If it is not possible to remove the fold, the operation is repeated, but a larger area of the film is released.
What to do when the canvas collapses
After installing a stretch ceiling, sometimes an unpleasant problem arises. When a door or window is opened, the film is drawn in and adheres to the base ceiling. The outlines of mortgages and other elements located behind the canvas become visible.
The reason for the collapse is the difference in air pressure. When air flows in the room, it rises, but behind the ceiling it remains the same.
There are two ways to fix the problem:
- Seal all gaps between the film and the walls.
- Install ventilation grilles. Then the air will quickly pass into the space behind the canvas, and the pressure will equalize.
In the first case, carefully inspect the ceiling to find all the gaps. The cracks are sealed with sealant.
The second method is more preferable, since additional ventilation will ensure ventilation of the inter-ceiling space, which reduces the likelihood of fungus appearing. To locate the gratings, select inconspicuous places: in corners, behind curtains, etc. A hole is cut in the canvas. For this purpose, a protector ring under the lamp is used. Then a small ventilation grill is glued on so as to completely cover the hole. The product can be matched to the color of the ceiling.
It is enough to install two grilles in opposite corners.
How to choose lamps for lighting fixtures
The film melts and turns yellow at high temperatures. Therefore, traditional incandescent lamps are not suitable. For PVC ceilings, energy-saving or LED devices are used. They consume little electricity and have a long service life. When using halogen and incandescent lamps, the power should not exceed 35 W. The most popular are spots with base G5.3 and GX53.
Security measures
To heat the canvas, use a heat gun. But when working with it, there is a danger of explosion or gas leakage. Therefore, it is imperative to follow the safety rules:
- Before starting installation, check the connection of the gas cylinder, hose and gun.
- Make sure the equipment is in good working order. At the slightest suspicion, it is better to contact the experts.
- View the date the cylinder condition was checked (indicated on the body).
- Refueling or repairing equipment should only be performed in specialized workshops.
- Do not increase the length of the hose yourself.
- Do not point the gun at a gas cylinder or place it near a radiator, heating pipe or other source of elevated temperature.
An electric gun is safer to use, although it is more expensive. But it is more difficult to warm up a large room with its help, so it is recommended to use a composite gas cylinder.
Features of operation and care of the coating
Film ceilings are very easy to pierce with a sharp object; you need to be careful during installation. It is also important to take this property into account during further operation.
It is unacceptable to use abrasives or acetone for cleaning. They will damage the coating. It is also prohibited to press hard on the fabric while washing.
Modern film ceilings are treated with an antistatic agent, dust does not easily settle on them, but sometimes cleaning is still required (especially in the kitchen due to grease and splashes). Wet cleaning is suitable for PVC. Take a soft sponge or rag, lightly moisten it and wipe it without unnecessary pressure. Suitable products include glass cleaning liquid, dishwashing gel or soap solution. Then the surface is wiped dry. Glossy ceilings are additionally treated with a weak solution of ammonia, this increases shine.
Thus, installing suspended ceilings with your own hands is a relatively inexpensive and durable finishing method. If the correct installation technique is followed, the coating will last for decades. And if you have certain construction skills, the work can be done alone without the assistance of assistants.
Step-by-step installation instructions
The bottom surface of the ceiling will remain closed. But this does not mean that it does not need to be processed. At a minimum, before stretching suspended ceilings, you need to make sure that the remnants of the old plaster do not fall off, because they can damage the film. When you need to install a suspended ceiling, instructions will help you on how to do everything correctly, developed using the example of when you need to connect spotlights and “bypass” the heating riser pipe. Let's assume that the ceiling is single-level.
Preparing the base
If you want to make a high-quality suspended ceiling under which there will be no mold, then treat the concrete ceiling with an antiseptic.
There is no point in leveling the ceiling surface, as it will remain hidden from view. However, it is important to remove the old plaster. There is no need to eliminate defects. You need to understand that before installing a suspended ceiling, it is important to get rid of parasites, dust, and debris. In other words, “expose” the concrete or wood. Fungus, mold, and microorganisms will not be able to settle if the surface is treated with a primer and a construction antiseptic. Only after this proceed with the installation of the stretch ceiling. Moreover, everything can be done with your own hands.
Marking
The procedure was described earlier, but if we talk about step-by-step instructions, the tension is done according to pre-prepared markings, which are applied as follows:
- The lowest angle is determined. You can use a laser level or a regular tape measure when measuring the height from floor to ceiling.
- It is important to provide a gap from the ceiling to the future level of film installation. Typically this is 3.0-5.0 centimeters required for lighting installation.
- If there is a “laser”, the line of the future level is immediately visible, and all that remains is to draw it with a pencil directly on the wall. Otherwise, see the next paragraph.
- We take measurements of all corners in height. The Sami chooses low. Leave a gap and put a mark. We do the same for the remaining corners, measuring the minimum height.
- We stretch the cord along which we draw a solid line, connecting all the marks at the corners. The result is a closed line around the perimeter of the room.
Our goal is to maintain the horizontal position of the future canvas. There may be a difference of 1-2 centimeters in the room, which is considered normal. It makes sense to purchase lamps in advance. Some models require a gap of up to 7 cm. Then we make markings based on this criterion.
Fastening a plastic baguette
Initially, it is necessary to determine the location of the electrical wiring route. This is not difficult if there is no decorative covering on the walls. The grooved channels are plastered, and it shows. In accordance with the technology for installing suspended ceilings, holes will have to be made, and it is important not to damage the power cable. The next step-by-step procedure looks like this:
- The marking strip is the bottom edge of the baguette, which will have to be cut to the appropriate dimensions, preserving the internal corners.
- Using a hammer drill, he makes holes in the wall in increments of 120-150 millimeters. This is for installing plastic dowels under self-tapping screws.
- We insert the dowels, having first checked that the line connecting the fastening points is original (parallel to the floor, horizontal).
- We take 5x50 self-tapping screws and screw them into the dowels. The task is to press the baguette without gaps and cracks, maintaining the geometric correctness of the structure.
The joints must match. To avoid differences, we drill holes 4-7 cm from the end of the profile. There may be a gap, if it does not exceed 2-3 millimeters. Before mounting, it is advisable to sand the ends to remove burrs that could damage the canvas. It is important that the supporting profile is securely fastened. If it wobbles, reduce the pitch between dowels.
The installation technology does not involve joints in corners, both internal and external. In this case, the step-by-step algorithm of actions is as follows:
- Measure the distance from the joint to the corner.
- Transfer the mark to the corner profile.
- Make a notch on the back side if the corner is internal.
- Bend the profile and install it so that there are no gaps.
If the corner is external, three cuts are made in 10 mm increments. Excess segments are removed using pliers.
Installation of embedded parts and wiring for spotlights
It's done like this. First, markings are applied to the ceiling surface. It is advisable to transfer the projection to the floor to understand the coverage area. Then it is easier to determine places for installing lamps. Mortgages must be installed as follows:
- A hole is cut with a diameter slightly larger than the lamp socket.
- The metal profile suspension is bent in the shape of the letter “P”. the structure is screwed with small self-tapping screws to the platform.
- The mortgage is applied to the ceiling, marks are made for future holes for fasteners.
- Holes are drilled and dowels are laid. The fasteners are screwed with self-tapping screws 51 mm long.
It is important that the base for the lamps does not protrude, so that when the time comes to install the suspended ceiling, there are no differences in height.
Mortgages and wiring for soffits
At this stage, those who want to make a suspended ceiling with their own hands are faced with a problem. The main mistake is the lack of horizontal control. The lamps heat up, and you need to use a heat-resistant ring mounted on special profiles. Otherwise, the film will be overheated and deformed. The wiring must be laid before stretching the suspended ceiling. Use the ShVVP cable 2*0.75, which will allow you to connect up to 20 spotlights. It is better to lay the electrical wiring inside a corrugated pipe that protects against breakdown.
The wires should not sag below the level provided for the suspended ceiling. Then the surface of the film will be perfectly smooth. If the ceiling is wooden, all wires are protected from the possibility of contact with other elements. Joining areas are carefully isolated. Connection type – parallel. Terminal blocks are used as connectors. Typically, products with a rating of 3-5 A are used with an allowed power of 660-1100 W. The ends of the cord are exposed and clamped with mounting screws. It is extremely important to avoid sagging wiring.
Mortgage and wiring under the chandelier
It is advisable to make and secure a special platform before stretching the suspended ceiling. It can be made from plywood. A square with a side of 15-20 cm is cut out. The thickness is at least 16 mm. If you use solid wood, the last parameter cannot be less than 30 mm. If you want to stretch a suspended ceiling without defects, make sure that the structure does not extend beyond the future surface of the film. The fastening is organized using the same metal profile as in the previous case.
In the process of installing a stretch ceiling, many home-grown “craftsmen” use creative methods for attaching a chandelier. Use polyurethane foam or even an inflatable children's swimming ring. These methods are short-lived and it is better to go the standard route. To install chandelier lighting, follow the step-by-step instructions:
- Install the platform. Make sure that it is not lower than the planned area of the canvas.
- Transfer the location to the canvas drawing, noting the connection to the corners and walls.
- Glue the shrink ring to the film with polyurethane glue.
- Make a cut without going beyond the boundaries of the soldered ring.
Use specialized elements. Thus, manufacturing companies offer rings with a diameter of 60-400 mm. If you “invent a bicycle,” then when the time comes to tension, the canvas will become unusable.
There is another installation method, when the chandelier is attached to the ceiling using a hook screwed into the ceiling. For this you will also need a platform, but you need to make a hole in it. This method of stretching a ceiling is not considered the best, since it requires maintaining the geometric accuracy of measurements and markings. A common mistake is incorrectly measuring the length of the hook, which leads to the formation of an annular dent after a few weeks. And when the time comes to replace the lamp, you will have to change the suspended ceilings again with your own hands, since a trace will remain from the old chandelier.
Curtain mortgage
Modern apartment design allows you to use various curtain fastening systems. It’s not enough to know how to make suspended ceilings with your own hands. It must be taken into account that each time a specific technology is used:
- Wooden curtain rod. You should measure at what level the cornice attached to the wall will be located. The main thing is that the mark is lower than the edges of the cap (molding), and that the decorative trim does not cross this line.
- Metal wall cornices. Technology is no different. Holes are drilled, dowels are inserted, and brackets are screwed with self-tapping screws.
- Plastic hidden ceiling cornices. It is important to attach them directly to the ceiling using metal profile fasteners. The step between fastenings is from 40 to 50 centimeters.
In the latter case, it is better to make a rigid structure, which is installed before taking measurements. If it is a wooden beam, the baguette will be screwed to it. Or the dimensions of the timber should be such that the canvas fits against it without sagging.
Fabric stretching
Before stretching, check that the elements touching the film do not have sharp corners and are jagged so as not to damage it. And to mount the structure you need to close the windows and doors. A draft has a detrimental effect on the quality of the installation result. The canvas is unpacked, spread on the floor, and allowed to take the air temperature in the room. Then, using crocodiles, they hang it to the mounting profile. At the same time, make sure that the bent part of the harpoon is facing down. Now:
- Turn on the heat gun and direct warm air onto the canvas to achieve elasticity. The edge becomes soft.
- The canvas must be tightened and the harpoons inserted into the mounting grooves of the baguette. A special spatula with a curved working edge is used.
Before stretching the suspended ceiling, diametrical (opposite) corners are attached. Then they move on to the rest. The harpoons are inserted into grooves around the perimeter of the entire room. It is important to avoid folds and sagging. After natural cooling, the ceiling will become perfectly flat. If a crease appears, do the following:
- Separate the harpoon latch not 30 centimeters on both sides.
- Warm up the fold with an electric or gas heat gun.
- Thread the harpoon into the groove in the middle of the released area.
- Repeat the operation in the middle of the two resulting “free” segments.
- Continue this process until the sagging is removed.
If after this the fold remains, it is necessary to release a larger area and repeat the procedure again. Another problem is the collapse of the film when opening or closing doors and windows. Then the embedded and fastening elements hidden by the canvas appear. The reason for this effect is the pressure difference. There are two ways out of this situation:
- Seal all gaps between the tensile structure and the walls.
- Install ventilation grilles for unobstructed air flow.
In the first case, look at the entire surface for holes that should not be there. If any are identified, seal the holes with a special sealant.
The second method is more preferable, since ventilation will prevent moisture from accumulating in the space above the ceiling, which is especially important if the ceiling is wooden. You will have to purchase a ring that is glued to the canvas. Then a hole is cut into which a special profile plastic grill is inserted. Manufacturers made sure that all elements could be selected by color. To prevent ventilation from spoiling the appearance, install it behind the curtain.
Pipe bypass
In apartments, heating risers come out of the ceilings, which complicates the process of installing a stretch ceiling. You have to use additional elements. The size of the plastic rim is standard. Select according to the outer diameter of the pipe. Those who are wondering how to make a suspended ceiling with their own hands should follow the following instructions:
- Measure the distance from the axis of the pipeline to the nearest wall panel at the shortest distance.
- Transfer the markings to the canvas. In this case, take into account the temperature shrinkage coefficient of 0.92.
- The plastic profile is cut so that there is a gap of about 4-5 mm between the cut and the fastening profile.
- Using Cosmofen glue, the cut is glued to the film from the wrong side, the inside.
- Diametrical cuts are made along the inner diameter of the outline in the manner of sun rays, as in a child’s drawing.
- Another cut is made along the special slot to the end of the blade in order to thread the pipe into the guide plate.
In this case, the mounted canvas is fixed first in the corners, and then at the riser at a distance of 30 cm from the perpendicular to the wall surface. then proceed as described previously.
Lighting installation
When the ceiling is already installed, proceed to the installation of electrical appliances:
- Determine the location of the embedded elements.
- A thermal ring is attached to the outside at the place where the lamp is mounted.
- The film inside the ring is cut out with a stationery knife, without going beyond the ring.
- When bringing the wires into the room, connect the connectors.
- Having bent the spring, install the light bulb and check its functionality.
If these are not spotlights, but a chandelier, the procedure is the same. The difference is that the elements are not recessed, but are tightly screwed to a wooden embedded part. It is important that the electricity is turned off before starting work. This is necessary to avoid electric shock.
Soffits
The peculiarity of this type of lighting fixtures is that different connection schemes are used depending on the design solution. If it is expected that consumers will turn on simultaneously, install a one-button switch. Then the circuit assumes a serial connection. Otherwise, the bulbs are connected in parallel, allowing one set of lights to be turned on or all at once depending on the active switch.
It is important to choose the right lamps. Ceiling film melts easily and becomes deformed when heated. Therefore, ordinary incandescent light bulbs are not used. An excellent alternative is diode lighting fixtures or energy-saving ones that do not heat up during operation. They last a long time and consume little electricity. Halogen lamps are used less frequently if their power does not exceed 35W. In most cases, spots with a G5.3 and GX53 base are used.
Chandeliers
There are also cases here where the lamp or lamps are turned on by pressing a single button. There are chandeliers that have a different contact group divided into two or more circuits. The distribution box is attached to the platform between the ceiling and the mortgage or directly to the wall. The main thing is that it is not in limbo. In any case, you need to de-energize the entire room. So, make sure that the work is done during the day. Otherwise, stock up on a self-contained light source.
Chandelier recessed into the ceiling
Ceiling curtains
The material can be different: plastic, metal, wood. There are models that are attached to special brackets directly to the ceiling. In this case, it is important that the stretched fabric does not protrude, but remains level. A wooden beam or platform is screwed to the ceiling. The latter option is preferable, since it is possible to make the mount adjustable in height. After installing each unit, check the geometric correctness of the installation. Pull the thread, making sure that it does not sag or rest on the beams.
The second option for curtain rods is baguettes, into which hooks are inserted for hanging curtains and curtains. Then it makes sense to use one solid wooden beam, which is attached to the ceiling with dowels with self-tapping screws. In this case, it is important that the gap between it and the suspended ceiling is minimal and tends to zero. The cornice itself is screwed “tightly”, but after tensioning the canvas. Determine the location of the beam, and screw it in increments of 30-40 cm with wood screws through pre-drilled holes.
Masking joints
When it is impossible to cover the entire area with a single piece, the fragments must be soldered before stretching the ceiling. In most cases, from a design standpoint, it is better to have the seam along the larger wall. But after the harpoon profile is mounted and the canvas is tensioned, a gap remains around the perimeter, which also needs to be closed. A special flexible plug is used. This is a tape, the cross section of which is a T-shaped plastic profile. A spatula is used for installation. In the corners, the joint is made by cutting adjacent elements at 45 degrees.