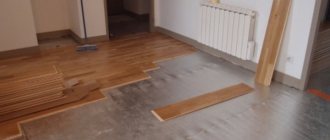
Some floor coverings, such as laminate, linoleum, tile, require a perfectly flat base. Using a regular cement screed, it is incredibly difficult to achieve such a coating, especially if you are not a professional. The best solution in this case is to pour the self-leveling floor with your own hands, creating an impeccable base for the finishing coating. Compared to installing a screed, installing a self-leveling floor can be quite a simple matter. For those who do not know how to fill a self-leveling floor with their own hands, video tutorials will allow you to understand in detail the intricacies of the process.
Choosing a mixture for self-leveling floor
The first thing you need to do before you start arranging the finishing self-leveling floor with your own hands is to select the appropriate material. Mixtures for self-leveling floors are presented in a huge number of varieties and options, differing in characteristics, quality, and price. How do you know which composition to choose?
Criteria by which you should choose a mixture for installing a self-leveling floor:
- Compound. Self-leveling mixtures can be based on a cement or gypsum binder component, in addition to which the composition contains sand, mineral fillers, and special modifying additives. Self-leveling cement flooring is the most inexpensive and versatile option, characterized by high wear resistance, strength, and moisture resistance. Gypsum floors dry quickly and allow you to create a thicker layer, but they are susceptible to moisture, so they are only suitable for dry rooms.
- Layer thickness. Varies from 1 to 100 mm for different compositions. For cement - up to 10 mm, for gypsum and complex - more.
- Speed of setting and hardening. All poured floors dry quickly, but gypsum floors can be walked on earlier than cement ones, approximately 3-4 hours after completion of work.
- Mixture consumption. Varies between 13–18 kg per square meter. m. with a layer thickness of 10 mm. For a cement floor it will be larger than for a plaster floor.
If you are thinking about how to make a poured floor with your own hands, first of all you should be interested in the composition and approximate thickness of the pour. When choosing, you should be well aware of the unevenness, differences and slope in the room in which you will make a self-leveling floor for the finishing coating with your own hands; it is from their dimensions that you need to start.
USEFUL INFORMATION: Parquet laying technology: cost of work per 1 sq. m.
Many mixtures for poured floors successfully replace screed, and are also used when pouring pipes of a “warm floor” system.
Calculation of material consumption
Before making a self-leveling floor with your own hands, you should correctly calculate the consumption of the dry mixture, leaving a small reserve. The norm is from 1.3 to 1.8 kg per 1 sq. m of area per 1 mm of layer thickness. It turns out that if you need to fill a layer of 8 mm, the calculation will be as follows:
1.8 × 8 = 14.4 kg/sq. m.
Advantages of self-leveling decorative floors
Self-leveling decorative floors have many advantages over other coatings. They can serve for decades without repairs or special preventive measures. The minimum service life is 20 years, and then only when using the cheapest mixtures. They can be easily cleaned from dust using a vacuum cleaner or wet cleaning.
Characteristics of self-leveling floor
Attention! Self-leveling floors should not be washed with products containing abrasives. With constant use, they can scratch the finishing layer and the floor will lose its shine and attractive appearance.
The mechanical load on these floors is not at all terrible. Furniture and equipment that have significant weight can be installed on them. Also, the floors are not afraid of chemical influences, and in addition to everything, they have excellent fire resistance.
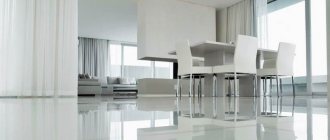
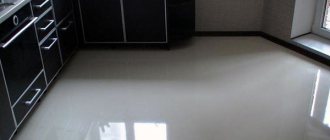
Self-leveling floor in the interior
Such floors can fit perfectly into any interior due to the ability to create absolutely any pattern and a wide selection of shades. They look especially good in the bathroom or kitchen. It is in premises of such purpose that the use of decorative self-leveling floors is most appropriate and convenient. Do not be afraid that such a coating will be slippery when water gets on it. On the contrary, its slip index is much lower than that of tiles or linoleum. And such floors are not afraid of water - even if you spill boiling water on them, nothing will happen to them, unlike the same laminate. All you need to do is wipe the wet floor with a cloth.
Self-leveling floor in the interior
Also, floors do not fade under the influence of sunlight throughout their entire service life if they were made correctly and with strict adherence to technology.
On a note! Such floors are indispensable in apartments where people with allergies live. The coating is completely hypoallergenic and does not emit unpleasant or irritating odors after complete hardening.
Self-leveling floor
But you should not consider self-leveling decorative floors as an ideal floor covering option. They also have their disadvantages. First of all, this is the need to strictly follow the installation instructions, since otherwise the coating can easily be damaged, and correcting the entire work will be difficult and expensive. Also, polymer floors are somewhat toxic at the installation stage - the polymer mixture emits a very pungent odor and it will not be possible to work without at least a respirator and compliance with safety regulations. The cost of the floor also leaves much to be desired - the prices for some mixtures are quite high, and not everyone can afford to make such a base in the entire apartment. Especially when you consider that the consumption of mixtures during installation is quite high, although the floor is laid at a maximum thickness of several centimeters.
On a note! The average consumption of mixtures for self-leveling floors is 4 kg/m2, provided that the base is poured with a thickness of only 3-4 mm.
Beautiful self-leveling floor
Prices for some brands of 3d self-leveling floor
self-leveling floor 3d
Preparing the base
Before making self-leveling floors, it is necessary to prepare the surface step by step. Anyone who is still unfamiliar with pouring self-leveling floors can watch video tutorials. The general rules are the same everywhere.
- Preparing the floor begins with removing everything unnecessary from it, including baseboards.
- The surface is thoroughly cleaned from any dirt, dust, or oil stains.
- The old peeling coating is removed.
- Before the floor is poured with mortar, potholes and cracks are sealed. This must be done in advance, no later than 24 hours before the start of work.
You can fill the self-leveling floor in an apartment at temperatures from +5 to + 30 C°.
[smartcontrol_youtube_shortcode key=”preparing the floor for self-leveling flooring” cnt=”2" col=”2" shls=”true”]
- The base must be treated with a deep penetration primer. Porous materials are processed several times. Large pores are closed with a high-viscosity primer. Dust should not be deposited on a freshly treated surface. Filling begins no later than 24 hours later.
- A special damping tape for poured floors must be laid along the perimeter of the walls on all sides, otherwise the layer will crack due to temperature deformations. Polystyrene strips up to 10 mm thick can be used. The width of such a strip or tape should correspond to the thickness of the poured layer.
- When leveling the surface, it is checked using a level and a rule. The highest point and the lowest are found, after which the beacons are set.
The beacon for the self-leveling floor is a dowel screwed into the base, which is then easily removed. Setting the beacons in height allows you to correctly determine the thickness of the fill.
Before you make a self-leveling floor with your own hands, you need to select the necessary equipment, and then calculate the consumption of the dry mixture. To properly level the base under a laminate or tile using a self-leveling floor, you must follow the step-by-step instructions. This will help you not miss anything.
USEFUL INFORMATION: Do-it-yourself repair of wooden floors in Khrushchev (video)
Kinds
All self-leveling floors can be divided into several large types depending on the binding material:
- polyurethane;
- epoxy;
- gypsum;
- on a cement base.
Polyurethane self-leveling floors
As the name suggests, their base is polyurethane. They have high strength, immunity to chemical influences, and wear resistance. Increased elasticity prevents cracks.
Can be used in both residential and industrial premises.
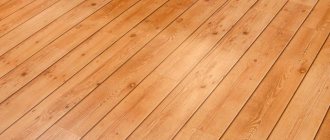
Polyurethane flooring can be poured onto almost any substrate: floorboard, laminate, metal, concrete.
Epoxy self-leveling floors
The basis of the epoxy floor is epoxy resin and hardener. These are the most beautiful polymer self-leveling floors; a good craftsman can use it to create a real work of art.
The floor can be transparent with any pattern, glossy like glass or matte. It is very hard, resistant to various chemicals and mechanical stress, but is afraid of pinpoint impacts.
Epoxy floors are recommended for areas with high loads (schools, cafes, offices) and for residential premises due to their high decorative properties.
Due to the more complex manufacturing technology, it is recommended to entrust their filling to specialists.
Self-leveling cement-based floors
These are cement-based dry mixtures to increase plasticity and greater spreadability, special modified additives are added to them.
Suitable for leveling large differences, cracks and other defects on the subfloor.
Used as a base for laying the finishing floor covering on it:
- laminate,
- tile,
- linoleum, etc.
One of the leaders in the modern construction market is the fast-hardening mixture OSNOVIT SKORLINE T-45; using its example below, step-by-step instructions for pouring a self-leveling floor in an apartment will be given.
Osnovit Skorline T-45 is used for surfaces with unevenness up to 10 cm, both for final leveling and preliminary leveling. It is non-shrinking, high strength and crack resistant.
It is also suitable for those who want to install a “warm floor” system. This is facilitated by its high self-leveling and spreadability.
Founder Skorline T-45 complies with all hygiene standards in force in the Russian Federation, it is environmentally friendly and does not contain harmful impurities. When hardened and completely dry, the surface is completely smooth and does not require further sanding.
Video instructions for pouring self-leveling floor:
Required Tools
The self-leveling floor is installed using special tools, including:
- Containers for preparing the solution.
- A drill with an attachment for mixing mortar or a construction mixer.
- Large spatula.
- Squeegee for self-leveling floor.
- Needle roller.
- Shoes for walking on fresh surfaces (paint shoes).
- Level and rule.
What does the market offer?
Self-leveling floors have a wide range of colors and patterns - much wider than even tiles. Prices for polymer coatings are quite different: they depend on the design, polymers used and brand. Also, with a strong mechanical impact on the floor in the room, preference is given to the polyurethane version, since epoxy is less elastic. But for a constant static load - just right.
As for the brand, so far the best reviews can be heard about the self-leveling floor Gipcreet Thermafloor. This is a lightweight polymer solution that never cracks. No less popular today is the Elakor PU self-leveling floor brand. This mixture contains a good hardener and color base that are mixed right before use. As a result, the floor is resistant to stress, dampness and the active use of chemicals.
You can also hear good reviews about Praspan and Proplan, SIKA and Hyperdesmo. And for the most complex projects, they often choose RINOL, an Italian company that today is considered the world leader in self-leveling coating systems. Such floors are irreplaceable for those rooms where special or increased requirements are imposed:
- Parking lots;
- Operating rooms;
- Supermarkets;
- Public premises;
- Transformer substations.
The environmental friendliness, durability and UV resistance of the final coating really depend on the quality of the materials used. If you hire a team to pour a polymer floor, it would be a good idea to ask them about their certificates.
It is not the polymer floor itself that is expensive, but its installation. Construction companies indeed often inflate prices for such services, which they themselves often admit. That's why, if you learn how to fill such a coating yourself, then a modern self-leveling floor will not be a luxury for you, but an excellent option for updating your home. And over time, thanks to its impressive service life, a polymer floor will pay you back at least twice.
Preparation of the solution
When self-leveling floors are made in an apartment with your own hands, first of all you prepare a solution.
Important! Many people ask the question: “why does the self-leveling floor crack?” The reason is simple: it's all about excess water. Therefore, do not pour water “by eye”; follow the manufacturer’s instructions.
- In a given ratio, pour water into the container and add the dry mixture.
- Mix the solution with a mixer until you get a homogeneous mass.
- Allow 5 minutes for the leveling solution to mature.
- The technology for pouring a self-leveling floor involves checking for spreadability. The solution is poured into the lid of a shaving can with the bottom cut off, placed on a horizontal plane. The lid will lift and the solution should form a spot with a diameter of 16–18 cm. If the dimensions do not correspond to the norm, the composition of the solution is adjusted.
Important! Freshly prepared mixture must be used within 60 minutes. Portions are applied in parts with an interval of at least 10 minutes. If you look at how a self-leveling floor is made (video), you will notice that the number of workers should be at least two.
Polymer flooring: fashion or practicality?
Today there are many types of polymer flooring: for every taste, style and idea. And according to their composition they are divided into:
- Polyurethane. The floor has good performance and can be laid independently both in a technical room and in a residential building.
- Epoxy-urethane. This coating is especially resistant to abrasion and is indispensable for significant pedestrian and traffic loads: workshops, corridors and warehouses. True, the price is quite high.
- Methyl methacrylate. When laying such a floor, it is necessary to strictly follow the process technology, but within 2 hours after drying you can walk on it. It is frost-resistant and can withstand any bad weather outdoors.
- Cement-polyurethane coatings are used mainly to create floors with severe operating conditions: high temperatures, exposure to aggressive chemicals and live steam. It is this kind of floor that most effectively protects the concrete base from destruction, which is why they are most often ordered for car service centers.
Of course, epoxy and polyurethane floors are more popular today due to their coating thickness: from 0.5 mm to 6 mm. Let's compare these two types of flooring. So, epoxy ones are much harder, they are cheaper, but they are laid in a layer of up to 5 mm, while polyurethane ones are enough to 3 mm. And polyurethane floors are more scratch-resistant than epoxy floors.
Pouring the floor
How to make a self-leveling floor correctly? The first time you can pour a self-leveling floor yourself in a small utility room to develop the necessary skills. The process of pouring a self-leveling floor is not complicated and is done as follows.
- Work begins from the wall farthest from the front door. There should be no long breaks between each operation, otherwise the surface will turn out uneven. The solution is applied to a separate area parallel to the wall and then leveled. The thickness of the layer is adjusted with a squeegee. Then they move on to the next section.
During the work, you will need special shoes for pouring the self-leveling floor. A worker wearing boots with special spikes will not damage the leveled floor when moving on it.
- To remove air bubbles, the solution is rolled with a needle roller.
- The following layers are poured and leveled in the same way until the entire floor to be poured is completed. It is better to do the work with at least two people: while one is pouring and leveling the floor, the other is preparing the next container with the solution.
Attention! After pouring, it is important to protect the surface from drafts and direct sunlight.
To better understand how to make a self-leveling floor with your own hands, it is recommended to study photos and videos with detailed descriptions.
USEFUL INFORMATION: How to lay carpet: laying on concrete, wood floors and linoleum
Note! When self-leveling floors are made, the technology for preparing solutions and pouring from different materials may differ slightly. Before pouring a self-leveling floor, be sure to read the instructions for use.
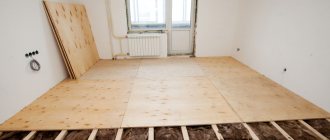
Preparing the base
Floor screed
The main requirements for preparing the base are correcting defects and cleaning the surface. If there is old coating, it must be completely removed. The entire area of the subfloor is thoroughly cleaned of debris and dust (you should use a vacuum cleaner). After cleaning, existing defects become clearly visible. Existing cracks and cracks are puttied, the protrusions are knocked down. The best way to treat the surface is to use a grinding machine. If a polymer floor has to be poured onto ceramic tiles, its surface is made smooth with sandpaper or sandpaper.
It is necessary to measure the horizontal level of the base: if its difference does not exceed 4 mm, then you can start making a polymer floor. If there are significant fluctuations in the level, the surface will have to be leveled with a sand-cement screed and further work postponed until it dries.
In the vast majority of cases, poor-quality pouring of a self-leveling floor is caused by a poorly prepared base, which causes peeling.
Thorough primer
After the screed has dried, a thorough primer is required, which increases adhesion between the base and the self-leveling floor, and also reduces the absorption of the polymer mixture, and, therefore, the consumption of the expensive composition. It is better to apply the primer in two layers, leaving a break of at least 4 hours between them. The composition is applied with a roller. To prevent the liquid mixture of the self-leveling floor from leaking near the wall, this area is taped with damper tape. Also, wooden slats are installed along the perimeter of the room, which will preserve space for the expansion joint.
How to make a self-leveling floor with your own hands: step-by-step instructions
Before starting work, the foundation should be properly prepared. Naturally, it is necessary to completely empty the room of furniture, remove the baseboards, and inspect the base.
Be sure to prepare a container for the solution and tools:
- a needle roller with a length of spikes approximately equal to the thickness of the layer being poured;
- drill;
- mixer attachment;
- a wide spatula, as well as a squeegee for self-leveling flooring;
- rule;
- water level;
- paint shoes - special pads for shoes.
You will also need to calculate the required amount of material to complete the work. In this case, you can rely on the recommendations set out in the instructions, but you should keep in mind that you cannot do without adjusting the indicators.
Paint walkers
It is more convenient to use another method to calculate the self-leveling floor - a special formula that takes into account the characteristics of the base. But this will require the help of specialists or at least manager-consultants of a hardware store.
If the calculations are carried out independently, then you should know that the consumption per 1 m2, with a layer thickness of 1-2 mm and small surface defects, requires an average of 2 kg of dry mixture.
You will also need to prepare a primer composition, the consumption of which, depending on the absorbency of the base, ranges from 100 to 300 ml/m2.
Step-by-step instructions for pouring mineral self-leveling floors
The process of leveling the base is perfectly illustrated in the figure below.
Scheme for pouring a self-leveling subfloor.
For non-professionals, here is a detailed description.
First of all, you need to prepare the following set of tools:
- Container for mixing the solution (plastic or galvanized bucket);
- Construction mixer or drill with a mixing attachment;
- A squeegee for drawing out the solution or a rule;
- Level or laser level;
- Point beacons-benchmarks;
- Needle roller to remove air bubbles;
- Paint shoes (shoe pads).
Stage 1. Preparing the base
The final result depends on how carefully and correctly the floor is prepared for pouring. And this is not an unfounded statement. On a dusty, weak, unprimed base, the hardened mortar will quickly crack, lose strength, and eventually simply peel off. Accordingly, all efforts and costs will be lost.
In accordance with SP 29.13330.2011 and SNiP 3.04.01-87, the base must be:
- Dry. Humidity coefficient - no more than 2%, heated screeds - less than 1.8%.
- Durable. Compression index – not less than 10 MPa.
- Ripened. The age of the cement-sand base is more than 28 days, the concrete base is from 3 months.
The floor should first be cleaned of debris, dust and dirt. Stains of grease, oil, bitumen, paints - remove with solvents or clean. Weak crumbling areas must be removed, and cracks and cavities must be expanded and filled with special quick-drying compounds (epoxy putty or repair blitz cement).
If the base is heavily contaminated with bitumen, oil, and the strength is in doubt, manufacturers recommend using a so-called separating layer. Polyethylene film with a thickness of 100 microns, roll waterproofing materials and their analogues can act as a kind of “damper”. The same method works well on highly absorbent substrates.
Sanitary standards recommend sanding anhydrite screeds until the filler becomes visible. You should not be intimidated by this action, because the grinder can easily be rented for 1-2 days. It is economical and practical.
The final step should be priming. Deep penetration or strengthening primers (Betonkontakt, Putzgrunt, ST-17) are applied to the surface with a brush or roller in 1-3 layers. Intermediate drying of at least 12 hours between layers is required.
Stage 2. Mixing the solution
Every self-respecting manufacturer always prints instructions on the packaging indicating the water consumption rate for mixing. Its temperature varies from +15 to +20 °C.
Pour a carefully measured amount of clean, free liquid into a bucket, gradually add the dry mixture and mix with a mixer until a homogeneous solution is obtained. The pot life depends on the base binder and, as a rule, does not exceed 30-60 minutes.
Advice! Materials containing cement form an alkali when interacting with water, so when working it is recommended to avoid getting the mixture on the skin and eyes. Use personal protective equipment (respirator, goggles, gloves).
Excess water is dangerous for self-leveling floors. The finished solution may delaminate, as in photo 2, and the hardened base may crack and lose strength.
Self-leveling floor damaged by excess water.
Stage 3. Pouring the composition
This step is considered the easiest. Using a laser level or water level, the difference in the base is checked and the layer thickness is calculated. The floor heating system is turned off 48 hours before work begins. Restarting is allowed 3-7 days after the coating is formed.
When applied in thin layers (less than 1 cm), the finished composition must be poured onto the base and carefully distributed with a squeegee or a rule. If the size of the leveling layer exceeds 1-2 cm, then to control the floor level you can use reference beacons, which are placed at equal intervals throughout the room.
After pouring the solution, it should be rolled with a needle roller. This process will remove air bubbles and compact the mixture. If there are expansion joints in the base, they must be repeated in the finishing layer.
Rolling the solution with a needle roller.
Let us note an important point that masters often forget about. Draft is the enemy of a smooth and durable coating. In the room, you need to close the windows and doors; when applying a thick layer, you can additionally cover the poured solution with plastic film so that drying occurs evenly.
After 7-10 days, the rough base is ready for installation of any flooring material, from LVT tiles to parquet.