When a major renovation is done in an apartment, in any case you need to pay attention not only to the condition of the walls, but also to the condition of the floors. In appearance, renovating the floor in an apartment looks quite simple - you just need to update the old floor covering. However, in reality everything can turn out to be much more complicated. For example, a major overhaul of the rough foundation may be required, and this applies not only to joists and floorboards, but also to the concrete screed itself. Let's figure out whether you always need to do heavy, rough work, or whether in some cases you can only get by with replacing the floor covering.
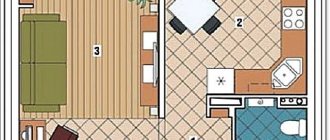
Repairing the floor in the apartment
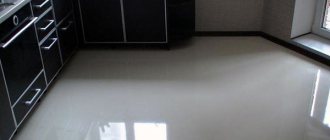
How to replace a wooden floor with a concrete one in an apartment
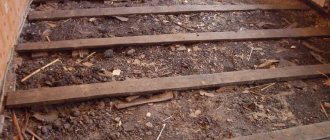
Whether you live in a panel house, a brick house, or a so-called Stalinist one, it doesn’t matter - the work of replacing floors begins with dismantling the old floor covering.
Laminate, linoleum and carpet are quite easy to disassemble/remove, but removing stone or ceramics is a troublesome task. Wooden floors based on joists are also difficult to redo, but time and patience are key.
Before pouring a concrete floor, the old wood covering should be removed using a crowbar or other suitable tools.
But in any case, your task is to reach the concrete screed. After this, you need to evaluate what the screed is like and whether it needs some restoration as well. Sometimes they get rid of it by reaching the reinforced concrete slab.
Then we repair the floor like this:
- Free the floor, which has already been cleaned of the old coating, from dust and dirt, repair chips and cracks, after which waterproofing is laid on the floor;
- If the room is large, the work will take place in sections - the room is divided into fragments, limiters are used;
- Sometimes it is necessary to lay insulation, the heat insulator is covered with a layer of waterproofing, after which the screed is poured;
- In order to not only level and repair the floor, but also give it strength and rigidity, you can make a reinforcing frame from wire mesh;
- Then the solution is poured in sections, everything is aligned along the guides with a long rule;
- A day after pouring, the guides are removed, and the installation sites of the guides are sealed with screed mortar.
Within a week, this floor can be finished. Sometimes restoration is needed, but in many cases there is no point in restoration; the floor needs to be completely replaced. And in a private house with ceilings you have to do the same.
Boards:
- If you want to spruce up your wood plank floors, you'll need to reconsider each floorboard.
- If you have a first floor, it is recommended to replace the thermal insulation layer under the boards.
- The entire surface is processed with a sander to remove old varnish, paint, and dirt to bare wood.
- Unusable floorboards should be replaced.
- It is necessary to strengthen the fastening of the boards to the joists. To do this, drive the nails deeper.
- After the repair, you need to go through it again with a grinder or sandpaper.
- The next stage of work is dry and then wet cleaning.
- After drying, the boards are coated with paint or varnish.
Parquet
Parquet is considered an elite type of flooring. It is durable and environmentally friendly. But, unfortunately, over time it loses its visual appeal, dries out, and begins to creak. The cause of such defects can be not only time, but also improper care, mechanical damage, and high humidity:
If the parquet board is not swollen from water, does not become loose and dark, it can be restored. Use a sander with fine sandpaper to sand the surface of the parquet. Next, using a spatula and cosmetic putty for parquet, you need to repair all the scratches, holes and chips.
- If some parquet flooring is loose, it needs to be strengthened using nails driven in at a 45 degree angle.
- If a whole section of the floor moves, then several holes are drilled along its perimeter into which bamboo pegs are driven. They will swell in a few days and fix this area. The excess bamboo is cut off with a knife, and then all that remains is to putty and varnish the parquet.
- The creaking of the coating can be eliminated by replacing the wedges around the perimeter of the room. To do this, remove the baseboards and remove the old wedges. In their place, place new ones at a distance of 50 cm from each other. Now you need to wait a few days. Every day you need to knock out the wedges and check whether the parquet continues to creak. Only when you have achieved the desired result, return the baseboards to their place.
Removing scratches
Repairing scratches using putty
Scratches on floorboards most often appear when rearranging furniture in the house or moving bulky and massive objects. They do not affect the performance characteristics of the floor, but significantly worsen its appearance.
The technology for eliminating scratches depends on their size and depth. Restoration of minor damage is carried out with a special pencil. After sealing, the restored areas are covered with a layer of varnish or paint.
Deep and long scratches should be repaired with putty of a suitable color. Not many of those who try to carry out such repairs with their own hands know that when choosing, it is necessary to take into account not only the shade of the mixture, but also its strength and drying speed. After the sealed areas have completely dried, accumulated dust is removed from their surface, sanded with sandpaper and varnish or paint is applied.
Cement strainer
No new floor covering should be laid on top of an old, damaged base. A major renovation of the floor in an apartment can be ruined simply by the lack of a good base. Therefore, we will deal with cement screed - an unusually strong and reliable protection (including from flooding of neighbors below).
We will need the following materials:
- cement (we bought it for 250 rubles per 50 kg bag);
- sand or screenings for screed (they charged 900 rubles per cubic meter);
- sand, screenings, crushed stone, small enough for a pillow (the latter cost us 420 rubles per cubic meter);
- perforated lighthouse profiles (20 rubles per 1 piece).
Filling the screed will require the following tools from us:
- concrete mixer or tub for stirring the solution;
- a shovel or hoe for mixing the solution in the tub;
- raw or silk thread for lighthouses;
- water level (use either a tubular or laser);
- ordinary level;
- rule;
- Master OK;
- poluter;
- several buckets.
Selection of paint and varnish material
The final stage of floor restoration is the application of some kind of paint and varnish material. If small areas have been damaged, they are painted in the same way as the main floor. In cases where you have to go through and sand all the boards, the question arises about choosing a coating. In this case, it is important to take into account not only the aesthetic component, but also the ability of the composition to provide reliable protection for the tree.
One of the most popular materials is paint. The modern market offers a wide range of different paints, which include substances that increase the fire resistance of wood and its resistance to rotting. The paint reliably protects the floor in conditions of high humidity.
Another popular material is varnish. It allows you to see all the beauty of wood texture, but is less resistant to high humidity. Materials such as oil and wax are used much less frequently. They provide good protection for wood, but oil mixtures are sensitive to temperature changes, and wax is sensitive to mechanical damage.
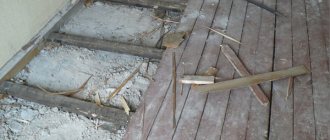
Dismantling a wooden floor
If the old coating was attached with screws (self-tapping screws), then you can try to dismantle it using a screwdriver.
Well, if the board covering is no longer of any value, then the most convenient way would be to make cuts using a manual vertical circular saw (carefully and prudently, so as not to catch the concrete base, damage the joists, or “run into” a nail). After separating the long floorboards this way, removing them will be an easy task.
Is it worth removing the entire plank floor covering if obvious defects were observed only in certain areas, and there are no plans to replace it with a different type of surface finish? Of course, you can limit yourself to only partial repairs - replacing worn out or damaged parts. But experts unanimously advise - remove everything completely. There is no guarantee that if the deterioration process has manifested itself in one area of the floor, then it will not show itself in another in a year, or even earlier. It will be cheaper to renew the base and re-lay the floor, even using old material, than to return to such repairs again after a short period.
Conducting a foundation audit
After the floor covering has been removed, it is necessary to carefully inspect the base.
If there are logs left on the floor, and you plan to re-lay the plank flooring, you should carefully check the condition of these load-bearing elements and the supports on which they are installed. Log beams should not have areas of decomposition, rottenness, or fungal damage - such parts must be replaced. Each joist is checked under load - it should not dangle, sag, creak, etc. If necessary, update the linings that hold the guide at the desired height.
It is recommended that after inspection and repair of the logs, treat all the wood with an antiseptic composition - this will protect it from biological decomposition.
If the condition of the joists does not cause concern, then after thorough cleaning, a new coating can be laid in the spaces between them. Most old floorboards will probably work just fine. After such a bulkhead, the floor will stop creaking and gain the necessary stability. If required, thermal insulation material can be laid between the joists, which will also act as a sound insulator.
Tree
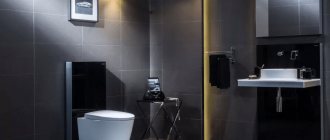
If we talk about choosing a wooden floor, then this is perhaps the most environmentally friendly option. It is mounted on logs. The big plus is that noise and heat insulation can be placed between the joists without any problems. The only place where you should not install a wooden floor is the bathroom. And in other rooms it can be installed without any doubt. The parquet is also laid on logs. However, an additional sheet of plywood is laid between them and the planks themselves.
Concrete floor
Preparing the base
In what cases can such a skill be useful, how to make concrete floors in an apartment with your own hands? In many. This is a kind of panacea for the bad sex.
So, the reasons for concreting:
- No coverage at all. If this is, for example, only a new building that has been commissioned.
- The need to level the surface for subsequent covering with parquet, laminate or tiles.
- Preparation for installation of “warm floors”.
If you are wondering which floors to make in an apartment are more reliable, then opt for concreting. A correctly placed screed will not bother you for a couple of decades.
Photo of cement screed
To understand the correctness of this judgment, let's group all the advantages of this material.
Benefits of concrete
- Ease of use.
- Relatively low price.
- Versatile functionality. Thanks to the presence of various additives, it can be lighter, more durable, quickly set and have other additional qualities that, however, increase the cost of the material.
- High strength and durability.
Installation progress
How to make a flat floor in a concrete apartment? First of all, you should level the base well using an expanded clay cushion.
The following instructions will help you avoid skipping installation steps:
- We completely clean the base to the ground if it is a private house, and to the floor slab if it is an apartment.
- We create a pillow by filling it with sand or expanded clay. We also level the surface in this way.
- We set up beacons.
- We take care of how to waterproof the floor in the apartment. Cover the surface with plastic film. We fasten the joints with mounting tape.
Protection against high humidity
We install an iron mesh.
Steel mesh
- Using wooden blocks we roughly divide the surface into several parts.
- Pour in the prepared mixture.
- Let's ram it.
- We take out the bars and fill the resulting recesses.
- Cover with film so that the screed does not weather during the drying process and cracks do not appear.
- We are waiting for complete hardening.
Dry screed
A very interesting and modern type of concreting is dry screed. How to properly make floors in an apartment in this way? Much easier than classic concreting.
Installation process
Until the moment of using the DSP, the installation process points are the same as in the “wet” screed.
And then:
We lay gypsum-fiber moisture-resistant sheets carefully, without fidgeting on the surface, with an offset to ensure greater durability of the coating.
- We fix it with self-tapping screws. For a more reliable result, you can also use glue.
- We putty the uneven spots and crevices.
- We process the surface with a grinding machine.
- We apply bitumen insulation.
- Easy to install. No dirt.
- High heat-saving properties.
- Ease of installation of communications.
- Fast installation.
Advantages of dry screed
Of course, using such material is more expensive, but it all depends on the situation. If the question becomes how to quickly make a floor in an apartment with your own hands, then the option of using gypsum fiber sheets can quite help you out.
After concreting, the surface is ready for installation of the finishing layer of your preferred material.
Parquet laid on a concrete base
Laying reinforcement
Reinforcing the apartment screed is recommended, but with a layer thickness of 40-50 mm you can use the following methods:
- classic, laying a 10 mm steel mesh with a mesh size of 5 cm on the floor with a gap to the insulation or waterproofing insulation;
- using plastic reinforcing mesh;
- adding special fibers to the solution.
You can also place an aluminum mesh inside the screed. But the method using fibers is the leader in terms of convenience and rationality. This will allow:
- do not worry about the presence of an expansion gap to the waterproofing or insulation;
- lay a heated floor heating system inside the screed;
- work at high speed.
Mesh reinforcement
We study the condition of the coating
Agree that it is much easier to eliminate small defects
But how do you understand that it’s time to carry out repair work if outwardly there seem to be no big problems? Builders recommend paying attention to the following signs: - small irregularities have appeared on the floor surface: small cracks, potholes; — the joining seams began to lose strength; — the amount of saw blades on the surface has increased. By eliminating minor deficiencies, you will prevent the urgent need for major screed repairs
Before repairing the floor screed, additional work should be carried out: - dismantle the finishing coating; - leave the screed to air for a day. or better yet for two; — carefully remove all debris and dust, if possible, use a household or construction vacuum cleaner; — using a metal brush, remove: mold, rust, residual primer; - be sure to remove grease and oil stains; — if metal parts are found inside the screed, clean them and treat them with special anti-corrosion agents. Preliminary work will help prepare the basis for normal further work and increase the percentage of positive outcomes of repair work.
Factors influencing the condition of concrete pavement
For a better understanding of what you have to deal with during repair work, let's consider the main factors that can lead to damage to a given floor: - soil substrate. Under the influence of temperature changes, the soil may swell, which will lead to cracks. In addition, the screed will be negatively affected by poorly compacted soil, shrinkage and erosion of the latter by groundwater; - internal problems. Improper care during the hardening period of the screed, shrinkage of concrete, peeling of the top layer of the screed will be a big problem; - external influences. These include chemical and mechanical effects, potholes from falling heavy objects, and natural abrasion.
Categories of complexity of work processes
The most labor-intensive work is considered to be screeding the floors and plastering the walls. It can be especially difficult to deal with surfaces with a large number of differences. Some of them can be eliminated by knocking them down with a hammer, but only a leveling screed or similar plaster layer can really save the situation.
To carry out high-quality straightening of wall surfaces, plaster beacons are used. To do this, buy aluminum slats or metal pipes of small square or rectangular cross-section.
In the first case, the material is inexpensive, but when purchasing, you should know that when you remove the slats from the seams after the plaster has dried, they can no longer be used again.
Metal pipes are more expensive, but the percentage of their preservation after dismantling is much higher. In addition, some people prefer to leave them in the solution for a stronger layer.
The most economical way to achieve evenness of the screed is considered to be the installation of mortar beacons on the floors. But this process is very painstaking and only those who have the appropriate skills can decide on it.
Paint rollers and brushes, plastic trays with meshes for rolling rollers. By working with high-quality tools, you can avoid smudges on the walls and vertical paint stripes.
Sequence
When carrying out renovations, few people know where to start with the floor or walls. First of all, you should install windows and doors if you want to replace them with new ones. It will be enough to even install the door frame and window frames.
The putty starts from the ceiling, then goes all the way to the walls. Only then is everything transferred to the floor. If all issues regarding the floor have also been resolved and the floor screed has been poured, then we proceed to wallpapering.
Concrete floor repair sequence
It is worth noting that the floor should be poured before other finishing work begins. This is due to the need for the base to dry completely. While this process continues, you can walk on the floor and do everything else. But furniture cannot be installed.
Replacing wooden flooring with self-leveling flooring
If the floors are in poor condition and require dismantling, but there is no desire or money to lay new wooden flooring, then a self-leveling self-leveling floor can be an alternative.
One solution is to abandon the wooden floor in favor of a self-leveling self-leveling screed.
Ready-made compositions for self-leveling floors are designed to dry quickly and bring the reinforced concrete floor surface into perfect order.
The installation of a self-leveling coating consists of several stages. Moreover, the first, preparatory, is no less important than the finishing one.
So, after dismantling the compressed covering and joists and thoroughly removing debris, the following actions are performed:
Defects in the concrete base must be repaired.
The surface is being checked. If cracks are found on it, they must be carefully repaired. To do this, the crack is expanded, primed and filled with a homogeneous cement-sand mortar or special repair putty. In some cases, a sealant designed for use with concrete may be suitable for small cracks. If there are depressions or protrusions on the surface, they also need to be removed. The protruding parts are cleaned off with a grinding machine or simply knocked off. The depressions are filled with repair compound to the general level of the base. In order for the solution to have good adhesion to the concrete surface, it is necessary to make notches in the depression area, then clean it of debris and prime it.
Primer of concrete base for self-leveling floor.
- The next step is to apply the primer to the entire floor surface. This composition is designed to create the required high adhesion between the base and the self-leveling floor solution.
- Then, the solution is mixed in the prepared container, according to the manufacturer’s recommendations on the packaging. Mixing must be done using a construction mixer, or an attachment that is installed on an electric drill or hammer drill.
Leveling the solution over the surface with a needle roller.
- The solution is poured onto the concrete base in puddles starting from the far wall of the room. First, the solution is distributed over the surface with a wide spatula or squeegee. And then it is finally leveled by rolling with a needle roller.
- When the entire surface of the floor is covered with a layer of self-leveling compound of the required thickness, time is given to dry and gain strength. The drying time for each specific composition may be different - this information must be indicated on the packaging of the mixture.
This method is good because the work is done quite quickly. And with due diligence and following the technological instructions, even a novice master can do it. The solution dries quickly, which means you can soon move on to the next stage of work. Once ready, this base is suitable for almost any type of decorative floor covering.
* * * * * * *
Now, having information about the methods of repairing floors in Khrushchev-era houses and assessing the condition of the floors in your own apartment, you can decide on the choice of the optimal method. However, before undertaking a major reconstruction, you need to properly weigh both your financial capabilities and your experience in construction and finishing. If you carry out repairs on your own, you can save a decent amount by spending only on building materials.
Recommendations for choosing flooring
Construction stores offer a wide range of floor coverings. They may differ in characteristics and cost. When choosing any of them, it is necessary to take into account all the pros and cons of a particular material, as well as its properties. Most often, indoor floor finishing is done using parquet, laminate, linoleum, carpet, and floor tiles.
Parquet flooring is natural; it should be chosen for dry, ventilated rooms, but not for the kitchen or bathroom. If necessary, the parquet can be easily dismantled and then laid back. Laminate differs from parquet in that it consists of 4 layers:
- Stabilizing.
- Carrier.
- Decorative.
- Protective.
Laminate requires less careful maintenance than parquet, but is also not moisture resistant. Linoleum has the same properties, which is not suitable for rooms with high humidity. Carpet, which has increased sound insulation, includes 4 main layers:
- Fixing.
- Primary basis.
- Pile.
- Secondary base.
Carpet flooring in the kitchen and hallway wears out quickly because it is sensitive to moisture. Ceramic tiles are ideal for the kitchen, bathroom and hallway, as they are easy to clean and have a long service life. When performing work step by step with your own hands, you must remember that choosing low-quality materials can cause them to swell, shift, or other unpleasant consequences.
Laminate
This material is based on a wood-polymer composite. The price of laminate flooring is absolutely not high, which makes it very affordable.
The disadvantage of this material is that it is made from phenol-formaldehyde resins (a substance of synthetic origin). To avoid unpleasant health consequences, it is best to choose E1 class laminate.
Laminate flooring requires a perfectly prepared base (it must be absolutely flat), otherwise it will not be possible to avoid scattering when installing it.
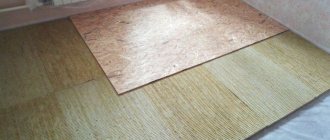
Experts recommend laying this flooring on OSB sheets or plywood. However, if a special polyethylene foam backing is used during installation, then this step can be skipped.
If the condition of the joists is good and does not cause concern, then the new coating can be laid on them as well.
However, on an old wooden floor, very often the joists themselves are quite worn out, and their repair is impossible or does not guarantee durability. In this case, they will have to be dismantled in order to subsequently install new ones. When removing joists, remember that they may be quite firmly attached to the base. You need to be careful and careful to prevent severe destruction of the concrete base and not add unnecessary worries to its restoration.
After removing the joists, the subfloor is cleaned as thoroughly as possible so that you can proceed to further steps.
In the case when, after removing the old finishing coating, a concrete screed underneath is exposed, it is inspected most carefully. You need to trust that the concrete is strong in itself, and repairing such a surface is not necessary.
The screed must be tapped - this will help to remove areas of its detachment, which must be removed to a “healthy” base. The surface is checked for the presence of loose areas, those where, due to a violation of the pouring technology, the solution has not gained strength or has been eroded due to exposure to moisture. Such areas also require cleaning.
Inspection of the base (logs and concrete)
To continue repairing the floor yourself, it is important to understand the condition of the base. If there were logs under the boards, you need to understand whether they are in proper condition. If the bars have noticeably deteriorated (succumbed to fungi or become rotten), they need to be replaced. To be on the safe side, professionals recommend treating the wood (joists) with an antiseptic compound. If the joists have to be removed, the base base must be thoroughly cleaned.
When examining the concrete screed, you need to make sure that there are no areas of delamination. To do this, you need to carefully tap the floor. If there are no such nuances, you should simply clean the screed thoroughly from dust and excess debris.
Wood floor repair
If you have a wooden floor, you can repair it yourself only if you are sure that its base is in good condition. In this case, repairing the wooden floor in the apartment with your own hands will be of a cosmetic nature. It includes the following stages of work:
- cleaning the surface of the floorboards from varnish using a sanding machine;
- replacing rotten and dried out elements with new ones;
- checking the fastening of the floorboards. If they are not securely fastened enough, you can fix this with nails or self-tapping screws;
- various cracks and holes from fastenings are covered with putty intended for wooden surfaces. Large gaps are closed using a chopper;
- putty areas are rubbed down with sandpaper or a grinding machine;
- The surface is cleared of construction debris and dust for further application of paints and varnishes.
This kind of floor repair can be done independently and at minimal cost.
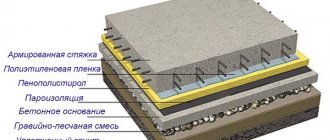
Types of subfloors and possible defects
It is worth understanding that the final outer floor covering is only the visible part of the entire floor pie. Repairing only it is not enough when it comes to major repairs of the floor and its necessity. In fact, the main part of the floor is located below, under the finishing coating, and can be presented in two variations - wooden and concrete.
Table. Main types of floors.
| Type | brief information |
| Concrete floor | This is a strong, heavy and durable base, which is made from a cement mixture - in other words, it can be concrete floors and a concrete screed poured onto them. Typically, such options are found in modern houses, as well as in old panel houses. Apartments located on the first floors in Stalin buildings may also have a concrete base. Typically, such flooring options do not require repairs for many years, but much will depend on how well the screed was poured. If the technology is violated, the floors can become quite fragile and begin to crumble over time. In this case, major repairs may be required. |
| Wooden floor | This option is a boardwalk laid on logs standing on a concrete or wooden base. Moreover, the logs can be stationary or adjustable. Typically, such floors are found in wooden houses, and can also be present in Khrushchev and Stalin buildings. By the way, such floors were often installed on top of a concrete base. To overhaul them, you need to remove old boards, as well as joists, and replace them completely with new ones. Or you can remove all wooden elements and pour a concrete screed. |
Gaps in the wooden floor
As for defects, depending on what the rough base is made of, they can be different. In general, floors must meet certain requirements of aesthetic, sanitary, and operational standards. The following defects are distinguished in concrete floors:
- abrasion;
- subsidence;
- the appearance of chips;
- cracking.
Concrete screed repair - sealing cracks
On a note! Most concrete floor defects can be easily corrected by grinding and applying self-leveling mixtures, that is, self-leveling floors. Major repairs are only necessary if the screed is severely damaged and has deep cracks.
If you regularly monitor the condition of your floors and promptly eliminate minor defects such as small chips, you can easily avoid the need for major repairs.
As for wooden floor defects, these can be:
- floor subsidence;
- the appearance of creaking floorboards or logs;
- rotting;
- the appearance of cracks, chips;
- the appearance of fragility and brittleness of wooden elements;
- infection of wooden elements by bacteria, fungus, parasites.
The rotting process is the destruction of cellulose under the influence of microorganisms and fungi
If the wooden floor is warped, then most likely some of the joists have failed. In this case, you will need to disassemble the wooden base and replace the old logs with new ones. The same will have to be done if the floors sway strongly when walking.
To get rid of squeaks, sometimes it is enough to break through the places where the floorboards join the joists. But if after this the creaking does not disappear, then you will have to look for defective lags and change them, since they will be the cause of the unpleasant sound.
The floor in the apartment creaks, how to fix it
In general, the end result of floor repair should be the complete elimination of all defects, from cosmetic and aesthetic to structural. In the first case, sometimes you only need to change the floor covering and update it, but in the latter, a major overhaul will be required.
Advice! Wooden floors, especially on the first floors, are recommended to be inspected and tapped at least once a year. If a dull sound appears, then this is one of the main signals that the processes of wood rotting have begun, and the boards will soon have to be replaced. If there are large gaps between the floorboards, you should think about the fact that the joists are beginning to deteriorate and collapse.
It is important to understand that the durability of floors largely depends on how they are used. Thus, frequent rearrangements of furniture, heavy objects falling on the floor, etc. can have a negative impact on them. Increased humidity, which is usually observed in apartments on the ground floors, as well as in bathrooms and kitchens, will also negatively affect the floors. To avoid rapid damage to the floors in this case, you should ensure that good air exchange is ensured between the layers of the floor cake. First of all, this applies specifically to wooden floors.
Wooden floor
A complex, but often simply necessary operation - complete removal of the old screed
Of course, the process of completely dismantling a screed using a breaker tool is very tedious, noisy and dusty, but no other method has yet been invented
This requires some care to avoid damaging the concrete floor slab. The screed is cut into separate pieces, which are immediately raked to the side with a shovel and packed into bags for removal
It is not recommended to use even small fragments as material for filling a new solution, since they will not enhance, but rather worsen the quality.
After removing the old screed, thoroughly clean the surface - as described above.
Base surface repair
Whatever the floor was, it was not planned for the flooring in the future; the concrete base under it needs to be put in order. Thus, poorly sealed seams between floor slabs, cracks around the perimeter of walls, potholes or cavities, etc. may be exposed.
Such repairs are necessary even if a new screed is planned to be poured. The solution may not penetrate into these flaws; air cavities will remain there, reducing the solidity of the coating and becoming the starting point for the destruction of the screed
This is especially important and mandatory if the screed will be poured onto a separating layer or onto a waterproofing film (floating screed)
How to refine linoleum?
Repairing linoleum is quite easy. Typically, damage such as small swellings, cracks and tears is carried out by introducing special glue under the coating (using a syringe). The linoleum is pressed to the base, straightened and a small weight is placed on top.
Linoleum repair - click to enlarge picture
If large areas of linoleum are damaged, they are removed and replaced with new ones.
Need for floor repairs
The floor is one of the few places in the apartment that can withstand constant load every day. In the most trafficked places, the coating gradually wears out: the top layer of the tile wears out, the parquet begins to creak, the laminate becomes deformed, and linoleum loses its attractiveness. This problem requires a timely solution, because no matter how you transform the interior, it will not look decent with a poor floor.
The floor covering can be repaired (restore parquet), the covering itself can be replaced (laminate, linoleum), or the floor can be completely replaced from scratch. Whatever you choose, it all requires a significant investment of money, time and effort.
Carpet
Carpet is a covering that very quickly became less in demand. It can give the room incredible comfort and coziness, but after a short time the coating loses its presentable appearance. The villi quickly lose their freshness, and the former softness and beauty simply disappear. It is difficult to remove stains from carpet and clean it from small debris. Therefore, if renovations are being done in an apartment where there are small children or pets, then it is better not to choose such a floor covering.
In addition, carpet can be dangerous for small children. This is due to the fact that due to the difficulty of cleaning it and the high probability of dust particles accumulating between the pile, there is a high probability of developing allergies.
However, if all these nuances do not bother you, then you can safely lay the carpet. There will be no difficulties in this matter, since the installation principle is very simple and similar to laying linoleum.