Composition and characteristics of stone-like plaster
Depending on the type of material, the composition of the plaster mixture may differ. However, there are basic components that should always be present in the mixture:
- A cement or gypsum composition is used as a base.
- Granular elements that include sand, quartzite, mica...
- Thickeners are added to give the mixture the desired consistency.
- Dye to give the solution a suitable shade.
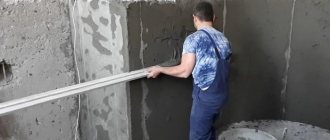
In rooms, stone-like plaster is applied in a thinner layer
The use of such a composition makes it possible to impart strength, moisture resistance and increased wear resistance to the coating. Plaster with a stone effect not only gives the walls a beautiful appearance, but also creates a reliable coating.
Varieties
Modern mineral plaster for facades is available in a large number of options. They differ in composition, color and size of the fractions that are used as filler. Large additives provide texture to the coating.
When choosing, it is important that the mixture complies with GOST and international standards. This is an indicator of quality.
Mineral plaster is divided into different categories. But there is a basic classification:
- decorative;
- façade
They are not much different. But the facade is subject to increased requirements for resistance to moisture, as well as atmospheric influences.
Façade compositions usually include mixtures with large-sized fractions. This provides relief. Facade mixtures also contain additives to improve the UV resistance of the coating.
When mineral plaster is applied to facades, its layer is usually at least 5 mm. This explains the high consumption of the composition.
The texture of the coating depends on what filler is used.
Types of fillers
You can choose the future coating texture on the facade. To do this, focus on the filler.
The filler is like this:
- Glass
. The coating will not be scratched. The filler has no sharp edges. But it looks impressive. Creates shine on the facade; - Clay
. The cheapest option. You can choose any color. More often used for mineral-based decorative compositions; - Ceramic
. Rare filler. All due to the complexity of production. But the appearance is unusual; - Anthracite
. Made from waste from the coal industry. Gives the composition a dark tint. Rarely found on shelves; - Quartz
. A common type of filler. Inexpensive, but visually looks beautiful. Easy to apply; - Marble
. This filler is durable. The wall resembles natural stone. Suitable for interior and exterior work. Difficult to apply; - Mica
. And this is just terrasite plaster. Gives the wall an original appearance. It has a delicate shine.
Now you can decide what type of litter to use. Please note that not all of them are easy to find on sale.
Fractions and their sizes
The result of wall treatment is largely influenced by the fractions of fillers. Or rather their sizes.
They are divided into several categories:
- Rough textured
. Size from 5 mm or more; - Large-textured
. The fraction has dimensions in the range of 3.5-4 mm; - Medium textured
. This is up to 3 mm; - Fine-textured
. No more than 0.5-1 mm; - Fine-textured
. Here the size is less than 0.5 mm.
For facades, plasters with fractions ranging from coarse to medium texture inclusions are better suited. But you can take a more delicate composition.
What are the advantages of this type of façade finishing?
Decorative stone plaster, like any other material for wall decoration, has certain advantages and disadvantages. It is worth noting that there are significantly more pros than cons.
- Good indicator of vapor permeability. Due to this, the material can “breathe”, which is very important if the cladding is carried out indoors. Decorative stone-like plaster allows you to create the most favorable indoor microclimate.
- Can withstand quite heavy loads, mechanical stress and shocks.
- It tolerates sudden changes in temperature and is not influenced by aggressive factors. Plaster of this type does not pose any threat from high humidity or low temperatures.
- For a long time it can retain its original characteristics and properties, including color and appearance.
- Has a long service life.
- The solution is easy to use.
- The finished coating is very easy to care for.
The disadvantages are that over time, corrosion may appear on the metal surface due to the water base of the plaster. You should not apply the material to insulation materials such as mineral wool, as this will negatively affect vapor permeability.
Stage one: marking and texture
For work, use finishing or starting putty. If the surface requires a grain size that is different from the starting putty, then it is better to use it. This solution is more suitable for imitation, despite the fact that additional texture will be created. If you need to depict a facing brick, use a finishing putty that provides a perfectly smooth surface.
A layer of mortar 0.5 cm thick is applied to the wall and distributed evenly. Immediately create a rough surface. To do this, use simple materials:
- foam sponge,
- hard bristled roller,
- hard fabric folded into a ball
- steel wool for cleaning kitchen utensils.
With short, jerky touches, they leave marks on the wet putty, filling the prepared area with them. This technique gives the surface the realism that is characteristic of rough natural stone.
Ways to imitate a stone wall
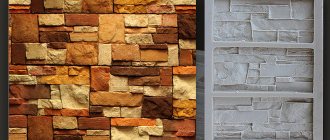
So, let's look at what you can use to make a wall in your house or apartment like in an ancient castle. If we do not take into account the cladding made from natural prepared material, then there are several popular methods of imitation:
- From tiles. This does not mean tiles, but relief tiles made from gypsum or cement-sand mortar. Artificial stone is sold ready-to-use, already painted, and is used for interior decoration and on facades. Most often this is an imitation of torn slate, limestone (travertine), dolomite, sandstone or rock. You can make such tiles yourself by pouring the solution into rubber molds. But this is a labor-intensive process that requires special equipment (vibrating table) and painting materials for high quality.
- Stone-look panels. Plastic panels are often used for cladding the facade of a building. The advantages of this method: speed of work, practicality, attractive appearance, reasonable price. The textures are the same as those of stone made from gypsum slabs - slate, limestone, etc.
- Made from polystyrene foam. This cheap way to create artificial stone requires creativity and certain skills. The essence of the decorating process is to cut out masonry on a sheet of polystyrene foam (foam plastic, penoplex, etc.). The surface is roughened using hard brushes or other available tools. After the finished panel is glued to the wall, it is painted in a suitable color.
- Made from plaster. This is no less simple, but more practical and, perhaps, the most common type of stone finishing. Plastic mortar provides enormous opportunities for simulating any stone surface. For decoration, I will use gypsum, cement-sand (on the facade) or polymer plasters (acrylic, silicate, silicone). They may contain mineral fillers: sand, marble chips, rounded granules, etc., which help emphasize the created effect of the stone texture. Below we will look at this finishing method in detail.
Stone facade: why is it difficult
The development of building exterior design in most cases aims to provide an exclusive appearance at minimal cost. In fact, making a building beautiful in appearance is not difficult: authentic expensive materials do not require any tricks; it is only important to follow the installation technology so that the facade is not only beautiful, but also durable.
However, the cost of constructing a structure entirely from natural stone is prohibitive, and it is also impossible to meet modern energy efficiency trends with such material. You have to get out of it by using available materials for the load-bearing base and thermal protection, subsequently hiding the resulting “sandwich” under a layer of attractive finishing.
Most modern solutions to imitate natural stone finishes use homogeneous slabs mounted on a system of supporting profiles. If climatic conditions and the deformability of the building allow, these slabs are attached with glue. The disadvantage of both methods is obvious: the seams of the coating are not tied to the configuration of the architectural elements, but to the form factor of the material itself. This introduces dissonance into the architectural ensemble, which is why even elite facades look unnatural, their fakeness is too obvious.
Types of stone imitation
To imitate stone during interior decoration, a variety of compositions can be used: gypsum, clay, concrete, lime and others. Both mortar compositions and cheaper putty options can be used. The technique for creating a coating is divided into several types depending on how deeply the design will be worked out.
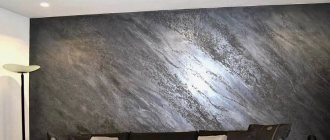
Smooth stone surface
The decorative coating on a smooth surface in the form of stone is similar to decorative plaster Travertine. Usually, to create a pattern that imitates stone, solutions with different colors are used. In this case, the prepared composition is applied to the prepared surface in several stages. Then a multi-layer coating with different patterns of stones is formed. At the final stage, the wall is processed with a grinding machine or a trowel to create an even coating.
Textured
These finishes include flat surfaces with small indentations that imitate the appearance of a rough stone surface. The textured finish may have a small decorative pattern or rather convex areas. For example, finishing such as travertine or Roman stone can be done in two ways:
- continuous, in which a uniform layer is formed, decorated after partial drying (using tingling touches of a brush, dishwashing sponge, etc.),
- partial, in which the underlying layer is made even, and the proper one is applied partially (with chaotic strokes), without completely covering the underlying layer.
Textured finishes also include decorative stone finishes that imitate facing with stone slabs or masonry with a shallow depth of grooves applied with a sharp tool.
Masonry
One of the most common design options is to create brick or stone masonry. In this case, seams are formed on the wall, resembling recesses between individual elements:
- The building mixture is applied to the wall.
- After the solution has partially dried, a seam is formed using a trowel or chisel.
- You can create a pattern in another way, for this you will need a stencil. It must be applied before applying the solution. When the mixture completely covers the wall, all that remains is to remove the stencil.
- In the final stage, it is necessary to process the coating with a sanding disc.
Flat-relief
The next deepest relief layer elaboration technique is suitable for simulating masonry made of blocks, bricks or flat stone tiles. In this case, the recesses imitating seams do not exceed the thickness of the layer, and the texture of individual blocks is set in very fine relief. An example of such a technique is wood-look plaster performed with special silicone molds, or an imitation of a brick wall, in which decorative stone from ordinary gypsum plaster is obtained by creating a grid of shallow joints.
In the convex technique, the foundation is finished with plaster that imitates cobblestone masonry. In this technique, the relief height is more than 1 cm.
Convex
The greatest resemblance to natural stones is achieved, of course, by imitating the original. Notches, chips and convex areas are formed in a chaotic manner. Pieces and blocks most often have convex fragments. This is easy to achieve by giving the rough decor an external resemblance to its analogue.
The greatest resemblance to natural stones is achieved, of course, by imitating the original.
Imitation with impressions
You can imitate natural or artificial stone using impressions or matrices. The process consists of several stages:
- The prepared solution is applied to the pre-treated wall.
- A matrix, previously moistened with water, is applied to the wall.
- The matrix is pressed tightly against the wall to form a pattern, after which it is removed. This must be repeated until a uniform pattern is formed on the wall.
- If a section of the material comes off the coating, it must be reapplied and then the procedure repeated.
- Uneven surfaces on the wall should be sanded using a sander.
Using an impression to imitate masonry
Laying stone - step by step instructions
Laying decorative stone with your own hands begins with calculating the required amount of this stone. We multiply the area of that part of the walls that will be finished with brick or stone facing tiles in the apartment by 1.1, i.e. we give a reserve of 10% for trimming and rejecting the material.
Step 1 preparing glue
Pour the adhesive composition into a bucket and, having read on the label how to prepare it correctly, add water and mix thoroughly with an electric drill with a mixer attachment. Let it sit for 5 minutes, then repeat the operation. As a result, the glue should acquire the consistency of thick sour cream.
Step 2 laying the first row
Laying the first row can start from the floor, or from the ceiling. It is believed that when laying from the floor, the tiles following the first row, having support, will not slide down the wall. If you lay it from the ceiling, the solution falling from the spatula and tiles will not stain the tiles laid below. Both are correct. Using a notched trowel, apply the adhesive solution to part of the wall. The thickness of the glue layer should be about 7-8 mm. Press the appropriate number of tiles. Carefully level them to the building level. Then repeat until the first row ends. Subsequent rows must be laid so that the distances between the rows are the same, the width of the vertical seams must also be uniform. This is achieved by using plastic dividers in the shape of a cross. After the masonry has dried, the delimiters are removed. Another important point: vertical seams in adjacent rows should not coincide, that is, one should not be a continuation of the other.
Step 3: finishing the corners
Particularly often, corner cladding has to be done when finishing the front door with decorative stone, which, if the work is done “with your own hands,” can create difficulties for an inexperienced performer. If the stone is made in the form of tiles, the corner can be made in two ways: with dressing according to the pattern of brickwork, and with cutting the end of the tile at an angle of 45°. Trimming is done with a grinder or on a tile cutting machine. It is easier to finish a corner if the purchased decorative stone contains special corner elements.
Step 4: decorating the edges of the masonry
The expressiveness of decorative stone comes from the correct design of the edges. A possible option is to trim the free edge of the stone and then sand it with sandpaper.
Step 5 sealing joints
The joints between the stones are sealed with the same glue on which the tiles were laid. A budget option is to use gypsum putty. The sealing is carried out using a construction syringe, vaguely reminiscent of a pistol. The adhesive solution is squeezed into the space between the stones. Excess is removed with a spatula and a damp cloth.
Step 6 finishing
Finishing refers to the tinting of joints if the composition used differs from the color of the stone. It is advisable to cover the masonry with two layers of acrylic varnish. This will make it strong and durable.
Characteristics of types of plaster
Decorative finishing is carried out using plaster based on silicone, acrylic (polymer), lime (mineral), silicate.
Silicone
Due to synthetic silicone, the mixture becomes plastic, but at the same time durable. The service life of silicone plasters reaches up to 20 years, and they also have high adhesive properties to many substrates:
- concrete;
- brick;
- tree, etc.
Silicone plaster easily takes and holds almost any shape, and also repels moisture. Throughout the entire period of operation, the technical characteristics of the material are not lost.
Among other advantages, it is worth noting mechanical stability, vapor permeability, and prevents the development of mold and fungi. The silicone coating effectively resists the effects of solar ultraviolet radiation and low temperatures. In addition, the silicone composition is fire-resistant, environmentally friendly, and safe. After applying the mixture, periodic updating is not required.
However, with all these advantages, there is a significant drawback - high cost. In addition, the coating requires careful care to avoid yellowing.
The coating is resistant to adverse weather conditions
Polymer
Polymer compositions are made on the basis of acrylic resins, which are the main binding component. Often, an acrylic water-dispersion composition is used to imitate stone finishing. The service life is also long - from 15 years and, unlike silicate, silicone analogs, it is cheaper.
Polymer plasters can be firmly fixed to almost any base, be it brick, gypsum block, aerated concrete, concrete, wood and other varieties. In addition, the material consumption is small.
Among the main advantages:
- resistance to mechanical load;
- environmental friendliness and, accordingly, safety;
- the finished coating is easy to maintain;
- resistance to moisture;
- painting the polymer coating does not cause difficulties;
- the mixture sets quickly;
- preliminary priming is optional;
- the surface can withstand low temperatures.
Note! Acrylic plaster is only slightly inferior to its silicone counterpart, although it is less resistant to ultraviolet rays. Another drawback is that the coating accumulates static electricity, which actually attracts dust.
Polymer plaster is an incredibly elastic material
Silicate
Silicate solutions are based on liquid glass (an alloy of potassium silicate and sodium). The service life of the material far exceeds the presented analogues and other types of finishes - the coating can please the eye for 50 years.
There are brands of plaster to which some components are added:
- mica;
- chit;
- sand.
The mixture is easily applied to embossed surfaces, and goes on sale in a ready-to-use form. The main advantages of silicate plasters:
- heat resistant;
- waterproof;
- vapor-tight;
- granular;
- textured;
- fire resistant.
The coating changes color when wet. However, after the surface dries, the original appearance returns. The solution sets quickly, and therefore prompt action is required. In addition, before covering the walls with a silicate mixture, they need to be treated with a primer on the same basis.
Silicate plaster is simply ideal for external coatings
Mineral
The mineral mixture is based on lime hydrate with the addition of stone chips, colored clay and other components. In some cases, adding dyes to the composition provides the desired effect. In finishing work on the façade of a building, preliminary reinforcement of the surface is required, which is not done during interior work. In the absence of a mesh, impregnation with a penetrating primer in 1-2 layers is necessary.
The advantages of mineral plasters are that they differ in a number of properties and, in particular, this mixture:
- vapor permeable;
- frost-resistant;
- resistant to temperature fluctuations;
- environmentally friendly;
- safe;
- does not contribute to the formation of condensation.
Walls covered with mineral plaster are easy to maintain. In addition, it is a cheap material and does not shrink during the drying stage. But it is worth considering a number of points. Firstly, you must strictly follow the instructions when mixing the solution. Secondly, the choice of shades is limited. Thirdly, the mineral mixture is difficult to apply.
Important! The service life of the coating does not exceed 10 years; the surface cannot withstand mechanical or vibration effects.
The filler of mineral plaster plays not only a decorative role
Choosing materials for exterior decoration of the house
For a long time, plaster based on cement and sand has been widely used as the main finishing material. Today, due to the advent of new, more efficient materials and technologies for their application, cement-sand plaster is used mainly for applying a rough base. .
The range of plaster mixtures in most construction stores is replenished every year with an increasing number of new items and modifications presented in various price categories.
Each category of finishing material optimally corresponds to the parameters of a particular surface of load-bearing walls. Therefore, the result of finishing work largely depends on the correct choice of mixture.
All plaster mixtures on the market, according to the type of binding components, can be divided into the following varieties:
- mineral;
- water-based polymer;
- epoxy and polyurethane;
- made on the basis of silicone;
- silicate.
Mineral decorative plasters
The most common mineral mixtures
This category of dry mixtures for façade cladding is used as semi-liquid or thick solutions. When making solutions from mineral mixtures, ordinary water is used as a solvent. Products of this type are good because they can be prepared directly on site.
Mineral grout plasters are distinguished by their affordable price and fire resistance. Mineral-based finishing mixtures are characterized by high vapor permeability. As a result, walls covered with such materials breathe, which is, of course, good. But they allow moisture to pass through, which is bad.
In addition to insufficient hydrophobicity, the material is characterized by such disadvantages as lack of elasticity and low degree of adhesion. Therefore, when choosing mixtures for wall cladding, you should take into account that such materials will not adhere well enough to a perfectly smooth surface.
Polymer mixtures based on polyurethane or epoxy
The photo shows a relief applied on polyurethane plaster
Anhydrous polymer plasters are produced using either an epoxy or a polyurethane binder.
Such compositions have a number of advantages, including:
- high wear resistance of the finished coating;
- resistance to environmental factors;
- excellent adhesion to most known substrates;
- non-flammability;
- acceptable degree of hydrophobicity;
- acceptable price;
- wide range of colors.
Polymer plasters are universal products that can be applied to most pre-primed hard surfaces, including brickwork, concrete structures, stone walls, etc.
However, against the background of these advantages, it is necessary to note some disadvantages. For example, when heated above +140º C, the binder component decomposes, releasing toxic substances.
Thus, when heated to the specified temperature, polyurethane-based plaster releases cyanide, and mixtures based on epoxy resins release chlorine compounds.
Water-based polymer mixtures
In the photo - acrylic plaster
Water-based polymer plaster mixtures are less toxic than their anhydrous counterparts. The range of mixtures on the market is represented by polyvinyl acetate, acrylic and styrene-butadiene modifications.
Coatings based on such mixtures differ:
- optimal degree of moisture resistance;
- elasticity;
- resistance to the negative effects of environmental factors;
- resistance to ultraviolet radiation.
Along with numerous advantages, such plasters have one significant drawback - they are unstable to temperature changes and, in particular, do not tolerate elevated temperatures well. For example, such mixtures cannot be applied to surfaces heated above + 90º C.
Silicone based plaster mixtures
Applying a Silicone Based Finish
Mixtures made on the basis of silicone, used as a binding component, are a modern development with many advantages, including:
- antistatic properties of the finished coating;
- optimal degree of hydrophobicity and, as a result, resistance to precipitation;
- resistance to long-term exposure to direct sunlight;
- lack of strict requirements for the quality of the base on which the plaster will be applied;
- minimum maintenance of the facade lined with such plaster;
- wide range of colors.
Important: In order for the plastered coating to be sufficiently strong and durable, before finishing work the surface of the base must be coated with a silicone primer.
Silicate plaster mixtures
Range of silicate mixtures
Ready-made silicate plaster mixtures for exterior use are made using “liquid glass” as a binder component.
Materials of this type are sold in sealed containers in ready-made form. It is this type of plaster that demonstrates the optimal degree of hydrophobicity, as it is practically vapor-tight. As a result, the mixture can even be used for finishing basement floors.
Technology of decorative plastering of facades with dry mixtures
When starting to finish the facade, we purchase mixtures for applying decorative printed plaster. As a rule, dry mixtures on the market are sold in standard packaging in 25 kg bags, which is practical and convenient. We purchase the dry mixture in accordance with the type of surface being treated.
Required Tools
Decorating the surface with plaster indoors or on the facade is the most promising type of finishing. To do this you need to choose the right set of tools:
- a suitable container for mixing the solution (when purchasing dry mixes);
- electric mixer;
- rule;
- spatula with trowel;
- steel graters with a width of 200 to 250 mm;
- building level;
- bush hammer;
- boaster;
- mold or matrix;
- rags.
In addition, for marking you will need a tape measure, a pencil (marker), and masking tape. Also, do not forget about basic safety measures, in particular – overalls, shoes, gloves. If necessary, wear a hat and glasses.
To apply the solution and create texture you will need a set of tools
Imitation brick made of porcelain stoneware
Ceramic granite is the most reliable and high-quality material for creating bricks. It differs from ceramics in that during production granite shavings are added to the solution, and then the material is fired twice in a kiln. This is what gives it such strength and durability.
The advantages of porcelain stoneware bricks include:
- Full resistance to temperatures (withstands frosts down to -50)
- Moisture resistance
- Easy to clean and does not absorb dirt
- Service life from 30 years.
The colors can be any - on store shelves there is a large selection of shades that will suit any interior.
Porcelain stoneware brick looks original and interesting in the bathroom, dining room or kitchen, as well as in the hall.
Application technology
The essence of the technique of simulating natural materials comes down to three main stages:
- Create an external surface texture - blocks, cobblestones, bricks, solids.
- Give the necessary shape to the relief, which is typical for blocks, cobblestones, bricks, as well as surfaces made up of these elements.
- Use paint close to natural shades.
It is worth highlighting some special techniques. With the “Wild Stone” technology, plaster is applied to a small section of the wall, after which it is covered with a finishing coating and then a trowel is used to give the appearance of a stone surface. Upon completion of drying, veins are made by coloring by rubbing into the surface with a sponge.
The Marmorino technique is performed by knocking out rectangular boundaries with a chisel on completely dry plaster. The “Torn Stone” style is designed in an illogical way, but the notches are made in a chaotic manner.
Preparing the base
In work where you need to create a decorative coating with maximum imitation of natural stone, every stage is important, including preparation. This especially applies to interior decoration. The main thing is to ensure adhesion of the plaster to the base, which will allow you to lay the material in an even layer. Subsequently, dirt stains should not appear through the finish.
The scope of preparatory work comes down to the following:
- The surface is cleaned of all contaminants without exception.
- Uneven walls are leveled using cement-sand mortar or gypsum mixture.
- If there are chips, cracks, or large gouges, the defects are repaired with cement and sand and the use of reinforcing mesh.
- If necessary, the walls are treated with special degreasers or antiseptics.
- Give time to dry.
- In order to increase the adhesion of the plaster to the wall, the surface is primed. This especially applies to gypsum panels, OSB, and fiberboard.
Attention! To decorate the foundation of a house like a stone, insulated with foam plastic, you definitely need a concrete “crust” and reinforcement with fiberglass mesh (2 layers). The first is on top of a 20 mm thick spray, the second is on top of another spray of the same thickness. At the end, the mesh is covered with a final coating of 25-30 mm.
Before starting work, it is necessary to eliminate defects and apply a primer
Applying plaster
Natural stone plaster is not applied all over, but in sections of 2-3 m2. The specific parameters of the processing area fully depend on the skill, speed of work and the technology used.
Creating the necessary structure is carried out using different techniques:
- Using a trowel involves distributing the plaster mixture over the surface, making short strokes. The material itself is laid using the overlapping method. Trimming with a trowel creates a small “fur coat” on the walls.
- Rollers also help create an original pattern with an interesting texture.
- Using a brush to create finishing coatings is not difficult, and the work is done quickly.
- It is convenient to apply plaster under wild stone with a sponge, which allows you to almost exactly imitate natural contours with a great emphasis on naturalness.
- The machine method of applying the plaster mixture ensures a high level of adhesion of the solution to the base. In addition, the work speed increases and less material is wasted.
It’s easier to create relief on the walls by first preparing a suitable matrix with the desired pattern. In the case of manual formation of seams, it is advisable to spray a little water on the surface, which will make the mixture pliable.
The working material is applied to the surface in sections of 2-3 m2
Preparation of the composition
Dry ready-made compositions for plaster require the independent preparation of a homogeneous solution. To mix the ingredients, it is better to use a wide container or a construction mixer. Afterwards, the composition is left for 10 minutes to polymerize, and then the procedure is performed again.
The prepared mixture is used immediately after preparation, so you should correctly calculate the required volume and time of application to the surface. The quality of the coating depends on compliance with this point. To obtain the deep texture of the stone, the composition must have a thick consistency, which will create a relief.
The treated surface acquires the properties of decorative plaster. This coating is characterized by high vapor permeability, which eliminates the formation of condensation, and is resistant to mechanical stress.
Main components of the plaster composition
You can get the texture of natural stone and achieve the effect of a relief surface using special mixtures. The working compositions are based on crumbs, which are obtained by crushing natural materials. Marble and granite are often used for manufacturing.
Cement, acrylic and silicone resins, silicate are used as a binding element; the plasticity of the composition is ensured by the addition of lime. Decorative properties are provided by sand, mica, and mineral pigments.
The composition of plaster solutions includes plasticizers - PVA, soap solution. To make it resistant to fungus and low temperatures, special glue is added.
How to prepare decorative compositions yourself
The finished material allows for high-quality surface finishing. Imitating stone from plaster with your own hands will allow you to save on expensive compounds. A simple option consists of sand and putty. If necessary, water is added to the working mass.
To perform external work and finishing work, working material is used, which includes:
- lime - 1 kg;
- cement - 1 kg;
- sand - 2 kg;
- water;
- liquid glass (5% by weight).
A mixture made from lime paste, water, marble sand, cement and manganese peroxide is durable. Self-preparing stone plaster requires following the recommendations.
In this case, the water temperature should be above +10℃, lime dough should be prepared from the dry component. Binders are used in combination, for example, gypsum, lime, cement.
Main components of the plaster composition
The described type of raw material owes its name to a natural analogue, but the “wild stone” plaster will be obtained after hardening is complete.
Stone plaster ingredients:
- Base (gypsum, cement, lime in different proportions);
- Granular inclusions or natural components (sand, quartzites, mica, stone chips or flour);
- Plasticizers and thickeners;
- Pigment and natural dyes (ochre, red lead, manganese, vitriol).
It is important to balance the texture, shades and percentage of stone chips. The visual effect depends on the proportion of the composition, dyes and method of application.
The visual effect depends on the proportion of the composition, dyes and method of application.
Features of plastering work on the facade
Experts believe that the easiest way to make decorative stone is based on a ready-made mixture, but you can prepare the composition yourself. You can get an imitation of any rock or ornamental gem.
Universal cladding for facades, characterized by high durability and aesthetics. External work is carried out in compliance with the technology indicated on the packaging, adjusted for temperature and humidity. Sometimes you have to moisten the surface so that it does not dry out. Overheating in the sun with rapid polymerization is undesirable; it will complicate decoration.
Universal cladding for facades, characterized by high durability and aesthetics.
How to do it yourself, stages of implementation
To reduce repair costs, it is recommended to master all stages of application. It can be used to cover walls and foundations, steps and columns. After application, the relief is extruded with a polymer stamp, then the seams are formed.
To obtain the highest quality coating, use three layers:
- Starting plaster will eliminate all wall defects and prepare the surface; this layer is not leveled.
- The primer layer is applied no earlier than 2-3 hours later, when the base has hardened.
- The covering layer is the surface on which the stone effect is formed, decorating in the way you like.
After application, the relief is extruded with a polymer stamp, then the seams are formed.
Obviously, it is easier to decorate any vertical or inclined surface with an imitation of wild rock using special plaster. This simplifies the processing of spherical, arched and curved shapes, which is difficult when facing with stone blocks. The finished surface is difficult to distinguish from natural granite or basalt, and plaster is much lighter.
Preparatory stage
- remove old finishing material;
- carefully scrape off all the scraps that, one way or another, may interfere with you in the future;
- inspect the wall for cracks and irregularities;
- if you notice cracks, then use a hammer and chisel to make them a little wider and fill the holes with a deep penetration primer - this will help prevent the appearance of always unwanted mold;
- carry out the initial treatment of the wall surface with a primer - it is not necessary to achieve a perfectly smooth surface, since after puttying the priming procedure will have to be repeated;
- if the surface is very uneven and there are noticeable defects, then go over the wall with plaster, and also cover the cracks previously treated with primer;
- to achieve a perfectly smooth wall after plastering, it makes sense to use gypsum-based putty - it is not so rough in consistency and will help make the wall flawless, eliminating those irregularities that plaster, for objective reasons, cannot cope with;
- the final touch is re-priming the surface, this time we are pursuing the goal of achieving excellent adhesion to the decorative material that will be used to imitate brick, the treatment must be carried out carefully, generously lubricating those areas that very quickly absorb the solution.
Popular articles Corrugated paper rose
How to check if your wall is ready for the next stage? Everything is very simple: run your hand over it - if you don’t feel any obstacles or unpleasant roughness, it means you have successfully completed such a tedious, but still necessary preparatory stage.
Cost of plastering finishing works
The price for the services of professional craftsmen is ultimately more expensive than the materials purchased for wall decoration. This is not surprising, since the work of builders is highly valued.
The price for the work will be per square meter. Wall decoration with decorative plaster can be ordered cheaper from private craftsmen working without the mediation of construction companies. Private traders rarely give a guarantee for work; even reviews help little.
When paying professionals, they order a labor-intensive type of plastering and complex reliefs. It is not in the interests of builders to delay the completion of work, which has a positive effect on the speed of repairs. Imitating stone from plaster with your own hands will take much more effort.
The “stone-like” interior effect for everyone implies an individual vision of design. Rough brutal surfaces of the castle wall, or delicate brickwork, bright red shades, muted brick, or inconspicuous beige. There are a huge number of options for both textures and color palettes. But even an amateur designer will choose the right option for any room.
Advantages of stone plaster
The popularity of stone plaster must be justified in some way: after all, it is extremely popular among people of various social statuses, ages and even tastes.
So, what are the advantages that make people choose this method of finishing their home?
- Relatively low price. There are immediately two sides to this issue: people who believe that plaster is quite expensive, and people who disagree with this. In principle, both sides are right to some extent. One thing can be said: compared to the original natural stone finish, stone plaster seems really cheap.
- High quality workmanship. This is one of the reasons why decorative plaster seems so expensive: it is made of really high quality, and is suitable not only for people with low or average income, but also for people for whom the price of the product does not play a big role.
- You can make stone plaster yourself. Yes, you can even make it yourself: the main thing is to have all its ingredients, tools and some knowledge.
- A huge selection of different types of plaster. Since it is created by human hands, at the moment there are a large number of types of this plaster mixture that imitate a variety of rocks. The choice is huge: from ordinary marble to exotic rocks that will surprise even the most experienced designers.
- The ability to use some types of decorative plaster for exterior decoration, facade finishing or foundation. The most expensive options for decorative plaster mixtures are impervious to the influence of moisture and direct sunlight, which allows them to be used for exterior decoration.
If you pay attention to the price-quality combination, then decorative plaster has almost no disadvantages: but this does not mean that it is worth purchasing inexpensive options. If you have the opportunity to spend a little, then it’s worth doing it: in any case, if you purchased plaster in a company store, then after you see the result, you will not regret it
Is it possible to make an imitation stone without experience?
Most developers who have the energy and time to decorate walls are stopped by the imaginary complexity of decorative finishing. But imitation of natural stone with plasters is not so scary:
- Unevenness is not a flaw. When creating “stone” plasters, there is no need to perfectly level the surface.
- Maximum freedom when drawing.
The only exceptions are imitations of marble: the shine of polished wax reveals any irregularities, tool marks, or grains of sand.
The remaining plastering techniques can be easily implemented by novice builders.
Advantages of the material
As described, the material has many qualities - this makes it popular.
- By cladding with granite stone, the façade of the building becomes attractive.
- The material is practical.
- The strength of granite allows it to withstand heavy mechanical stress. There are no scratches on it, it is not deformed.
- Cold resistance is an important advantage. The stone can be used in different climatic conditions without worrying about its condition.
Wall finishing can be done with any material that meets the customer’s preferences. Installation work must be carried out responsibly.
Errors when simulating masonry.
Do-it-yourself stone imitation differs from a professional one only if serious mistakes are made:
- Uneven drawing. The “masonry” should be level, the general direction of the longitudinal edges of the stones should be strictly horizontal.
- Scales. A relief that looks like scales is a sign of unprofessionalism, since stonework of this shape does not exist in reality.
- The accuracy of the shapes of the stones does not have to be perfect: the stones do not rub against each other. Therefore, you should not be afraid to make wider depressions in the places where the ends of two stones are connected.
- Roughness. “Burrs”, small pellets must be cleaned off.
Otherwise, imitation of stone with plaster is no more difficult than any painting and plastering work and can be performed by a non-professional of any level. Especially if this work is done for oneself: shortcomings are forgivable, but the work is exciting and interesting.
Surface preparation
Before applying decorative plaster, the wall needs to be prepared. The surface must be completely cleaned of various coatings and made smooth. Although, no one demands perfect smoothness from you. Be sure to remove all salt bulges and grease stains. Only after this can the wall be primed. This is necessary to improve the contact of decorative plaster with the wall. By skipping this step, you risk getting an unreliable final coating.
In nature, masonry is made up of different sized stones. We will consider the option of laying on a flat surface, without bulges. Stones, just like in natural masonry, will have a variety of sizes. For this we only need imagination, a wallpaper knife and masking tape.
The primed wall must be covered with strips of masking tape. Thereby defining the seams between the stones. Cover the entire wall at once, even if the area of the room is very large and the decorative plaster is planned to be applied in certain portions.
Using this method you can create an imitation of brickwork. Simply tape the wall parallel to the floor with strips of tape to create straight horizontal lines. And then, using masking tape, make future vertical seams. This way you get a lot of small bricks, as if it were real brickwork.
Recommendations for using finishes
If you plan to finish the external walls of a building, it is better to use a mixture whose binder base is cement.
This plaster composition is most suitable for surfaces exposed to sudden temperature changes and is resistant to humidity.
It is recommended to apply the plaster solution in small areas, and not over the entire facing surface.
The thickness of the finishing layer should be no more than 10 mm.
Watch a video on the topic:
Before carrying out work, the surface should be primed.
Methods of jointing and invoicing
After drying, cement plaster becomes granular and finely porous, which is not entirely natural for most types of rocks. Removing texture and applying jointing is the most creative and delicate part of the finishing process, which determines the believability of the appearance.
It is required that the surface acquires some semblance of a glossy film, which is possible by squeezing a small portion of dissolved cement onto the surface. The best way to achieve this effect is to spray the freshly applied solution with a small portion of water and cover the surface with a film about 10–15 microns thick. The film is laid on the surface and rolled with force with a hard roller, without smoothing out the folds. At the same time, through the transparent shell it is clearly visible how laitance accumulates on the surface.
Popular articles Happy birthday cards for men. more than 100 congratulations!
What conclusions can be drawn?
- Facade plaster is easy to apply to the wall without using a mounting mesh, because it is light in weight.
- Due to the versatility of the material, it is used not only indoors, but also outdoors.
- Due to the wide selection of shapes, the most suitable texture of the treated surface is selected.
- Stone plaster can be combined with other building materials. It will make the interior of the house original and visually attractive.
- The mixture allows you to fairly level the surface if you apply it in two layers.
- Treating a wall with such a facing material will not take much time and effort.
- By adding cement to the finished mixture, the plaster has excellent characteristics, does not crack, tolerates temperature changes and is not affected by moisture.
Decorating your home with decorative plaster is very easy. To do this, you do not need to have any deep knowledge of construction. It is enough to strictly follow the instructions and carry out the work step by step.
Sources
- https://1oschtukaturke.ru/dlia-fasada/imitatsiya-kamnya-iz-dekorativnoj-shtukaturki-svoimi-rukami
- https://1pofasady.ru/shtukaturka/shtukaturka-pod-kamen
- https://santehmen.ru/kamen/shtukaturka-iskusstvennyj-kamen-svoimi-rukami.html
- https://DekorShtukaturka.ru/dekorativnaya-shtukaturka/dekorativnaya-shtukaturka-pod-kamen
- https://kraski-net.ru/obrabotka-sten/oshtukaturivanie/dekorativnaya-s-imitatsiej-kamnya-svoimi-rukami
- https://PoShtukaturke.ru/steny-snaruzhi/dekorativnaya-shtukaturka-naruzhnyx-sten/imitaciya-kamnya-iz-shtukaturki.html
- https://1beton.info/shtukaturka/pod-kamen
- https://svoimi-rukami2.ru/imitacia-granitnoj-kladki/
- https://myshtukaturka.ru/oshtukaturivanie/imitaciya-kamnya-iz-shtukaturki.html
- https://remontonly.ru/shtukaturka-pod-kamen-svoimi-rukami.html
Rauf Decor
There is an opinion among people that everything domestically produced does not have the proper quality. Basically, we are talking about the auto industry, football, and building materials. But this company can surprise you.
Let's start with the price, which is an order of magnitude lower than foreign manufacturers. Of course, it is not possible to achieve such a variety of collections as Bayramix, but Rauf Decor is not striving for this yet - having offered consumers a classic collection of excellent quality, the company takes its rightful place among manufacturers of marble plasters.
Methods for attaching granite slabs to the wall
Work begins with surface preparation. The wall is cleaned, dusted, and dried. Weak, crumbling areas must be removed, large defects must be repaired with plaster. For installation you will need a building level, a tape measure, a cord, a mallet for leveling the slabs, spatulas, a container for preparing mortar, and a cutting tool.
Glue installation (“wet” method)
Granite cladding is heavy, so it is recommended to use a mesh to secure the slabs. The reinforcing layer will strengthen the surface, increase its load-bearing capacity, and prevent peeling of the finish. The mesh is secured using plaster or hardware.