Careful plastering of wall corners, previously leveled with a layer of gypsum or cement, improves the visual perception of the room. If the surfaces deviate from 90°, the wallpaper pattern is disrupted, you have to trim the ceramic tiles or try to correct the distortions with an additional portion of tile adhesive. The owner of a house or apartment can remove the corners with his own hands only if he has experience in plastering work.
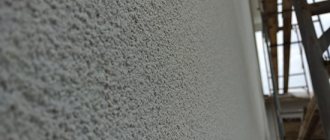
How to properly plaster smooth corners of a wall with plaster
The walls of residential or office premises can intersect at different angles, but during the repair process it is necessary to ensure an even vertical line where the planes meet.
Applying gypsum or cement based plaster requires preliminary preparation of surfaces and adherence to technology when processing surfaces. If the requirements are not met, the hardened material cracks or crumbles; to increase the mechanical strength, a reinforcing synthetic mesh is placed in the gypsum layer.
To create smooth joints, several methods are used:
- Using wooden or metal beacons, which are then removed or left in the thickness of the finishing material.
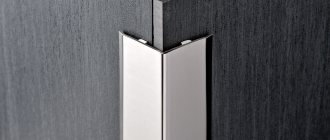
- Using a metal or plastic profile with planes located perpendicularly. Suitable for applying plaster up to 10 mm thick, providing increased edge strength.
- Cutting corners using a removable board and a spatula, the resulting edge does not have high mechanical strength.
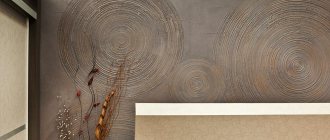
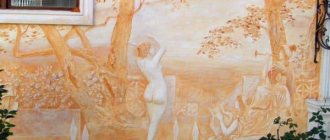
- Shaped design of lines connecting surfaces using a special pattern. The method is used to produce decorative cornices, requires high qualifications and is performed by hired workers.
- Manual removal using finishing putty and a shaped spatula. The technology requires the master to have the skills to perform plastering work.
Before starting plastering work, it is necessary to clear the room of furniture and foreign objects (for example, remove it or install it in the center of the room, covering it with plastic wrap). If you plan to replace the electrical wiring in the room, then you should cut grooves and lay the power cables in accordance with the developed diagram. After sealing the wires, it is necessary to make final markings to align the walls.
To level surfaces at home, gypsum plasters are used, which harden within 24-48 hours. The dry mixture is combined with water using an electric mixer or a small concrete mixer.
The solution should have a thick consistency, adhere firmly to the walls and not slide down under its own weight. Small fragments of the dry mixture are not allowed, which would not allow for accurate removal of external or internal corners.
Geometry of plastering works
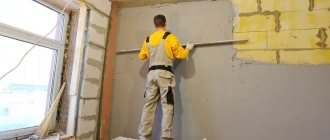
Plastering work is necessary to level the surface of the walls horizontally and at a 90-degree under the furniture. For this purpose, the beacon method is used. All beacons installed on one of the bases should be easily installed using a laser level .
Quite a lot of examples have spread on the Internet showing work without the use of beacons. It must be said that such technology should not be used, since without beacons it is absolutely impossible to maintain a single plane of plastering work on the surface. The 2 or 3 meter rule will not help to level a 15 meter wall in one plane.
And if there is a doorway in the plane, then this task becomes even more impossible. Aligning the walls at an angle of 90 will give the walls an ideal vertical level and an angle of 90
Many plasterers offer to correct the geometry of the rooms; in common parlance this is called “Aligning the walls at an angle of 90”. This leads to an increase in the layer, material consumption and cost of work , and this is the only way to hide the masons’ jambs.
The geometry of the room is not fully maintained at the stage of erecting partitions.
But in every house there are places where there should be an angle of 90° , this is the bathroom, the work area in the kitchen where the kitchen set will be placed (so that furniture assemblers do not adjust the countertop to the location), and a couple more places in the apartment, for example, an angle at in which there will be a built-in wardrobe without a back plane (for the same reason as the kitchen).
How to make markings when plastering
The accuracy of obtaining a right internal angle depends on the quality of the wall layout; to perform the work it is necessary:
- Using a plumb line or level, determine the deviation of the mating walls from the vertical position. To improve the quality of marking, you should use a laser level.
- Draw lines on the floor and ceiling corresponding to the virtual vertical surface. When using a laser device, it is necessary to draw lines along the beam path.
- Secure metal beacons using quick-drying plaster and drywall spacers. The supports should be spaced every 500-600 mm, the profile should not sag when the rule is moved or move away from the attachment points.
- Using a similar scheme, remove the adjacent wall, and then begin plastering work. At the initial stage, it is necessary to seal the cracks by laying a reinforcing mesh. Large gaps (for example, between slabs) can be filled with polyurethane foam, and the excess can be cut off after polymerization. If there are metal elements on the walls, they should be dismantled or covered with paint or anti-corrosion mastic. If the rule is violated, rust stains will appear on the plaster, which will transfer to the finish.
Some craftsmen use a different technique, determining wall distortions using cords stretched diagonally. After the area with the maximum protrusion has been found, they begin to install the profiles, which are aligned along the stretched twine. After marking is completed, the cord is removed, the surfaces are treated with plaster or covered with sheets of plasterboard, using the beacons as a base support.
Basic rules when applying gypsum plaster:
- Before carrying out work, the walls must be cleaned of dust and covered with primer. In damp areas, materials with antibacterial additives should be used.
- When processing, follow the manufacturer's recommendations for layer thickness, which should not exceed 50 mm. To level deep holes, you will need to apply several layers with intermediate drying.
- When dissolving, pour the dry mixture into water while simultaneously stirring the solution with a mixer. If you do not have the skills to prepare gypsum mortar, it is recommended to use ready-made plasters supplied in plastic buckets.
- You should not prepare a large portion of the solution, since the material has a limited shelf life and gradually loses its characteristics.
- Plaster applied to the walls must be quickly leveled - lumps formed on the surface impair the quality of the finish.
- Plastering work should not be carried out in rooms at air temperatures below +5°C or above +35°C.
- Applying the finishing touch (for example, wallpaper) is allowed 12-14 days after completion of the work. Otherwise, the moisture remaining in the plaster will damage the paper or vinyl wallpaper and cause the coating to peel off.
How to plaster wall corners at 90 degrees
Before drawing out corners when plastering using beacons, it is necessary to prepare a gypsum mortar and a building level (hydraulic or laser). To carry out the work, preliminary finishing of the walls is not required, but it is recommended to determine the areas with the largest protrusion.
Otherwise, with further leveling of the surfaces, the line of contact between the partitions may be covered with an additional layer of mortar, and all work will have to be repeated again.
Brief algorithm of actions:
- Install beacons on the surface of adjacent walls, ensuring the vertical position of the elements. For fixation, use quick-drying plaster and drywall scraps. The guides should be at a distance of 100-120 mm from the wall joint line.
- Wait for the plaster to harden, and then fill the voids with a solution, smoothing the material with a rule and removing excess with a spatula.
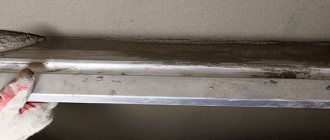
- Place the angle tool on the beacons and carefully form a joint line, moving the spatula from top to bottom. To obtain a smooth surface, the rule should be periodically moistened with water.
- After the mixture has hardened, the beacons can be removed, but since the profiles are made of galvanized steel, many craftsmen leave the elements in the thickness of the building mixture. If you plan to paint or paste the walls, then apply a leveling layer of fine finishing putty, which is then smoothed with a float or sandpaper.
When carrying out independent repairs, a situation may arise in which it is necessary to restore the straight line of the internal joint of previously plastered walls. In this case, a metal profile with a reinforcing mesh installed is used. A small amount of gypsum mixture is thrown onto the walls, and then the profile is pressed into the material. Excess solution is smoothed out and removed; excessive force should not be used due to the risk of deformation of the metal guide. At the final stage, it is necessary to completely close the corner under the layer of plaster.
Recommendations
To ensure that all work goes smoothly, you must use the following recommendations from the experts:
- Any bumps or too deep depressions in the future when plastering the walls will significantly complicate the work (how to work with plaster?). A greater consumption of material will be required for leveling at the highest point of the plane; in large recesses, thick layers of plaster take a long time to dry. This delays the repair, so it’s faster to put on several thin layers than to wait for one thick one to dry.
- The primer is selected according to the composition of the plaster used and the type of wall. It is desirable that it has deep penetration. This will increase the adhesion to the surface of the solution and make its consumption significantly lower.
- If beacons are installed, all work must be accurately verified by the building level, and it does not matter what their design or operating principle is. The main thing is to achieve their exact vertical placement with the ends aligned on a flat plane.
- They are best leveled by properly finishing the walls with plaster. If one of them is well coated and dried well, then it will be easier to work with the other.
- The use of an angle trowel for internal or external processing should be done with regular wetting of it in water. This will soften the plaster slightly, and it will be easier for the master to level it.
Read about leveling walls with plaster here.
The most difficult stage when plastering a room is finishing its corners. Difficulties arise even at the stage of forming the surface of the walls near them, since then the solution is removed onto the adjacent base or bends inward. Therefore, it is necessary to use a perforated corner or create a finish in several stages so that the solution hardens in areas with deep defects.
Plastering internal corners with your own hands
Plastering of internal corners is carried out using:
- metal perforated profile, providing a straight line and increased strength;
- fine mesh made of synthetic material reinforcing the gypsum mixture.
Before you remove the corner, you need to carefully align the walls. Protrusions or depressions that lead to curvature of the joint line are not allowed. To check, you can use a rule or a wooden block. Some artists determine unevenness by directing a stream of light onto the walls at different angles.
How to level a wall corner using perforated profiles
To complete the work you will need:
- Apply the solution to the walls along the joint line with a spatula.
- Carefully lay the profile, pressing the element into the mixture as a rule.
- Smooth out the gypsum plaster protruding through the holes with a spatula.
- Wait for the solution to harden and treat the walls with sandpaper; any defects found should be eliminated with finishing putty.
Some craftsmen use homemade devices that allow them to create a right angle. To make patterns, U-shaped plasterboard profiles are used, connected with screws and additional spacers. After applying the mortar to the walls and rough smoothing with a spatula, the final removal is carried out. The pattern is moved upward from the floor, wetting the surface with water for better gliding and reducing the number of defects on the plaster. Instead of a metal profile, a wooden block can be used to make a pattern.
How to plaster an internal corner using serpyanka
The technique is used when finishing wall surfaces with sheets of plasterboard; when applying the solution without a reinforcing mesh, cracks may form at the joint. Before plastering the internal corners, it is necessary to prepare the solution and a rectangular wooden block 500-600 mm long in advance.
To increase strength, a synthetic reinforcing tape with an adhesive base is used, which will be called serpyanka in manufacturers' catalogs. The material is supplied in rolls of different widths, which allows you to work with different surfaces.
Brief algorithm for performing the work:
- Treat the edges of the sheets with a primer that improves the adhesion of building materials.
- Apply plaster to the walls with a spatula along the joint line, the width of the strip is 80-100 mm.
- Unwind the roll of serpyanka and attach the end of the tape to the top of the wall, and then evenly lower the coil down. To press in the reinforcing stack, use a wooden block; the mesh should be evenly distributed over the mating surfaces.
- Carefully level the mixture with a spatula, avoiding displacement or damage to the synthetic fabric.
- Wait for the solution to harden and finish using an angled spatula.
- Treat the surfaces with a float or sandpaper, removing small irregularities. Before painting or wallpapering, remove fine dust and saturate the plaster with an acrylic primer.
Alignment methods
Depending on the task at hand (90 degrees or a very even connection of adjacent walls), the corners can be aligned in several ways.
A right angle can be obtained using:
- Plaster. A very labor-intensive and financially expensive method. Used for small height differences near the wall surface and an angle of 88-92 degrees. Allows you to save as much usable space as possible;
- Plasterboard - used when there is significant blockage of the wall vertically or horizontally. Installing gypsum board on a frame allows you to eliminate surface unevenness, but it steals the footage of the room, sometimes even square meters.
- Plaster and gypsum board at the same time , when one wall is plastered, the other is sheathed with sheets of plasterboard. This technology is used when the curvature of the wall surface is insignificant, and the deviation of the angle from a straight line reaches 5 degrees or more. Using only plaster is too expensive; leveling with gypsum plasterboard steals a lot of usable space. Exit in combined wall alignment.
The zigzag seam is leveled using putty using:
- plaster corner (counter-shoulder);
- corner spatula;
- flat board (for external corners).
Plastering external corners
Plastering external corners is done using:
- A metal perforated overlay (contra-shultz), which remains in the hardened gypsum mixture and increases the strength of the edge.
- Spatulas and a template made of wooden beams. The technique is suitable provided that the walls are neatly leveled.
How to make a right angle without using a counterswitch
To obtain a smooth outer line of the junction of 2 walls, you must:
- Prepare a wooden block with carefully processed surfaces corresponding to the height of the surface to be leveled.
- Secure the board to the wall using dowels or anchors, allowing for protrusion relative to the wall on which the gypsum mortar will be applied. If the master does not want to damage the partitions, then it is necessary to install a template between the floor and the ceiling.
- Apply the plaster mixture and smooth it with a metal square or rule, moving the tool along the block. It is allowed to repeat the operation with intermediate drying of the building material.
- Wait for the moisture to evaporate, and then install the template to process another wall.
- Remove the block after 2-3 days, eliminate minor defects with finishing putty and treat the surfaces with sandpaper. The disadvantage of the technique is the risk of damage to the edge with an abrasive tool or during subsequent use of the room.
Forming external corners using perforated aluminum profiles
To obtain a smooth outer edge using an overlay, you must:
- Apply a gypsum mixture to the walls, and then place a perforated corner on the edge, aligning the element vertically using a building level.
- Remove excess mortar squeezed out through the holes with a spatula, carefully distributing the mixture over the surfaces of the walls.
- Make sure the position of the profile is correct and wait for the solution to harden.
- Treat the surfaces with fine sandpaper, and then eliminate any identified defects with finishing plaster. The metal profile allows you to quickly remove the end edges, the plates protect the surfaces from accidental damage. When working, one-piece pads should be used; the use of profile sections leads to the formation of cracks at the joint line.
Surface preparation
Before you start leveling the corners of the walls with your own hands, you need to prepare the adjacent foundations. To obtain a high-quality right angle between the walls, you need to perform the following work:
- Remove the old wall covering, thoroughly cleaning the surface of small particles.
- Treat the walls with a deep penetration primer, especially carefully brushing the corners.
- If you plan to plaster with cement-sand mortar, the prepared wall surface should be moistened.
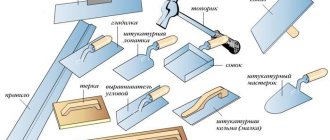
Tools for plastering internal corners and external corners
Leveling corners with plaster requires the use of the following tools:
- metal spatulas with different widths of the working surface, allowing you to level the finishing layer;
- graters for removing small irregularities (with a set of abrasive pads);
- trays with a roller for applying primer;
- a plastic bucket and an electric drill with an attachment for mixing cement or gypsum mixture with water;
- corner spatula, allowing you to get an even angle;
- drawing devices (rulers, tape measures, plumb lines) for marking surfaces;
- masking tape to protect mating surfaces from contamination with the solution;
- an adjustable corner spatula (trowel), which allows you to remove outer corners along the perimeter of window openings;
- metal brush and chisel for cleaning concrete or brick surfaces.
The range of tools depends on the wall material. For example, to treat surfaces made of foamed concrete, which has a loose structure, plaster planes with 3-4 blades are used. The tool is moved along the wall, cutting off the protrusions. To carry out the work, skills are required, otherwise bumps and waves will form on the concrete planes, which will have to be covered with gypsum or cement mortar.
A specific tool includes an angle trowel, equipped with a handle and a metal working part. The planes are located perpendicularly, the master draws internal angles by moving the tool vertically. There are also modifications for processing external contact lines.
To obtain a high-quality joint, experience with the tool is required; when deviating from the vertical or changing the force, the line turns out to be uneven.
Angle trowel
This tool was specially made for plastering corners; its working surface is bent at 90 degrees.
It is convenient for aligning mainly internal corners; it is almost never used for external corners - perforated corners are more often installed.
Another option is an angle spatula. This tool has a handle attached to the side of the work surface, but the essence of use is the same.
You need to work with the tool, positioning it at a slight angle to the surface to be finished. The plaster is evenly distributed with smooth movements.
How to carry out preparatory work when plastering the outer and inner corners of walls
Before plastering the corners of the walls, you must:
- Remove furniture and interior items from the room or cover things with thick cellophane film.
- Carefully clean the surfaces of old finishing materials, remove areas with a loose structure, wash off grease stains and remove traces of mold or rust from the fittings.
- Apply notches to improve adhesion on the concrete base or embroider joints on brick walls.
- Cut out fittings and other metal elements located close to the surface. It is possible to paint over areas with oil paint, but a layer of synthetic material impairs the adhesion of the plaster.
- Remove fine dust and saturate the surfaces with primer with antibacterial additives.
- Fill large potholes with gypsum mortar and then re-soak the walls with soil.
- Mark the surface and begin reinforcing the wall (with a synthetic fiber mesh) or installing beacons and a perforated corner made of steel tape.
These measures can increase the strength of the finish and reduce the risk of saturation of the base with moisture. The durability of the gypsum layer, which will withstand changes in humidity and temperature in the room without peeling off from the surface of the partitions, depends on the correct preparation. Impregnation with antibacterial compounds reduces the risk of the appearance of mold and fungi, which cause an unpleasant odor in the premises and worsen the appearance of the apartment or house.
How to plaster slopes at 90 degrees on walls
Plastering the outer corners of window openings is difficult due to the deflection of the surface to increase the light flux. To complete the work, you will need a wooden template, according to which you can set metal beacons or perforated pads to strengthen the corner. After the gypsum has hardened under the profiles, they begin plastering the walls. The material is applied to the upper plane of the opening, and then to the sides. For smoothing, a template is used, which is pressed against the window frame and a metal corner; minor defects are eliminated with a steel flat spatula.
Doorways have slopes located at right angles. For leveling, you can use sheets of plasterboard, which are secured with gypsum plaster and dowels. Then cover the corners with a metal plate and carefully tighten the surface with the solution. Any excess mixture that gets on the door frame is removed with a damp sponge until it hardens. To carry out the work, you can make a template, which speeds up the repair procedure and allows you to obtain smooth surfaces and neat corner edges.