Friends, today we’ll talk about an interesting topic. More and more often we are asked questions related to whether there is a need to do some work on the walls if certain repairs are planned, be it wallpapering or painting the walls. We understand that the popularity of such issues is due to the fact that people want to save on repairs and not overpay for unnecessary actions that are not mandatory.
Thus, today we will cover the topic of whether it is necessary to plaster a wall in a panel house. Since most people continue to live in panel houses, as in Soviet times, we are focusing on this type of house.
Which plaster is better for concrete walls
There are many varieties of plaster compositions based on:
Each of the listed building mixtures is used in concrete finishing. The choice depends on:
- appointments;
- external temperature conditions;
- drying time;
- degree of unevenness.
It is advisable to carry out external finishing with cement mortars, since other compositions have low moisture resistance and strength.
Can gypsum plaster be applied to a concrete wall?
As already mentioned, compositions based on gypsum powder are also applicable to concrete. They have a lot of advantages, but there are also disadvantages. It is not allowed to plaster rooms with high humidity using gypsum solutions. The coating is also not resistant to damage. For these reasons, the scope of use of this composition is limited.
What is the best way to plaster concrete walls in an apartment?
If we talk about the quality of the result regarding the finishing of the concrete base in the apartment, cement plaster is the most popular. Its main advantages are strength and durability. In addition to these qualities, she has:
- moisture resistance;
- practicality;
- low cost;
- vapor permeability;
- thermal conductivity;
- soundproofing.
The disadvantages include:
- high specific gravity;
- complex application technology;
- time costs for finishing and subsequent drying.
What materials are best for plastering in new buildings?
For interior finishing work, experts advise paying attention to solutions based on binder gypsum. Such mixtures dry quickly, guaranteeing proper strength and low shrinkage, which cannot be achieved when using cement mortars. Plaster allows you to independently regulate the climate in the room during its further use. The natural properties of gypsum make it an excellent absorbent. Interestingly, it can also saturate the room with moisture if it becomes too dry.
Gypsum mortar with special additives allows you to extend the “life” of just prepared, fresh mortar; additives increase its plastic properties. The most important mistake of novice finishing professionals is their careless attitude to recommendations on the required amount of water that is used when mixing solutions. If you exceed the prescribed amount of liquid, internal stresses will appear during the drying stage of the plaster, which will lead to the formation of cracks. Read the instructions carefully and do not add more water than required to dissolve the mixture.
The Rotband plaster mixture from the Knauf concern has become very popular recently. This finishing material has good “adhesion” to the coating, which makes it ideal even for walls that are too smooth.
The average thickness of one layer of gypsum plaster is about 18 mm. In most cases, it is applied immediately in one layer. If you need to apply 2 layers, then the second of them is applied immediately to the wet first. Do not forget that the surface for subsequent application of plaster must be prepared: remove dust, moisture and white deposits (efflorescence). If you need to level a wall with several layers of plaster, do not forget that each new layer should be softer. To increase the ability of the solution to quickly adhere to the base, the surface is usually treated with a concrete contact primer. If the walls are too uneven, you need to think about leveling them using sheets of plasterboard or cement plaster.
How to properly plaster a concrete wall with your own hands
You can correct the curvature of the walls in your apartment yourself, without resorting to professional help. The main thing is to choose the right composition, stock up on a construction arsenal and follow the technology.
Tools
There is a wide range of plastering supplies on the market. The main ones are presented below:
- plaster mesh for a durable result;
- guide rails acting as beacons;
- bucket and construction mixer for mixing the solution;
- trowel or spatula - blades with which it is convenient to take and apply the plaster mixture;
- square - a special wooden or metal spatula designed for applying plaster to corner areas;
- plaster falcon - a tray with a handle on which the solution is laid out;
- ladle - as an alternative to a trowel and falcon;
- the rule is a flat metal or wooden strip to create an ideal surface;
- building level (spirit level) or level - devices for determining the value of the difference;
- float to add texture or a smooth surface.
Surface preparation
Before the plastering process, a number of preparatory steps should be performed:
- remove old finishes (paint, whitewash, wallpaper, tiles);
- eliminate defects (lumps and other convex irregularities);
- make notches with a hatchet or hammer, because for better adhesion of the material to the base, the surface must be rough;
- straighten the channels if communication wiring is planned;
- get rid of dirt and dust on the wall by wiping it with a damp sponge or
- rinse with running water and then dry;
- Apply a thin layer of primer. After complete drying, the procedure must be repeated again.
- lay electrical cables in appropriate grooves;
- attach the plaster mesh to the wall with dowels.
Work progress
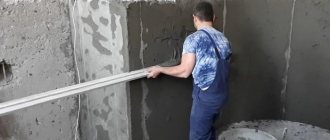
The plastering process begins with the installation of beacons - wooden or metal slats. Using a spirit level, check their vertical position. Next, you should prepare the solution according to the instructions, depending on the composition of the plaster.
The next step is to apply the “spray” - the first layer of plaster. Using a special ladle or using a trowel and a falcon, throw the solution onto the moistened surface to be treated with sharp movements and thus fill the entire area. Keep the thickness to 5 mm, remove excess as a rule. Let the layer dry.
Then apply the second layer, up to 10 mm thick. In essence, the procedure is repeated, but this time the solution is allowed to be both poured and spread. The base should be leveled as a rule, stretching it along the beacons from bottom to top.
This is followed by the application of the third layer - “covering” up to 2 mm thick. After this, plaster the external and internal corners with special tools. Then carefully remove the beacons until the previous layer is completely dry and fill in the traces from them separately with putty.
Finally, you need to grout - run a float over the surface to add texture or smoothness. This must be done when the last layer has set, but has not had time to dry.
Strict vertical
The first step in leveling is determining whether the surface is vertical. The tools required for this are a plumb line and a building level. Check all angles:
- The cord is hung on a nail, and the nail is driven in so that the plumb line does not touch the wall plane.
- By moving the plumb line along the nail, the optimal position is found.
- Another nail is driven in near the floor so that its head is in contact with the plumb line.
- The same actions are performed from the other edge.
Important! If the slope is no more than 1 cm, you can limit yourself to puttying work based on gypsum or cement mortar. With well-leveled surfaces, internal corners will also turn out well.
If the discrepancy between the wall and the vertical is significant, then you can correct the situation using drywall installed on the profile. Broken corners or protruding slopes are secured with special profiles.
After all the preparatory work has been completed, you can soundproof the walls. First of all, you need to decide on the choice of the necessary design.
There are frame and frameless sound insulation systems.
In the first case, a profile is built, then MaxForte sound-absorbing materials are placed in the space between the metal frame profiles, and at the end the structure is sheathed with gypsum fiber sheets (GVL) and plasterboard (GKL).
Frameless systems are essentially the same thing, only in a ready-made version: sound-absorbing boards are already glued to the gypsum fiber sheets (GVL). The panels are mounted to the walls and also covered with plasterboard (gypsum plasterboard).
With the same thickness, frame and frameless sound insulation systems are identical to each other. Nevertheless, in our company all soundproofing schemes are based on frame options. In our opinion, they have a number of advantages that distinguish them favorably from frameless systems:
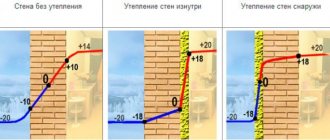
- Frame systems automatically level the wall surface. Even if the wall is crooked, there is no need to spend money on plastering and leveling work. When installing the profiles, workers will set the plane to which the gypsum board will be attached. Frameless systems completely follow the topography of the wall, so the walls must be leveled before installing the panels!
- Fewer attachment points. Often the profile can be installed directly between the floor and the ceiling and not be attached to the wall at all, but even if fastening is necessary (the height of the room is more than 3 meters or large loads are planned), then with frame systems the number of attachment points is 3-4 times less than with frameless ones . Although the fastening units are vibration-isolated, you need to understand that not a single elastomer can completely remove the vibration load, so the fewer fastenings, the better!
- The cladding on the frame can withstand large cantilever loads. It is not a problem to hang an air conditioner, TV, kitchen cabinets and other heavy objects on such walls.
- Installation of sound insulation on the frame can be performed by any worker involved in apartment renovation, since standard KNAUF construction technology is used.
Soundproofing a wall is not just MaxForte sound-absorbing materials, it’s the entire structure as a whole!
Therefore, having chosen sound insulation for a wall using frame technology, you need to figure out what the increase in sound insulation depends on and try to assemble the structure as correctly as possible.
When can further finishing work be carried out?
Only after the base has completely dried should you begin further work on finishing the wall.
For good adhesion, you need to apply a primer and wait for complete drying again, this will take about a day.
Putty in two layers is the next step. The coating must dry completely. After all the work done, they begin cladding with decorative materials:
Plastering is an excellent and most optimal way to get rid of unevenness and defects. Beautiful walls are the key to a good renovation.
Is it necessary to plaster the walls in a panel house?
Concrete wall slabs can be finished with high quality without plaster, the main thing is to properly prepare them for finishing. But in any case, I advise you to plaster the panel slabs that are in contact with the street. The apartment will be warmer. It is better to plaster concrete over a mesh mounted on the wall, or over an applied concrete contact, then the plaster will definitely not fall off.
Concrete itself does not need additional finishing if it is not used in an aggressive environment (acids, alkalis, etc.), or if special qualities are not required (increased water resistance, for example). Plaster, like wall putty, is only required if the quality of the surface does not suit you (uneven, with dimples, for example). If the surface is smooth, you can immediately apply a finishing coating (glue wallpaper, for example). If you are going to paint the walls, then it is better to putty on the walls in order to fill the micro-pits that usually exist in concrete. If there are unevenness in the walls, but do not exceed 5-10 mm, then it is better to level the surface with plaster or putty; if they exceed 10 mm, plaster. Typically, plaster does not adhere well to a smooth concrete surface, so either notches are made on the concrete, or a chain-link mesh is attached with dowels, or primed with compounds with high adhesion (in the simplest case, a liquid solution of water, cement and coarse sand with the addition of PVA glue in an amount of 100- 200 ml per bucket of solution).
Related article: Three-layer walls with brick cladding
Bagaliy, in my opinion, you confused finishing with concrete protection; putty is unlikely to save concrete from an aggressive environment.) As for notches, you have a valid method, but it is labor-intensive. In the early 90s, they plastered 20 low-rise buildings made of expanded clay concrete on a state farm near Moscow, and they were tortured by swinging axes and making notches with them. It’s good that the solution was imported and made of lime, it sticks to the concrete better than CPS.
, and there is no need to putty under the wallpaper. whether? Still as needed. Apparently you didn't see the bare panels. where else in the factory when they are manufactured are “sinks” obtained, and it is more expensive to glue wallpaper onto such ones. I have a friend. who lives with her mother, there is no man in the house, so they were engaged in such “pasting” of wallpaper. Then I had to tear everything off and putty the walls. and prime before and after putty. This is how they do it according to science. And the walls can be plastered if they do not suit the residents.
See for yourself whether to plaster or not, it all depends on the condition of the walls. In any case, you need to putty, even if you are going to glue wallpaper, at least in a layer of base putty and a layer of finishing putty. The base one will be like a base; all defects of the panel slab will be repaired with it; it has better adhesive properties. The layer of finishing putty will already be leveling and with it it will be easier to achieve a smooth surface of the walls.
How are your electrical wiring grooves and plumbing pipe passages in the walls sealed? It often happens that it is easier to plaster the entire wall than to correct these “jambed” patches, or level them with a thick layer of putty. Recently we plastered the crossbars in a monolithic frame building, covered them with mesh, and plastered them with ordinary cement-sand mortar, which we made ourselves.
With a mesh, the plaster consumption will be greater, and for slabs a thick layer is not required. It’s better to go through the walls with purchased concrete contact, or an analogue prepared with your own hands according to the Bagaliy recipe, they have a similar composition. It is better to plaster on concrete contact with gypsum mixtures, they set better with such a primer and then you won’t have to put a lot of putty, one layer of finishing will be enough.
Yesterday I went to see my neighbor; he had already started renovations in his apartment. The hired finishers offered him to plaster only some walls that had large unevenness, but he decided to plaster everything. I, too, do not have unevenness on all panels, and most of them are precisely due to the patches of the grooves and pipe passages. It seems to me that you can knock off the plaster that is sticking out on the patches and just putty the walls.
Dmitry, you can putty right away, but in my opinion it’s better to plaster such walls. It is difficult to judge from the photo the unevenness of the walls, but it is noticeable that all the seams of the slabs are roughly sealed and there are also a lot of patches. Finishers will be tortured to bring such walls to zero using putty, and it is not a fact that in this situation they will be able to win financially.
Why argue here? Every weekend, through almost all channels, they teach how to renovate apartments)))) They come to a family where they plaster panels. where they just putty. and where they are finished with plasterboard. Anything can be plastered. even log walls, even cow dung and there will be no smell. If you want to properly level the walls, plaster them. no - don't plaster.
I won’t plaster with cow dung, but I’ll probably have to use some kind of gypsum mixture. The financial component is, of course, important, but that’s not why I was even interested in whether it’s necessary to plaster or not. For me, the timing of the repair is more important. As I understand it, with plaster the repair will take a couple of weeks longer than if you just putty the walls?
High quality finish. This is what exactly is meant by this concept. You need to look at the condition of the walls. Nobody will tell you. What kind of finish will there be? If all the walls are in gypsum board, then why plaster, if you are going to paint, then you need to bring them to zero. Would you share your plans with us? It’s difficult to give advice, but usually the walls are plastered, the surface is prepared for future finishing, and then it’s a matter of little things. Don’t save money, it’s better to start repairs later, collect money, think about whether you need plaster and what you will use in finishing.
The walls are leveled with plaster. It is applied along the beacons, which in turn are set strictly according to the level. There is no other way to level (by level). And if you just need to remove chips and shells, then putty is enough, but the wall will simply become smooth. And if the wallpaper is expensive, you may end up messing it up when applying it. Bubbles will appear and the seams will come apart. And they won’t fit in the corners. You can plaster with gypsum, cement and lime mixture. but after drying there will be shrinkage. and the cheaper the material, the greater the shrinkage. The best way is plaster. And there is no shrinkage, and the surface does not need to be puttied.
First, the walls are primed (but not any cheaper, but with a good primer, for example, I do this with a deep-penetrating primer, tifengrund, sold in 10-liter buckets. But I often read on forums about concrete contact - I have NEVER used concrete contact in the entire period from 1998 to 2018 You can plaster and hide glaring defects under a spatula, putty to hide the defects of the plaster and create a finer grain, then sand the walls, then prime them, then glue the wallpaper.
I read the comments and was a little surprised. Look at the approximate price list for 90% of the costs:
Primer Knauf Tiefengrunt 10 l for a room of 18 m2, well, let there be 2 buckets, I don’t remember the exact price, let’s say 800 rubles per bucket
Volma layer plaster mixture that does not require puttying 30 kg. Domestic plaster is better for me! rotband (albeit in dry rooms) it’s better to make bathrooms with rotband. Volma layer, what in my opinion is 300 rubles a bag + -, Well, let’s have 3 bags per room (naturally, there’s no question of any beacons) Prepare the walls for wallpaper if. Vetonit putty (I I love LR+) let 2 bags of 25 kg each. a bag will cost about 800 rubles. It might be cheaper.
I use sandpaper 2 m2 for the whole apartment, number 6 and 12 on the fabric.
Let everything be approximately 5000 rubles. Completion time is a week (the layer dries overnight, in the evening at 5-6 he left at 9-10 in the morning, he arrived, you can move on. If you are going to do the whole apartment, take 10 volma, 8 vetonite, 10 soil at once, in the process, taking into account the decrease, you will understand and calculate buy the missing amount of material. But in general, if you don’t have experience and time, as often happens, then YouTube may turn out to be not only ineffective but, as it were, not always 100 percent informative.
Related article: Attaching facing bricks to a load-bearing wall
Yes, if for painting, then leveling the walls is necessary! The process is long and costly, by the way, not always justified, it often happens that people understand by the end of the renovation, well, sometimes in the process, that the walls are perfect, everything is painted as it should, although the price is several times more expensive and the furniture is much more expensive took up some part of the apartment, hid most of the walls and they are not visible as they were before the start of work, that is, in fact, euro finishing is not very bad, but if you want to get by with minimal costs, then it’s not so important to align the walls with beacons, unless of course they are they don’t “scream” and, for example, are more like the blocks of ancient pyramids.
It is better to plaster concrete over a mesh mounted on the wall, or over an applied concrete contact, then the plaster will definitely not fall off.
Why do you need putty under wallpaper?
Remember what wallpaper used to be like? Paper, with edges that had to be cut off on one side and overlapped. This made it possible not to worry too much about the smoothness of the base; most often, the walls were covered with old newspapers before the final finishing.
Today, old newspapers have already been abandoned, but the unevenness of the walls still requires some tinkering to get the wallpaper to fit as it should. That is why many people prefer to immediately entrust these chores to third-party craftsmen who will do it faster, without unnecessary nerves and with high quality.
Modern wallpaper is glued end to end. And the slightest hole or protrusion at the junction of adjacent canvases leads to a poor-quality seam. Ideally, it should be completely invisible, which is why the base needs to be carefully leveled. But the role of putty is not only this.
Functions of putty
In addition to the final leveling of walls or ceilings, finishing putty allows you to solve other problems, which include:
- Elimination of defects such as cracks, chips, large scratches, etc.;
- Giving the base greater strength;
- Increasing the adhesive properties of the base - its ability to firmly adhere to the finishing coating;
Note. Primer compounds fully possess this property, and in some cases it is enough to use only them if other qualities of the putty are not relevant in your case.
- Reducing the ability of the wall material to absorb moisture. This is important for high-quality wallpaper stickers and allows you to save glue;
- Leveling the surface color. White putty will reliably protect the wallpaper (see Decorating walls with wallpaper in the correct form) from stains that can show through it from an untreated wall.
As you can see, putty has many functions, and any of them can play a decisive role in the quality of the finish.
Putty of different materials
Now let's figure out whether putty is always needed and how it depends on the base material:
- Brick walls definitely need leveling. If the masonry is fairly smooth, you can do without plaster, using several layers of starting coarse putty, and finishing the preliminary finishing with a thin finishing layer.
- But concrete walls can be so smooth and strong that they do not require the application of putty. Especially if they have an even color, you have chosen fairly dense, non-translucent wallpaper, and the room will have a constant temperature and normal air humidity. But it is absolutely necessary to prime them before pasting - this is required by the instructions. The primer will improve adhesion and create a moisture-proof film on the surface.
For reference. If there are small potholes and chips on the concrete surface or joints between slabs, it is enough to fill only these places with putty.
- Plaster. Plaster mixtures are quite rough. And even if the surface turns out to be smooth, it is unlikely to be smooth. Sand particles make it rough and unsuitable for wallpapering.
- Plasterboard walls still cause the greatest amount of controversy on the topic - whether they need to be puttied or whether it is possible to limit ourselves to only sealing the seams. After all, they are used precisely for leveling walls instead of plaster. In this case, putty is also needed, but to protect the plasterboard itself (see How to putty a plasterboard ceiling and avoid mistakes), or rather, its outer paper covering. If you stick wallpaper directly onto it, then during the next repair the paper will be removed along with the old wallpaper, exposing the gypsum core, which will lead to the need to completely replace the sheets. It is clear that the cost of such repairs is incomparable with the cost of putty.
Puttying walls in a panel house
Hello, please tell me, dear craftsmen, which putty to putty on the walls in a panel house? What should be the first layer and the second layer? I'm interested in the brand and company of the putty. What corners are placed on the corner of the slope and the wall? What are they correctly called and how are they attached? Best regards, Dmitry
Any putty, preferably from a good manufacturer. It all depends on your finances. But the first layer is always a primer, and if it is a panel one, that is. concrete, then any concrete contact, preferably from the same manufacturer, after primer, after wallpaper or paint. The corner is called a paint corner, sometimes a plaster corner. They are attached using the “freezing” method, type in Google “installation of beacons” and look at the tube.
First you need to prime the walls, preferably with contact. and then putty with gypsum plaster (type Volma layer) as a rule. After putty cleanly, with finishing putty
Hello Dmitry! First, you must decide if you need plaster on the walls or just putty for the wallpaper. We plaster the walls with “Rotband” and before priming the walls with betokokontakt. If it’s just putty for wallpaper, then we putty with “Vitonit” LR+. Concrete contact is not needed before putty - just a regular primer.
Depends on the unevenness of the walls. Standard set of works: 1. Primer of walls with concrete contact 2. Visual alignment with rotband 3. Primer of walls with deep penetration primer. 4.Double puttying of walls with Vetonite KR. 5. Sanding the walls and priming the walls with a primer. 6. Wallpapering. 7. If painting the walls, then after sanding and priming the walls, putty the walls with a felt brush, sanding with fine sandpaper or mesh, another primer of the walls, painting the walls with a diluted color, puttying the defective areas, priming the putty areas with a diluted color, painting the walls a second time. The mounting plaster corner is adjusted to the plane of the walls and level during the process of leveling the walls with a rotating band, depending on the unevenness of the angle, it is installed either on a rotating band or on an adhesive-sealant.
You can’t make the putty yourself. There are no special secrets, but you need the hands of a master
There are a lot of putties, I like EK. I work with a spotlight, I see all the irregularities, the quality is many times better, I always putty towards the window, setting the direction of the putty, if the ceiling is to be painted later, then this is very important. now step by step 1. primer, read the instructions, they are all different, if it says that you have to wait 4-6 hours, wait, it should crystallize, the wall will be covered with pimples, increasing adhesion (sticking) to the wall, and also the antibacterial effect will occur. There are some that you can work on immediately. 2. puttying, from bottom to top from left to right, try to hold the spatula straight with the knife to the wall, thereby you will see the unevenness and apply the correct layer. wash the entire tool, why is this important, the remaining material will distort the spatula knife, you will scratch with the corners when applying the second layer. 3 installation of the perforated corner, I will apply a putty solution into the corner itself, someone on the walls, do it as you prefer, and press it so that the stiffening rib is level, I press it like this, install the corner, apply a level and press it to bring it to the desired plane. 4. before applying the second layer, prime the same way, apply the putty in the same way, after sanding the dry wall, read the instructions for the putty, don’t dilute too much at a time, apply each putty to its own thickness, some are up to 2 mm, some are up to 5, water is better use a measuring cup, so it will be convenient for you 5 Sanding, with ordinary sandpaper, medium grit, I sand the entire surface to an ideal state. Good luck! everything will work out.
there is a lot of information on these issues here
Dmitry, if you have time and need to putty on concrete without plaster, take a look. I recommend. Not expensive and the quality is decent. The rest is left to chance.
aluminum paint corner, the rest is from the wallet, prospectors, take one manufacturer, primer, plaster, putty, but it’s better to take a trusted specialist; it will use less material
Attention promotion! Free consultations on any issues regarding apartment renovation! Did you get the estimate correctly? Does the level of quality correspond to the stated price? What can you save on? How to choose a non-drinking contractor? What materials to use and how to choose? Any questions! My 17 years of experience should not be lost! To get information or order a free estimate, go to my website and look on the pages for a ready-made answer. If you don’t find it, use the feedback (the “ask a question” checkbox on the left). type in the Yandex search “apartment renovation Kaluga” select the site
This depends on the assortment offered at the point where the material will be purchased.
if the walls are very uneven, use a rotban, on a finishing LR+
1. Clean the surface; 2. Apply concrete contact; (wait for complete drying); 3. Apply the 1st layer of putty (“Vetonit LR+”) (after drying, lightly sand it with sandpaper); 4. Prime with a deep penetration primer; 5. Putty with a second layer (“Vetonit LR+”)5. Cleaning up; 6. Primer. After the primer has completely dried, the wall is ready for wallpapering.
Use rotban for the first layer, on finishing LR+
if I’m not an astronaut then I have nothing to do in space, invite a good master and your head won’t hurt, if you do it yourself then rework is inevitable, if you don’t have a lot of experience you end up wasting money [respectfully]
So invite good masters for yourself, and we’ll do it ourselves. Thanks for the advice.
I will answer all questions. specialists' answers
So that's it. Vetonit LR - first layer (two possible, with sanding) Pasting with canvas (non-woven or gossamer). Shitrok is the finishing layer. Painting (don’t forget to prime and sand properly “under the spotlight”). If you do not paint the walls, but cover them with decorative wallpaper, then DO NOT GLUE the canvas into putty.
Types of tools and devices for repair
We all live in apartments or in our own houses. But sooner or later we have to make repairs in our home, and to carry it out we need tools with which we can fix any damage.
What helps is an “ambulance” in the form of a toolbox. This is an essential item that should be in every home, just like a first aid kit.
Today, it is impossible to imagine carrying out construction and repair work without the use of modern tools. The quality of the work performed, the speed and ease of execution, as well as the service life of the tool itself depend on the quality of the tool.
Variety of types of tools and accessories for repairs
and their appointments are simply amazing. The tool is divided according to the nature of the application of force. That's why the tool is called mechanical or electric.
Apartment on Prazhskaya street, St. Petersburg
to be or not to be renovated in a new panel building?
What is the best ceiling for an apartment?
Design of a square bedroom 10m2 (aka office)
116674385) In addition, I would suggest some calm dark blue. Plus, if desired, you can add a little dark wood, a couple of bright accents (yellow, red). It might look something like this: I wouldn’t make a glass screen for the battery, I looked at your link - to be honest, it looks uh. Not good. Make it a simple white wooden lattice, it will be much better. And further. If your balcony is not insulated and/or you don’t go there every 5 minutes, I would make curtains inside: it will be more comfortable, and your chimney will be covered, and you won’t have to worry about jumping out onto the balcony every time to close or open something there. As for the lighting, given your low ceiling height, I wouldn’t stick ceiling lights there, they will only emphasize it. You could, for example, try a track one - it’s not too noticeable, and the lighting can be directed differently, some on the headboard, some on the passage at the foot. As for crooked builders, it’s better not to trust them with anything at all. And, by the way, they may also start recommending a suspended ceiling, simply because they can’t bear to bother with plaster. If you don’t have very noticeable differences in the slabs in the middle of the room, then why would you sleep with a piece of oilcloth 10 m2 above your head? (And even for this case there is drywall). Ask here on the forum - many pros have their own proven teams, maybe they will recommend you someone in your region. Good luck with the renovation!
Natalia Victorovna
I’ll write as a customer: The house is new, it hasn’t settled yet. We putty first. Then they glued some special glass fiber to the entire ceiling. Then they painted it, first with the same glue, then 2 times with paint. The same thing was glued to the walls. It turned out very well! Gave 5 years warranty. If during this time I find at least one crack, .. well, okay, no need to scare people.