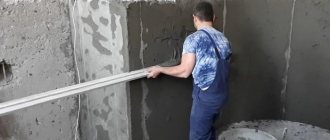
To apply relief plaster with your own hands, you will need a spatula in the form of a grater with a rubber base. With its help, the material is applied to the surface of the walls in a thick layer. It is very important to apply in different directions so that relief bulges remain on the surface. In this regard, there are no strict recommendations; everything depends on the imagination of the work manufacturer.
After laying the first layer, another layer is applied to the area to be finished, which will emphasize the depth of the relief. There is no need to worry about the quality and strength of the applied material, everything will be fine, because it can be laid up to 5 cm thick (as mentioned above).
Attention! The relief plaster applied in this way with your own hands must dry well, only then can we talk about the high quality and strength of the layer.
Drying can take a lot of time: from 8 to 48 hours (it all depends on the drying mode and the quality characteristics of the material itself).
If the plaster has dried, then you can go over its surface with fine sandpaper to remove the sharp edges of the material that remained after working with a spatula. Next, dust is removed from the walls, where you can use regular paint brushes. Do everything carefully so that the dust does not settle back on the plastered surface.
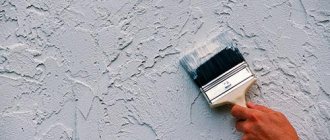
Everything is ready, you can proceed to painting (see photo). It is very important to choose the right material for this type of work. There are special ready-made dyes to which you just need to add a color selected strictly according to the color in the design project. You can also use water-based paint as a budget option. It is important to know how the dye is applied.
- If it is a water-based emulsion, then it is applied to the wall in three layers located in different directions. For example, the first is vertical, the second is horizontal, the third is vertical. There is no need to dry each layer; this technology is called “wet”.
- Special dyes are applied differently.
They are mixed with color and, using a wide paint brush, laid in large strokes on the surface of the walls. You shouldn’t fill the entire wall with paint at once; it’s better to do everything in small areas. Apply it in strokes, rub it over the area with a spatula with a rubber base, move on to the next one. Uniform distribution of the dye is the key to a successful operation.
If you want the surface of the finished walls to become a little shabby, so to speak, to give the relief plaster a little antiquity, then go over the walls with a foam rubber sponge soaked in water. You need to moisten it a little. By the way, a little applied thin layer of wax will give the plaster water-repellent properties. This means that this material can be used for finishing in damp rooms. As you can see, applying relief plaster to the surface of the walls with your own hands is not very difficult.
How to choose the right material
If you take the issue of choosing high-quality plaster seriously, you can achieve a beautiful appearance and durability of the coating. When starting a renovation, each owner decides which design concept to use:
- Wall decoration.
- Ceiling.
- Floor covering.
- Furniture style.
- Choice of accessories.
- Installation of household appliances.
What should the coating look like?
To make a room look beautiful, it is very important to choose the right wall texture. The use of all kinds of ornaments, beautiful designs and patterns allows you to hide the shortcomings of the room and emphasize the existing advantages
If you put a small drawing on the wall, the space visually increases. A large drawing will significantly reduce it. The room will look larger if stripes are painted on the walls in different directions.
When choosing a texture, you must follow several important rules. The classic interior will be decorated with a coating that imitates natural stone or leather. Metal-look material is suitable for creating a modern interior. In a children's room, the surface of the walls can be decorated with a pattern of fruits.
The most popular shades
The appearance of the room depends on the color scheme. Basically, everyone decides for themselves which color of plaster suits them most. However, there are several rules that will help you make the right choice. It is necessary to remember that dark colors make the space narrower. Light shades, on the contrary, expand it significantly.
According to designers, a room looks very beautiful when all the walls are the same color. Those who like to experiment can be advised to make two walls red and the others beige.
For the bedroom, it is better to cover the walls with calm tones. A colorful pattern will look beautiful in a children's room. The work office can be decorated with a “natural wood” texture.
Technological process of applying plaster
To achieve a beautiful appearance of the plastered surface, it is necessary to comply with certain requirements of the technological process.
First, the desired drawing is selected. Then the wall surface is prepared. Old wallpaper is removed, a layer of old plaster is removed.
To prevent fungus from appearing in the future, the surface is treated with an antiseptic. It is an excellent replacement for a regular primer.
To work, mix relief plaster. All work is carried out strictly according to the instructions on the packaging.
When the starting plaster has dried well, it is advisable to apply a second primer layer. It will improve its adhesive ability.
After complete drying, the relief of the future finishing plaster is formed.
Each drawing requires an individual approach. Sometimes it is done immediately after the mixture begins to set, the relief surface is leveled. In other cases, the drawing simply dries without any manipulation.
When the drawing is applied to the surface of the wall, it is covered with a colored tint. When the paint begins to set, remove excess with a damp sponge.
Tools for work
To apply relief plaster with your own hands, you need to prepare several tools in advance, without which such work is simply impossible:
- Sponge. Creates a color tone, the pattern gets a textured bubble.
- Roller.
- Brush.
- Polyethylene film.
- Putty knife.
- Ironing iron.
There is also a special tool that helps create a special, unique relief plaster. For example, a roller with unique attachments that allows you to create an imitation of natural leather.
After creating the relief pattern, it is coated with paint of a certain color. Creating the tone of the entire room depends on it. The best paint coating is considered to be a combination of colors.
Good to know! Existing depressions or protruding parts should be covered with a color that contrasts with the surrounding color scheme. To soften the transition, not completely dry paint is retouched.
Independent work with building mixtures
You should start plastering the walls of facades or interior spaces only after a real assessment of your capabilities, having previously studied the intricacies of the process. It is best to buy goods from reputable markets. Decorative solutions when applied to walls, especially ceilings, require a lot of experience. In addition to skills, you cannot do without knowledge of the intricacies of technology. Every owner should have their own tool, even if they don’t have to work often. The plasterer's kit usually includes:
- spatulas of different widths;
- containers for pasta;
- half and grater;
- level, tape measure;
- trowel;
- construction mixer;
- polishing device;
- rollers.
Any decorative mixture is applied in several layers over the course of not just one day, but several weeks. After applying the material, you should wait until it dries completely. You will need to cover the floor, otherwise the hardened putty will have to be washed for a long time. During the preliminary preparation process, the surface to be treated is thoroughly cleaned of contaminants. Then the wall is primed. For a concrete surface, a mineral product is better; for a brick surface, an acrylic one is better. Application of the primary layer ensures the elimination of wall defects, seam gaps, and irregularities. The formation of the next layer depends on the type of material. The final stage of plastering can begin no earlier than a day later. The gloss effect is achieved by using special tinting or polishing devices. When combining shades, each layer should be prepared immediately before application. The resulting surface color after final drying will become two shades lighter. Do-it-yourself relief plaster is a flight of inspiration and imagination.
In addition to standard spatulas, some craftsmen use a variety of improvised means: stencils, bags or foam rubber. The formation of texture must begin when the solution is no longer liquid, but still retains its plasticity. Literally after 40-50 minutes the mixture begins to harden. A novice plasterer should know that the process of finishing walls is a long one, so it will require not only patience, but also physical endurance.
DIY technology for applying relief plaster
If you decide to finish the walls yourself, then you need to realistically assess your capabilities. Decorative plastering itself is not a very complicated process, but it requires some construction skills, strict adherence to technology, and the availability of a certain set of tools, including those for creating the desired relief. It is necessary to understand that textured plaster requires special application of layers, and this may require more than one day, since each layer must harden and only after that the next one can be applied. In addition, it is possible to use ready-made solutions or improvise with shades and reliefs yourself.
Particular attention should be paid to tools. You will definitely need containers for preparing mixtures, rollers, a spatula and a trowel.
It is also recommended to protect the floor coverings from contamination with a special material, and mark the boundaries with construction tape.
Stages of applying finished texture plaster
If you already have experience in carrying out repair and construction activities, then it is enough to familiarize yourself with the following stages of installation using ready-made solutions:
- Preliminary surface preparation. At this initial stage, you need to completely clean the surface of the previous coating, as well as dust and dirt. If the wall has already been plastered before and the material is firmly in place, then it is permissible to leave it. You can make sure that there are no defects on the surface by tapping all the walls. Significant defects are puttied and, after drying, cleaned.
- Padding. For each type of surface, a primer with a specific binding base is selected. For example, a mineral-based product is better suited for a concrete wall, an acrylic-based product for a brick wall, and so on. More accurate information can be obtained from a consultant or read on the packaging. The layer can be applied with a roller and its thickness should not exceed 2 mm;
- Applying plaster. The first layer of material is a kind of leveling base, with the help of which possible defects, surface differences, joints of plates, and so on are hidden. The work is carried out using a trowel or spatula of the appropriate size. As a result or after complete drying, the surface must meet such requirements as the texture of the plaster is seamless, the absence of slopes, depressions, cracks;
- Laying decorative plaster. How many layers there will be and what technique of applying the material is used depends on the desired effect and the artist’s creative approach. The simplest method is to coat it with a ready-made solution, which, due to the addition of special components, acquires original configurations. For example, in retail outlets on stands you can see the material, and next to it there is a photo of relief plaster, which helps you make a choice, since just by the name “Lamb”, “Bark Beetle”, “Africa” or any other, the final result of the texture does not always become clear and colors.
- Polishing or painting. This final stage should be started when the surface has completely hardened, no earlier than 24 hours. In special cases, manufacturers indicate the drying time of the material. To obtain a glossy effect, wax or special polishing agents are used. Changing the color is also very simple, the main thing is to choose the right paint and apply the product in an even layer.
Stages of applying relief plaster with independent formation of patterns
In order to create a unique ornament or color palette, you need to choose a high-quality material that has the necessary plasticity. The preparatory stages are no different from those intended for finishing with ready-made plaster decorative mixtures; the main thing is to follow some rules:
Step-by-step instruction
Plastering surfaces with this material consists of several stages:
- Preparatory. At this stage, it is necessary to thoroughly clean the surface to be treated using sandpaper or a sanding machine from old paint and wallpaper glue. After this, you need to check whether the old plaster is holding firmly. If it cracks and separates into small fragments, it should be removed too. After this, you need to tap the entire working surface with a hammer to check for defects. All dents that form should be filled with putty and wait until it dries.
- Applying primer. Some people skip this stage, as a result of which the plaster begins to crumble within 3-4 years after repair. Therefore, it is simply necessary to apply this composition in order to increase adhesion, which in turn will lead to closer contact between the plaster and the wall surface. A mineral primer is better for concrete walls, and an acrylic primer for bricks. Before purchasing, you need to consult the seller, and during work follow the manufacturer’s instructions, which are indicated on the packaging. Apply the primer in a thin layer using a roller. Then let the wall dry.
- First layer of plaster. First you will need to apply a layer of starting solution. It is necessary to level the working surface. To do this, prepare a solution in proportions specified by the manufacturer. After that, a small amount of the mixture is collected on a wide spatula and applied to the wall. It is recommended to regularly check the building level to obtain a perfectly level surface. Small spatulas are used to process the joints between the wall and the ceiling and floor covering. After completing the work, you need to let the plaster dry. 12-24 hours is enough for this.
- Application of decorative plaster. The easiest way is to buy a mixture that, after drying, will take on a certain texture. It is enough to apply such material in an even layer and wait for it to dry, and then begin painting.
- Completion of work. A day after applying the layer, when the texture has already been drawn, you need to paint the wall. The paint is applied with a special roller, and the technology is no different from painting a regular surface. After the paint has dried (see manufacturer's recommendations), it is necessary to treat the surface with wax or varnish to make it glossy. If you don’t need this effect, you can just stop at painting.
Create a relief pattern
To make future volumetric plaster look the way you want, be sure to draw a sketch. It is necessary to compare the drawing obtained in reality with it and correct it during the formation process. Point two: choose a tool suitable for creating a pattern. It doesn’t have to be a textured roller; there are other options:
- equally short strokes of the spatula allow you to obtain a uniform texture, and long ones - a pattern consisting of stripes;
- using a crumpled plastic bag, the surface appears to be covered with small craters;
- An ordinary kitchen brush or brush will help you achieve a variety of textures in the form of circles or stripes;
- With the convex part of a tablespoon, you can draw leaves or rose petals on the surface, as was done in the photo.
Once the tool has been selected and tested on any surface, you will have to apply the final layer of plaster. Prepare the solution to a viscous consistency and apply it evenly onto the wall with a wide spatula so that the layer thickness does not exceed 3 mm, optimally 2 mm.
If the wall is adjacent to another type of cladding - tiles, wallpaper or plastic panels, then the latter must be glued along the edge with wide masking tape so as not to get dirty. When the finishing layer of relief plaster has completely hardened, it can be lightly rubbed in order to remove strongly protruding texture elements.
At the end of the work, paint the wall with mother-of-pearl or another composition, if your building mixture has not been tinted previously. More details about creating a three-dimensional drawing are described in the latest video:
Note. If, in addition to relief plaster, you plan to decorate the interior with stucco or create a convex image - bas-relief, then you should familiarize yourself with this material.
Tools and accessories
Tools for creating texture, relief
To know how to make a three-dimensional drawing, you should select certain tools and devices; by treating the wall with them you can get an original texture. So, in addition to traditional finishing items, the following elements may be needed in the process of creating a relief:
- the sponge will add a “bubbly” appearance or serve as the main tool for painting;
- a roller with a special attachment is used to obtain a textured print on a wet layer;
- rollers for creating a grass pattern or the formation of horizontal chaotic and even stripes;
- a plastic bag, a rubber glove or a simple brush will also come in handy when creating a volumetric effect.
Applying decorative putty
Various mixtures for plastering are available on sale. For example, these are dry compositions from which an aqueous solution is prepared and quickly used. It cannot stand without use. There is also a ready-made putty that retains its properties for a long time. When carrying out the work yourself, the option of a textured type of plaster will be convenient.
Experts assure the reliability of such coating. It is not necessary to thoroughly prepare the walls, since the composition itself can smooth out defects. First, just remove the old cladding and eliminate the cracks. For example, for bark beetle plaster this is quite enough. The condition for more thorough preparation is set for Venetian decor. The walls are perfectly aligned.
When carrying out the work yourself, the option of a textured type of plaster will be convenient.
Different application methods
To prepare material from mixtures, you should read the instructions on the packaging. The compositions are made at a time in the correct proportions, but you need to quickly develop a solution. Therefore, their quantity is limited. The unique surface is achieved using wave-like or circular movements. The lines can be horizontal or rain-patterned. Textured rollers and a shaped spatula greatly simplify the decorator’s work.
To make the surface high-quality, pay attention to the timely elimination of joints and sagging. For example, after 20 minutes use a smoothing iron
The completely finished wall will harden in a day. Fine sandpaper will remove excess.
- The fur coat looks good inside and out. Take a solution, prepare pieces of polyethylene, dense for textures and thin for creating a smooth surface. The mixture is applied, the polyethylene is crushed and pressed to the wall. Get a soft or rough texture;
- The bark beetle requires cleaning the surface and eliminating differences on it. Using a trowel tool, create a pattern. The drawings are obtained due to the presence of air underneath;
- The scales are made with a spatula. Its size determines the width of the design elements. The coating is applied to an area the size of your palm. The spatula is applied and pressed from the corner. Make sure you apply the same amount of pressure to get a neat picture.
Having set a goal, it is quite possible to master the technique of applying finishing on your own. Experience will come if you first practice on a small area.
Nowadays, such finishing, decorative plaster and putty are very popular. Many construction teams offer a similar service. But it is quite possible to master the technique of performing the work yourself. This will save money and allow you to express yourself during the creative process.
Decorating walls: the simplest way to create relief
With the advent of modern interior materials, although wallpaper has not ceased to be the most popular finishing option, especially when the task is to do it “cheaply and cheerfully,” it has significantly lost its position. Various decorative plasters are becoming increasingly popular; due to their versatility, they allow you to achieve a lot of effects when using the same composition. Most often this is an imitation of any natural surfaces, stone, fabric and even metal, and the severity of the relief depends mainly on the fraction of the abrasive present in the composition.
However, the cost of compositions with fillers, as well as certain difficulties in applying and creating a pattern, is a significant disadvantage that scares away potential consumers. But you can get the desired relief at a lower cost, and the application method is much more tolerant of amateurs.
Acrylic plaster and polyethylene
The use of expensive compounds on marble chips or marble flour, special stencils, impressions, rollers and trowels is rather the prerogative of professionals. And to decorate the walls in an apartment, room or even zone, you can get by with the simplest materials and tools.
Surface preparation
Both the decorativeness and durability of the plaster directly depend on the quality of preparation of the base; it must be strong and even. All previous finishing layers are removed - old wallpaper and paint come off easier if you wet the walls with a weak primer solution, this is more effective than wetting with just water. After some time, the residue can be easily removed with a spatula. Cracks and potholes are pre-sealed with starting compounds, and the surface is thoroughly primed. After the primer has dried, if necessary, apply masking tape to the joints of the plaster with the already finished areas.
Applying plaster, creating relief
The plaster is applied from the corner, ending in the opposite one, the plaster is applied with a small spatula to a large one and spread over the wall with a large one. The entire wall should be covered in one go - leaving a piece or half for tomorrow is not recommended. If you still haven’t mastered it, make a “ragged” line with a descending layer - the last scratch strokes. This will make the transition between fragments less noticeable, but it is better to invite an assistant and complete the wall in a day. Perfect smoothness is not required, but the layer should be uniform, about 2 mm thick.
You can create a relief using film with just one hand, but it’s also easier with two people – one puts polyethylene on the applied plaster, the other holds the rest so that it doesn’t stick randomly. They begin to form a pattern, just like plastering - from the corner, applying a film and creating folds on it, a heavily crumpled film will give a pronounced texture.
You should not use polyethylene that is too dense, it is more difficult to work with, but if you need a slight “clumsiness”, it is just right. It is convenient that under the film the plaster remains wet longer, and there is enough time to carefully work out the relief; you can first go through the entire surface, and then add “frost” in the right places. Depending on the type of plaster used, the wall will be partially ready in 12-15 hours, after which the film is removed. If the layer is thicker in places and the plaster has not yet dried, the finishing touch is postponed until it is completely dry.
Another option for creating a relief using polyethylene is not to apply film over the entire wall, but to cover the entire surface with prints using a crumpled plastic bag or a crumpled piece of film. The relief turns out to be less uniform, with characteristic “spines” formed when the plaster layer is pulled behind the film when torn off. In its original form it does not look very attractive, but if you slightly smooth out the texture, it turns out interesting.
Finishing
There are a lot of decorative options for such plaster - it is coated with wax, painted in one or several tones, and lightened in fragments. The wax is applied with a roller or sponge; if the plaster was painted in mass, use colorless or glossy; if the plaster is white, it is first painted. An interesting effect is obtained by painting in two approaches - first with a relief roller, and then with a smooth roller. The first pass will allow you to fill all the potholes with paint, and after processing with a smooth roller, the paint will remain only on the relief. To achieve the effect of antiquity, first the plaster is painted in a rich color, and then, before the paint has dried, it is carefully removed from the protruding folds with a rag, or after drying, it is lightly sanded over, resulting in characteristic abrasions.
When it comes to major renovations, sealing cracks may not be enough and more careful preparation will be required; read how to level walls. For lovers of smooth, marble coatings - an article about the Venetian. Interesting minimum budget and presentable appearance - find out how to make liquid wallpaper with your own hands. The video contains ideas for original interior design from a famous exhibition.
Source
Applying paint
Upon completion of plastering and finishing work, painting is carried out. There are only two options:
- Monochromatic coloring. Paint of a certain shade is purchased and stained.
- Getting your own shade. The base is white paint, to which pigments can be added. Professionals recommend pouring the paint into several containers and adding different amounts of color. As a result, a more voluminous picture will appear on the wall.
The plaster is painted in the desired color
Coloring can be carried out using different means, depending on the created relief (its depth):
- roller;
- brush;
- spray.
Artists often paint relief plaster with brushes to get the desired picture or entire wall panel.
Wall panel
The finishing touch to creating relief plaster will be the application of a protective coating. These products can also be found at a hardware store. In addition to protection, they will help give the wall a certain shade:
- pearl;
- golden;
- silver, etc.
Using the finishing method described above, you can transform the interior of the room and decorate the walls in an original way.
Painting plastered walls
For the convenience of applying paint, use a special tray for the roller; it helps to better roll the paint into the roller, which means there will be no drips on the wall. Next, we paint the surface with water-based paint in a pre-selected color.
It is best to paint the entire surface at once so that the tone is the same everywhere; the remaining layers are selected as planned, depending on the chosen pattern.
Masters use small brushes to paint walls; with them they can create a whole picture, a so-called panel, but for now this task is not for us, although if you are confident in your artistic abilities, you can try. After the entire surface has dried, it can be varnished with a solution for interior work.
Material for bas-relief
Expert opinion Marina Zanina Interior designer
I will say right away that an acceptable result in creating wall panels can be obtained from almost any plaster (gypsum and cement) or finishing putty
The main thing you should pay attention to is the maximum and minimum thickness of the material layer according to the manufacturer’s recommendations. Choose mixtures based on the expected result: when ideal smoothness is required, use finishing putty for the bas-relief.
How to choose a mixture for artistic plaster?
First of all, you need to choose according to the location of the planned work. Gypsum plasters are used only for interior dry rooms, because... gypsum actively absorbs moisture and loses strength
Cement-based materials are not afraid of moisture, so you only need to use them for the facade. The second thing to pay attention to is the thickness of the application. If you are planning subtle patterns and small details, then buy putty with the smallest allowable layer height
The same applies to the greatest thickness. All modern plasters can be applied in a layer of up to 5 cm. If a larger layer is required, then I advise you to choose Weber Vetonit Profi Gyps. It allows a local thickness of up to 10 cm. Also, it is better to start paintings and bas-reliefs with a large volume from plaster; it will create a strong frame. After forming the general contours of the design, the details and the upper smooth layers are made of putty.
Here are some proven materials for making relief paintings and panels:
| Name | The basis | Thickness, mm | pros |
| Knauf Uniflot | plaster | 1-5 | Very smooth, sets quickly. |
| Knauf Fugen | plaster | 1-5 | Less smooth, but “stone” strength. |
| Satentech | plaster | 1-5 | Perfectly smooth, without grain. Easy to process. |
| Volma Layer | plaster | 5-30 | It sands well, no need to putty. Easy to apply, keeps its shape. |
| Knauf Rotband | plaster | 5-50 | Rough, strong |
| Volma Aquastandard | cement | 1-8 | Suitable for dry and wet areas. The viability of the solution is up to 2 hours. |
| Weber VH | cement | 1-4 | Strong putty for exterior use |
Current prices for putty:
Gypsum putty
This video tells you which plaster and gypsum putty is best for three-dimensional paintings on the wall.
Plaster Texture Gaufree
Texture Gaufree is a relief plaster, which is sold in 2.5 liter buckets. You can purchase material with this volume for 1,000 rubles. It will be enough for 15 m2. This plaster can be used to create various relief effects. By choosing tools, you can get a finish with a unique three-dimensional texture.
Among the devices it is worth highlighting:
- graters;
- rollers with long pile;
- brushes;
- rugs
This composition is suitable for rooms with normal humidity, including:
- living rooms;
- bedrooms;
- offices.
Do-it-yourself application of textured putty on the wall
If you are planning to make an imitation of a stone cut in a room using decorative elements, you will find this short master class useful:
| Illustration | Description of action |
| To work, prepare plaster with PVA glue, two spatulas - wide and medium, a trowel, grout with sandpaper No. 6 or 8, wallpaper glue, tint, acrylic-based varnish and a roller. | |
| Before applying plaster, level and prime the wall surface. | |
| Apply the plaster mixture with a wide spatula approximately 2 mm thick. | |
| Using the uncured mixture, make transverse movements of the trowel with minimal pressure. | |
| After 10 minutes, when the surface begins to set, smooth it with a dry spatula so that there are no protruding uneven parts left. | |
| After 10-12 hours, after the surface has dried, sand it with fine sandpaper. Try not to press too hard so as not to spoil the relief. | |
| Mix the composition for painting: to 2 liters of diluted glue for non-woven wallpaper, add 1 liter of acrylic transparent varnish and the color of the color you need. | |
| Using a trowel, apply colored wax to the surface of the wall, avoiding smudges and rubbing the composition as evenly as possible. | |
| The final touch: apply clear acrylic varnish to the dry wall with a roller and spread evenly. | |
| This video shows a visual example of what DIY decorative plaster for walls can look like. Choose the shade of paint that best suits your interior. |
Blend selection
Construction plaster mixtures may vary in texture, type, and finishing technology. There are a number of compositions that are most beloved by consumers.
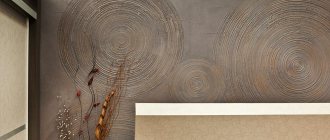
Textured. The highlight of the finish here is the inclusion of large, strong particles in its composition. More often crushed marble stone is added. The decorative effect at the end of application is very original, attractive, creating neat, at the same time careless grooves. You can see them only after smoothing the finishing layer.
Bark beetle If you want to create a surface on your wall that is outwardly “eaten away” by bugs, feel free to give preference to this particular composition. The effect is achieved due to the content of dimensional grains in the mixture, with a diameter of up to 3 mm. "Bark beetle" is suitable for interior decoration.
Flock. An interesting finish just like this. After drying, this coating imitates the texture of various fabric and stone surfaces. There is flock plaster, which allows you to end up with a “velor”, “suede”, “fur” wall. It is very beautiful, and the room acquires additional “softness” and comfort. The peculiarity of this cladding is that it requires a three-layer application. First of all, adhesive acrylic is used as a base, then flock and matte varnish coating. The decorative effect is achieved by adding large particles of dry acrylic pigment of various colors to the composition.
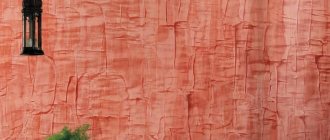
Structural. The plaster contains sand, cellulose, and fibrous inclusions. Small stone and mica may also be present. Due to this, the faction leaves traces that differ from each other. The highlight is that they are never repeated even if the same composition is constantly used, and the application technology is honed to the smallest detail. The pattern obtained after the plaster has dried: unevenness, grooves, roughness, large and small scratches.
Danish. This type of cladding has a second name – liquid wallpaper. Fillers from cellulose fiber and textile material are added here. The most expensive pleasure is plaster with inclusions of silk or gold threads. This approach gives the interior a unique luxury. Many people, in order to save money, treat not the entire wall with Danish plaster, but its individual compositional elements using stencils.
Plaster. The composition is based on gypsum putty. Dye and filler are mixed in it. You can make such a construction liquid yourself using the following instructions: mix 3 kg with a mixer. dry plaster, 100 ml. pva glue, 1 liter of water, fillers made of sand, small stone chips, marble pieces, and a little acrylic paint for the desired color. Without special knowledge or skills, such a composition is not recommended for independent execution, since the resulting coating threatens to crumble.
Venetian. Owners who can afford an expensive interior with an element of luxury will like this plaster. The main filler here is marble, malachite, and granite chips. At the exit, Venetian cladding imitates a stone coating. Thus, large inclusions create the image of hewn stone, smaller ones - finished stone tiles.
Repair of decorative plaster
Decorative plaster periodically requires repair or restoration. Cracks, swellings, peelings and chips appear on it. It is not difficult to repair the damaged area with your own hands.
If you notice swelling of the plaster, go over the entire surface of the wall with a wooden hammer and listen to how it sounds. A dull sound will tell you which area has peeled off. This area of damaged plaster should be removed using a hammer drill, chisel, hatchet, etc. Then scrub the wall with a wire brush and prime. Before applying a new composition of decorative plaster, thoroughly moisten not only the cleaned area with warm water, but also the adjacent plaster for better adhesion of the materials to each other.
Try to apply decorative paint and repeat the pattern that was there earlier. To ensure that the difference in the pattern is not so noticeable, repair the plaster by knocking out a rectangular area.
After the plaster has completely dried, it must be repainted. This way you will mask the joints and heterogeneity of the layers.
Cracks in decorative plaster can be repaired in a similar way. The crack should be widened and all the measures described above should be carried out.
Surface preparation
In order for decorative plaster to last long and with high quality, the surface must be clean, dry, and even!
Before applying decorative plaster, you need to remove the old wallpaper. You can leave the paint, but make notches on it with a chisel. There should be at least a hundred of them per 1 square meter. If the old plaster is weak, remove it. You can partially remove it by tapping the wall with your fist, where the sound is dull, which means there is emptiness under the plaster and it should be replaced. We clean damp places and places with mold to the ground and treat them with special antifungal agents in several layers. For work we use a paint roller. Before doing this, eliminate the source of moisture, if any.
We sweep away dust and debris from the surface.
Pros and cons of using
Everything can be learned by comparison: ordinary wallpaper provided the owners with a whole set of undeniable advantages, the main ones of which, perhaps, are the ease of application and versatility of use. What about the obvious advantages of textured plaster?
- resistance to any mechanical stress;
- excellent vapor permeability;
- maintaining performance at any temperature;
- high level of fire resistance;
- not afraid of ultraviolet rays;
- variety of surface relief;
- wide selection of color options;
- no toxic substances in the composition;
- good heat and sound insulation;
- basic installation and dismantling.
As you can see, textured plaster has more than enough advantages in terms of expressive wall design - in the photo you can only see how perfectly this or that texture fits into the interior. If you go from the other side and try to “dig out” the negative, then the first thing that comes to mind is the relatively short service life
. Regarding other, more sustainable finishing materials. Otherwise, we have before us a case where even with the greatest desire to come up with a minus out of the blue, nothing happens.
Advantages and disadvantages.
Relief plaster has a number of advantages. Here are the most significant of them:
- insulation effect. To achieve it, you need to pre-treat the wall with a primer (before applying plaster);
- the ability to disguise any unevenness and lumpiness at the base of the walls;
- easy operation. Detailed instructions for using any type of plaster are indicated on the production packaging. Usually you can apply relief plaster with your own hands and without difficulty, the main thing is to use the simplest tool (roller, spatula). In addition, it can be used to process almost any coating;
- a wide range of plaster allows you to choose the necessary product that suits the overall design of the room;
- environmental cleanliness. Almost all solutions for relief decorative plaster do not contain toxins, there are no harmful substances;
- aesthetic appearance. This cladding material looks quite original and elegant;
- resistance to external mechanical influences, changes in weather conditions;
- protection against absorption of foreign odors;
- ease of care. If the walls become dirty, you can simply wash them with running water;
- durability.
The only drawback it has is its far from budget price. However, taking into account all the listed advantages, its purchase is a very profitable investment that will definitely pay off over many years of service.
Types and methods of applying decorative plaster with your own hands
Manufacturers supply two types of finishing material to the market: dry and ready-to-use composition
It is important to correctly apply the heterogeneous mass to the walls. If the technique of applying decorative plaster is violated, it will be impossible to obtain the desired result.
The mixtures may contain natural or synthetic binders. Natural ones include lime and cement, and synthetic ones include polyvinyl acetate and acrylic resin. Sand, granite and marble chips are used as filler.
There are several ways to apply the finishing coating:
1. Spray method, or using a trowel. The surface texture depends on the dimensional characteristics of the grains. In order to achieve similarity in texture to untreated stone, it is necessary to use a composition that contains grains measuring 1.5 mm. To imitate the effect of tree bark, it is necessary to give preference to a grain size of 3 mm. The spray method is a fairly popular method of applying finishing coatings to walls.
Method of spraying decorative plaster
2. A method that uses a comb or a wide brush. Running a comb over the laid layers of finishing makes it possible to obtain a variety of patterns. When working with a tool, it is necessary to decide in advance on the type of movements: straight, circular, chaotic and wavy. Many designers prefer to combine several types of movements in order to obtain exclusive patterns.
It is important to prepare a solution of the correct consistency for the job.
Running a comb over the plaster on the wall
3. Trimming method. In this case, the trowel must be placed on the fresh solution and torn away from it. The mixture that has managed to stick to the trowel will continue to stick to it for a couple of seconds. Only then will it burst. This way you can get scallops. If desired, they can be smoothed using a plastic trowel or flattened using a damp sponge.
Trimming method for applying decorative plaster
4. Roller rolling method. Thanks to this method, you can achieve the effect of figured cylinders on the wall or figured pile. You can use stencils in your work. Decorative plaster should be applied to the walls with a fluffy brush, which will make it possible to achieve a straw effect.
Roller rolling method for applying plaster
5. Simultaneous application of several mixtures, which are painted in different colors, allows you to obtain walls with gradient transitions between shades. The composition of various tones is applied to the extreme part of the trowel with a spatula. Portions should be small. The surface of the walls is covered with strokes in an arcuate manner, forming thin layers.
Plaster with gradient transitions
Features of working with textured plaster
Textured plaster, also known as structural and Venetian plaster, is a heterogeneous viscous composition of white color. It contains a binder and multi-fraction granules. Textured wall plaster allows you to create coatings with varying degrees of grain, rough texture, and a rich color palette. You can make textured plaster that will imitate the texture of stone, wood and other materials.
Textured plaster allows you to create coatings on walls that have different degrees of grain, rough texture, and a rich color palette.
Textured wall plaster does not limit your imagination. For example, you can add a special fine-grained material (the so-called “bark beetle”) to the mixture and decorate the surface to resemble wood eaten away by the beetle of the same name.
Textured plaster of walls can be done indoors and outdoors. For exterior wall decoration with your own hands, it is best to use a mixture that contains calibrated granules. Interior finishing is traditionally done using plaster containing small unsorted granules or granules of different fractions.
A coating with a large calibrated filler is applied using a special grater or trowel. The layer of plaster, however, should not exceed the size of the contained granules. Textured plastering of walls using a material with mixed filler is performed using a trowel and a roller. The spraying technique is also used. In this case, the order of application depends on how thick the mixture used is.
Fine-grained compositions are liquid solutions prepared on the basis of lime. They are easier to work with. This plaster can be applied using a vacuum cleaner or roller.
How to apply decorative plaster with your own hands using different tools
You can achieve an interesting textured structure using several methods, including using tools and devices from your home arsenal. We have selected for you video and photo examples of how to apply decorative plasters with your own hands.
Trowels and spatulas for applying decorative plasters
We showed you how to operate a simple spatula and trowel in the master class. Other methods are also possible. For example, a notched trowel can leave parallel grooves. In this way, it is easy to create an intricate chaotic pattern with deep relief. You can find master classes on applying decorative putty on the Internet.
In addition to spatulas and trowels, it is possible to use a trowel to create unusual textures.
Secrets of applying decorative plaster using rollers with your own hands
The use of a roller is perhaps one of the most primitive methods of giving uncured plaster a relief appearance. The result directly depends on what is on the surface of the tool. Keep in mind: if you choose a roller with a fur or fleece cover, make sure that the fibers do not pull out during the process.
Otherwise, the pile will remain on the walls, and it will be very ugly
Rubber or wooden rollers can imprint a clear pattern and even ornamental stripes on the putty. To achieve a high-quality result, you need to regularly wash and wipe the roller.
Video on how to apply textured plaster for walls yourself using a roller:
Watch this video on YouTube
Improvised devices for creating relief
You can make your own tool for creating a relief surface from scrap materials. Polyethylene, fabric, ropes or even newspapers will be used. If you crumple up fabric or paper, it will leave clear imprints on the uncured plaster. The main thing is not to overdo it with the pressure.
You can wrap a rope around a regular round roller and it will become embossed.
You can even apply patterns with a broom: thin branches of millet will leave shallow grooves on the surface, which will appear more clearly after painting
Features of the technological process
Decorative plaster panels
To achieve the desired result, all work must be performed in a strictly defined order, which is prescribed by technology.
- Selecting a suitable pattern for the style of the room. It is best to print out the sample in several copies so that the sheets are always at hand. This will allow you to accurately reproduce your plans.
- Surface preparation. The process is quite labor-intensive, as it requires completely removing the previous finish.
- Removing dust and dirt using a broom, rags and water.
- Padding. Modern primer solutions are also used as an antiseptic that will protect against fungus and insects.
- Applying the starting layer of plaster. He is the basis.
- Re-priming the surface after the starting layer has completely dried.
- Formation of the relief with the finishing layer.
- At the last stage, the completely dry wall is covered with paint. If there are excesses and drips, it is best to remove them immediately using a damp foam sponge.
The operating algorithm is quite simple, so you should not take risks and deviate from the described process. Otherwise, it will negatively affect the final result. There is no need to rush in the process of creating the desired relief, as this may take more than one day.
Creating relief using a roller
Each drawing involves the use of certain objects and technologies.
Which is better: mineral, acrylic or silicone?
All four main types of solutions have features determined by their base and other components. Due to poor environmental friendliness, silicate compounds are not used for interior work. Therefore, below we will mainly talk about three types of decorative solutions.
Mineral
The main binding components of the solutions are white cement M500 and lime. These structural compositions do not shrink when hardened, “get along” well with any base (although somewhat worse than silicone and acrylic), “breathe”, are environmentally friendly, fit well and keep their shape. They are not afraid of water, so they are suitable for plastering wet rooms such as bathrooms and basements. They can be washed with soapy water or dishwashing detergents.
Since mineral plasters are quite hard, they are not resistant to vibrations and various movements. When the house shrinks, cracks appear. Therefore, they cannot be used in new buildings until the buildings “nest” - settle down. They are also not used in seismic areas or near railway tracks.
Non-flammable, therefore can be used near sources of open fire. Lime compositions are not susceptible to mold and mildew. When colored clays are present in the composition, they turn out colored. Mostly they are white or colored. Service life 10 years.
Acrylic
The binders of this type of mixture are acrylic synthetic resins. The basis of the solution is a water-dispersed emulsion. In addition to the filler, substances are added to it that impart the necessary properties - biocides, fire retardants, etc. The structural acrylic mixture is supplied ready-made in buckets.
Acrylic mixtures are tenacious, durable, and elastic. No harmful fumes are emitted. However, they hardly “breathe.” Because of this, they are not recommended for use in bedrooms and living rooms. However, they are good for bathrooms. Not resistant to UV radiation, flammable. They accumulate static, so they become dust collectors. Wash and clean with a vacuum cleaner.
Guaranteed durability – 15 years.
Silicone
The binders of structural plaster are polymer resins. It is very elastic. The polymerized dispersion has high strength. It is hydrophobic, but breathes due to micropores. It does not get dirty, it is fire resistant, it is not afraid of UV rays, it does not fade, it can be used for work indoors and outdoors. Wear-resistant. Pre-priming is required. Serves for 25 years. Most expensive. Rich palette. Evaporation during hardening.
Of the three plasters presented, the most tensile is silicone. It requires a silicone primer and is the most expensive. Decorative acrylic and silicone compositions do not require final painting and are sold ready-made. These are relatively recent materials. However, mineral plaster, which is somewhat inferior to them in several individual positions, in general, copes well with the functions of a structural decorative coating and has its advantages.
Therefore, all three types are good in their own way.
How to make a mineral mixture using regular putty? Take 4 parts of it, add 3 parts of clean sand, mix the mixture and add water to the desired consistency. You will get structural decorative plaster - a mixture that has a structure suitable for creating texture.
Primer and leveling
The primer is needed to increase adhesion (adhesion) between the decorative plaster and the base of the walls and as a protective barrier against the appearance of fungi on the surface. We treat the entire wall with a deep penetration primer; it is convenient to use a paint roller or a wide brush; The wall must be covered completely, but without drips. Let the primer dry for 2 hours.
We level the areas where the plaster was removed with a new solution. Its composition should be the same as the original one: cement-sand, gypsum, clay, or lime. Do not begin further work until the solution has completely dried; the process may take a day or more. Also treat areas with new plaster with a primer.
Work principles
The installation of decorative plaster is carried out in several stages:
- surface preparation;
- preparing the solution;
- applying the mass;
- pattern formation;
- painting, waxing, glazing.
The application technique can include from 1 to 3-4 layers with a total thickness of up to 10 mm. The interval between operations ranges from 15 minutes to 6-8 hours.
It is recommended to work together - one person applies the mixture, the other forms the pattern. If there is only one master, the plaster is divided into sections of 1-1.5 sq.m.
The surface texture depends on the type and size of the filler:
finely ground grains form a fairly smooth structure, the relief on the wall is set by the master; Large inclusions themselves create a pattern; it is important to correctly apply the material to the surface.
Before painting, the coating must be dried for up to 24 hours. Coloring can be done in several stages. Additional processing to obtain an artificially aged surface, patina or pearlescent sheen will give the finish an even more attractive and impressive look.
Technique for making relief paintings
The first thing you need to start with is preparing your workplace. You will need:
- Place decorative plaster on a plastic board.
- Add a few drops of color. You can not mix completely, but leave color transitions from saturated to almost white.
- We collect the material on the back side of the palette knife: use the edge of the working surface to separate it a little. You can apply it in one go or in several short strokes.
- In the place in the picture where there will be a petal or leaf, place the palette knife on the other edge and leave the plaster on the canvas with one stroke.
- Do not forget to wipe the palette knife from any paste residue.
- When forming a flower bud, first make the lower petals, then overlap them with the upper ones.
- With a palette knife, you can also correct the edges of the elements, wrap them, and leave characteristic grooves.
Having mastered this basic technique of strokes and combining their directions, you can create simple relief compositions.
What materials will be needed for the work?
Leveling mixtures. They can be gypsum, cement and clay. It would be wise to use a gypsum-based mixture when the finishing plaster is also gypsum. A cement base is also suitable, this option is very economical, you only need cement and sand. Clay mixtures are used very rarely, but their plasticity and harmlessness make them a good option.
Finishing mixtures. The range of such mixtures on the modern market is quite large. For each type of texture, their own mixtures are produced. When choosing, you need to carefully read the recommendations on the packaging.
It is better to use water-based paint. Color depends on individual decision. If the desired shade is not available, then you can buy a white base and dyes for it.
To ensure that the surface lasts for a long time, the painted wall is additionally coated with varnish.
Tools we will need
First, we will need standard items for plastering:
- container for diluting plaster mixture;
- assembly mixer for mixing the mixture;
- Master OK;
- a set of spatulas of different sizes;
- trowel - for rubbing the surface;
- mounting level;
- Plastering tool
To apply relief plaster we will need additional tools:
- In general, any object can be suitable for applying relief, be it a fork, a toothbrush or anything else that gives a decorative shape to the solution. A sponge is for applying a “special” bubble-shaped pattern;
- roller with a pattern - can be purchased at a hardware store with a ready-made and symmetrical pattern;
- plastic film - can serve as an option for creating texture and a unique pattern;
- car tire - can also serve as a design option;
- roller attachments – there is a large selection of roller attachments with a wide variety of designs.
How to choose the best materials First, we need to determine what materials we will need, and which one will suit us best.
Tool for relief plaster
Creating a bas-relief
Preparation
An orientation marking is drawn on the wall, which is necessary for the symmetrical and even application of decorative details.
It is advisable to make markings according to existing landmarks (corners, joints, edges of openings, etc.), since they are very often not perfectly smooth. If you place the bas-reliefs according to the marks made using the mounting level, they will “lie” perfectly evenly on the walls, and this will visually show the “curvature” of the walls, openings or corners of the room.
Fixing the stencil
In order for the bas-relief to turn out to be of high quality, it is necessary to place each template evenly on the wall. You can use several options for this:
- use adhesive compounds, however, they often leave absorbed stains and surface irregularities, which then additionally need to be removed;
- use double-sided tape or masking mesh - they are easy to use and can be easily removed from the plaster.
As a result, the fixative is applied to the stencil no closer than 4.0 mm to the edge of the cut out ornament. Carefully, without displacement, the matrix should be attached to the wall.
Priming the wall
This step is not mandatory, however, it will only improve the adhesion strength of the bas-reliefs to the surface being decorated. The technology for covering a section of wall for decoration with a primer solution does not differ from the similar preparation of walls before painting or wallpapering.
Recommendation! It is convenient to apply impregnation with a sponge, through which the required amount of primer composition, without smudges, is evenly distributed over the required working area!
Each priming (optimally 2 layers) should be followed by sufficient drying time.
Applying a bas-relief
Spectacular, three-dimensional designs will be obtained only from a fine-grained putty mixture. When ready for use, it is a homogeneous, viscous, pasty mass.
Putty material can be purchased ready-made or as a dry mixture for diluting yourself (instructions with a recipe are usually included).
The putty is applied in several layers to the stencil (cut out area), covering it evenly, and each new layer must be thoroughly compacted.
Making your own plaster
After looking at the photo of relief plaster, you can make such a mixture yourself. The process will use available and inexpensive materials sold in a construction supply store. For example, plaster for interior work can be made from sifted and washed river sand, which is used in an amount of 3 parts by volume.
If you decide to use quarry sand, you need to soak it in cold water for several hours to get rid of any remaining greasy clay. To make the mixture, finely ground starting gypsum putty is used, which is used for preliminary leveling of walls. This ingredient will be added in an amount of 3 parts by volume.
The binder will be dry gypsum building mixture in a volume of 1 part. The components are mixed well in dry form, then cold water is added to them. The composition should be mixed well again with a construction mixer until it has a homogeneous consistency.
A selection of photos in the interior
We invite you to look at the photo of textured plaster for wall surfaces in the interior. By selecting examples, we tried to demonstrate how advantageous this finishing material looks in different design styles. Also note that almost everywhere he takes an active part in creating the unique atmosphere of the room. This point is very important if you want to “make friends” of plaster with the features of your interior.
Frequently asked questions
Beginning finishers face the same type of problems.
The most common questions that arise during work:
What is the best tool to work with?
The choice of tool depends on the type and characteristics of the material. For compositions with large fillers, ordinary tools are used - a trowel, a trowel, a grater. For finer textures, use toothed slats or crumpled rags (polyethylene, paper). There are many options, you can try to create your own technique.
Is it possible to apply textured plaster to brickwork without preparation?
This is only possible for trains with large relief. However, masonry seams may stand out on the plane, therefore, it is recommended to first carry out preparation and apply a layer of primer.
Which is better, factory-made or home-made textured plaster?
It is difficult to compare homemade and factory-made plaster, since there are many materials and their performance qualities differ significantly from each other. However, if there is no practical experience in creating plaster, factory-made material will be a more reliable choice.
How long does it take to finish?
The duration of the work depends on the type of material and the qualifications of the craftsman. If he has the proper skills and experience, the procedure differs little in time from ordinary plastering of walls (sometimes it goes even faster).
How to paint a finished relief?
The most common method of applying paint is with a semi-dry roller. Only the upper levels of the relief are covered, resulting in a two-color coating with an expressive and effective pattern.
Working with textured plaster is a creative process. There are no clear requirements for the tool used. The main criterion is the result. You can choose any methods and techniques of work, the main thing is to get a strong and attractive surface.
What it is?
Modern compositions have serious protective capabilities, therefore, special attention is paid to decorative capabilities. Textured plaster is very popular, forming a specific relief pattern on the surfaces. This is a material that gives a lot of design options and is capable of creating exclusive types of coatings. Let's take a closer look at it.
Expert opinion
Kukushkin Anatoly Sergeevich
Repair specialist
Textured plaster is a group of finishing materials designed to create relief decorative coatings. The group includes many compositions made on the basis of various binders with fillers. A feature of textured plaster is the versatility of the coatings formed, the ability to acquire different types of relief without changing the composition. The result depends on the skills and application technique. Two craftsmen, using the same composition and set of tools, can create externally different types of coatings.
There are many types of textured (it can also be sold under the name decorative) plaster on sale. However, it is not difficult to make it yourself - just mix a regular solution with a filler (fine crushed stone, fibers, other components) to get textured plaster. Many users prefer homemade compounds because they are cheaper and can be created to suit the finishing conditions.
Briefly about the main thing
- First of all, you need to choose the pattern that you want to put on the wall, remember it and think through every little detail so that it turns out exactly the way you intended it.
- The second very important stage is the preparation of the walls; everything needs to be done carefully. You need to remove old wallpaper, tiles, plaster, everything that is unstable on the wall.
- We sweep away all small elements (dust, dirt) with a brush or broom so that they do not interfere with applying the mixture.
You definitely need to prime the wall, this will help improve the adhesion of the mixture, which will give wear resistance and durability to your work.
- The relief mixture is applied only to the base layer, which also needs to be primed, since without it the wall most likely will not be level.
- It is best to use a ready-made mixture in jars or buckets; it is diluted in the required proportion, which means the quality will be better than a homemade mixture.
- The so-called stone plaster can be used; it contains many small stones, when rubbed, various intricate patterns are formed.
- It is advisable to apply varnish to the surface, especially if the plaster is made to look like stone or leather.