After some time has passed after the completion of the repair, stains appear on the ceramic tiles, they fade, scratches appear on the coating, and the seams between the tiles begin to let moisture through. This is especially true for porous coatings with a matte finish - such floors are most susceptible to mechanical stress and contamination. A good way to prevent such troubles is to varnish the tiles. Varnishing will not only protect against damage, but will also provide a higher contrast in the colors of the materials and give the floor a fresh look for several years to come.
Areas of application and technical parameters
Varnishing of tiles is used for the following coatings:
- absorbent ceramic tiles (for example, Tuscan tiles, terracotta, etc.);
- cladding with seams based on cement grout;
- cladding made of natural stone or brick;
- concrete floors, coverings made of natural and agglomerated stone, as well as paving slabs, etc.
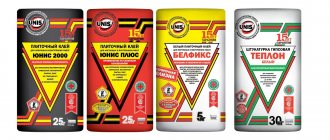
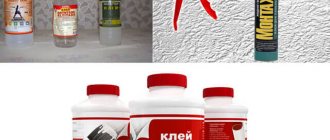
This type of varnish is usually made on the basis of acrylic with the addition of very small particles of ceramics. Also, the tile varnish may include a urethane polymer dissolved in aliphatic solvents.
After drying, the treated surface becomes glossy and much stronger, which helps prevent mechanical damage.
The tiles are coated with a protective varnish to avoid fading and various mechanical damages.
How to properly paint tiles in the kitchen
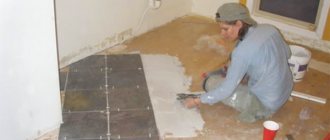
Painting ceramic tiles in the kitchen with your own hands is quite easy and quick. You can also do a very beautiful painting that will highlight the overall design of the room. This option is considered the most budget-friendly option for updating tiles. It is possible to very quickly improve the condition of tile joints.
Before painting tiles, they should be degreased and free of dust.
In particular, you can:
- Paint;
- Treat with vinegar solution;
- Replace grout.
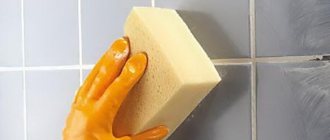
After painting the tiles, it is important to know what to do with the seams. Light-colored tile joints darken very quickly, lose color and become covered with a greasy coating. The easiest way is to paint the seams between the tiles. The most ordinary paint or marker will do for this.
Before painting, you need to thoroughly clean the seams from dirt and dry them well.
If the seams between the tiles are darkened, then most likely the reason is the formation of mold. You can clean it with a weak vinegar solution. Then carefully wipe the seams with a soft cloth or sponge. The most difficult and reliable method is to replace the grout. To do this, you need to remove the top layer of the old grout and apply new putty.
Tips for use
If you are going to varnish Tuscan tiles, terracotta tiles or any other highly absorbent surfaces, you should avoid using varnish until the regular adhesive has completely hardened. Otherwise, the tiles are in danger of fading. In some cases you will have to wait several months. If installation is carried out on dry screeds using cement-based adhesives, the waiting period is radically reduced.
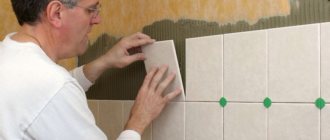
The varnish must be applied in a thin and even layer. For this operation, you can use a piece of fabric. The main thing here is to prevent sagging, which is especially visible on a light-colored surface.
Note! Do not apply paint and varnish material to a surface whose base is poorly insulated from moisture.
Instructions for use
The tiles must be absolutely dry and free from dust and all kinds of contaminants. All traces of cement should be removed and the seams should be leveled. Thorough cleaning of the floor is a must before starting varnishing.
Applying varnish
Paintwork should be applied using a clean piece of soft cloth. There should be no lint on the fabric. You can also use a soft brush. Consumption of tile varnish is from 100 to 200 grams per square meter. The varnish should be applied evenly. It is wrong to pour varnish onto the tiles and then spread it over the surface - this will lead to the formation of sagging and stains.
After applying the layer, you need to let the composition absorb for several minutes. Next you need to remove the remaining varnish with a rag. If the material is highly absorbent (terracotta, Tuscan tiles, etc.), it is necessary to process the tile again to achieve the desired result. On poorly absorbent tiles, the composition can only be applied with a soft cloth in order to prevent streaks that will visually spoil the floor.
The best way to apply varnish to tiles is with a soft piece of clean cloth.
12 hours after treating the floor, you can walk on it. Applying varnish to wall tiles follows the same principle as to floor tiles.
Tile varnish can also be used to pre-varnish Tuscan tiles and other easily absorbent materials before laying them with cement-based adhesive or before creating joints. These steps will make cleaning the finished tiles easier. However, pre-treatment is not necessary when laying terracotta over mortar as this will cause the material to fade.
Note! The consumer properties of tile varnish are maintained for 1.5-3 years.
Upon completion of work, hands, tools and work clothes can be cleaned using turpentine or other solvents.
Installation of terracotta tiles
First, the surface undergoes preparatory measures. If it is planned to cover an outdated masonry of brick blocks with terracotta, the base is freed from accumulated dirt, settled dust, deposits and residues of greasy substances. To prevent cracking and peeling of the coating, the structure of a newly constructed fireplace should be in its final position after the shrinkage process. In baths and saunas, surfaces are freed from harmful microorganisms, covered with an antiseptic primer and dried thoroughly. Next, a heat-resistant mortar is selected that will be used to attach the terracotta cladding elements:
- Cement adhesive contains modification additives that improve the resistance of the elastic layer to high temperatures.
- Heat-resistant mastics are completely ready for use, form a stretchable layer, adhere perfectly to the base plane and completely dry four hours after application.
- Cement-sand glue is prepared by combining dry cement with sand in a ratio of 1:3. The components in the container are diluted with water and mixed to optimal density. The resulting material is supplemented with table salt (ratio 10 l:1 kg) and a small amount of asbestos. All components are mixed with a construction mixer until a homogeneous composition appears.
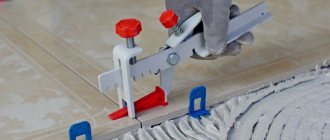
To make the masonry resemble brick blocks, installing terracotta tiles begins at the corners of the structure. Before its implementation, the surface to be decorated and the side of the product containing the corrugation are treated with an adhesive solution, the thickness of which is controlled with a notched trowel. Next, the material is applied to the base and, with short movements, takes on the optimal position. The correspondence of the formed rows to the axes is controlled by the building level. In order for equally wide seams to appear between the tiles, it is recommended to use plastic auxiliary crosses, which are removed the next day after laying work.
When cutting a covering element, a path is marked along which the cutting edge of the disk attached to the grinder is drawn and a piece of the required size is separated. Breakage of the porous product is prevented by careful execution of the work mentioned. The next day after installation, the seams between the terracotta tiles are grouted. To get an acceptable result, craftsmen are recommended to use mixtures that resist 400-degree heat. They are prepared according to the manufacturer's instructions and applied with a special gun.
In order for the layer to be 6–8 mm thick, the pistol nozzle is cut at a certain angle using a paint knife
Then it is inserted into the space to be treated, and the master carefully squeezes out the troweling material, moving the device along all joints until the thickness of the layer matches the level of the tiled surface. After a two-hour pause, the remaining grout is removed with a knife blade, and the seams are finally leveled with the fingers of hands equipped with protective gloves.
Safety instructions
When working with paints and varnishes, the following safety rules should be observed:
- It is mandatory to use protective glasses and gloves;
- It is also advisable to use a respirator;
- Paintwork materials can only be stored in a cool room;
- Do not smoke near an open container of varnish or maintain an open flame where varnishing is in progress;
- It is strictly not recommended to throw paint residues into the sewer;
- The room where the varnish is stored must have ventilation or good ventilation.
Composition of the varnish mixture
Typically, varnish for ceramic floor tiles is made from acrylic resins with the addition of very small ceramic particles. In addition, the tile varnish may contain polyurethane polymer substances that are dissolved in an aliphatic solvent.
Depending on the composition, glossy and matte varnishes for tiles are produced. On a matte surface, dirt is less visible, while a glossy finish is shiny, reflects light well, and looks very attractive. Regardless of the type of gloss, each composition has a high level of strength and wear resistance, protecting ceramic tiles from damage.
Lappated tiles (semi-polished, honed, Lappato, Semilucido)
Lapped or semi-polished tiles are quickly becoming one of the most popular modern tile options for interiors of a wide variety of types and purposes. The peculiarity of lappatted tiles is the alternation of polished and matte areas, which allows you to achieve a unique aesthetic and stylistic effect of a wet surface.
Lapped tiles are also made by grinding the original matte tiles. However, this process does not reach the same intensity and depth as in the case of polished tiles. In this regard, lappatted tiles are significantly more resistant to aggressive environmental influences and physical wear, which is why they have become especially widespread in interior decoration for commercial and public purposes.
Area of use
Tile varnishing is used for the following types of coating:
- cladding with cement-based joints;
- ceramic tiles that absorb moisture, for example, varnished Tuscan tiles or terracotta;
- protection of natural stone or bricks;
- treatment of concrete surfaces, including walls and floors;
- agglomerated or natural stone, all kinds of paving slabs;
- processing of clinker tiles.
Advantages and disadvantages
Varnishing ceramic tiles provides many undeniable advantages. After the varnish dries, a thin but very durable protective layer is created on the surface. Varnishing tiles, especially old tiles, can make them attractive again and save money.
In addition, in some cases, after varnishing, the floor covering becomes less slippery.
If you varnish tiles that are in conditions of excessive air humidity and temperature fluctuations, the acrylic varnish mixture will protect the material from gradual destruction. How to varnish terracotta tiles for stoves? The varnish fills all the microcracks and pores located on the surface of the new or old tile, as a result it remains protected from the absorption of moisture and water. After varnishing, it is much easier to care for the surface, since a flat and smooth wall or floor becomes dirty very slowly, and cleaning is done very quickly.
After using tile varnish, this material will not fade, that is, its shade will not change over time, thanks to which the tile remains attractive for many years.
If you do not follow the varnishing technology and apply the varnish mixture incorrectly, the appearance of the coating will be ruined. And if you varnish a floor that a huge number of people walk on every day, the coating will wear off very quickly, despite the fact that it is durable and reliable. The old varnish layer, which has completely hardened, is quite difficult to remove.
Polished tiles (Lucido, Pulido)
Polished tiles are made by sanding raw tiles until they have a shiny, glossy finish. Since polishing works with the structure of the tile itself, and is not applied on top (unlike glossy tiles), it enhances the aesthetic characteristics of the finishing material, making its pattern and texture more rich and authentic.
The way polished tiles are produced also makes the pattern permanent—it won't wear off or fade over time. And it is susceptible to scratches, wear and damage to the same extent as other types of tiles. All this allows you to confidently use polished tiles in high-traffic interiors.
The main disadvantage of polished tiles is that their surface becomes especially thick when wet. Therefore, polished tiles are more often used for finishing interior spaces and for wall use.
Consumption
The consumption of tile varnish depends on how quickly the material absorbs liquid, as well as the temperature and humidity of the air. If the liquid is absorbed very quickly, you will have to varnish in several layers. In addition, in order to achieve the desired aesthetic result, it may be necessary to apply not one, but several layers of varnish; thanks to multi-layer varnish, the shade of the surface will change.
Typically, ceramic tile varnish does not wear out very quickly. The consumption of this paint and varnish material for tile materials is approximately 100-200 grams per square meter. Porous materials absorb varnish much faster, so consumption increases, but smooth, even tiles without pores absorb much less of the mixture, so consumption is minimal.
The nuances of using epoxy paint for tiles
In order to beautifully and permanently renew old, but durable decorative tiles, you need to take the choice of paint used very seriously. When choosing the most suitable dye, you must take into account the adhesive qualities of the surface.
Epoxy paint has a long service life and a wide variety of colors
They can be:
- Weak – tiles;
- Moderate – clinker or ceramic tiles;
- Good - gypsum.
In addition, when painting, be sure to take into account the location of the tiles. If you need to carry out work in damp rooms, such as a kitchen or bath, then moisture-resistant paints and varnishes are used.
Epoxy paints are best suited for flooring, as they apply evenly, dry quickly, are easy to clean, and are resistant to mechanical damage and abrasion.
When painting tiles, it is best to use less toxic mixtures. For ease of use, you can take acrylic-epoxy paints made in aerosol form. There are many options for epoxy paints, differing in their composition and technical characteristics.
Varnishing tips
If you need to varnish terracotta tiles or Tuscan tiles or any other surfaces that quickly absorb liquid, you need to wait until the adhesive has completely hardened, otherwise the shade of the tile may fade. Sometimes you need to wait from several weeks to several months. But if the installation is carried out on a dry concrete screed, or cement-based adhesive is used, then the waiting period is significantly reduced.
It is not recommended to apply varnish to floor tiles in a very thick layer. It is better to apply 2-3 thin coats than one thick coat. You need to varnish evenly, avoiding gaps, and you should not allow sagging or the appearance of puddles, which will be too visible on a light-colored material.
You can varnish with a regular piece of fabric.
Attention! It is highly not recommended to varnish a material whose base is not protected from moisture penetration.
It is allowed to varnish the tiles only after they have been cleaned of any contaminants, including cement residues, dirt, dust, grease, etc. The seams must be aligned. The varnish must be applied only to a dry and clean surface.
Advantages of terracotta tiles
The wide distribution of the tile covering in question in the decoration of fireplaces, stoves, and other surfaces of the apartment is due to:
- Unstrict geometric shapes that create a luxurious atmosphere of an aesthetically attractive interior.
- Masking defects. Cracks, deep seams and other problems with brickwork are easily hidden under the tiles.
- Updating the design, allowing surfaces to always correspond to modern trends in design art.
The durable structure of terracotta tiles can be used for a long period of time. It effectively resists the destructive effects of the heat generated by the fireplace, as well as seventy cycles of thawing and freezing. The interiors of baths, saunas and other periodically moistened rooms are decorated with a material that is unable to absorb liquids. The original color is preserved under the ultraviolet part of the radiation sent by the sun, and the natural environment is not polluted by the environmentally friendly components of the products in question. Thanks to this, the well-being of people in rooms decorated with terracotta does not deteriorate.
Safety precautions
When working with paints and varnishes, the following rules must be observed:
- You can only work with safety glasses and rubber gloves;
- It is recommended to wear a respirator that protects the respiratory system from harmful varnish vapors;
- storing varnish solution is usually allowed at temperatures from +5 to +25 degrees;
- It is prohibited to apply the composition near an open flame; you cannot smoke near an open container;
- the remaining mixture must not be discharged into the sewer system;
- the room where the varnish mixture is stored must be well ventilated;
- During the application of varnish, the room must be well ventilated.
Similar
Actions: 1. Clean the tiles 2. Degrease with alcohol 3. Prime with adhesive primer (increases adhesion.
So, I repeat, this video is more about an experiment than a direct repair. BUT! In general, tiles can be overlapped.
Don't like the roughness of the tile joints? Do you want uniformity, gloss, shine? Varnishing is the first thing.
This is the first time I have encountered the need to varnish floor tiles. It would be possible to come up with something else for the walls, but it’s unlikely for the floor. Poor adhesion will not allow the varnish to last long, regardless of heating. By the way, are the tiles smooth (mirror-like) or like natural stone (porous)?
If you varnish tiles that are in conditions of excessive air humidity and temperature fluctuations, the acrylic varnish mixture will protect the material from gradual destruction. Can tile grout be varnished? The varnish fills all the microcracks and pores located on the surface of the new or old tile, as a result it remains protected from the absorption of moisture and water.
After varnishing, it is much easier to care for the surface, since a flat and smooth wall or floor becomes dirty very slowly, and cleaning is done very quickly. After using tile varnish, this material will not fade, that is, its shade will not change over time, thanks to which the tile remains attractive for many years.
Paints made on the basis of epoxy resins create a durable and hard coating on the surface of porcelain tiles. The enamel adheres very well to the surface and protects it from moisture. Latex paint adheres very well to any surface.
It is wear-resistant, reliable and at the same time has absolutely no unpleasant odors, which is why it is completely safe for use. When working with this paint, no preliminary primer is required.
The question is often asked, is it possible to varnish floor tiles to protect the paint? Floor tiles must be varnished, since even the most resistant paint will not withstand the loads and moisture that occur in a bathroom. Varnishing is an important step and is carried out only after the paint has completely dried.
There are several coating options: 1. Brand new “Nano technologies”, coating with this product is done and fat and water rolls off the tiles like from a leaf of a plant (but these products appeared quite recently in St. Petersburg and we are their representatives, we can offer you); 2. Go to a paint salon - Tikkurila or Bakers - and ask them for a protective varnish, preferably matte, otherwise your tiles may change color, and gloss will not be appropriate. We also covered the decorative stone “Camelot” with this varnish on the backsplash and it did not change in any way in appearance, but the pores were covered up and it can be easily washed. I just don’t remember the name of the varnish now, but you can explain to the consultant in the store what you need.
After the repair is completed, stains form on the surface of the ceramic tiles, the tiles fade, and scratches may appear on the surface during use. Moisture also accumulates in the tile joints during operation. This is true for porous types of floor tiles with a matte surface - such a floor is much more exposed to various mechanical stress and contamination. Don't despair and go to hardware stores. Using tile varnish, you can restore the aesthetics of the coating.
Varieties of ceramic tiles depending on the type of production and raw materials used
Depending on the raw materials used and production technology, the following types of tiles are distinguished:
- bicottura;
- monocottura;
- porcelain stoneware (gres);
- cotto;
- cottoforte;
- clinker;
- majolica.
Each type has its own characteristics and is intended for coating on various surfaces: walls, floors, outside the building.
Bicottura
Bicottura tiles are produced using double firing. The starting material is red clay. The clay mixture is pressed, fired, coated with enamel and then fired again. This type of tile is intended for laying on indoor walls. The material has gained great popularity due to its smooth shiny surface with a variety of patterns. A wide range of colors allows you to choose the right shade for any interior.
Bicottura tiles.
The small thickness of the tiles and convenient format (20x20, 20x25, 25x33.3 cm) ensure ease of installation work. Manufacturers offer numerous collections of bicottura, with smooth transitions of shades from basic to additional.
Application. The enamel applied to the surface protects the material well from the penetration of steam and moisture, so it is especially relevant for walls in the bathroom and toilet, and for kitchen aprons. For flooring, tiles are used only in rooms with low traffic, in those rooms where dirt from the street does not fall.
Monocottura
Monocottura is a type of single-fired tile. The raw material for production is red or white clay, formed by intensive pressing. This method reduces the porosity of the material. After drying, enamel is applied to the tile and sent to the oven. The raw material affects the degree of water absorption, which is 0-20% for red clay tiles, and 0-10% for white clay tiles.
Monocottura tiles.
Monocottura can be used to cover walls and floors indoors. Due to its increased frost resistance, it is used for outdoor floors.
Monocottura differs from bicottura tiles by improved characteristics:
- frost resistance;
- increased strength due to increased thickness;
- great hardness;
- wear resistance;
- reduced water absorption, especially in special series.
Application. The glaze on single-fired tiles is also resistant to abrasion and chemical detergents. Monocottura with increased strength is often used in public buildings where there is not much traffic.
Porcelain tiles
The raw materials for the production of porcelain tiles (gres) do not differ from the materials from which tiles are made (mono-cotton or bi-cotton). The difference lies in the manufacturing technology. During production, a coloring pigment is immediately added to the clay mixture, due to which the entire mass is evenly colored. Enamel is not applied to the surface of the tile, because the color is initially applied throughout the entire thickness.
The prepared mixture is shaped, dried and pressed. To add strength and reduce porosity, porcelain stoneware is pressed again using more powerful pressing machines. The material is fired at high temperatures (1200-1300 degrees). The resulting products have a very low water absorption coefficient from 0 to 4%.
Varieties of gres porcelain stoneware
Grey.
Red.
Black.
Beige.
The advantages of porcelain stoneware include:
- strength;
- frost resistance;
- environmental friendliness;
- resistance to chemicals;
- wear resistance;
- low level of moisture absorption.
Its popularity is slightly reduced by the high cost and complexity of installation due to its heavy weight.
Application. Porcelain tiles are intended for cladding indoors and outdoors. Increased strength due to double pressing allows the material to be used in public places: in institutions, airports, catering establishments, etc.
Cotto
Cotto is one of the most ancient types of tiles. This is a simple unglazed material made from red clay with the addition of fine pumice and coloring pigments. The tiles are formed by extrusion, that is, by pressing them through dies of the desired configuration. After drying, the products are fired at a temperature of 1100°C. The moisture absorption coefficient of Cotto tiles can range from 3 to 15%.
The color range varies from light yellowish to dark brown. Sometimes pink pigment is added to the mixture. The finished tile has a rough, uneven surface and a porous structure. Depending on the final purpose, the material is sanded or given an even rougher appearance.
Cotto tile texture.
Texture of dark brown cotto tiles.
Application. Cotto ceramics are usually used for exterior decoration (blind areas, drains, paths). For indoor use, series are produced that are specially treated with substances to reduce porosity. The tiles are popular among owners of private houses in a retro style, and are also often used in churches or museums.
Cottoforte
To produce Cottoforte, double firing is used. A mixture of clay and kaolin is formed, after first being sent to the kiln, an opaque glaze is applied to the products and fired again at lower temperatures than for ordinary tiles. The most common sizes are 15x25, 20x20 and 20x30 cm, but shapes can be larger.
Cottoforte tiles.
The applied glaze gives the tile a sophisticated look and improved performance characteristics. The degree of moisture absorption is 7-15%.
Application. Cottoforte is used to cover indoor floors.
Clinker
The main material used for the manufacture of clinker tiles is highly plastic shale clay. During the production process, no dyes or plasticizers are added to the mixture, due to which clinker is considered one of the best environmentally friendly materials. Extrusion molding technology with further firing at a temperature of 1200-1400°C allows us to obtain a product with high performance properties.
The material is different:
- low ability to absorb moisture (0-6%);
- large thickness;
- increased strength;
- resistance to chemicals and mechanical stress;
- frost resistance.
Clinker tiles.
Application. The product is used for external and internal cladding of walls, floors, for finishing blind areas, plinths, drains, steps.
Majolica
Ceramic tile Majolica is one of the stylish and expensive elements of interior decor. The product is made from red clay using double firing technology. The mixture is molded, dried, pressed and fired at low temperatures. After applying the glaze and design, the tile is fired again, but at elevated temperatures.
The high porosity of the material promotes moisture absorption; the moisture absorption coefficient is quite high (15-25%) compared to other types of ceramic tiles. Therefore, Majolica is used only indoors.
Majolica.
Application. The variety of patterns and shapes makes tiles particularly popular when designing sophisticated designs, especially in antique interiors. The material is used to cover walls, stoves, and create decorative panels.
Varnish composition
Varnish for ceramic tiles is often made on the basis of acrylic resins with the inclusion of tiny ceramic particles. These materials may also include urethane polymers dissolved in aliphatic solvents.
After application and complete drying, such a coating will have a glossy shine and high strength - this will protect the tile from various damages.
Color selection
When choosing a design solution for updating your bathroom, it is recommended to use ready-made options, of which you can find a great variety on the Internet. You can get creative and make a pattern based on several fragments. If the work is complex, you will have to hire a painter to do the painting.
The following factors influence the choice of color:
- size of the room - light colors visually increase the space of the room;
- each style corresponds to certain shades - this must be taken into account;
- human psychological perception of colors.
The universal color is white. It matches with furniture and plumbing fixtures of any shade. The combination of white and green has a calming effect; it can also be combined with yellow and orange.
It is recommended to use black colors carefully, dotted or splashed. Completely black tiles in the bathroom can serve as a backdrop for light patterns. Looks good with gold plated.
It will be difficult to achieve peace if you paint your bathroom tiles red. It excites and calls for action rather than calms.
Blue or cyan are the colors of water, so they suit the bathroom interior perfectly. It is usually combined with white or beige.
Different shades of yellow or orange can be combined within the same room. The smaller the bathroom, the lighter the tone should be to visually expand the room.
Coziness and comfort can be achieved by painting the tiles in the bathroom brown . Such a solution, however, is rare.
How to combine colors
To accurately combine colors in a design, professionals use the Johansen Itten circle . It is compiled according to the following principles and formulas:
- the most compatible colors are located opposite each other;
- if it is necessary to choose three colors for finishing, they should be located at an equal distance from each other;
- The 3 shades located next to each other belong to the analogue triad;
- for a contrasting triad, choose 2 colors that are located next to, but opposite any of the main ones.
Colors can be placed horizontally in the bathroom, separated by a straight line or in an arc. You can apply inserts after painting the tiles in the main color. This can be done after complete drying.
Accent walls are painted a darker color, and niches are decorated using the same principle.
Scope of use
Tile varnish is used for:
- highly absorbent ceramic tiles (Tuscan tiles, terracotta);
- facing work, when the seam is made of cement;
- finishing of natural or artificial stone, brick;
- application on floors made of concrete, natural or agglomerated stone.
Varnish is also widely used for paving slabs; it is also suitable for clinker tiles; it not only gives an aesthetic appearance to the material, but also reliably protects its surface.
In the video: using varnish for paving slabs.
What types of tiles are there?
The grade of ceramic tiles is determined by the international standard EN98. The facing material is divided into three grades, for which different colors are used in the markings:
| Variety | Defects | Marking color |
| First grade. | The permissible content of tiles with defects in a batch is no more than 5%. | Marked in red. |
| Second grade. | The permissible number of defective tiles is no more than 25%. | Marked in blue. |
| Third grade. | In such batches, the number of defective tiles can reach 50%. | Marked in green. |
For facing materials, there are certain standards for acceptable defects: aesthetic and functional. The first suggests the presence of microcracks or slight blurring of color. The second group includes more serious defects, such as uneven sides, sagging, and curved surfaces.
Tiles of the first grade cannot contain elements of functional defects; only a slightly blurred coating is acceptable. In the second grade, tiles with both aesthetic and functional defects may be found.
The third grade includes substandard. It is not necessary that all products will be cracked, they may simply not match in shade.
Advantages and disadvantages
Thus, after application, a durable protective coating is created. Using these materials, you can update the look of old tiles, thereby breathing new life into them - this also allows you to save money. Sometimes after coating with varnish the floor becomes less slippery.
For tiles that are exposed to high humidity and temperature changes, acrylic compounds will prevent their destruction by clogging the pores of the ceramic. After applying the materials, surface care is greatly simplified - practically no dirt accumulates on the varnish. The color of floor and any other tiles will never fade, since varnishes allow you to preserve the tiles for many years.
If you violate the technology and cover the surface incorrectly, the appearance of the tile will significantly deteriorate. If there is a lot of traffic in the room, the coating will be erased despite the reliability of the protective layer. It is also very difficult to clean hardened varnish from floor tiles.
Applying protective impregnation to seams
After grouting, the seams must be completely dry. Grout mixtures from different manufacturers will have different drying times and readiness for further processing.
Before application, you need to isolate the tiles from contact with the protective composition. For example, you can carefully glue it with paper tape and leave only the seams uncovered. This will be better for tiles with a monotonous or one-color pattern, on which various defects are more noticeable.
The seams between the tiles are coated with a thin brush. This method guarantees high-quality, uniform coverage. Compositions with deep penetrating ability are applied in 2 layers, since the first layer is almost completely absorbed into the grout. A double layer will provide the best protection.
Cover the material with impregnation subject to certain temperature and air humidity levels. These indicators are indicated on the label. If they are not followed, the impregnation may lose its properties and even begin to fall off. It is best to use a universal impregnating water repellent.
After applying the protective impregnation, it will be better to leave it for 1-2 days to completely dry and harden. After this, further processing can be carried out.
A few tips to help give a new look to old tile joints:
- If they are not subject to destruction or cracking, which is caused by moisture or mechanical stress, then they can simply be coated with one layer of deep penetration impregnation. It protects from destruction.
- Colored seams can be cleaned, refinished with acrylic paint, and then a layer of protective impregnation (acrylic or polymer) applied.
- Dirt is removed with a toothbrush and bleach. Treat severe stains with baking soda and vinegar. Soda is poured in, then vinegar is poured in. A chemical reaction occurs that pushes dirt out of the pores.
Products for treating tile joints (20 photos)
After some time has passed after the completion of the repair, stains appear on the ceramic tiles, they fade, scratches appear on the coating, and the seams between the tiles begin to let moisture through. This is especially true for porous coatings with a matte finish - such floors are most susceptible to mechanical stress and contamination. A good way to prevent such troubles is to varnish the tiles. Varnishing will not only protect against damage, but will also provide a higher contrast in the colors of the materials and give the floor a fresh look for several years to come.
Coating the tile with a special varnish allows you to observe its original appearance for many years.
Material consumption
The consumption of varnishes for porcelain stoneware and tiles depends on the degree of porosity. Due to this porosity, the tiles are covered in several layers. Also, the shade significantly affects the consumption - to achieve the desired aesthetic result, one layer may not be enough.
As for the consumption of paints and varnishes for a tiled surface, it ranges from 100 to 200 g per 1 m2.
Instructions for use
Before applying varnish, it is necessary to prepare the floor surface. It must be completely dry and free of dust or other contaminants. Any remaining cement must be removed and the seams leveled.
The material is applied using soft gauze. The piece must be perfectly clean. The fabric should not have lint. A soft brush will also work.
Apply the varnish as evenly as possible. Do not pour out all the material at once and then distribute it - this can lead to sagging and stains. Then the layer is given time to absorb - 2-3 minutes, the excess is removed with a rag.
If terracotta, Tuscan tiles and other highly absorbent materials are being varnished, the surface should be treated one more time to obtain a high-quality result. If the tile absorbs poorly, then the composition is applied only with soft fabrics to avoid streaks that can spoil the result.
After 12 hours you can start walking on the floor. If this material is used on a wall, then the principle of application is the same.
These coatings can also be used for pre-treatment of Tuscan tiles and easily absorbent tiles before laying them on an adhesive or cement mixture. This will help remove the finished tiles. But terracotta should not be pre-treated - there is a risk of fading.
Varnish selection and step-by-step application instructions
It is easy to make a mistake with the consumption of the varnish mixture - each type of tile has its own porosity indicator. The absorption of the composition will vary; the thicker the varnish, the less it is absorbed.
Helpful advice! The varnish consumption should be indicated on the packaging, but if the tiles have reliefs and chamfers, multiply by 1.5.
It is advisable to buy varnish with a small supply. It’s better to let it remain than to look for 1 can at points of sale until the work process is completed.
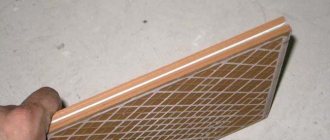
Helpful advice! Choose a two-component varnish that has fine ceramic fractions to fill small cracks.
This is an acrylic base containing tiny ceramic chips. Actively absorbent tiles are varnished twice. The paint and varnish mixture must meet the following parameters:
- gives an even coating without sagging or drips, with the effect of filling minor defects and scratches;
- have high abrasion resistance;
- preserves and enhances color without the obsessive yellowness that often occurs with wood varnish;
- does not require pre-treatment of the tile with any mixture, with the exception of a primer from the same manufacturer.
When preparing a room, it is important to remove all foreign objects in advance (they can absorb odors) and thoroughly clean the floor (or wall) before painting. You will need the following working tools:
- a roller with a suitable attachment and a tray suitable for it in width;
- paint brushes of different sizes;
- dry rags and sponges (for cleaning surfaces);
- medium-grain sandpaper (to smooth out uneven areas at joints);
- sufficient quantity of varnish;
- solvent (to remove residues from tools and hands).
It is important to take all safety measures into account when working. Varnishes contain volatile, flammable substances - smoking and the use of an open fire in the room where painting is intended are prohibited. It is necessary to work in a well-ventilated area without drafts. To protect your skin from varnish and your respiratory system from caustic fumes, it is recommended to wear:
- respirator;
- protective glasses;
- work gloves;
- workwear.
Additional recommendations
For work on Tuscan tiles, terracotta, and highly absorbent coatings, it is recommended, if possible, to avoid using varnish until the adhesive has completely cured. The curing process can take months. When laying on a dry screed with cement adhesives, the curing time is significantly shorter.
Before varnishing clinker, it is recommended to first treat the seams. Then, after finishing with varnish, the surface will look perfect if you decide to varnish the tiles.
There is a special varnish for processing stone - wet stone. It will reliably protect natural or artificial stone from aggressive influences.
When it is not possible to replace old tiles with new ones, then using varnishes you can give the floor or wall a completely new look. If the tiles have just been purchased, then the varnish coating will help protect them from moisture, from various mechanical influences, and from temperature changes. Varnishing will give a positive effect, and if the result is not to your liking, you can paint it. The varnish is also good because it can be applied independently.
Preparing to lay terracotta tiles
Just as with regular tiles, this will take no more than three days. But there are certain features; after all, we are dealing with unusual floor tiles in an ordinary kitchen room. So, you should be prepared for the fact that the floor laid with terracotta tiles will rise above your usual level, since the thickness of these tiles can be higher than the usual 12 millimeters.
Therefore, the very first day of your work may be entirely spent on preparing the kitchen for tiling: removing all the furniture and household appliances, removing the furniture itself and taking the necessary measurements. Also, if you are not going to remove the wood flooring or linoleum and plan to lay tiles on top of them, then you will need to spend extra time nailing the wire mesh to the floor, as without this the tiles will not adhere well. However, if tiles have already been laid in the kitchen, they will still have to be removed, otherwise the floor level will be too high.
Old tiles should be removed to the level of a strong and hard floor; only on such a floor will the tiles hold securely and the mortar connecting the tiles will avoid cracking.
Prepare an aluminum profile in advance to take measurements and determine levels. You should immediately decide where you plan to start laying, and also find out for yourself the question of whether you will do edging along the edges of the kitchen, especially if the tiles will be laid diagonally.
In addition, do not forget to leave part of the threshold in the kitchen uncovered in case the floor in the adjacent room will end up at a different level. In this place, you will later need to install a special transition strip.