Cement-sand screed is indispensable for creating a strong and high-quality foundation for industrial facilities, and serves as one of the best options in private construction. Its main advantages are the porosity of the structure, which provides excellent sound and heat insulation, minimal shrinkage due to a limited amount of water and the availability of manufacturing materials. And now we’ll tell you how to make such a screed with your own hands and technologically correctly.
The most reliable and durable screed with differences in the base of no more than 3 cm is considered to be a cement-sand screed. It is simple, accessible even to a beginner and inexpensive.
Cement-sand screed is mainly produced using semi-dry technology, but we will consider both options.
- 2 Stage II. Determining the curvature of the existing base
- 3 Stage III. Preparing the floor for screed
- 4 Stage IV. Preparation of cement-sand mortar
- 5 Stage V. Preparatory work
- 6 Stage VI. Performing a screed
- 7 Stage VII. Finishing work
Stage I. Calculation of future screed
On compacted soil its thickness should be at least 12 cm, and on an old concrete base - from 7 cm. If you make a cement-sand screed thinner than 3 cm, it will soon crack and begin to peel off from the base. Its optimal layer is 5 cm.
But, if the surface of your floor has differences from 10 to 20 cm, and you still plan to make a cement-sand screed, then use expanded clay as a leveling base. Mix it with the solution and you get expanded clay concrete. The sound insulation of such a floor will be excellent.
But here are the main disadvantages of cement-sand screed, which must be taken into account when calculating the screed:
- Long drying time - about a month in dry summer, and much longer if work was carried out in winter.
- Lots of dirt and dampness in the process.
- Serious increase in load on the floor.
- The thickness of the screed is limited to only 5 to 7 cm.
- Ready-made mixtures are often sold of low quality, with unknown additives, and they are often counterfeit.
And with all these disadvantages, the screed is still quite popular among builders. Therefore, if these problems are not problems, we proceed to the immediate process.
Padding
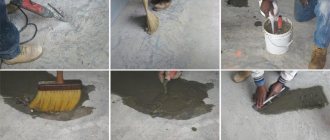
Leveling the floor with your own hands cannot be done without a primer. The entire surface where the screed is installed must be coated with a roller. This will increase the level of adhesion of the solution to the floor surface. At the same time, this procedure also performs the function of waterproofing.
You should not skip the procedure of priming the base for pouring the solution, as over time the screed will begin to crack. This will be especially noticeable when the poured solution has a small layer thickness.
Particular attention is paid to kitchen areas or bathrooms. Here, specialized priming compounds are used in the work, which are both waterproofing and hydrophobic. During operation, they will be able to pass moisture to the screed, and, conversely, from the screed. This manifests itself in case of accidental flooding, when the water will remain indoors and will not go to the neighbors below.
When visiting a store to buy a primer, you should pay attention to those that are marked “for concrete.” There is another name for them - “primer soils”.
Stage II. Determining the curvature of the existing base
A linear level, plumb lines or more modern devices such as optical or laser levels will help you. There is only one goal: to determine the topography of the base, mark the zero mark, find the highest point of the floor and calculate future costs - how much will need to be bought to make such a floor screed.
The simplest device for measuring floors is a level. They don’t need any special skills to use - it’s a simple glass flask with an air bubble, which they use to navigate. The flask is mounted in a wooden ruler, which we pick up.
Stage III. Preparing the floor for screed
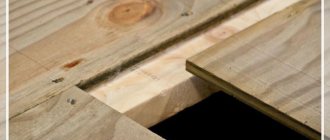
Now we are installing beacons. These are special guides along which we will align the plane of the screed. Any smooth running material is suitable - pipes with a diameter of 15-32 mm, mounting rectangular profiles or timber. The main thing is that the beacons do not sag during laying of the screed - i.e. were quite tough.
But you can place beacons in several ways:
- Method number 1. We take a rack level and measure the horizontal along the length of each beacon and between them. And in order to set all the guides evenly, you will need to tighten the network of threads at the height of the future screed. All this takes a lot of time and requires some skill.
- Method number 2. We use the most primitive laser level. First, we beat off the lines of the beacons, then we place them strictly parallel to each other and so that the first one is at a distance from the wall of 20 to 30 cm. Between the remaining beacons, make such an indent so that it is then convenient for you to rest the ends of the rule on two adjacent beacons. You will then use it to level the solution. Usually this is 1.5 meters, and the rule for such work is better to take two meters.
Drill self-tapping screws along the broken lines. For each such beacon, three pieces will be enough: along the edges with an indentation of 10 cm and in the middle. We set the laser level at the topmost broken line.
After the level is knocked off, fasten the self-tapping screws to the walls along the marks. Stretch threads on them along the entire perimeter of the floor - these will be your beacons. And so that the threads do not sag, make additional supports in the center of each of them using the same screws or bars.
Types of screeds
When carrying out repairs, you should know how to level the floor correctly and in compliance with all technologies. There are a large number of classifications of screeds for leveling the base. Each of them contributes to the performance of certain functions and has a different purpose. Depending on how the solution is connected to the foundation slab, it is divided into:
- Related. The solution is poured directly onto the base. Bonding occurs due to the presence of adhesion. Warmth and waterproofing are not adequate. It is suitable in cases where there is no way to raise the floor level (the doors may not open, the distance to the ceiling will be significantly reduced). In addition, the connected screed is arranged to create a light “pie”, the base itself is almost perfectly flat, and the area of the room where the installation is carried out has a significant area. As for specific premises, the tied screed will fit perfectly into those where there is a large amount of furniture, including massive furniture, there are partitions, and storage rooms. The screed turns out to be quite massive - up to 150 kg per square meter. There are some nuances for this type of floor leveling regarding beacons. They must be suspended above the base (on self-tapping screws or laid out sections of mortar).
- Floating. It got its name because of the presence of a pillow that includes many layers: sound, heat, waterproofing. It is on them that the screed is located. Excellent for floor coverings such as linoleum, laminate, parquet boards. But it is worth paying attention that for parquet flooring screed will no longer be an option. This leveling option is indispensable for rooms with heated floors, a high probability of cracking, and for quickly pouring mortar. It can even be considered as a cheap way to level the floor.
- On the separating layer. A layer of heat and waterproofing is installed as a separating layer during leveling. It still has no contact with the walls. Various materials for such layers can be used. Waterproofing in this case is intended to protect against moisture. Suitable for bathrooms, basements, attics, ground floor floors.
In any case, when choosing a screed option for high-quality leveling of the base, you should purchase the necessary material and tools. The quality of mixing the solution will subsequently affect the reliability of the entire “pie”.
Stage IV. Preparation of cement-sand mortar
Cement-sand mixture can be obtained in three ways:
- Method 1. Order the ready-made solution in a mixer. Among the advantages, this method will please you with quality and reasonable price. But the disadvantages will also be significant: for a sufficiently large floor area, the solution cannot be transferred from the mixer during the day. And ordering the same composition several times, in parts, is both difficult and expensive. The only option for spacious premises is a concrete pump service, which is even more expensive.
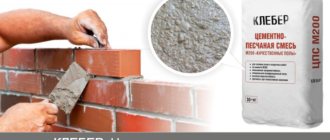
- Method 2. Order the ready-made mixture in bags and dilute it with water on the spot. But such bags cost a lot.
- Method 3. Mix cement and sand yourself right on the spot, according to the chosen recipe. This is a labor-intensive, but most budget-friendly option. Choose the method that is suitable for your room and future finishing coating.
This is how the mechanized supply of cement-sand mixture occurs:
First, let's learn how to prepare a cement-sand mixture using wet technology. So, the recipe is quite simple: sand + cement in a ratio of 3:1, and water to this mixture in a ratio of 50/50. Those. To prepare a cement-sand screed, take one part of cement and three building sand. And then - according to the instructions:
- Mix sand with cement using a trowel.
- Pour water into the container and carefully add the dry mixture.
- Mix the solution in a deep container with a volume of up to 30 liters, using a drill with a stirrer attachment.
- If desired, add a plasticizer to the solution to improve the plasticity of the future screed.
- As soon as the consistency of the solution becomes similar to thick sour cream, take a little of the mixture into your fist to test. It should neither spread nor fall apart. You need to pour the solution directly onto the floor and level it well. It must be completely used within an hour and a half.
And now for semi-dry. To install the screed, use cement grade M-400. For one room you will need approximately 7-8 bags if the screed is made 4-5 cm thick.
Mix the solution directly on the floor, placing a sheet of metal on this area. This method is called “volcano”, and it is by this method that a semi-dry cement-sand mixture is made:
- Step 1. Pour out a 50-kilogram bag of sand, 1/3 of a bag of cement on top of it, and mix it all with a shovel. Don't add water yet.
- Step 2. Pour a second bag of sand and the same amount of cement onto all this as the first time. And so - the third time, and only then mix the whole mixture.
- Step 3. In the resulting slide, we form a “crater” with a shovel, and pour water into it. Mix well and start laying the screed.
The correct cement-sand mixture should have a gray color - and yellow or red shades indicate that there is too much sand in the solution. Of course, special plasticizers can also give their color. Such additives allow the solution to harden better and subsequently not crack.
Use of dry mixtures
When all of the above types of work are completed, you can begin mixing the solution. In this case, it is best to use ready-made dry construction mixtures, which contain all the components for a complete filling. In addition, they usually use a non-shrinking type of cement. It will be enough to add the required amount of water and mix the solution until the consistency is homogeneous.
Anyone who does not know how to level the floor correctly using a high-quality mortar should not try to assemble cement, sand and the necessary additives into one whole. All this is already ready-made. In addition, they have a certain set of advantages, including a short time before complete drying. In addition, the surface is durable, and after a few days you can easily move on it and carry out finishing work indoors.
There are a large number of mixtures, and they can all be designed to perform a specific task. The choice will depend on the contractor who performs the base leveling work. It would be a good idea to consult on this matter with professionals who can advise on the best option.
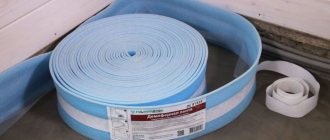
Stage V. Preparatory work
To separate the screed from the walls, attach a damper tape. It’s easy to calculate its quantity: this is exactly the perimeter of the room.
The process itself is simple. Lighthouse slats need to be placed in a row. Install the first beacon from the wall at a distance of several centimeters, and each subsequent one in increments of 50-100 cm. After installing the beacons, lay out the mixture and level it using the rule. Once the mixture is so hard that it can be moved freely, remove the slats.
You can make beacons for the sand-cement mixture yourself. To do this, buy inexpensive 10 mm plaster beacons and 30 kilograms of gypsum plaster for them at a hardware store. For each lighthouse we make four supports from plaster - and this will be enough so that nothing bends while working with the rule. And the most durable adhesion of beacons is from Rotband, if you mix it in small portions. Just place the mortar in small slaps next to the screws, between them, and a little higher. Then attach the beacon, slowly lowering it until it touches everyone. Check the resulting plane.
You will be surprised, but many masters of their craft manage to arrange such screeds without beacons at all:
Types of screeds, advantages and disadvantages, areas of application
The installation of a cement floor screed depends on the technology by which the work will be carried out. Today, there are four main principles for laying a concrete floor:
- wet;
- dry;
- semi-dry (mechanized);
- floating.
Wet screed is the classic and most common method of laying concrete floors. If the screed is performed in full compliance with the technology, the result will be a strong and reliable layer of concrete.
The main positive difference between wet technology, which makes it unrivaled in the construction market, is the low cost of raw materials. In addition, every experienced builder is familiar with this screed laying technology.
Among the disadvantages, it should be noted the long period of “maturation” - drying of sand concrete, as well as the need to reinforce the screed with iron mesh if you plan to subject the floor to high loads. To make a high-quality solution for wet screed, you need to use a concrete mixer. Sometimes, upon completion of work, it is necessary to finish the floor with a self-leveling mixture.
Dry cement floor screed allows you to level the floors in the room in the shortest possible time. The main advantage of this method is the absence of a “maturing” period due to the use of exclusively dry bulk materials for laying floors. Even a person with no experience in construction work can lay a dry cement floor screed.
The disadvantages of this method can stop those who primarily seek to save money, since the materials for implementing this flooring technique are not cheap. When walking on a dry-tied floor, you can hear a cracking noise due to the friction of the material. If backfilling is done poorly, the sheets of the top floor covering may sag. The most important disadvantage of dry coating is the likelihood of mold appearing if moisture gets in. In this case, the entire floor must be replaced.
If you want to save on manual labor, you can choose a fully mechanized semi-dry cement floor screed. This technology involves the use of a special device - a trowel, which will level the surface of the screed. Semi-dry cement floor screed is impervious to mechanical loads and has good noise-absorbing properties.
The advantages of automated floor laying are rapid maturation and the absence of the need for metal mesh reinforcement. The price and strength of a semi-dry coating are equal to those of a wet coating. However, the implementation of this technology requires the involvement of qualified specialists and equipment.
Floating cement floor screed is used during construction work, especially if the structure is being built on the ground. Sometimes this technique is used in apartments. The peculiarity of a floating cement floor screed is that there is no contact with the concrete or other base. The fact that the floating coating has its own physical parameters due to the lack of connection with the ceiling significantly increases the technical characteristics of the floor in the room.
The positive aspects of using floating flooring technology are the complete absorption of noise and vibration, as well as permissible thermal expansion and load absorption. Using this method, you can significantly save on building materials, since the thickness of the leveling layer will be significantly less compared to other types of concrete pavement. If you put a thermal insulation layer under the cement, this will not only make heating the room more economical, but will also provide comfort when walking.
Also, a floating cement floor screed does not require maintenance and can be made from different classes of mortar. However, there are also disadvantages of this technique: an unaesthetic appearance due to the heterogeneity of the composition and poor resistance to chemicals. In addition, if the floor in a multi-story building is fragile, then the large mass of a floating concrete floor can create difficulties.
Stage VI. Performing a screed
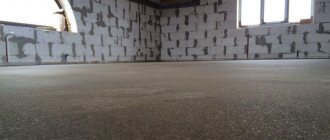
Start laying the cement-sand screed from the corner opposite the exit. First lay out the solution half a meter, and then, as a rule, pull it towards you - everything is simpler than it even seems at first glance.
Pour the prepared mixture from the corner of the room, and try to fill all the cracks as much as possible. Smooth the solution with the rule so that it moves along the guides easily, as if on rails. Go from the far wall towards you and pull the solution above the beacons. Fill the strips that will be opposite the doorway last.
Now, using a metal spatula, we knock off all the bumps from the already hardened screed, and rub everything with a wooden grater until the surface becomes uniform and rough.
Prepare the grout solution. To do this, mix well-dried sand, sifted through a sieve, cement in the same amount and water. While grouting, constantly moisten the screed with water from a spray bottle.
And finally, we check the resulting quality of the screed using the rule and level, removing all noticed irregularities. We maintain such a screed for 12 hours, and only after this time will it be possible to walk on it.