A frame house, like no other, needs high-quality interior finishing that can protect it from moisture penetration, heat loss and other negative factors.
Interior finishing is carried out using materials that solve these problems with varying degrees of reliability. For cladding inside a frame house, plasterboard and gypsum board are used. These are simple and effective materials for insulation, waterproofing and leveling surfaces inside a frame house, its veranda or loggia.
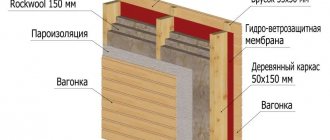
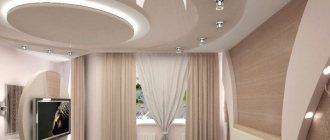
Finishing in a frame house
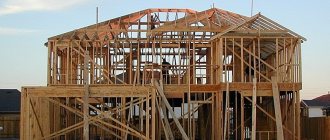
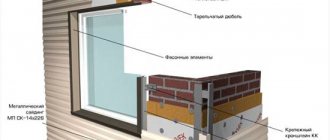
Frame of a house under a roof without finishing
The practice of modern frame house construction requires quality work at every stage. Until recently, this type of construction as the frame of a house under a roof without finishing was not known to a wide range of customers. People ordered turnkey frame houses. Usually they came to some exhibition center of houses, selected it by appearance according to the “what is” type and ordered construction. After this, the customer and the contractor’s company signed one contract for all work and proceeded to installation. As a result, the customer received what he wanted, that is, the picture of the appearance of the house that he saw at the exhibition site. The work was completed and the satisfied customer moved into the house. Home Sweet Home. Is it worth telling what the owner of the house encountered after two weeks or a month of living in such a house. Suddenly it turned out that the floor was creaking and more like a trampoline, that the rolled insulation had slipped and there was no fifteen centimeters under the ceiling at all and the wall there was freezing. And even the worst thing was that the house was shaking. What can I say, I myself worked for several years in the largest company in Bronnitsy and I know this kitchen from the inside. The houses left much to be desired. Despite the fact that the house was built for a ridiculous 700 thousand or a million rubles, it was just a beautiful picture of the facades. It was impossible to live in such a house; it could only be burned. Suing such companies was ineffective, since competent lawyers not only drafted the contract in the right way, but also represented the interests of the company on behalf of the defendant in the courtroom. Often such lawsuits were lost; the customer could only bulldoze the house and build a new one or endure freezing and sagging boards. For many at that time, faith in reliable frame houses had completely died; some customers went to foam concrete options or to mortgaged apartments, which is especially sad for our ideology.
But time does not stand still and the trends towards improving the quality of the frame and each individual unit are becoming higher. Many information resources have been posting more and more information on structural components of frames and video reviews. Competition, mainly on YouTube, forced designers to improve their skills and improve the design of frames for increasingly reliable performance. For customers this resulted in higher prices. Nobody wanted to order a house for a million anymore, and companies that had good designers began to push away cheap competitors and enter the market themselves. The price per square meter of a turnkey frame house grew by leaps and bounds, but was still below the average price of an apartment in the Moscow region. Prices went beyond the level of 16-20 thousand rubles per square meter. But then the market faced another problem - the global and, as a consequence, the Russian financial crisis, which worsened in 2014. The incomes of Russians, read Muscovites, began to fall and paying 3 million rubles for a frame house in 120 square meters became unaffordable for many. Moreover, competition, constantly spurred by the entry of new players into the market, largely thanks to Business Youth, has made the opportunity to “take” such an order for the average construction company almost impossible. Everything was divided among the mastodons of frame housing construction.
Moreover, most of the customers were ready to carry out the basic work themselves, such as insulation, flooring, interior finishing, drainage system, metal structures for retaining snow and treating the boards with fire protection. All the customer needs from the contractor is the frame of the house under the roof without finishing
That is why, in order to stay afloat, many companies, including us - Karkas Master, began to use separate construction. Only a frame under the roof or a frame under the roof without finishing and insulation is the basis of our work.
How to decorate the facades of a frame house?
The main element of such a house is a wooden or metal frame system filled with insulation. The options for finishing a frame house are so varied, it all depends on your taste and capabilities.
All wooden elements are treated with antifungal and fire retardant compounds.
The walls of a frame house look like this:
Many people wonder: is double-sided wall covering with OSB boards necessary? This, of course, leads to an increase in the cost of the structure, but will provide the house with rigidity and solidity. You can safely hang furniture and other equipment on the walls.
The technology of frame house construction will not require additional time for shrinking the house and drying the building materials, so you can almost immediately begin finishing the walls, both external and internal.
There are several options for finishing facades. Like any facade, it can be plastered and painted, the walls can be lined with siding, clapboard, or a block house (imitation of a wooden house) can be used.
There are two ways to plaster the facades of a frame house:
- plastering is carried out using sheets of façade foam plastic, previously fixed to the façade using glue and clamping dowels;
- or plastered directly on OSB sheets, having previously treated the joints with frost-resistant sealant, pasted the walls with fiberglass mesh and primed them. But this method is not durable; it is more suitable as a temporary option.
Cladding with siding is a budget option, while the facades look finished and neat. A variety of colors and imitation of various textures provide ample opportunities to make the house attractive and combine it with the color of the roof and window frames.
First, along the perimeter of the facades, a sheathing is made of 50x25 mm bars or metal profiles in increments of 50 cm, to which panels or siding strips are subsequently attached with self-tapping screws. Decorative profile corners are installed at the corners of the house.
Facade boards can be used as a facing material, as do residents of Scandinavian countries who prefer more natural and environmentally friendly materials. In addition, wood provides additional thermal protection.
To fasten the board you will need the same frame of bars. In addition, for durability, the board must be treated with an antifungal compound, primed and painted in two layers.
There are several types of façade board fastening:
- horizontal or vertical;
- tongue-and-groove connection:
- butt or overlap fastening.
Composite boards meet increased requirements: they will last longer than conventional boards and do not require additional treatment with varnishes and mastics.
A type of wooden facade decoration is a block house, while the house looks as if it was built from timber.
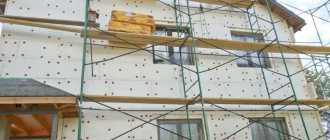
The facades of a frame house can be faced with clinker tiles or artificial stone, which will give the house not only an attractive appearance, but also protect the walls from precipitation and damage. Before cladding, an insulating material - foam plastic - is attached to the surfaces and covered with a reinforcing mesh, and then the tiles are glued to a flexible adhesive.
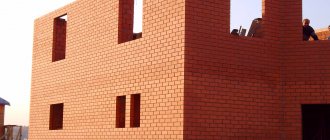
Cladding facades with brick is not the cheapest option, because the frame construction system itself is primarily attractive due to its low cost compared to other types of construction. However, there are adherents of this finish. Nevertheless, such cladding increases the reliability of facades and gives the house a respectable appearance.
A ventilated gap must be left between the walls and the brickwork. For such cladding, a foundation with a high load-bearing capacity will be required, on which the brickwork will rest.
Attaching drywall to the frame
In prefabricated houses - aluminum LSTK, wooden ones made of timber - plasterboard is used to sheathe the walls along the frame. Like the “skeleton” of the building, it can be made of wood or metal.
Advantages and disadvantages of sheathing on the frame
Sheathing walls with the preliminary construction of sheathing or metal frames is a labor-intensive process. To install drywall in a frame house, you need at least minimal experience working with wood or metal profiles. At the same time, the advantages of this cladding option include:
There are some disadvantages to installing drywall over a frame:
Competent design of the structure, choice of finishing material and work with it help to mitigate the shortcomings. Thus, laying reinforcing mesh before plastering makes the wall stronger. In a frame house, plasterboard is attached to profiles or a frame made of wood. The first is preferred when finishing rooms with high humidity, the second when working in “dry” rooms.
Rules for assembling wooden sheathing
Wooden lathing for drywall is easy to install, affordable and environmentally friendly. The guides for it are mounted across the supporting posts of the frame house, that is, horizontally. For assembly you will need identical beams with a cross section of 40x50 mm, 50x50 mm or calibrated boards - dried and without defects . They work with them as follows:
Nails, screws, and metal corners are used as fasteners. anchors will be needed to attach the guides to the floor and ceiling .
Installation of a metal frame
If the frame under the plasterboard is assembled from metal profiles (guides and racks), then special hangers . The sequence of actions is as follows:
At each stage of finishing a frame house with plasterboard, the evenness of the structures is checked using a building level. All window and door openings are reinforced along the perimeter with metal profiles .
Covering the frame with plasterboard
Drywall sheets are installed on a wooden frame or metal profiles so that their edges fall in the middle of the racks. This ensures rigidity and strength of the structure . When installing gypsum boards, 0.5-1 cm is removed from the ceiling and floor. This creates a compensation gap. It is needed for free expansion of the skin when temperature and humidity conditions change.
Drywall is secured with wood or metal screws. Typically their length is 25 mm. Screws are screwed in first in the middle of the sheet, then along the edges. During the installation process, technological holes are made for sockets and other communications. The joints of the installed sheets are puttied.
External cladding of the walls of a wooden frame house
For external wall cladding, OSB boards with a thickness of 9 mm or more are installed over the entire surface. Instead of OSB boards, you can take sheets of moisture-resistant plywood and QSB boards. The methods of fastening these materials are similar. Nails or wood screws are used for fastening to the frame.
The slabs are mounted either vertically - parallel to the frame posts, or horizontally - across the posts. The second method is more economical, but it is complicated by the need to arrange them in a checkerboard pattern.
An indispensable condition for any method of laying panels is fastening with gaps at the joints of 2-3 mm, so that the slabs can move during thermal expansion.
The next prerequisite is that the screws or nails must fit 4-5 cm into the frame posts. When installing external cladding panels, the number of screws to be screwed in, as well as nails to be driven in, is several thousand. Even when using a cordless screwdriver, this work is one of the longest and most monotonous. You need to be patient or purchase a special pneumatic hammer and learn how to use it. With its help, the speed of hammering nails will increase several times.
After covering the external walls of the frame, the house is ready for the final stage of finishing.
Method of fastening gypsum boards from the edge of the wall
The method is not complicated if you follow the calculations. Finishing is done using a ladder. The first sheet is held in the correct position. Before this, you need to mark and adjust the edge that will join the adjacent ceiling. The sheet is put in place and attached to the frame elements.
The remaining GC slabs are installed in order, along the wall space. Each element should be joined with beveled edges tightly to each other. If the edges are rectangular, you need to leave a gap of about 3 mm. If necessary, before strengthening the end sheet, take measurements of its edge connecting to the adjacent wall. At the end of the cladding, a plinth is cut out with slopes at the corners of the room. It can also be fitted to the edges of old baseboards. The element is fixed with nails or screws.
Finishing
Finishing is a much more labor-intensive and critical stage
It is important to highlight the basic rules that must be followed when finishing:
- The finishing of rooms inside a frame house is carried out separately. It is not worth making repairs in all rooms at the same time; it is better to move from one to another.
- Work begins from the front door of the furthest room, gradually moving towards the exit from the building.
- Work related to the laying of communications must be carried out even before the start of finishing work.
- Regardless of the characteristics of the room, finishing must be done from top to bottom. First they make the ceiling, then move on to the walls and only at the end the floor covering is installed. The only exception is the use of a stretch ceiling. In this case, the walls and floor are first prepared, and only after that the tension structure is attached.
To achieve optimal results, you must take a responsible approach to the choice of materials and methods of their installation.
General rules for carrying out work
- Finishing work in the premises should be carried out in turn. You should not start decorating all rooms at the same time.
- You should always start work from the room that is located farthest from the exit.
- Work on finishing the inside of a frame house should begin after completion of all communications: water and sewer pipes, as well as cable ducts and electrical cables.
- The finishing of any room is carried out according to the “top to bottom” principle. That is, first the ceiling is put in order, then the interior walls of the room are finished. The flooring is laid at the end. The only exception is the case when suspended ceilings are supposed to be used in the room. In this case, first they finish the walls, arrange the floor and only then the ceiling.
- It is better to cover areas of the premises that will not be finished with polyethylene. This will protect them from damage and construction debris.
Among other things, you need to remember the following feature: the walls of the frame house in the places where the openings for windows are arranged must be further strengthened.
Types of drywall for finishing frame surfaces
According to parametric data, the material is divided into four types: standard and narrow, underlying, thermal insulation, vapor barrier.
The first varieties of the type are standard and narrow plasterboard. Used in finishing all internal surfaces, except floor ones. The material is available in various sizes. The front side is ivory. The width of one sheet ranges from 0.9 to 1.2 m, length - 1.8-2.4 m, thickness 9.5; 12.5; 15; 19 mm. The underlying drywall has a gray paper surface. There are vapor-tight subspecies. The material is thick, so it is rarely used in wall decoration. Its thickness is 9.5 mm. Available in sheets up to 1.2 m long, 0.9 m wide. Cut type – rectangular.
Thermal insulation. GKL are produced with polystyrene foam, pressed polystyrene, bakelite gaskets. The material is good for covering walls under plaster or wallpaper. This option is the most successful for repairing walls in a frame house.
External wall cladding
Taking on a large load, the outer cladding of the wall frame ensures the rigidity of the structure and its stability during operation. Properly selected building materials for cladding will allow the walls to maintain their shape for many years and withstand negative external factors.
Application of OSB-3 boards in frame construction
OSB-3 boards (OSP-3) are moisture-resistant oriented strand boards of increased rigidity. They are made by pressing and gluing three to four layers of wood chips. In each layer it has a different direction, which gives the material increased rigidity.
Advantages of OSB-3 boards:
- The optimum ratio of price and quality.
- Easy to process - cutting, drilling, grinding.
- Suitable for using various fastening elements - nails, screws, dowels, etc.
- Resistant to splitting even when fasteners are used close to the edge of the slab.
- Do not deform due to temperature changes and various atmospheric conditions.
The main disadvantage is the low vapor permeability. Walls made of OSB boards do not “breathe”.
Of no small importance is the fact that synthetic resins are used for gluing chips. This means that the cladding material can release formaldehyde and phenol into the air.
However, stoves made according to European standards are safe for humans.
Note! The most environmentally friendly material is the one marked E0 and E1
Cement particle boards (CSP)
DSP is a material based on a mixture of wood chips and high-grade cement. To improve its performance properties, special additives are included in the composition.
Cement particle boards have the following advantages:
- Resistant to moisture and, accordingly, to mold formation.
- They are not afraid of rodents.
- Environmentally friendly. They do not release harmful substances into the air.
- Fireproof, belong to the category of low-flammable materials.
- Retains heat well.
- They have good vapor permeability and are breathable.
- When covering the frame, a flat surface is formed.
In contrast to the advantages of DSPs, they also have disadvantages:
- Heavy weight.
- Difficulty in processing the material. Drilling and cutting require a lot of physical effort. At the same time, a lot of dust is generated during the work.
- High price.
The recommended thickness of cement particle boards for frame construction is 12-18 mm.
Fiberboard for external cladding
Fiberboard is wood fibers pressed into a board. As in the production of OSB, they are laid in several layers, in each of which the fibers have their own direction. No adhesives are used. Enough pressure, exposure to high temperatures and resins contained in coniferous wood.
What characterizes this material on the positive side?
- It provides good heat and sound insulation of rooms.
- Environmentally friendly.
- The slabs are light in weight.
- Good vapor permeability.
The main disadvantage of fiberboard is its low stiffness index. When using this material, it is necessary to install jibs and select rigid internal lining.
Note! The recommended thickness of fibreboards for cladding the walls of a frame house is at least 25 mm
Covering the frame with plywood
Plywood is a sheet material made from several layers of veneer that are glued together. In frame houses, regular walls made of moisture-resistant plywood have a thickness of at least 12 mm.
Advantages of plywood:
- not afraid of low temperatures;
- easy to process;
- high compressive strength;
- affordable price.
The disadvantages of plywood include its flammability, the presence of synthetic resins, and its tendency to chip.
Attaching the outer skin to the frame
Attaching the outer skin to the frame is done according to general rules.
- The presence of a temperature gap of 3-5 mm between the plates (sheets) is mandatory.
- Their joints should be in the middle of the frame beam.
- To fasten the sheathing, self-tapping screws 55-70 cm long are used. At the same time, they must go into the frame stud to a depth of at least 40 mm.
- Self-tapping screws are screwed in at a distance of at least 10 mm from the edge of the slab.
- Fixation of sheets or slabs is carried out in increments of 15 cm - along the edge, in 30 cm - in the center.
Since you will be using a huge number of fasteners, stock up on high-quality power tools in advance.
Description and dimensions
Drywall has good soundproofing and thermal insulation properties, it is light, durable and inexpensive.
The plasterboard sheet has the following dimensions:
You can level the walls with plasterboard yourself using two methods:
We sheath using the frameless method
For durability and reliability of frameless leveling of walls with plasterboard in the house, it is worth using thick sheets - 12 mm or more.
Preparing the walls in the room for work:
On a sheet of paper laid on a clean, flat surface, use a level pencil to apply markings. We make a shallow cut along the level and break the material. Using a file or an abrasive sponge, remove the chamfer from the edges.
For frameless wall coverings, you will need a special adhesive that is applied to both the wall and the drywall.
We apply the sheet to the wall, level it using a level, a rubber mallet or a wide wooden beam. Glue hardening time – up to 40 minutes.
We seal the joints with sickle tape, and apply another 2-3 layers of glue on top of it. After it dries, sand the joints and prime them.
Sheathing using the frame method
How to mount the frame correctly
If you have to level wooden or very uneven walls in a room, you need to first build a frame. It can be made of wood or metal.
You need to know that:
Ideally, to decorate wooden walls with plasterboard, the frame should be wooden, since in metal, oxidation processes can begin, leading to rotting of the wood.
We nail wooden beams for the frame according to certain rules:
We treat the wood with an antiseptic solution. We place a self-adhesive backing under the sub-grid to improve sound and vapor insulation.
Alignment of walls in a house with plasterboard with a metal frame is carried out using two types of profiles - ud (guides, 28 x 27 mm) and cd (load-bearing, 60 x 27 mm). The former serve to define the plane of the surface, and the latter serve to strengthen the structure and volume.
We install ud profiles on the floor, ceiling and adjacent walls:
Next, we strengthen the frame and give it volume. Here it is important to ensure the rigidity of the profiles and maintain the specified plane:
How to properly insulate and sheath
The next stage of repair is the laying of hidden communications, insulation and soundproofing of the walls in the room.
We cut mineral insulation (Ursa, Izover) into strips of the required width and lay them between the supporting slats. Or you can purchase sheet insulation with dimensions of 1 x 0.5 m and lay it in the cavity.
Next, we sheathe the frame. To do this, we cut out the drywall and adjust it to the required size. We fasten it with metal screws with a diameter of 3.5 mm and a length of 25 mm every 15 - 25 cm. The screws should not sink deep into the drywall or stick out from it. To prevent this, you can use a ratchet on a screwdriver or a bit with a limiter.
Decorating the walls of a house with plasterboard with your own hands is not a difficult task, but it must be approached with all responsibility. If you plan to putty and paint the walls without subsequent wallpapering, then place load-bearing profiles under the joints of the plasterboard sheets and screw both edges with self-tapping screws. If this is not done, then you are guaranteed to get a crack at the joint.
Is it possible to save money?
How much does it cost to cover the walls with plasterboard in a house? The cost of services varies widely and depends on the complexity of the work.
If you are covering the walls with your own hands, know that you won’t save much on buying drywall, since this material itself is not very expensive. But you can still reduce costs by using, for example, non-format drywall.
What does it mean? Non-format is gypsum board with minor defects, for example, broken corners or scratches. All these imperfections can be easily removed with putty.
Now imagine how much similar gypsum board, with scratches and slightly broken corners, is in the enterprises for its production or wholesale or retail sale.
In the Leroy Merlin store, for example, there is a special rack for defective drywall. Its price there, of course, is not much cheaper, but this is a retail store. At wholesale warehouses or drywall production factories, the prices for such gypsum board are simply ridiculous.
It is also possible to use used drywall. It can be found when dismantling old office buildings, or, for example, retail spaces (indoor markets, shopping centers). In this case, drywall can be given away in packs for next to nothing.
There are a lot of such places that need to be dismantled, especially in cities with a population of over a million. You just need to set a goal and study this issue in order to get your best offer.
Source
Plasterboard wall covering
The first thing to do is install a film vapor barrier membrane. This is done using a stapler, and on top (if the frame is wooden) you can, although not necessarily, stuff wooden planks 4 mm thick, which will create an air gap between the membrane and the drywall.
Sheathing a frame house from the inside with plasterboard can be done not only using slats or profiles, but also simply on top of the wall. This is called the frameless method. A sheet of drywall is attached with adhesive - and you're done!
This finishing method requires a special adhesive designed specifically for drywall. Walls are traditionally cleaned and primed, and also checked for curvature. The method is very simple and convenient, but it is not suitable for everyone. If the curvature of the wall is more than 20 cm, you will have to level it.
How to sew up a wall using a frame? We make markings and use dowels to attach UD profiles to the top and bottom. We place load-bearing parts between them, attaching them to the guides with self-tapping screws. It is worth calculating the pitch in such a way that the edges of the sheets strictly coincide with the frame profiles.
We install the hangers, screw the supporting profiles through the appropriate holes in the legs. We break off the protruding legs.
When the frame is ready, we can begin to attach the drywall. This is quite simple to do: place the sheet correctly and screw it with self-tapping screws where it touches the frame.
It is recommended to fill the remaining free space with insulation. There can be a lot of insulation options: mineral wool, polystyrene foam, etc. But glass wool is an aggressive material for the body. If you still decide to go with this insulation, work with it wearing protective gloves and closed clothing. The product releases phenol and formaldehyde, and in such quantities that even being near an uncovered area of glass wool is dangerous.
How to cover a wall with a doorway?
Finishing the interior wall with the door opening is a little more painstaking and is done according to the following algorithm:
- Mark the location of the door ceiling trim on the gypsum board section. To do this, use a ladder to firmly hold the first sheet level with the door post.
- Cut a strip 2.5 s wide between the marking and the top cut of the sheet so that its edge lies in the center of the rack.
- Attach the sheet in the desired place to the frame.
- The same should be done with the rest of the material on the opposite side, prematurely cutting off strips 2.5 cm from the edge of each sheet.
- Cut a piece of drywall to fit over the opening so that it lines up with the cutouts in the boards on either side of the door. The edges are cleaned with sandpaper.
- Treat the back side of the wall in the same way.
After covering, the surfaces are puttied, paying special attention to cuts and joints. The box is installed, and the edges are covered with platbands. Finally, the baseboards are cut, installed and nailed through the drywall to the frame through one stud.
Conditions for the construction of houses without finishing
1. First of all, we do not have any advance payment. Payment only upon completion and acceptance of work at your site.
2. Payment for each individual service. We have assembled the frame, you like everything - pay for the frame, and move on. No “all inclusive”, “turnkey for 2 million” and other deceptions, there is an area and there is a cost factor and nothing more.
3. Low prices. No extra people, no “margin”, payment only for work. No hidden fees or bad news in the middle of installation. All prices are already indicated in each project and no changes can be made.
4. High quality frames. Reliable roof frames using Canadian or Finnish technology. Frame posts 150x50, floor joists and trusses 200x50. A rigid frame, regular 150×50 jibs attached to the corners of the frame, you will walk on the floor as if on a concrete floor.
5. Don’t overpay anyone. Give the complex areas (frame, roof, cladding) to us, and do the rest yourself - insulation, interior finishing.
Tools and materials for work
You should immediately decide how the drywall will be attached. If the frame house is already sheathed from the inside with OSB boards and the evenness of the walls is not satisfactory, and communications are laid in the frame, the sheets can be attached directly to the sheathing.
If the frame is not sheathed on the inside at all, drywall is used as an internal sheathing element, after first checking the evenness of the installation of the supporting structure. If the walls need to be leveled, you will have to make a frame for drywall - metal or wood.
To work with drywall you will need:
- Drywall knife.
- Materials for the frame - metal profiles (wall CD or ceiling CW) and guides (for walls UD or ceiling UW) or wooden beams 4x7 cm.
- A wood saw for cutting bars or metal scissors when working with a profile.
- Screwdriver.
- Edge plane for chamfering the edges of sheets.
- Self-tapping screws for drywall and profiles.
- Tile adhesive - if the drywall is attached directly to the internal OSB cladding.
- Putty.
- Serpyanka - for reinforcing seams.
Internal frame of a house without finishing
Advantages
When the lathing is made from wood with your own hands, the home craftsman gains many advantages. Firstly, such a frame does not form cold bridges, which cannot be said about a metal profile. The internal cavities will only need to be filled with insulating material, which will also soundproof the walls. Secondly, installation work using wooden blocks is somewhat easier to carry out, because it can be difficult to deal with load-bearing, rack and guide profiles. Thirdly, all the disadvantages of wood such as fire hazard and susceptibility to insects can be eliminated by treating the material before installation with fire retardants and compounds that ensure biological inertness.
How to properly install drywall in a frame house
A frame house, like no other, needs high-quality interior finishing that can protect it from moisture penetration, heat loss and other negative factors.
Interior finishing is carried out using materials that solve these problems with varying degrees of reliability. For cladding inside a frame house, plasterboard and gypsum board are used.
These are simple and effective materials for insulation, waterproofing and leveling surfaces inside a frame house, its veranda or loggia.
Moisture-resistant drywall and gypsum plasterboard are most often chosen. This is true when finishing a loggia or bathroom. Where the humidity level is average, ordinary drywall and gypsum plasterboard are used.
According to fire safety standards, fire-resistant gypsum plasterboard and plasterboard are used to decorate areas around fireplaces, stoves and kitchens. It all starts with the markup. The position lines of the guides and supporting profiles are determined.
First, the lowest point of the ceiling is determined - it is taken as the reference point. From it the distance required for the installation of lamps and communications is laid down. The use of mineral wool is allowed.
But in this case, you will need to use a vapor barrier film and a ventilation gap - mineral wool accumulates moisture, and it is of no use on the loggia.
Finishing a frame house with plasterboard
Regardless of whether the frame will be assembled with metal or wooden sheathing, the cladding technology is practically the same. But the manufacture of the base itself has some differences, dictated by the characteristics of the material. The main rule is to start finishing the frame house from the ceiling.
Frame on the ceiling for plasterboard in a frame house
Installation of a plasterboard ceiling in a frame house follows the same technology as in other types of buildings. With fastening of guides, hangers and rack (ceiling) profile.
Wooden frame
Assembling a wooden frame is quite simple, and if the sheathing is installed, then the whole work is simplified even more:
- Initially, the walls are marked where the sheathing bars will be fixed.
- Wooden blanks are cut to size.
- Fastening is done using wood screws. Their length must be at least 75 mm for reliable fastening of the timber to the walls. The pitch between points is 300-350 mm.
- When installing lintels, first install the load-bearing support bars. They are mounted on the floor and ceiling according to the markings.
- The frame posts are installed on the guides, connecting them to the guides by attaching mounting angles.
- Jumpers made of the same material are attached to the racks with the same corners.
Insulation, waterproofing and frame base on the ceiling for plasterboard
After assembling the frame, you can route the wiring directly through the posts by drilling holes in them. They also lay sound insulation and a mandatory vapor barrier layer.
Metal carcass
The base from a metal profile is assembled according to the classical scheme: marking and installing guide profiles, fastening direct hangers to the walls, installing and connecting frame posts, installing lintels.
Installation procedure:
- Markings for the guide profile are made along the floor and ceiling.
- The lath is laid on the surface and holes are drilled for the fastening dowel nails. The distance between fasteners is 350-400 mm.
- The walls are marked with lines where the frame posts will be installed.
- Straight hangers in the amount of 3-4 pieces are attached along the lines with dowels - nails or screws - for each rack.
- A rack profile is inserted into the guides and connected to the supporting rails with small self-tapping screws. Direct hangers are bent and also connected to the racks. The number of racks is at least 3 pieces, with two sheets of drywall joined at the outermost ones.
- Jumpers are mounted between the racks, alternating their position up and down through 1-2 sheets.
After installation is completed, sound insulation and insulation, a vapor barrier sheet for the walls, and wiring in a corrugated pipe are placed in the frame, if necessary.
Drywall installation
Sheathing sheets are attached to the frame using the same technology and without any differences:
- the sheet is laid on the base and the lower right corner is first fixed, moving upward, then along the perimeter. Gaps should be left at the bottom and top within 10-20 mm;
- the next gypsum board is joined to the adjacent element on the frame post, leaving a gap of 2 millimeters;
- Self-tapping screws for mounting drywall sheets must be attached to the sheet at a distance of 250-300 millimeters. The caps are slightly sunk to a depth of 1-1.5 mm, but without damaging the cardboard shell.
- You can prepare holes in advance for wiring terminals for switches, sockets and distribution boxes. When attaching such a sheet, the wiring is pulled into the openings.
In general, finishing a house built on a frame with plasterboard is not very different from the usual options for performing the same work.
The main attention should be paid to laying communication lines, preparing and protecting load-bearing walls
Watch the video: covering the inside of a wooden house with plasterboard.
Installation features
If the frame is wooden, then the cross-section of the beam must be at least 50×30 mm. They are attached to the strength elements of a frame house (its frame can also be wooden) with dowels or screws.
Vertical slats or racks are mounted in increments along the width of the sheet. It is recommended to install transverse slats to strengthen the frame so that two or three pieces are placed between each pair of racks. The timber is taken with a section of 50x25 mm. The installation step of the racks is 40 cm. Screws are screwed in every 25 cm. Their length is 30-35 mm.
Metal frame for drywall
It is recommended to use glass wool as a heat insulator, which is installed in the frame after assembly.
It is recommended to install drywall and gypsum board with a gap of 5 mm. This ensures strong sealing of seams, and the finish will be of high quality.
The technology for constructing a frame from a metal profile is similar, but requires more elements. But it wins in durability. The thickness of the metal from which the profiles are made is at least 0.55-0.6 mm.
If arched or other structures of arbitrary shape are being installed, a special profile is taken. Arched or corner bends easily - it is perforated.
Interior finishing with plasterboard of a frame house
The work includes the stages of roughing and finishing.
The first includes preparing surfaces for finishing coating. This includes: wall insulation, floor screeding, installation of window frames, slopes and doors.
At the final finishing stage the following is carried out:
- Paintwork works.
- Cladding works, wallpapering.
- Floor covering.
- Materials for interior cladding.
Popular materials for interior cladding of a frame house are plasterboard and OSB. They are used when:
- Uneven surfaces.
- They construct partitions, false walls or other complex and shaped structures.
For finishing, materials are used - wallpaper, tiles or other tiles, different types of lining, siding, liquid wallpaper and artificial stone.
Materials are selected at the stage of preparation for doing the work yourself. After laying communications, determining the locations of lamps, switches and sockets, as well as water taps, air conditioning ducts, etc.
Floor
Floor finishing also consists of two stages - roughing and finishing. Rough finishing can be done using:
- plywood;
- OSB boards;
- veneer board;
- concrete screed;
- wooden board.
All options except concrete screed are laid directly on the frame joists. The concrete screed is poured onto a plywood base. Wooden boards can serve as the front finish for the floor. A decorative coating is applied to the remaining materials. It is worth noting that in most cases the floor is insulated before finishing. On top of the rough finish, you can install a “warm floor” system, which has become very popular recently. Lay the flooring on top, choosing it to your liking. It could be:
- linoleum;
- parquet board;
- vinyl flooring;
- laminate;
- ceramics or other material.
Interior finishing with plasterboard
First, locations for installing profiles are outlined. The optimal distance between the profiles is 60 cm. In this case, a minimum of time will be spent on preparatory work, and the plasterboard sheets will be securely held on the walls. In fact, another wall is built along the existing walls, consisting of a metal frame with drywall attached to it. Insulation boards (mineral wool or polystyrene foam) can be laid between the wall and the sheets of drywall. This layer will create additional protection for living spaces from cold and dampness.
Work on finishing walls with plasterboard is carried out in the following order:
- the starting profile is attached along the intended line;
- the entire frame is mounted on which the sheets of drywall will be attached;
- cables laid along the walls are laid in special cable channels (plastic boxes or PVC pipes);
- insulation is being laid;
- plasterboard sheets are laid on the profile and fixed with self-tapping screws;
- The joints between the sheets are carefully puttied and rubbed with fine-grained sandpaper.
Finishing with OSB boards
Work on interior finishing with OSB boards actually differs little from work on finishing with plasterboard. The main difference between OSB boards is that they weigh significantly more. Therefore, a more massive profile is needed for them. Typically, in this case, a frame made of wooden beams is used, onto which OSB sheets are attached with self-tapping screws 5 cm long. Upon completion of installation, the surface of the boards must be thoroughly sanded and coated with several layers of varnish.
In addition, OSB boards can also be used for flooring. In this case, the laying and fastening of the slabs is also carried out on logs made of timber.
Fastening gypsum boards to the ceiling
The first step is to take measurements of the ceiling and select a more economical size of plasterboard slabs for laying on this area. Each sheet is attached so that the long edges covered with paper run counter to the beams. The joints should be in adjacent rows with emphasis on the beams in a staggered sequence.
Nail at a slope the spacers with overlaps between the beams along the ceiling perimeter and intermediate spacers to support the long sides of the sheets. Their thickness should not be less than 5 cm. Spacers are installed so that the edges of the plasterboard are in their center. If necessary, the edges are trimmed.
Next, drywall is installed from one corner of the room. Since the material is quite heavy, you need to hold it with two or three pairs of hands. For independent work, support bars or supports are useful to help hold the sheet during fastening.
The two supports need to be made a little larger along the length of the full height of the room. Here you will need a five-centimeter beam. The crossbar is nailed with a pair of diagonal braces at each end of the support.
For a while, a 5*2 cm strip is attached near the upper edge of the wall. It will serve as a support for the long sides of the initial row of drywall. The second row is held in place, covering the edges of the sheets of the first with half the slats. Before attaching to the beam, it is necessary to make a plasterboard backing to provide a gap for the next row of gypsum boards. The material on the ceiling is fixed with galvanized nails, starting from the center and moving towards the edges. The fasteners are driven in in increments of 15 cm.
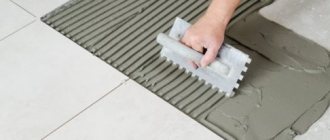
Ceramic tile cladding
The process of covering walls with ceramic tiles is considered a “delicate” job that requires certain skills. However, the process of laying tiles is extremely simple:
- the surface is carefully primed;
- the carefully primed surface is covered with a special tile adhesive;
- The tile is applied to the glue;
- The position of the laid tiles is checked with a building level and, if necessary, it is adjusted with a special rubber hammer;
- Uniform jointing of the tiles is ensured by installing special plastic crosses between them.
There are other options for choosing materials for interior decoration. The article briefly describes only the most common ones. And which one you give preference to – the choice is yours.
Read with this
- How to attach drywall to a wall: 2 installation methods
- Interior finishing of timber houses with plasterboard sheets
- Required profile for a plasterboard partition: 3 types
- Technology for constructing a frame house from metal profiles
- How to sheathe a ceiling with plasterboard: tools and necessary materials, markings, arrangement of the frame, installation of sheets
- Metal sheathing
- How to make a lathing for plasterboard on a wall: types of lathing, materials
- Reviews from real owners about frame houses
- Painting drywall: 4 finishing features
- Stages of building a frame garage with your own hands