Types of films
The material is produced in rolls ranging from two to fifteen meters in length.
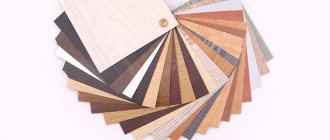
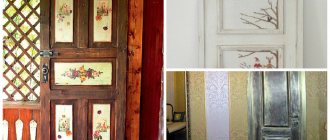
Their width is 45 cm, 67.5 and 90. A wide range includes products with a matte or glossy surface. Among plain films, metallized films are distinguished. Mirror coating has been successfully used for information protection of some objects. How to stick this type of self-adhesive film on the door so that it performs its functions properly is definitely indicated in the instructions. Decorative films are distinguished by texture and patterns. The most widely used materials are various types of wood, natural and artificial stone, imitating metal surfaces and even mosaics.
Transparent fluorescent specimens look very original. They are glued to glass doors and begin to glow in low light. Three-dimensional products also look great on interior paintings.
The adhesive composition on the material can be of two types. As a rule, this is a water-based dispersion acrylate. But its analogue based on rubber is also found. How to properly glue self-adhesive film and which adhesive composition is best suited for each individual case will depend on which doors the material needs to be placed on.
For the repair to be successful, you must first decide on the material, as well as the room where the self-adhesive film will be applied to the door. It would be good to read reviews about a standard product (any imitation) and its special versions. For example, how will material on which you can write with markers behave in the kitchen or bathroom. Experts advise dividing the purchase into two stages. On your first trip to the store, you need to familiarize yourself with the assortment and choose the one you like. But don't buy it. Upon returning home, take measurements and determine the required quantity. And only then pick up your purchase from the store.
How to cover a door with self-adhesive film
After completing the preparatory measures, you can proceed directly to pasting the door, performing actions in the following sequence:
- First you need to make markings. The dimensions of the door need to be determined using a tape measure and transferred from the inside of the self-adhesive film. Basically, this process does not cause difficulties, since many manufacturers apply millimeter markings to high-quality material.
- Next, using scissors or a sharp knife, you need to cut the film extremely carefully so that the resulting workpiece has perfectly smooth edges.
- Next, you can begin gluing it, applying the top edge of the cut material to the corresponding place on the door. You should separate the protective paper 10 cm from the edge and firmly press the sticky side of the self-adhesive film to the door leaf, placing it on the end from above.
Note! It is necessary to separate the paper gradually, immediately gluing the material to the door from top to bottom, smoothing the coating with a rubber spatula or a clean soft rag to eliminate any existing air bubbles.
Next, you need to tuck the film at the remaining ends, trimming the corners to reduce the overlap layers. When finished, carefully trim the excess on the sides and cut out the holes for the hardware, then install the door handle and lock or several in the appropriate places.
In addition, if the canvas was removed before carrying out the work, then it must be hung back on its hinges.
Having figured out how to cover a door with self-adhesive film, you can purchase the material, if this has not been done before, and having prepared the necessary tools, you can begin to carry out the process yourself, following the recommendations given.
Video:
You may be interested in:
How to choose a seal for a metal entrance door: nuances of choosing a quality material
How to insulate a metal entrance door from the inside with polystyrene foam and other materials
How to adjust the door closer correctly yourself
Useful tips
It is important to follow the following recommendations in order to get good results when gluing interior doors:
- Self-adhesive film can give a lamination effect. To refresh the look of the door and return it to its former characteristics, apply film.
- Decorative elements are needed if they give the interior a complete and at the same time complementary look. You need to follow the rule of prioritization. The door should not be too flashy with light walls. But if the walls are dark, then a light door leaf won’t look good either. This must be taken into account when choosing a finishing material.
- The easiest way to make old doors look attractive is to use wallpaper. They can match the walls or contrast with them. First, prepare the canvas, as described above, and then you can begin finishing.
It doesn’t matter what to cover the doors with to create a complete interior. Any choice should be based on convenience and the right combination of colors. It’s easy to do this work yourself; the main thing is to determine the amount of material and prepare the necessary tools.
Material characteristics
Furniture film helps to visually refresh furniture panels that have become boring over time in a short time. With the help of simple manipulations, the procedure can be done with your own hands in a few hours. To do this, you only need the material itself and sharp scissors or a construction knife.
Today, the range of this raw material occupies a leading position among other methods of furniture restoration. Using the material, you can bring any design solutions to life without spending a lot of money.
The popularity of using self-adhesive is due to its following advantages:
- the material is supplied in rolls, making it easy to cut rectangles and squares of the required dimensions;
- the film helps protect furniture from future scratches and chips, and if they do appear, replacing the material will not be difficult;
- self-adhesive film will help save the family budget: you won’t have to purchase a new set if it is possible to update old products;
- no additional tools are required for work;
- well suited for kitchen furniture, protecting it from grease, dirt and other damage;
- the material is easy to clean, self-adhesive compounds can be treated with detergents and gels.
The raw material consists of several layers: front, adhesive, protective. Each of them performs its own function. The very first layer, the front layer, is made from different types of materials:
- polymer film - represented by a self-adhesive type of vinyl, which perfectly covers surfaces. She looks very beautiful on furniture, and her decorative abilities are invaluable. In addition to vinyl, PVC or polyester is used;
- foil - used for lining less used pieces of furniture, most suitable for wall cabinets;
- paper - paper-based material can be glued to the ends of the shelves, since such a film does not withstand constant mechanical stress.
Decorative film can imitate a large number of surfaces: leather, wood, natural stone, ceramics, tiles and fabric. Thanks to this, it has a wide range of applications not only in updating facades, but also in ordinary decor.
Depending on the material of manufacture, self-adhesive film is divided into:
- single-layer roll products - produced on the basis of polymers, additives in the form of plasticizers, which give the raw material strength: all components are mixed together and flat rolls are formed by extrusion;
- two-layer models - in this case, two fabrics are used in production: the base and the surface; such material is technically worse than its single-layer counterpart.
Anyone can glue furniture on their own; no special skills are required. Before you start work, select the surface structure of the film; it can be glossy, matte, transparent, mirror and holographic
Each type is used in individual cases, so it is important to determine in advance the purpose of the raw material
What's next?
When the work is done efficiently, you can remove all the leftovers and extra pieces. Now the fittings are being installed and the doors are in place. The move should not be cramped.
This decorative film has a wide range of applications and is not only for covering doors.
The interior can be completely changed without investing a large amount of money. You don’t even need to throw away the leftovers, as they can be used in any other direction.
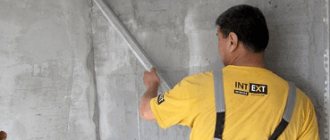
Surface preparation and film gluing
One of the advantages of using self-adhesive film is the minimum set of tools that will be required to carry out work on preparing the surface and gluing the material:
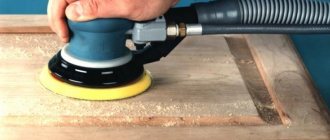
- To treat the surface - a grinding machine, a drill with a special attachment or emery (depending on the degree of roughness and the amount of damage), putty, primer or wallpaper glue for treating a wooden surface, acetone or another solvent.
- For marking, cutting and gluing - a stationery or construction knife, scissors, tape measure, ruler, pencil, rubber roller or spatula and a household hair dryer.
Self-adhesive film can only be applied to a well-prepared, grease-free surface. To do this, perform the following steps:
- The door is removed from its hinges, the fittings and decorative elements, as well as the glass, are dismantled.
- Before processing, the old coating should be removed. For these purposes, a grinding machine, drill with an attachment or emery is used.
- The cleaned smooth surface is degreased using detergents or acetone.
- Cracks, chips, deep scratches and impact marks can be repaired using putty.
- A layer of primer or wallpaper glue is applied to the surface of wood, plywood or chipboard.
- If the door fits very tightly to the frame, use a plane to remove 0.5-1 mm from the ends (the thickness of the film is small, about 0.3-0.4 mm, but it can prevent the door from closing and lead to abrasion of the material).
After removing all rough edges and remaining dust, you can begin gluing the decor on the door. Manufacturers usually place instructions for working with their product inside the package or on the back of the self-adhesive, but the general sequence of actions looks like this:
- Using a tape measure, the size of the door leaf is determined.
- The film for the door is cut according to the obtained dimensions with a margin of 2-3 cm.
- Next, you should paste over the end part of the door, while making an overlap of 1-2 cm on the canvas.
- A few centimeters of the protective layer are separated and the edge of the film is glued with an overlap to the upper end of the door (thanks to this, the seam will not be visible). The protective layer is gradually removed, the film is simultaneously pressed against the door leaf and smoothed using a rubber roller or spatula in the direction from the center to the edges. If wrinkles form, the film is peeled off, straightened and re-glued. If small air bubbles appear, you can do without re-gluing - just pierce them with a needle and smooth them out, the puncture mark will not be visible.
- If several strips of material are used for gluing, the joint is overlapped by 3-4 mm.
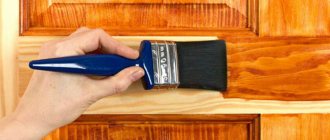
- Gluing the bends is done using a hairdryer. The heated film is heated at the bend and pasted under tension, after which it is pressed tightly to the surface until it cools.
- Strong adhesion at the edges of the film is achieved by ironing it through a sheet of thick paper or fabric.
- You should evaluate the quality of the pasting from a distance - if unevenness or distortions are detected, the sheets can be re-glued (the average time for the glue to completely harden is 5-6 hours).
- After making sure that there are no flaws, all remnants of the film are cut off using a sharp construction knife.
- The fittings are installed, the door is returned to its place and its free movement is checked.
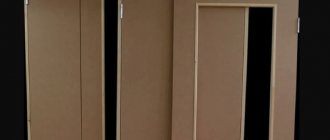
Wardrobe pasting
The process of updating furniture using film is not difficult, but it requires patience and knowledge of how to cover a cabinet and what tools will be needed.
Required tools and materials
To start updating your cabinets, in addition to adhesive tape, you will need a number of available tools:
- ruler or tape measure;
- pencil or marker;
- scissors, stationery knife;
- silicone spatula or dry rag;
- spray bottle with soapy water;
- hairdryer
Preparation
Gluing a polished cabinet with self-adhesive film begins with preparing the surface. From the very beginning, all removable fittings are removed. For convenience, you can remove the doors from their hinges.
All furniture must be carefully inspected for protruding fasteners, chips and cracks in the coating, since all these defects will appear in the future. Self-tapping screws and bolts can be easily tightened with a screwdriver or wrench, but unevenness will be more difficult to deal with. You will have to level the surface with putty and then sand it with sandpaper.
After leveling, begin cleaning and degreasing using any detergent and ethyl alcohol.
If the cabinet is made of wood, MDF or chipboard without additional coating, you can apply a thin layer of furniture primer and let it dry to enhance adhesion.
Pasting the cabinet
When gluing the film, 2 methods are used - wet and dry. The positive outcome of the entire process will depend on choosing the right one.
When dry gluing, you must first separate a small section of the substrate, freeing the adhesive base, apply the film to the place of fastening and level it. Then, as the gluing progresses, the backing is pulled back, and the sheet is gradually secured and leveled in parallel using a silicone spatula.
If the question arises of how to properly cover an old cabinet completely and at the same time eliminate the possibility of wrinkles and other defects, it would be better to use the wet method.
The process consists of gluing the film onto a damp base, which will allow you to correct errors immediately during the process.
To moisten the adhesive layer, use a spray bottle in the “fog” mode. To do this, the substrate is completely removed. For wetting, prepare a soap solution of 10 ml of detergent and 1 liter of water. The main rule with the wet method is not to overdo it with moisturizing. This greatly slows down the adhesion and causes the material to slip.
The prepared canvas is placed on the cabinet and moisture begins to be squeezed out from the center to the edges, while holding the surfaces together. The remaining solution will completely evaporate after 48 hours. After a day, you need to treat the canvas again with a roller.
We glue all the walls and facades in the same sequence.
How to easily cover furniture and walls with self-adhesive film
When some time passes after repairing and purchasing furniture, there is a desire to somehow refresh the interior, give it new life. However, not every time we have the opportunity to afford radical changes. It is precisely under such circumstances that a simple and affordable method of updating walls and furniture helps us. It is also useful if you need to hide small cracks or traces of children's monumental painting. Let's take a closer look at how to use self-adhesive film so that the result of our labors brings joy.
This type of coating, which came to our market a long time ago, is now gaining popularity. Due to its low cost, rich palette and variety of patterns, and mainly its ease of use, self-adhesive is widely used in decoration.
Like any material, film has its own characteristic qualities, so a certain approach is required.
Step-by-step instructions for pasting
Precisely gluing the self-adhesive film on the door contains several stages:
- Performing markings for the original material. Measure the door with a tape measure and mark the door with a pencil. If the width allows, then markings should be made taking into account the bend on the end side. For application, the reverse side of the material with millimeter markings is used.
- Using sharp scissors or a knife, cut out the pattern. You have to cut it very evenly, otherwise the result will be bad.
- We glue the door. Pasting begins from the top, having previously peeled off the protective layer by 10 centimeters. If the canvas was cut taking into account the end, then we place the material on the end, then, pressing down, gradually lower it, smoothing the material used into the edges. For better, faster smoothing, use a rubber spatula.
- Excess material is trimmed.
- Places for handles are cut out.
- If a bubble has formed and cannot be removed with a spatula, then carefully pierce it with a needle and press it with a dry rag.
We also recommend watching the video instructions before starting work:
Choosing a film based on the type of room
In order for pasting furniture with self-adhesive film to be successful and to serve for many years in the future, you need not only to purchase high-quality material, but also take into account the type of room in which the surface will be used. Raw materials for the kitchen and bedroom have their own characteristics, so when choosing, use the following tips:
film for furniture intended for the bedroom or living room should not only have an attractive appearance, but also fit into the interior. If previously the fronts of cabinets and tables had a certain color, it is not at all necessary to repeat it - you can purchase rolled products of a different shade, but do not forget about compatibility with upholstered furniture and decoration. For well-lit rooms, matte film is ideal - its structure will be perfectly visible in sunlight
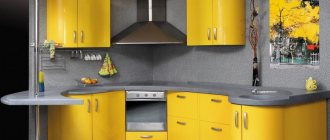
When choosing a self-adhesive base for the bedroom, pay attention to products that imitate natural materials. Such options would be appropriate for decorating the facades of cabinets and chests of drawers; To make the kitchen set look like new, it can also be covered with vinyl material
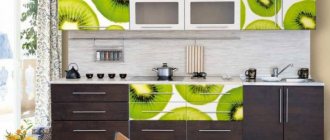
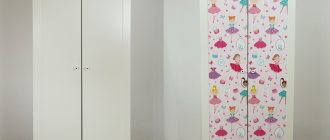
For this room, the strength characteristics of the raw materials and the ability to constantly withstand mechanical stress are very important. Gloss would look good here, but remember that the surface requires careful care. Many designers recommend using self-adhesive compounds with photo prints and bright images. The pattern of citrus fruits will suit the kitchen space; You can also update the furniture in the bathroom or toilet using this raw material. Thanks to its properties of not absorbing moisture, the pasted surface will not only look beautiful, but also be practical. For the facades of cabinets and cabinets in the bathroom, use options that are consistent with the color scheme of the floor and wall tiles; To freshen up the children's room, glue on material depicting your favorite cartoon characters. Children always enjoy new things, and such a surprise will delight them. An assortment of films with fairy-tale characters will help your child make the right choice. The raw material is used to process wardrobes, bedside tables and even tables for doing homework. If your plans do not include a complete replacement of the appearance of the furniture, you can stop at using individual patterns for decoration.
To update the outside of glass cabinets and display cases, treat the furniture with a transparent self-adhesive film. This material often has a small printed pattern that will help diversify glass facades.
When choosing a material, think carefully about the future design. Some varieties of holographic or glossy films can have the opposite effect and create a cluttered feeling in the room.
Application area
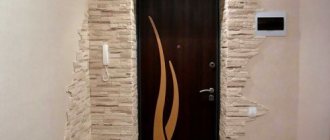
As you have seen, self-adhesive film has a lot of advantages. But the main thing is that it is universal and can be glued to almost any surface. Manufacturers recommend using the product for cladding doors made of chipboard, MDF, PVC and other similar budget materials, which often have an inexpressive appearance and wear out quickly. And thanks to the self-adhesive film, you can completely transform the door leaf and make it pleasing to the eye. So, most people choose natural wood veneer material. As a result, an inexpensive door acquires noble features and looks very presentable.
But it is worth noting that film finishing is used not only for budget door models, but also for metal structures. The question here is what goals the owner of the home is pursuing. For example, not everyone likes the elegant shine of iron, so people want to give their doors a more traditional wooden look. There are even cases when the owner wants to mislead possible uninvited guests by concealing that the structure is actually made of metal. By the way, film is often used to protect the surface, since even the most durable metal doors are exposed to adverse external factors. Therefore, if there is a large amount of precipitation in your region, then finishing the entrance doors with self-adhesive is more than justified - this way you will prevent metal corrosion.
Preparation for gluing
In order for the self-adhesive film to lay flat, you need to know the rules for handling it. First of all, remember that it is thin and any protrusions, depressions, or irregularities will be visible, especially on a glossy monochromatic film. Therefore, before gluing, the surface is leveled to an ideal state. If we are talking about old furniture, you can use wood putty. You can dilute regular finishing putty with PVA diluted with water (1:1). Use this mixture to seal all uneven surfaces. Just mix very small portions - literally a couple of tablespoons of powder. Try to immediately make the surface perfectly smooth - after drying it is very difficult to sand.
This is how you can use self-adhesive to change an old refrigerator
The leveled surface is cleaned of dust and dirt (with water and dishwashing detergent) and dried. Everything must be removed carefully: even drops of fat, if we are talking about changing the “image” of the kitchen set. If you use abrasive or acid-containing products, everything will need to be thoroughly removed and washed several times with water and liquid dishwashing detergent.
If the surface is loose (there are areas of putty, for example), it is better to cover it with a primer. The primer is selected according to the type of surface, taking into account the adhesive composition on the PVC film. A universal option is PVA glue. It can be slightly diluted with water and coated with the surface. Just make sure that there are no streaks or smudges left - all this will be emphasized by the film. The second primer option is acrylic. Why her? Because the adhesive on self-adhesive vinyl film has just such a base.
If the original substrate is very loose, two coats of primer may be required. After drying, check for any smudges. If everything is smooth, you can begin finishing.
Advantages and disadvantages of self-adhesive film
The material is in significant demand on the market due to a number of its positive qualities:
- Ease of use. Even a person who is doing such work for the first time can apply film to a door leaf without much difficulty.
- Huge and varied assortment. There are many films available on the market in color and texture, so you can choose the most suitable option in accordance with personal preferences and the interior of the room.
- Resistant to sunlight. Material made from high-quality raw materials does not have such a drawback, unlike cheap products, in which this occurs quite often.
- Easy to care for. Self-adhesive film is easy to clean from dust, grease and other contaminants, for which in most cases you only need to wipe it with a rag soaked in water or a regular detergent.
- Can be used for gluing products made from different materials.
- High wear resistance and strength. High-quality self-adhesive film can withstand light impacts and minor mechanical impacts, providing door protection from scratches.
- High resistance to moisture. The material does not allow the passage of water and steam through itself, which is why it can also be freely used in the bathroom or kitchen.
- The film does not cause any harm not only to metal, but also to wooden door structures.
- It is capable of hiding small defects present on the surface of the product being pasted. Using it, you can hide the door’s shortcomings that arose during its long period of operation.
- Affordable price. Compared to other materials intended for cladding door structures, the cost of self-adhesive film is noticeably lower.
Taking into account all the above advantages, self-adhesive film has a long service life and is an excellent option for finishing doors.
In addition to a number of positive qualities, the material also has several disadvantages:
- If gluing is done poorly, after some time it can begin to lag behind the surface.
- The material is intended for one-time use only.
- Before covering the door with self-adhesive film, its surface must first be prepared. Particularly careful work must be done when finishing structures with polymer coatings.
In addition, it is not capable of masking large defects, in the presence of which it is better to give preference to other more suitable options.
Why do you need self-adhesive?
Self-adhesive is used for complete repairs or for the restoration of outdated items, doors and furniture. The purpose of application may be to impart strength to various surfaces. For example, if wooden doors are installed in a bathroom, they need to be given moisture-resistant properties, and film is indispensable in this case.
Attention! When choosing a material for pasting, pay attention not only to the color, but also to the durability of the paints. Run your hand over the surface of the self-adhesive
If your palm is slightly stained, the paint will quickly rub off.
If you have made a renovation, radically changing the color scheme of the room, but you don’t want to change a door that doesn’t match the color, then self-adhesive will also come in handy.
Using self-adhesive film you can increase the moisture-proof properties of doors
Another area of application is protecting the door from scratches and damage of any kind.
Instructions for working with film
Let's look in detail at how to glue self-adhesive film on the door. First of all, you need to prepare the tool. You will need a ruler, tape measure, and a pencil for marking. A rubber spatula will be useful. To prepare the surface, you cannot do without sandpaper. You will also need a primer and mastic. For correction you will need a spray bottle with water and a hairdryer.
The algorithm of actions is as follows:
- The surface of the door leaf is cleaned of irregularities. Paint drips are removed and burrs and roughness are cut off;
- Then the entire plane is primed. This will allow the adhesive composition to better adhere to the surface;
- After marking the polymer material, all excess is cut off. For convenience, its back side is divided into squares;
- Pasting begins from the top of the canvas, moving down;
- Folding back the backing, glue the corner of the canvas. Then the material is leveled to the sides and down.
There is one trick for inexperienced and unconfident home craftsmen. Before gluing the door, you need to spray the canvas with a soap solution from a spray bottle. This will allow you to control the self-adhesive film. It will slide on the surface and can be moved to the sides. After fixing it in the right place, water is expelled from the rubber using a soft rag or spatula. Then the surface is dried with a hairdryer. But be warned that excessive use of water may ruin some materials. For example, if the base is paper. To make it more clear how to stick a self-adhesive film on a door using this method, it is better to watch the video.
The home craftsman also needs to know how to remove the already pasted film. This will come in handy when you want to change the interior of a room and need to change the texture on the door. There are several techniques to cope with this difficult task.
You can use a hairdryer first. You need to warm up a corner of the film, pry it with a knife and smoothly pull it towards you and down. If the material lags behind the surface normally, then you can continue moving. In those places where a hitch occurs, it is necessary to warm up the areas with a hairdryer.
Stores sell “Label and Sticker Remover.” This is a special highly penetrating aerosol composition that needs to be sprayed under the edge of the film and wait a little until it flows inside. Continue this way, gradually adding aerosol to the surface. The famous can of WD-40 has a similar effect.
If you want to suffer with solvents, then it is better to choose white spirit or 646. You cannot use their fatty varieties. The work will require skill. You should try to soften the glue by applying a moistened swab to the surface and then wipe off the excess with a dry cloth. But under no circumstances should you rub the solvent on the door. When mixed with glue, it can disrupt the structure of the material.
Required Tools
Before proceeding to pasting the door, you need to prepare the fixtures. To work you may need:
- ruler, metal corner and measuring tape (marking);
- pen or marker (outlining contours);
- scissors or construction knife (cutting film);
- rubber spatula (leveling the pasted coating);
- sprayer with water (adjusting the position of the self-adhesive);
- hair dryer (processing corners and protrusions).
If the door leaf needs preparation, then you need to prepare sandpaper or a sander, a plane, primer and putty.
Advantages of using film
A binder base is applied to one side of the PVC sheet, and a decorative pattern is placed on the other. Gluing occurs without effort and time, since there is no need to apply additional products with subsequent processing.
Other positive qualities include:
- Durability. The service life of the material depends on the quality of application and environmental conditions.
- Strength. The structure resists scratches.
- Moisture resistant. Steam and moisture do not penetrate through the coating, so it is often used for kitchen furniture.
- Wide choose. Manufacturing takes place using foreign equipment. This makes it possible to produce films of different colors with patterns like wood, stone, brick, and patterns. The top sellers are single-color models, as well as mirrored ones and those with photo prints.
- The binder contains no harmful components. Upon contact with wood, the glue penetrates into the structure of the material, providing reliable adhesion, but the coating is not damaged.
- Hides defects.
- A simple detergent removes dirt from the self-adhesive tape without leaving any residue.
- Resistant to sunlight - suitable for gluing the front door.-
- The price of the product is much lower than that of other similar materials.
Many positive aspects hide minor disadvantages. The film cannot be reused, as it loses its original properties after peeling off. Choosing the wrong application technology leads to the formation of bubbles, so you should consider in detail how to properly glue self-adhesive film to interior doors.
Film is a simple material that allows you to breathe a second life into furniture or a door structure in a few minutes. Due to its positive properties, it has found wide application in the household. The quality of the result depends on the gluing technology. An important stage is preparation, which involves removing old finishes, eliminating defects, and degreasing. It is glued gradually, smoothed from top to bottom, bubbles and irregularities are removed with a rubber spatula.
Material characteristics, advantages and disadvantages
To change the design of old furniture, it is often recommended to cover the surface with PVC film with an adhesive composition applied to the back side. These films are also called “self-adhesive”, since after removing the protective layer it is simply applied to the base and, due to the applied glue, sticks. A more “cultural” name is self-adhesive film for furniture. It is under this name that it can be found in stores and on the market.
Large assortment of flowers
Why is this film popular? Because it has a low price and has a lot of color/paint options. The film is waterproof and can be used in areas with high humidity. If you know certain rules, it is not difficult to work with, and the pasted surface is easy to care for - all contaminants remain on the surface and are not absorbed. In general, it’s a good option if you need to update furniture or doors, but don’t have the funds to buy new ones.
There are also disadvantages in sufficient quantities:
- Self-adhesive film sticks well only on smooth substrates.
- Preliminary preparation is required. The film is thin, all defects will be visible, so first you need to level the surface to perfect condition.
- It is difficult to make the joints perfectly - they are usually visible.
- In places of active friction, the film may rub off.
- It is difficult to peel off from some types of surfaces.
At a low cost you get a very good result
As you can see, it’s not an ideal option, but it’s not bad. It is difficult to replace this method of changing the decor - only sticking on a new veneer, which is much more expensive and technically more difficult. Cabinet furniture is also covered with wallpaper and then varnished. This method is cheaper (possibly), but it requires changing the decor more often.
What assortment?
The assortment is large, there are different colors, with drawings and photos. But with the type of film it’s not so simple. PVC films available for sale:
- Matte.
- Glossy.
- Transparent.
In addition, manufacturers take on individual orders for the existing interior. The composition of the film is simple - on one side there is an adhesive base, and on the other there is a pattern that is covered with a protective layer. Thanks to this, the surface becomes glossy and unique. Once it is in the right place, there is no smell. The material can be washed, and dust does not settle on the surface. The film is not difficult to care for, they say in the reviews.