The question of filing a wooden ceiling always depends on the cost and reliability of the material. You can sew with expensive plywood or the remains of a slab, but it is best to make the ceiling from OSB. There is less work, but the quality and reliability are much higher.
Working with OSB is much easier than plasterboard or chipboard
Pros and cons of OSB
To understand how the ceiling is hemmed with OSB boards, you need to know the characteristics of the finishing material. Ceiling tiles have the following advantages:
- very durable. The ceiling surface covered with such material can withstand any ceiling cladding, and if necessary, a layer of plaster;
- high density of the material, comparable to chipboard;
- optimal weight (18 kg - maximum for one element);
- a room with ceiling tiles retains heat for a long time;
- easy installation;
- the material is easy to process: you can saw, trim, create shapes, screw in hardware;
- resistant to temperature extremes;
- moisture resistant.
Like many materials, ceilings made of OSB boards have disadvantages:
- the material swells from excess moisture (if there is a lot of dampness). It is dangerous if neighbors from the upper floors flood. During installation, it is advisable to treat it with special water-repellent, impregnating agents;
- mandatory treatment with antiseptic solutions, otherwise the material will be affected by mold;
- a fire hazardous material because toxic substances are released when ignited. To avoid a possible fire, it is necessary to ensure the safety of electrical wiring and install fire warning systems;
- expensive.
The disadvantages of a ceiling made of OSB boards are fewer than the advantages. OSB can be purchased for installing a rough ceiling covering, while observing safety measures.
Where can I install an OSB ceiling?
In theory, the material can be used in almost any room that is protected from direct exposure to rain, fog or snow. In general, in any enclosed space. If there is ventilation, panels can be used to cover the ceilings in a garage or barn.
OSB is an excellent material for lining the ceiling on a balcony, in a corridor, or even in a residential building or bathhouse, but with the obligatory equipment for vapor barriers and vents. Formally, you can hem the ceilings even in a swimming pool or steam room, but to do this you will have to use a waterproof version of OSB, plus high temperatures can lead to the appearance of an odor. Therefore, slabs in such rooms often play the role of an intermediate base.
Preparatory work
Strand boards are a good base material on which to install ceiling cladding. OSB not only serves as the basis for the finishing cladding, but is also an excellent insulation material.
Before hemming the ceiling with OSB board, it is necessary to carry out preparatory work on the ceiling surface. The service life of the entire ceiling surface structure depends on how well the preparation for installation is carried out. Preparatory activities include the following:
- the old ceiling covering must be completely removed and then cleaned of dust;
- the cleaned ceiling surface should be treated with antiseptic and antifungal agents (can be done several times);
- Using a hydraulic level, you need to set the mounting marks for the slabs. The marked points are connected with a nylon thread or a marker.
Pay attention to the exact calculation of the fixing height of the slabs. When it is planned to lay an insulating layer under a rough ceiling made of OSB boards, try to leave gaps (1 cm is enough). Such actions are carried out so as not to squeeze the OSB with the surface of the ceiling, otherwise the elements will be deformed.
Selecting material for lining the ceiling surface
When using OSB, accurate selection of the variety is very important. Oriented strand boards include four main classes:
- OSP-1. Suitable for rough work in permanently dry rooms and for the manufacture of furniture parts.
- OSP-2. It has a higher density compared to the previous version, and rather low moisture resistance. The products have proven themselves to be suitable for covering internal surfaces taking into account constant humidity.
- OSP-3. The most popular variety, combining all the necessary properties. Can be used under severe mechanical loads. Although the products are classified as moisture resistant, they are not able to withstand prolonged contact with water without additional treatment.
- OSP-4. This type is used much less frequently, because despite all its advantages, its price is very high.
There are 4 types of oriented strand boards with different technical characteristics.
The ceiling lining with OSB boards is made with materials of classes 2 and 3. The first option is suitable for the living room, bedroom and corridor, the second - for the kitchen, hallway and even the bathroom.
OSB has a fairly wide range of sizes, but the most common products are those with dimensions of 122*244 cm and 125*250 cm. For working with a suspended horizontal structure, the optimal thickness is from 6 to 9–9.5 mm. In this situation, the leaf mass is 12.9–18.6 kg.
On a note! It is important to have security certificates. The environmental friendliness criterion, measured by the level of formaldehyde emission, should not be more than 10 mg/100 g. Which means a toxicity class no higher than E1.
The most important characteristics of OSB boards are weight and thickness
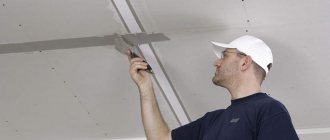
Installation of sheathing
The most important step in installation is attaching the frame system (sheathing). Mount a frame made of wood or metal corner. If the sheathing is made of wood, then pre-treat the material with the same antiseptic as the entire surface of the ceiling.
Installation of the sheathing includes the following steps:
- Regardless of the material chosen for the frame structure, elements of the required size are cut and then attached to the wall. Don't forget to leave a gap;
- To fasten the wooden frame, ordinary self-tapping screws are used;
- if the surface is concrete, you need to stock up on dowels and a hammer drill;
- During the installation process, observe the intervals between fastenings. It should be no more than 50 cm;
- transverse parts are installed to the previously prepared ceiling surface;
- check the height of the slats using a level.
After installing the sheathing, electrical wiring and an insulating layer are laid.
Selection of wooden floor beams
There is a certain sequence of actions on how to properly hem a ceiling with a board, which involves two stages:
- The boards are secured to the joists by nailing them or tightening them with self-tapping screws.
- Insulation and waterproofing are laid on top of them.
But there is another way to fasten the boards, which has a more complex implementation - in this case they are placed on top of the beams:
- first, cranial bars are secured to the joists;
- then boards are laid on them;
- then a thermal insulation and vapor barrier layer is installed, and they can be placed both under and on top of the boards.
Plywood is considered an ideal material for making a rough ceiling on beams. With its help, it will be easy to make a base for placing the cake from an insulating, waterproofing, vapor-permeable layer.
When the ceiling is hemmed with plywood along the beams, its sheets are exposed to a minimum of mechanical and thermal load. For such work, the dimensions of the material used must correspond to the interbeam distance.
The sequence of manufacturing this type of rough ceiling:
- if necessary, assemble a slatted frame and attach it to wooden beams from below;
- cut sheets of material 4-6 millimeters thick are hemmed to the sheathing;
- Sound-insulating and heat-protective mats and waterproofing films are placed on plywood.
The work on arranging the rough ceiling is carried out in such a way as to subsequently use the lattice frame and beams as the basis for installing finishing plasterboard panels.
The materials for such floors are lumber, laminated wood or plywood, special prefabricated structures, beams, boards, and beam shoes as fasteners.
- The load on wooden floors is their own weight plus temporary operational loads. The dead weight of interfloor wooden ceilings reaches 230 kg/m2, and their temporary loads – up to 200 kg/m2.
- The weight of attic floors depends on the weight of the insulation and reaches 300 kg/m2 with an accepted temporary load of 100 kg/m2.
- Taking into account the load-bearing characteristics of wooden beams on the ceiling, the length of their span, and the magnitude of the loads, we determine the distance between the beams, but, as a rule, no more than 1 m.
- Optimal are beams with a thickness of 5 and a height of 18 cm, if they are laid every 50 cm using mineral wool insulation. This will prevent the beams from sagging and the ceiling from collapsing.
The choice of beams depends on the subsequent magnitude of the possible load on them
Installation work
The rough ceiling and OSB can be mounted in the following ways:
- to a metal profile (suspended structure);
- on anchors and dowels;
- to cornices with decorative elements. The slabs are laid in grooves.
The most reliable, practical option for attaching ceiling tiles is to use an adhesive base, or using self-tapping screws with recessed heads of small thickness. Try using liquid nails.
The best thickness of OSB for the ceiling is 3 mm, and the width is from 1.5 to 2 meters. Cutting is performed in rare cases.
With the sheathing installed, the slabs are laid perpendicular to the fixed floors (along the length of the slabs).
Check out the video on how to hem an OSB ceiling. The optimal method of fastening is considered to be fixing the elements to a wooden surface. When installing this way, the following steps are performed:
- the working surface is prepared and defects are eliminated;
- antiseptic treatment;
- sheets are selected according to the required sizes;
- fastening is carried out with nails or using self-tapping screws around the perimeter of the ceiling elements. The pitch is 30-40 mm.
If the slabs are mounted on a concrete base, then the work will be a little more complicated. For fastening you need dowels-nails.
Before installing the elements, the concrete surface is checked for differences in height levels. Preparatory measures are similar for wood surfaces. A primer layer is used for strengthening. Then the marks are set, and holes for fastenings are drilled with a hammer drill. The marked sheets are applied to the ceiling and secured. We found out how to attach an OSB ceiling to various coatings.
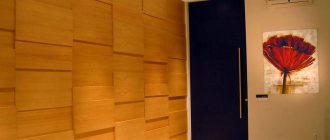
Rules for cladding walls inside the house
This OSB flooring technology is not very different from exterior work, but has some nuances:
- To build the frame, you can use a wooden beam and a metal profile. The second option is preferable when facing concrete and brick walls, as well as areas made of experimental materials.
- Installation of sheathing posts is carried out in increments of 40 to 60 cm.
- Self-tapping screws or nails are used to fix the slabs. For a metal frame, special screws are purchased.
- Installation of OSB is carried out with a gap of 3–4 mm between adjacent elements. An indentation from the floor and ceiling must be formed.
- The fastening points are placed at a distance of 10–15 cm from each other and at a distance of 1 cm from the edge. In the center, a step of 20–30 cm is allowed.
- Vertical installation is optimal, because it allows you to reduce the number of joints.
The sheets are placed facing the room. It is taken into account that OSB-3 has a moisture-proof impregnation, which will need to be removed before finishing cladding.
It is impossible to leave the damper gaps uncovered, so first they are filled with sealants and then puttied
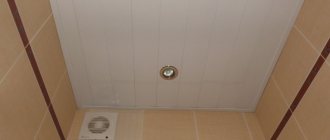
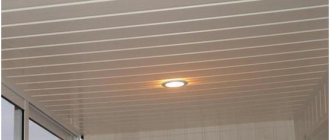
Final cladding
Oriented strand elements are increasingly used for rough construction of ceilings. Various facing materials are mounted on the already prepared surface. Let's consider how to decorate an OSB ceiling. The following materials are chosen for cladding:
- decorative plaster having a thin layer;
- ceiling wallpaper;
- paints and varnishes;
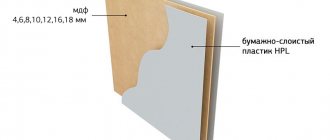
- LMDF or LDVP canvases.
The listed materials are the most common types of ceiling finishing after installing OSB. Look at the proposed photos of the ceiling made of OSB boards with finishing.
Let's figure out what each final cladding material is:
| Decorative plaster (relief plaster with a fine-grained structure, structural coloring compositions, various azures) | Any surface can be created |
| Wallpaper | Embossed on a non-woven base with a foam layer. Wallpaper imitates various patterns (dots, hatching) |
| LMB | These are mainly water-dispersed acrylic-based paint compositions. You can use regular gloss varnish |
| Panels | A budget option. Not suitable for rooms with high humidity (bathrooms, baths). It is also undesirable to use panels made of plastic and foam. |
For the final cladding of ceilings, use any coating, excluding PVC panels.
Wallpaper
Everything here is not as simple as it might seem at first. If you are decorating osb boards inside rooms using wallpaper, you need to make sure that the wood does not show through them. To do this, you need to choose a version that will completely hide the pattern on the outside of the panel formed by glued shavings.
Gluing can be done with ordinary glue intended for ceiling coverings of this type. If you choose wallpaper for painting with a three-dimensional pattern or a pronounced relief, then after gluing and painting it it will be impossible to determine what material the ceiling is made of - such a ceiling will look no different from standard structures.
Another option for decorating such a surface is to use “liquid wallpaper”. In terms of their consistency, such compositions resemble putty mixtures and are applied in the same way. However, finishing with such materials on an osb board should be done only after priming has been done.
Average prices
How much it costs to hem an OSB ceiling depends on parameters such as:
- room area;
- ceiling height;
- the amount of work performed, including preparatory activities.
The cost is calculated per square meter. Below are the average, approximate prices in rubles in Moscow and the region:
| Job title | Unit | Price |
| Dismantling the old coating | m2 | 130 |
| Installation of sheathing | — | 250 |
| Installation of slabs | — | 520 |
| Closing joints | — | 60 |
| Antiseptic impregnation | — | 20 |
| Laying insulation | — | 60 |
Having found out how much it costs to hem the OSV ceiling, you can decide whether to call specialists for repair work, or carry out the installation yourself.
OSB panel installation technology
Before finishing the OSB ceiling begins, the surface needs to be prepared.
The stages of work are as follows:
- Clean the surface from old coating and dust.
- Treat the ceiling with antiseptics, antiprenes, impregnation - this procedure is mandatory for wooden houses. Impregnation will protect against fires and reduce the risk of developing fungus and mold under the cladding.
- Mark the level of the lowest corner and mark around the perimeter of the room, taking into account the height of the OSB boards. The markings are marked with a nylon cord.
And now the most important thing: arrangement of the frame and the procedure for installing OSB boards on the ceiling
Tools and materials for work
Depending on the chosen cladding option, the following tools and materials will be required:
- OSB;
- composition for leveling base defects: putty, epoxy-based compound;
- primers: antiseptic, antiprene;
- hardware;
- building level, tape measure, pencil;
- hacksaw or jigsaw for cutting sheets;
- hammer drill or impact drill with attachments for concrete;
- screwdriver;
- hammer;
- stepladder, base.
To build the frame, you will need a wooden beam with a cross-section of at least 20 mm or a metal profile with guides and a set of hangers.
Frame installation
Installation of timber lathing begins with treating the elements with an antiseptic and antiprene. You can work with timber only after the elements have completely dried.
Work order:
- Cut the timber into pieces of the required length, secure it to the wall, maintaining an expansion gap (3-5 cm).
- When fastening a wooden structure, self-tapping screws are sufficient; if the installation is on a concrete surface, holes are punched with a hammer drill and the beam is attached to dowels.
- The fastener spacing is no more than 0.5 m.
- The transverse bars are also attached to the base in increments of 0.3-0.5 m.
- When carrying out work, it is necessary to check the evenness of the plane; a building level will be useful.
- As soon as the frame is completed, the wiring is installed, all contacts are insulated - after the ceiling is covered with slabs, free access to the electrical wires will be limited.
- During the work, holes are cut for lighting fixtures and pipes.
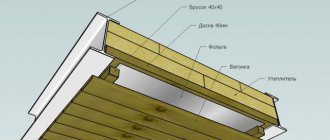
When installing a ceiling made of OSB boards on wooden beams in a private house, we must not forget about heat, hydro, and sound insulation. The materials are laid along the sheathing: first waterproofing, lukewarm sheets on top of it, then a vapor barrier membrane. The latter is attached to the beam with a stapler, overlapping.
Panel installation
The easiest way to do work is on a wooden ceiling. You don't have to think long about this:
- Check the evenness of the base plane and repair significant defects;
- Treat the wood with protective compounds and dry;
- Trim panels to the desired format;
- Attach the sheets with self-tapping screws around the perimeter in increments of 30-40 cm. It’s a good idea to go crosswise with self-tapping screws, especially if the slabs are large.
For a concrete slab, the work will be more difficult. The base for the slabs must be level, without crumbling areas of plaster. It is better to first clean all the old cladding to “zero”, then treat it with a primer 2-3 times and let the base dry. Fastening with durable dowels with a long leg. Drill with a hammer drill, insert plastic choppers into the holes and screw dowels into them.
If a rough OSB ceiling is attached to wooden beams, then self-tapping screws with deep heads of small thickness are used. It’s a good idea to use an adhesive to strengthen the fastening, but you can sit the slabs on liquid nails. The technology is simple: the sheets are laid out perpendicular to the ceilings. This way you can quickly and easily renovate the ceiling areas in a wooden house or apartment.
So, it’s clear how to cover a rough ceiling in a private house made of wood, brick and apartment, but what final cladding will be better? Experts do not limit the owners’ imagination in any way; there are many options for finishing OSB ceilings:
- Acrylic, water-based varnish compositions. For the latter, the surfaces of the slabs need to be puttied to protect them from moisture.
- Wallpaper. Any variations are allowed here: from silk-screen printing to photo and 3D wallpaper. By the way, if you choose textured wallpaper, it will hide small defects in the ceiling, creating a convex texture.
- Decorative plaster will also come in handy. Due to the high endurance of the sheets, you can apply a layer of up to 1.5 cm - this decor will make the ceilings unique and beautiful.
- Panels from LMDF, LDVP. But it is better not to use thin foam sheets, especially in rooms with high or variable humidity levels.
Finishing the ceiling from OSB gives full scope to the imagination and skill of the home craftsman. And, by the way, it allows you to save a lot on finishing cladding, which reduces the overall cost of repairing the ceiling.
Adviсe
Having made a choice in favor of OSB boards for the rough coating of the ceiling surface, you can use the following tips:
- When caring for slabs, adhere to the following rules: do not use rough, abrasive materials, otherwise the unstable structure will be damaged. It is better to use regular dishwashing detergents;
- slabs can be laid with the smallest gap over the entire area, without fear that the sheets will begin to sag;
- When attaching transverse or longitudinal slats, make sure that square grooves remain on the ceiling (side 40-60 cm). If necessary, an insulating layer or material is laid to insulate noise.
By following simple installation rules, you can independently perform high-quality installation of strand boards.
To come in
Already registered? Sign in here.
Related publications
A pitched roof is most often installed for a bathhouse, which is used only in the summer. In this case, the roof can be used as a sunbathing area. You can also lay out various fruits, vegetables or mushrooms on it to dry them. And a water tank installed on a roof that has a slight slope can be used for a summer shower; the water in such a tank will heat up sufficiently on hot days.
On a pitched roof, you can use turf as a roofing covering, laid in two layers: the bottom of which is laid with the roots up, and the second with the roots down. Caring for such a roof is similar to caring for a regular lawn. Such “green roofs” are quite popular in Europe, but are not widely used in our country, although they were used everywhere in ancient Rus'. Basically, the roofs of the baths are constructed as gable roofs with an attic. The attic is good for drying bath brooms, storing household equipment, and in rainy weather it is an excellent place for drying clothes. The attic also provides additional thermal insulation for the bathhouse.
Shed roof of a bathhouse When building a bathhouse, many decide to build a shed roof. Unlike other types of roofs, making a shed roof is much easier. So, for its arrangement there is no need to erect a complex rafter system. And if the bathhouse is attached to another building, then such a roof will be a continuation of the existing one
But despite the apparent simplicity in its manufacture, it is important to take into account a number of nuances, for example, the slope of the roof. The pitch of the roof is determined based on several factors, such as how much snow and wind load is in your area
The selected roofing material also influences the determination of the angle. If there is a large amount of snow in your region, then the angle of inclination should be made steeper from 15°. This will allow the snow to quickly melt off the roof and also make it easier to clean. If strong winds prevail in your region, then the roof, on the contrary, needs to be made more flat. Below is a diagram indicating the permissible roof slope angle for a particular roofing material:
Types of finishing
Materials for decorative surface design:
- ceiling wallpaper (how to glue wallpaper to the surface?);
- paints, varnishes for working with wood;
- decorative plaster, which is laid on a specially primed surface in a thin layer;
- LDVP, LMDF canvases.
Additionally, you will need to install a ceiling plinth. If the ceiling has large unevenness or differences at the junction of the panels, which will require enormous effort and material consumption for leveling, then it is better to make a suspended structure. Our specialists have prepared materials on the installation of systems: slatted, wooden, plasterboard, fabric, aluminum.
Installation technology
To install OSB boards correctly, the process should be divided into stages. This will allow you to carry out all procedures efficiently and avoid problems in the future.
Preparatory work
Preliminary activities include the following:
- The ceiling is treated with antiseptic and fire-fighting compounds. The location of communications is determined in advance. If the structure is directly connected to the attic, then steam and waterproofing is carried out and an insulation plan is thought out.
- According to a pre-designed layout of the frame posts, the product is cut.
- The surface is cleaned of dirt and dust with a broom and rags and, if necessary, degreased.
- The products are coated with 2–3 layers of concrete contact primer, each one is thoroughly dried.
- A tool for fixing is prepared - a screwdriver with the required set of bits. There should also be a place to carry out the process. For greater convenience, trestles or suitable stepladders are installed.
Before laying the slabs, it is necessary to carry out preliminary measures on the ceiling surface
Correctly carried out preliminary work allows you to avoid problems in the future.
Sheathing device
To ensure that the ceiling made of OSB slabs is extremely smooth and reliable, it is erected using lathing. The creation technology is as follows:
- If a wooden beam is used, it is pre-impregnated with protective compounds against mold and mildew and fire retardants. All parts are thoroughly dried.
- The surface is being marked. The first elements will be placed 2–3 cm from the walls, and the overall step depends on the type of base and the need to install insulation. The optimal option is 50–60 cm and the same frequency of jumpers, which will be required if the structure needs reinforcement or the slabs are cut into small fragments.
- The first frame post is attached near one of the walls and leveled. A cord is stretched from it to the opposite surface along both edges to position the second part. The remaining fragments of the sheathing are laid along the resulting plane. The structure must be secured with a margin of safety, so it is better to choose metal anchors.
- Communications are laid, the location of lighting fixtures is marked.
The sheathing is a special frame onto which OSB boards are subsequently attached.
Fastening the plate
OSB is attached to the ceiling with great care; any inaccuracies will lead to distortions. For ease of fixation, the parts are drilled out in several places, this will allow you to quickly install the self-tapping screw.
The material must be hemmed according to a certain pattern:
- The first element should be attached in the most visible corner. If the surface is assembled from the center, then you will need to perform complex transverse and diagonal markings, as well as pull the installation cords.
- Before fixing, it is necessary to make a gap from the wall of 10–15 mm and ensure that the seam is at least 3 mm. The screws are screwed in with force to ensure the deepening of the head.
- Due to the fact that the frame cross members are also used for fastening, they are marked after installation. To do this, a mark is made on the edge of the panel, aligned with the opposite one, and screws are tightened along the resulting line.
- If cutting is done locally, then the dimensions of the required part are first measured. The edges must lie on the sheathing.
- The remaining fragments should be hemmed using the same principle.
The fastening should not be done close to the wall, you need to leave a small gap
For a good fit, you can use plates with a locking connection. They are suitable for situations where it is necessary to obtain a surface that will be decorated with transparent compounds.
This is interesting: Sound insulation for metal roofing: we study in detail