The ceiling in the toilet must have high performance characteristics and be resistant to aggressive environments, especially moisture. Not every finishing material can combine beauty and durability in conditions of high humidity. Let's consider the most suitable options and features of their use in the sanitary room.
General information about the toilet ceiling
The toilet room is clearly not intended for admiring the ceiling surface. If it comes into a person’s field of vision, it is only at the entrance. In the future, attention is turned to completely different materials. However, it does not follow from this that the design of the ceiling in this room should be neglected. When decorating any room, it is very important to achieve complete unity of style. The smaller the room, the more complete it should look. For this reason, any detail, even a small one, is of great importance.
The building materials market presents many options for decorating the ceiling in the toilet. When choosing the color, texture and design of the system, it is important to take reasonable precautions. The restroom should not resemble the Palace of Versailles, because its purpose is completely different. Given the small area of the floor, you can finish it yourself, without the involvement of professionals.
Lighting and decor
Many people think that the smaller the room, the fewer light sources are needed.
This is wrong. One single lamp will not be able to cover all corners of the room. A good option is mini spotlights, which can be built into the center of the ceiling or along an extended row. Also, an LED strip for a mirror or floor lighting can become an additional stylish spotlight. Then the room will look small and cozy, and not narrow and gloomy. Original and practical decorative elements for a small toilet can be unusual towel organizers, soap dishes, small lamps of non-standard shapes, mirrors and even plants that do not require too much light (cyperus, cactus, ficus).
What should the ceiling in the toilet be like?
The toilet is a very special room. It contains risers of sewer and other pipes, and there is a toilet (and sometimes a boiler). For this reason, when selecting finishing materials, you have to take into account some wishes. There is always the possibility of pipe leaks, with subsequent water entering the finish. It is very important that the materials have a certain resistance to moisture.
Recommendations on which ceiling to choose in the toilet:
- They must withstand the formation of condensation without loss of quality, without provoking the growth of fungus and mold.
- The ceiling in the bathroom should not block access to the pipes.
- Installation of the structure should not lead to a noticeable reduction in space.
- It is important to achieve good compatibility of the finish with other surfaces in the room.
When deciding how to make a ceiling in the toilet, all wishes are taken into account. As a result, it is necessary to maintain good control of the pipes without sacrificing overall aesthetics. It is important that the thickness of the structure is as small as possible, and that the material itself is moisture resistant.
Color selection
The choice of color scheme for the toilet ceiling is influenced by the height of the room and the type of wall decoration:
- It is recommended to decorate a low room with light ceilings (compared to the walls). All pastel colors will work for this: light green, light blue, light pink. A good way to visually enlarge the space is to use mirror panels, glossy, glass or silver (golden, chrome) in color. The combination of matte and silver shades expands the perception especially well.
- In too high, pencil-shaped toilets, it is recommended to lower the ceiling somewhat. This is achieved by using dark tones - purple, red, blue, gold. In this case, it is better to make the walls light. Lamps are placed on the walls, focusing their light below the ceiling.
- It is not recommended to use artistic painting or photo printing to decorate the ceiling in the restroom. At best, it will simply be distracting, and at worst, it will be perceived by guests as bad taste.
Types of structures
Classifications of building structures are distributed according to the shape of the ceiling covering. Types of structures:
- Single-level.
- Multi-level.
- Stepped. The levels are arranged in the form of steps. Their shape can have strict geometric or rounded shapes.
Single-level
The ceiling has one level that completely covers the surface. The film follows all the corners and curves of the ceiling. Smooth canvases help create the appearance of precise, clear transitions. The look of the entire room is neat, bright and original. Single-level ones are suitable for three-dimensional drawings, plain materials, and photo printing. This design is simple to use. Installation is quick. The effect is no less beautiful than that of multi-level forms.
Whitewashing Guide
Whitewashing is considered a traditional ceiling option in a bathroom. Its undeniable advantages are the speed of application, external decorativeness, and the presence of a beautiful white color and texture. In the toilet it is better to use lime whitewash, which is not afraid of mold. In addition, the surface finished in this way can “breathe”. When there are leaks from above, wet spots appear on the ceiling, precisely indicating the location of the leaks. The entire finishing process takes no more than 15 minutes.
Operating procedure:
- Leveling the base. For this, putty is usually used. Considering the fact that the ceiling in the toilet usually consists of one continuous slab, there is no need to seal the tile joints. This significantly saves time and increases the overall aesthetics of the surface. For example, in larger rooms there can be differences of up to 4-5 cm between individual slabs on the ceiling. To level one slab, it is enough to go over it with putty a couple of times.
- A pair of spatulas (one narrow, the other wide) are used as leveling tools. You will also need a mixing bucket and a construction mixer.
- You need to prepare the mixture in such a way that there is enough for one layer. Before the second application, a pause is made for several hours: during this time, the remaining putty will most likely dry out. A narrow spatula acts as a spatula for scooping mortar onto a large tool. Next, using semicircular movements, the mixture is spread over the slab that has been previously cleaned of the old finish. Elimination of excess is carried out with movements in a perpendicular direction.
- Having applied the second layer of putty, pause for it to dry completely. It's best if it's a full day. After this, the dried surface is sanded with fine paint sandpaper.
- To apply the finished lime whitewash, you can use a wide brush or spray, avoiding skips. It is recommended to repeat the procedure 2-3 times.
After drying, the whitewashed ceiling becomes bright white. No special care is required during operation of the premises. In case of flooding from above, the surface is cleaned and whitewashed. Most often, this type of finishing is used in public toilets.
Painting
Painting can be used to make restroom ceilings waterproof. This is done using paint specially designed for rooms with high humidity. We are talking about oil, latex, silicone, acrylic and some water-dispersion paints.
Thanks to a significant range of colors and shades of modern materials, it becomes possible to choose the most suitable option for combination with wall decoration. Before applying paint, the ceiling surface in the toilet undergoes the same leveling procedure as before whitewashing. A fabric roller is used to apply paint to the leveled floor.
The paint is applied in several passes (usually 2-3), with pauses for drying. This will create a rich, waterproof surface. Even in the event of moisture condensation, such a ceiling will not suffer any harm. The accumulated drops can simply be wiped off with a rag, or left until they dry on their own. The main thing is to equip the room with effective ventilation.
PVC panels
To fix PVC tiles or panels to the ceiling, no additional fastening is required. This material is characterized by light weight, ease of installation, and low cost. A ceiling made of panels in a toilet will cost much less than suspended systems made of similar plastic panels. However, there is some danger of deformation and peeling of individual lamellas. If you use a low-quality ceiling made of PVC panels in the toilet, it may become unevenly yellowed.
The procedure for gluing the ceiling in a toilet made of plastic panels:
- The cleaned ceiling must be impregnated with waterproof glue.
- After waiting for the primer to dry, spread the glue onto the back surface of the tile or panel in thin strips or islands.
- The smeared lamella is applied to the ceiling and pressed.
- The second tile is laid adjacent to the first one so that there is no gap left. PVC tiles can be softened in close proximity to hot pipes.
- Upon completion of gluing the slabs, the perimeter of the contour can be decorated with a ceiling plinth.
Plasterboard for bathroom
First - and most important! – what you should pay attention to when designing a plasterboard ceiling in a bathroom is the choice of plasterboard itself. Of the variety of plasterboard slab models, only moisture-resistant gypsum plasterboard (GVL) slabs with a thickness of 9.5 or 12.5 mm are suitable for us. Why this particular drywall?
- Firstly, the cardboard layers of this drywall are treated with a special paraffin impregnation. It penetrates deep into the plasterboard itself, preventing it from moisture and deformation.
- Secondly, in high-quality moisture-resistant drywall, the gypsum layer is also subjected to water-repellent treatment. Thanks to this, the plasterboard sheet not only does not deform, it also acquires protection from the penetration and development of mold fungi.
- Thirdly, when installing plasterboard ceilings in the bathroom, each sheet of plasterboard can be additionally treated with an acrylic penetrating primer. Thanks to this treatment, the moisture-repellent properties of drywall will increase significantly.
Cork panels
Cork boards are classified as natural materials that can provide good sound insulation of a room. The shade base of such finishing is quite poor: usually we are talking about dark color solutions, more suitable for rooms with high ceilings. The high cost of the material should also be mentioned. Gluing is carried out in the same way as in the previous case.
Foam tiles
An excellent option for solving the problem of what is the best ceiling for a toilet. The material is presented for sale mainly in light shades. To decorate the surface of the slabs, various embossing, drawings, and imitation stucco are used. Foam boards are lightweight, which makes their installation much easier. When choosing a suitable option for the toilet, it is not recommended to use products with intricate designs, where dust accumulates very well. When gluing the slabs, you should avoid excessive pressure on their surface due to the risk of breaking off individual fragments.
Floor finishing
Finishing a toilet with tiles 57 photos, features of the work
Here, in addition to the already mentioned kaolin tiles and porcelain tiles, an excellent option is marmoleum. Although its structure includes cork, in general it is a bactericidal material
It also has one more important advantage: pressed down by the toilet, it will not let rust down the mounting pins; if necessary, they can be easily unscrewed from their sockets (see below) and replaced; you can mount the toilet, so as not to bother with measuring, directly through the marmoleum
Another interesting option: leave the top, polymer layer of the self-leveling floor as is, without covering it with anything. We will get a warm surface, slightly springy underfoot, of a yellowish or grayish color with streaks, well suited to physiology.
Installation of a plastic ceiling
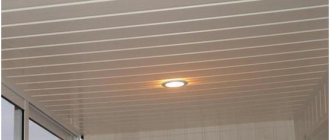
Plastic ceiling panels are characterized by quick installation, ease of maintenance, moisture resistance, and a wide range of colors. During installation, a frame is used that reduces the overall ceiling height by 30-4 mm. In fact, this type of finishing can be classified as suspended systems. As for the pipes, you can cut holes in the panels for them: this will allow you to install lamellas over the entire area of the toilet. There is also an option to make a separate box for the pipes. The remaining part of the ceiling is decorated with panels, cutting them to size.
When choosing a color for a PVC ceiling in a toilet, you can focus on the wall decoration. There is also an option with mirror elements or chameleon panels, matte, glossy, embossed, embossed, 3 D, rough, etc. The design of the PVC panel consists of a pair of sheets, with stiffeners located between them. The strength of the material is not very high: the panels can be easily pierced or damaged. The degree of strength is affected by the number, quality and stiffness of the ribs.
Based on the type of finishing surface, PVC panels are divided into the following types:
- Seamless. This type of finish has no cracks or gaps.
- Embossed. The individual panels are separated by a seam, like lining.
- With rustication. Here the seam is very similar to the joint between floor panels (small and neat).
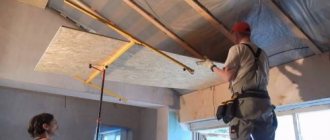
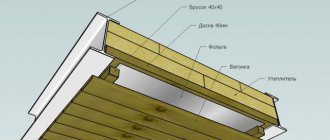
Installing a ceiling in a toilet made of plastic panels is carried out in several stages:
- Before you make a ceiling from panels in the toilet, you need to build a frame. For this purpose, 30x30 mm bars are used, pre-treated with antiseptic impregnations. The distance between individual elements is 40-50 cm. To fix the planks to the ceiling, anchors 70 mm long are used.
- In the case of installing built-in lamps during the construction of the sheathing, it is necessary to lay the necessary wiring to the location of the lighting fixtures.
- The first to be fixed is a special starting and finishing profile. The distance between them is indicated by the length of the panel.
- To cut the lamellas to size, use a simple hacksaw for metal.
- The panel is immersed in the side profile and moves towards the starting profile. After this, it needs to be fixed using self-tapping screws or a construction stapler. Fastening materials are installed in the groove.
- The next element must be inserted into the side profile, moved towards the first panel, inserted into the groove and snapped into place. To fasten it, you need to screw the self-tapping screw into the groove of the panel so that it fits into the sheathing.
- All other finishing elements are installed in a similar manner. The last lamella, as a rule, has to be cut along the size of the remaining niche.
To make a hole for the lamp, a drill with a special attachment is used. First, the lamp is installed, and then the panel. The width of the plastic panels may vary. It is selected for wall decoration: it looks very nice when the width of the tiles on the walls coincides with the width of the ceiling panel.
Bathroom ventilation
To reduce the cost of 1 m² of housing and operating costs in the Russian Federation, natural ventilation of the following scheme has been adopted in apartment buildings since Soviet times:
- air enters the living rooms through the loose narthexes of the window blocks;
- passes through rooms and corridors to two or three exhaust ducts available in the apartment - in the bath, toilet and kitchen.
To ensure air exchange, it is necessary to install supply valves in completely sealed PVC windows. Gaps of 0.8-1.5 cm should be left between the doors of all interior doors, without exception, and the floor covering. Otherwise, there will be no circulation and the air exchange rate will decrease.
Supply ventilation valve for PVC window block.
According to the standards of SP and SNiP, ventilation ducts must have a size of 15 x 15 cm. The upper edge of the hole must be at least 20 cm below the floor slab. Taking into account the ceiling height in an ordinary apartment - 250 cm (in practice 240 - 245 cm) and the distance from the finishing the floor to the bottom of the bath is 13 - 18 cm, lowering the drywall below the ventilation duct does not make sense. Otherwise, a person standing at full height in the bathtub will feel uncomfortable from the hanging ceiling.
Exhaust ventilation ducts remain below the plasterboard ceiling.
A distance of 20 cm is enough to mount the hangers and profile above the ventilation duct opening. The exceptions are large-sized apartments with ceilings of 3 m, for special projects, and country cottages. In these cases, the shaft remains inside the gypsum plasterboard structure.
Therefore, you need to not just cut a hole in a sheet of drywall, but connect it with your own hands to the shaft with a special flexible hose, a rigid plastic or metal box, or an air duct. This will prevent the destruction of plaster and cardboard by moist air, which is what is removed by natural ventilation from residential and functional premises.
In turn, air exchange should be ensured inside the space between the drywall and the floor slab. This will allow excess moisture to be removed after possible flooding by upper neighbors.
Suspended ceiling systems
False ceilings in toilets have been used in toilets recently. They are distinguished by their external beauty and attractiveness, moisture resistance, and the ability to mask defects in the rough foundation. Structures of this type can be quickly installed and disassembled if necessary. There is also a negative side: after installing a suspended ceiling in the toilet, access to the pipes becomes difficult. This point must be kept in mind, giving preference to collapsible systems.
Cassette ceiling
Not a very good option for a very small toilet, because... in such an environment the best characteristics of the finish will not be revealed. Even the presence of a diagonal orientation of the guides, which slightly expands the visual perception of the room, will not help. If the restroom has a medium to large area, cassette ceilings look good. The height of the room is of considerable importance: the cassette system will fit especially well into a room with high ceilings.
Cassette ceilings are available in two varieties: with an open and closed design. Open systems are characterized by the use of mirror and glass decorative elements. Closed structures mean aluminum French ceilings. Panels for each system also have their own specifics. For the open type, elements are produced that are equipped with a flat or stepped edge; for the closed type, panels with curved edges are produced, specifically for the size of the holes in the mounting profile.
It is recommended to finish low-height restrooms with closed-type aluminum cassette ceilings. The advantages of these structures are moisture resistance, the ability to paint in any color, ease of maintenance, low cost, and quick dismantling. To get to the ceiling or pipe, remove a couple of panels.
Installation procedure:
- Production of a diagram for installing a closed cassette ceiling, indicating the exact dimensions. This will make it possible to significantly reduce the finishing time by arranging the panels in the most convenient way.
- Transfer of markings to the ceiling with mandatory markings on the walls of the zero level. It is located 150 mm from the main floor.
- The zero level is a guide for fastening the corner profile along the walls. Holes are made in the walls, dowels are inserted, onto which the profile is subsequently screwed. The distance between individual fasteners is at least 40 cm.
- The installation location of the main guides is marked on top of the corner profile. For ease of orientation, you need to stretch the cord between the marks on opposite sides. He will help you make markings on the ceiling: hangers will be installed here.
- To fix ceiling suspensions, 13 mm anchors are used.
- When installing the main guides, an indentation is made from each other by the width of the lamella. They are lowered from above the corner profile, oriented exactly along the cord. When fixing to suspensions, it is necessary to ensure the accuracy of their horizontal position.
- The main guides are the basis for fixing decorative panels. After immersing the edge of the panel into the seats of the fastening profile, snapping is carried out. The panel needs to be moved to the edge of the structure. All other elements are mounted in the same way.
- If it is necessary to install smaller decorative elements, they are shortened using a hacksaw. Next, the cut edge is laid on top of the corner profile. This profile is equipped with special protrusions, which, when folded, increase the reliability of fixation.
When installing an open-type cassette ceiling, in addition to the main guides, the crossbars are installed at right angles. The panels are immersed inside the formed niches.
Slat ceiling
Using a slatted ceiling in a bathroom, you can create an impressive, beautiful surface that is functional and easy to maintain. These systems are made from aluminum or galvanized steel, which makes them particularly resistant to moisture, mold and high temperatures. Decorative elements are easy to wash and remove. The luminaires are mounted directly inside the slats, which makes it possible to hide the wiring. Ceilings of this type are available for sale in a wide variety of colors. For the slatted ceiling in the toilet, it is recommended to choose products in light matte shades of considerable width, diluting them with gold, silver and chrome inserts.
Plasterboard sheathing
Plasterboard ceiling systems are very convenient and easy to install. Considering the microclimate of the toilet, for their arrangement you need to take exclusively moisture-resistant material. If the height of the room allows, you can use a two-level structure that can accept any given configuration. The oval or round insert in the middle looks very nice. To finish plasterboard sheets, putty and painting with special moisture-resistant materials are used.
List of stages for installing a plasterboard ceiling in a toilet:
- Installation of guides.
- Installation of plasterboard boards.
- Priming with antiseptic impregnation.
- Finishing the joining seams with tape.
- Puttying the surface.
- Painting with a waterproof composition.
The plasterboard surface turns out to be perfectly flat, without any visible transitions. The disadvantages of the system include the difficulty of dismantling in case of leakage or pipe repair.
Conventional wisdom
It is believed that both drywall and other gypsum-based finishing materials (including gypsum putty used for sealing joints) are not resistant to high humidity. Moisture accumulates in the volume of the gypsum core of the gypsum plasterboard and helps reduce its mechanical strength; The putty even begins to blur over time and is made soft due to the high hygroscopicity of gypsum.
That is why for bathrooms, toilets and kitchens it is traditionally recommended to use finishing materials based on Portland cement - cement putty and plaster. Gypsum is used only in dry rooms. Paragraph, period.
The traditional way to finish a bathroom is cement plaster.
Tension systems
Stretch ceilings in the bathroom are rarely used. This is due to the need to separate the pipes with a partition and create difficulties in accessing communications. In addition, it is necessary to take into account the high cost of the tension fabric.
In cases where the decision to use a suspended ceiling in the bathroom is still made, it is better to use a harpoon-type PVC system, which will allow you to dismantle the system if necessary. However, each re-installation will require inviting specialists with a heat gun, which entails additional costs.
Wiring
When laying electrical cables intended for lighting fixtures and sockets in the bathroom, it is necessary to use corrugated cables.
- For lighting, a cable with a cross-section of 1.5 mm2 is suitable, for sockets - 2.5 mm2.
- It is also advisable to install an additional 10 mA RCD.