PVC panels are a long-known and popular material for interior decoration. They are used not only for walls, but also for ceilings. There is a huge variety of plastic panels on sale, which is easy to get lost in, but if you look, they can all be divided into several types. Let us consider in detail the existing types and sizes of products, as well as how to choose a quality product.
What are PVC panels
This is a common material for finishing ceilings and walls, which is made from polyvinyl chloride. Structurally, the plastic panel consists of two plates fastened with stiffening ribs. One of the surfaces is the front surface, often with a pattern or imitation of other materials, and the second is working and is not visible after finishing. This structure adds strength, and the air gap helps retain heat and cut off unnecessary sounds.
Peculiarities! The panels are mounted on a frame made of starting profiles, and connected to each other using the tongue-and-groove method (the edge fits into the recess on the previous part).
Peculiarities
The use of panels for finishing allows you to quickly update the ceiling in a house or apartment, while the costs associated with repair work will be minimal. The finishing material consists of slabs of various sizes. Based on the method of fastening, they can be divided into two main groups:
- The elements are mounted directly to the ceiling. The connection to the surface occurs by gluing the plates to it. Such options include foam plastic, polystyrene, and individual PVC strips.
- Installation is carried out on a pre-prepared frame and sheathing. This group includes aluminum, MDF, metal, and plastic panels.
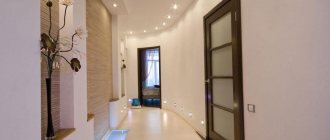
Panel ceilings are found everywhere. This is due to the fact that using building materials, you can give the room the necessary style, combine the type of ceiling with the selected floor covering and wall decoration, and merge with the overall interior of the room.
Advantages and disadvantages of the material
The main advantages are:
- plastic panels are insensitive to humidity, so they are suitable for kitchens and bathrooms;
- do not deteriorate if leaked, the plates can be removed, dried and returned to their place;
- the material is lightweight, making it easy to install, even without assistants; installation in one room takes only a few hours;
- are inexpensive;
- a layer of air between the stiffeners increases noise absorption and also helps retain heat;
- You can hide wires or additional insulation above the ceiling;
- lighting can be easily built into PVC panels;
- plastic tolerates temperature changes from -80°C to +80°C, which is why it is suitable for balconies and loggias;
- the material is durable, manufacturers provide a guarantee of about 10 years;
- if necessary, it is easy to replace individual panels;
- easy to care for, just wipe with a soapy sponge or rag, but products with abrasive particles, strong alkalis or acids are not suitable;
- They are produced in a variety of designs, have many colors, textures and patterns, so they are selected for almost any interior.
But the material also has disadvantages:
- there are noticeable joints on the panels, so it will not be possible to create an even ceiling; this drawback is also observed in seamless options, although their gaps are less noticeable;
- the height of the room is reduced, like all hanging structures;
- low-quality finishes burn and release toxic substances when heated, as well as immediately after installation;
- It will not be possible to mount a multi-level ceiling, since there are no suitable elements and components.
Types of plastic panels
There are different material options. The surface can be plain (white or colored), as well as with a pattern. For the ceiling, light shades are usually chosen that increase volume.
Patterns should be treated with caution - they can quickly become boring over a large area. If you choose a pattern, it is better to choose an unobtrusive one, without pronounced contrast.
According to the type of image application, they are distinguished:
- Painted on top is a cheaper option, but the layer is unstable and peels off quickly, and also smells unpleasant when heated (for example, on a sunny balcony). For such panels, softer plastic is used, which is why the structure is easily dented.
- With thermal printing - similar to the previous one, but with more design options.
- Varnished - the protective layer makes the pattern more durable, but gets scratched over time.
- Laminated - covered with film. They differ in texture, are resistant to ultraviolet radiation (do not fade, do not smell). The plastic is denser, thicker and more durable, and the film additionally strengthens the surface. Often imitates different types of wood.
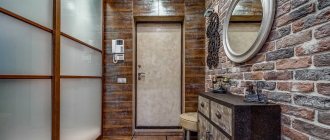
- Decorative - with a relief and pattern reminiscent of brickwork, stone, tiles, etc. The texture is chosen so that the edges meet each other without noticeable boundaries. The result is the impression of a single surface. The most expensive type, mainly used for walls.
The last type of PVC ceiling panels can have different smoothness, laminated ones are always matte, and the rest are glossy. This affects the perception of the ceiling. Shiny appears higher, but glare from direct light sources is unpleasant to the eye.
In addition, the panels differ in shape. For some, due to the ribs at the edges, there is a gap between the parts. They often come in sizes similar to wood trim. This option is even called plastic lining.
With seamless panels, the gap is much smaller, since they are positioned end to end. Such products are usually wider.
Another variety is panels that imitate a slatted ceiling. There are longitudinal grooves on the surface that divide the panel along its length (two-section or three-section are more common). Between the stripes there may be thin inserts of a different color (for example, chrome or imitation gold).
Advice! Panels for lining or slatted ceilings (especially three-section ones) can expand a narrow room if placed across them. But products with a seam are not compatible with built-in lamps - the rays partially penetrate through the cracks.
Finishing
Once the ceiling is assembled, there is one final, but very important, touch left—beautification. There are several operations that are independent of each other.
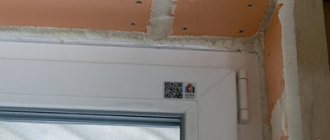
1. In this work, we considered the option of installing PVC panels directly into the ceiling plinth with a groove for the ceiling. In this case, no additional operations are provided. If a collapsible version of the molding was used, then a baguette must be glued to the U-shaped profile. Glue (liquid nails) is applied only to one side of the plinth: from the wall or profile and from the ceiling.
2. An internal angle is never right. Therefore, it is impossible to perfectly adjust the corner connection of the plinth strips. You can remove the gap with acrylic putty of the appropriate color.
3. For various reasons, gaps often form between the installed ceiling and the plinth (the panel inside the guide profile is pinched, a sag that is invisible to the eye has formed, etc.), which does not enhance the work done. You can fill the gap with an acrylic-based sealant (in a tube) inserted into a construction gun.
The sealant is pumped into the gaps in small portions, no more than 30 cm in one pass, after which the excess acrylic is removed with a narrow spatula with a sharp blade. Use a damp sponge to remove traces of putty from the ceiling and baseboard. If this is not done in a timely manner, the sealant will set and cannot be removed. This goes along the entire perimeter of the ceiling.
4. As noted above, it is better to install lamps as the ceiling is assembled. If this work is not done in a timely manner, then the holes for the light sources must be made with an electric drill with a crown. In size, it should be 4 mm larger in diameter than the lamp itself. After this, the lighting device is connected to electrical wires and fixed to the ceiling.
Possible sizes
Depending on the type of panels, lamellas are available in different sizes.
The lining has a length of 3 meters and a width of 10 cm. The reinforced one is slightly larger - 12.5 cm.
The dimensions of plastic panels for ceilings without seams are as follows:
- length 260, 270, 300, 400 or 600 cm;
- width - 10, 20, 25 or 50 cm.
The largest are leafy: length 150-400 and width 80-200 cm.
Peculiarities! The maximum dimensions are used for spacious premises (such as industrial facilities or garages for several cars). In ordinary apartments, plastic lining or panels no longer than 300 cm are installed.
The thickness of all products is within 5-10 mm. For a suspended ceiling, thinner ones are usually used. But you need to be careful with them - this material is less durable.
Installation instructions
Installation work has a step-by-step algorithm for performing technological operations:
- a diagram of fastening the frame and lamps (if necessary, and drivers) is drawn up;
- marking of the passage of the guide and ceiling profiles, places of fastening of direct suspensions and lamps is carried out;
- the PN guide profile is attached to the wall;
- the frame is assembled;
- wires are routed for lighting;
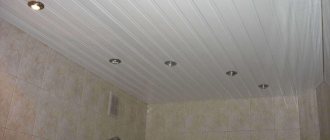
- panel ceiling is installed;
- finishing work is being carried out.
Drawing up a diagram and marking
Many builders ignore the process of drawing up diagrams and markings. In principle, you can install a plastic ceiling without them. It will just take a few hours longer. After all, thanks to a simple drawing, you can first mark on paper, and then on the walls and ceiling, the locations of lamps, pendants and profiles with centimeter accuracy.
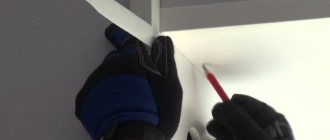
Marking.
Work begins by finding the lowest point of the ceiling. To do this, it is enough to measure the height of the apartment in the corners (ceilings have a flat surface, so a large number of measurements, as when screeding a floor, are not required).
At the next stage, the inter-ceiling space required for the lamps is determined (you need to know in advance which lamps will be installed). From the lowest point of the ceiling, you need to go down the distance required by the light sources and fix the future ceiling plane on the wall. Using a hydro- or laser level, a line is drawn along the entire perimeter of the room on the wall along which the panels will be assembled. If the correct calculation was made, the ends of the line will coincide. If the discrepancy is 0.5 cm or more, the work must be redone.
The rest is simple: use a tape measure to mark the mounting points of the ceiling profile (40 cm increments), suspensions (70 cm increments) and the location of the lamps. The work is not difficult, but it saves a lot of time.
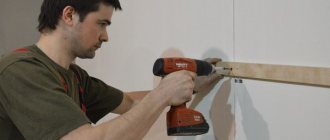
Profile fastening
Fastening the frame begins with installing a guide profile on the wall. Step by step it looks like this:
- the metal guide is cut with a grinder or a hacksaw to the size of walls B and B1;
- in the profile, holes for self-tapping screws are drilled with a puncher - the first and last 10-20 cm from the edge, the rest in increments of 50 cm;
- the plank is pressed tightly against the wall with its lower part strictly along the line of the ceiling;
- Marks for hardware are made through drilled holes on the wall;
- holes are drilled and dowels are driven into them;
- the PN profile is attached to the wall with self-tapping screws so that there are no gaps.
For reference: some sources claim that if there is an urgent need not to lower the ceiling low, guide panels can be fixed to the wall with liquid nails. Then the height of the apartment will decrease by only 3.1 cm. This technological solution can be used, but with the condition that the supporting profile will be attached to the ceiling every 40 cm. Another solution to the problem is to hem plastic panels onto a wooden sheathing or MDF sheets.
Frame installation
The structure of the frame for suspended ceilings is discussed in detail in the work “Do-it-yourself suspended ceiling made of plasterboard.” Let us briefly recall the instructions:
- Direct suspensions are attached to the ceiling;
- the PS profile is cut to size using a grinder or a hacksaw;
- both ends are inserted into the guide profile and secured with “bug” self-tapping screws;
- The supporting strips are additionally attached to the ceiling with suspensions - one “bug” on each side.
Attention: the PS profile must be inserted into the guide bar strictly perpendicularly.
After assembling the frame, hangers are attached to the installation site of the lamps.
Laying wiring
An important point in installing a suspended ceiling made of plastic panels is the wiring for lighting. It begins after installation of the frame. There are several points to consider here:
1. When laying wiring under a voltage of 220 V, it must:
- have a double braid;
- hide in a plastic corrugated tube;
- do not sag (should not touch future panels);
- accurately reach the place where the lamp is mounted;
- be fixed from the frame at a distance of at least 2 cm;
- have sufficient ends to connect to lighting fixtures.
2. Wires for voltage 12-24 V at first glance are very easy to connect to each lamp. However, there are a number of important points here:
- The wiring length for LED lamps cannot be more than 2 m - they sharply lose luminous flux power. Therefore, it is necessary to provide for the installation of several drivers on the ceiling.
- If possible, connect wires into bundles using plastic clamps.
- Avoid contact with 220 V wiring.
How to choose quality panels
Before purchasing, pay attention to several points:
- The stiffening ribs must be perpendicular. It is also necessary that these cross members have sufficient hardness. Otherwise, they will not be able to perform their function, and the panels will easily dent and break.
- The surface must be smooth (it is advisable to check with a ruler, especially wide ones), and without defects: nicks, cracks, chips or other damage, without noticeable differences in color on one product or within a batch.
- When choosing, check how the panels connect to each other and how smooth the seam is.
- High-quality products do not bend or sag when pressed with a finger. Stiffening ribs do not appear on the surface.
Important! Not only panels, but also components for them are carefully selected. You should not skimp on profiles, skirting boards and corners connecting ceiling and wall elements. Then installation will be faster and easier, and the entire ceiling structure will last longer.
It is advisable to purchase panels from construction stores. You shouldn’t settle for the most budget-friendly options—you can save money by simplifying production or choosing cheap raw materials. And this reduces the quality of products.
They also pay attention to the manufacturer. For example, the Italian company Forte and the Belgian Venta are considered reliable. Among the domestic companies, AnV-Plast LLC, Planet Plastik and Ural-Plast LLC have proven themselves well.
Interior ideas with PVC ceilings
Plastic ceiling panels are an inexpensive but quite practical way of finishing. The frame structure is quickly assembled and lasts a long time. And thanks to its resistance to temperature and humidity changes, it is suitable for all types of rooms.