For several decades now, soft wall panels have remained one of the most popular materials, both for wall decoration and in the manufacture of furniture. It is believed that the production of soft panels requires expensive equipment and appropriate qualifications. Next we will try to debunk this myth and you will learn how to make such a coating simply, quickly and at minimal cost.
Soft wall panels harmonize well with any type of interior.
Soft panels for the wall: relevance for the interior
An interior solution using wall panels complements the design of the apartment, creates warm comfort and, at the same time, looks luxurious and rich.
In addition to aesthetic pleasure, the panels are a convenient solution for young parents. Children learn about the world and often fall and hit themselves. The soft finishing of the walls will protect little people from bruises and, moreover, has good sound insulation.
Nude shades look harmonious in the bedroom; they are often used to decorate and give the room an atmosphere of tenderness.
In kitchen areas it is convenient to decorate the corners and bar with soft panels.
The panels are in perfect harmony with other finishing materials, which allows you to create exclusive and unique apartment designs.
It is worth noting that they were used in their interiors by nobles, and later by wealthy people, adding luxury and wealth to their homes.
Beautiful design ideas
Below are specific examples of decorating different interiors using various types of 3D wooden panels:
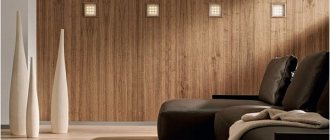
In this option, the wall becomes the real “highlight” of the room. And this despite the color of the material, because it is very modest. Classic furniture combined with original wall coverings gives stunning results.
In this case, the design becomes the personification of the excellent taste of the owner of the room. Discreet, elegant and at the same time incredibly stylish design option.
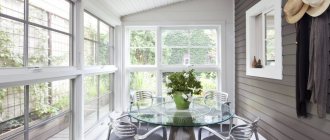
Such wall decoration will undoubtedly attract many looks. The walls are decorated with wooden planks of different sizes. This creates a very unusual visual effect: the size and shape of the walls literally blur.
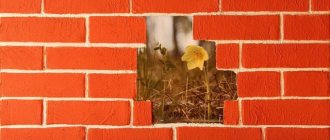
This is another option for elegant and beautiful room decoration. The noble color of natural wood combined with an unusual volumetric texture turns a classic-style living room into a room with elements of real art.
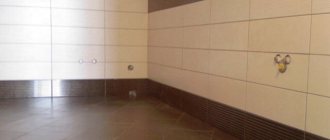
An example of a successful and effective wall decoration with slats. The color of the planks can be very different.
For information about the technical characteristics of 3D wooden panels, see the following video.
Soft wall panels for interior decoration: design features
The material has a second name because of its design - “3D Panels”. They have a multilayer structure in cross-section:
- 1) The first layer is a PVC backing 5 - 8 centimeters. It has increased strength and adhesive characteristics to various adhesive bases.
- 2) Second layer – or filling. It consists of a modernized analogue of polyurethane foam - hardened polyurethane foam.
- 3) The third layer is decorative. Made from different materials: leather, fabric, textiles.
Two materials are used as filler:
- foam rubber - it is used to make relief panels;
- padding polyester – for creating smooth surfaces.
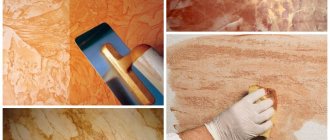
Decoupage
A panel made using the decoupage technique can decorate any wall: be it a kitchen or a corridor. This technique consists of gluing cut-out pictures and decorative elements onto the selected surface, and then covering it all with several layers of varnish. The general idea of the work can be anything.
Types of soft decorative coverings
The material used for upholstery is:
- 1) Textiles are a popular upholstery. It has a wide range of colors and various designs and patterns. For finishing it uses viscose, linen, silk, velor, suede, etc. They have a low price.
- 2) Leather and faux leather are a popular choice of finishes. They are durable and easy to use. Wide selection of colors, textures and rhinestone decoration options. They are most successfully combined with a calm tone of wallpaper or paint.
Fabric upholstery is not as durable as leather or leatherette upholstery.
Soft walls in the interior: advantages and disadvantages
The finishing material has a lot of pleasant advantages:
- 1) Versatility.
- 2) Combine with other materials - paints, wallpaper.
- 3) They make the interior luxurious and add gloss.
- 4) Faux leather panels do not require special care.
- 5) Easy to install and assemble.
- 6) They are soundproofed.
- 7) Conceal surface unevenness, as well as wires and communications.
 Durability.
- 9) Safe and environmentally friendly material is used for creation.
- 10) You can form relief patterns without additional constriction.
- 11) Wear resistance.
- 12) Resistance to mechanical stress.
- 13) They are not prone to fire and do not emit toxic substances when heated.
The advantages of finishing include hypoallergenicity. To create it, we use high-quality and safe materials that do not cause allergies.
The panels come in different sizes, which is convenient when using and decorating an apartment. You can choose exactly the one you need.
There are significantly fewer disadvantages, these include:
- The price of some types, especially those made of genuine leather.
- Material with suede and textile trim requires careful care.
The finishing material looks harmonious in spacious rooms. For owners of small apartments or houses, it is more advisable to partially use such material for decoration in the interior.
Thanks to the panels, it is easy to focus attention on the necessary things in the interior. You can highlight a fireplace, a bar, or make a frame above the TV. Panels above the head of beds and in children's rooms are widespread.
Recommendations for selection
In order for soft walls to look good and harmonious in your home interior, you need to wisely choose finished products or select materials for self-production. Creating wall panels and then installing them with your own hands significantly reduces the cost of finishing your home. When choosing, the general style of room design and the properties of the materials from which the products are made are taken into account.
When purchasing factory products, or preparing to manufacture them yourself, you should consider the following recommendations:
- if fabric panels are chosen, the covering must be durable and wear-resistant;
- the textile fabric should not fade over time, stretch, or sag;
- high-quality leatherette is a durable, practical, heavy material that is easy to care for and is not afraid of wet cleaning;
- leather is an expensive option, rarely used for DIY finishing, and it is also difficult for beginners to work with;
- when you need to create a thick layer of soft coating, it is better to use foam rubber for this purpose.
Following simple tips allows you to get a high-quality decorative coating; the photo below serves as an example of this.
Harmonious interior “insert”
The optimal upholstery option is furniture fabrics. Decorating walls with your own hands using them is easier to do than with other materials. Leather is often used to cover small slabs that are combined into a continuous panel. It is advisable for beginners to work with padding polyester, because it levels the surface and creates a relief pattern.
How to make soft wall panels with your own hands: a master class on making
You can create wall panels with your own hands.
Composition and installation do not require special skills and equipment. Initially, you need to decide what kind of panel you will create and the upholstery material. When choosing leather for upholstery, you need to take into account that the material is demanding and difficult to work with without skills.
To work you will need:
- 1) Base – fiberboard sheet or plywood.
- 2) Construction stapler, glue, you can use liquid nails. Scissors.
- 3) Material for finishing: textiles, leatherette, leather. The piece of material must be larger than the base.
- 4) Filling: padding polyester or foam rubber.
- 5) Materials for decoration: buttons, rhinestones, etc.
First layer
The base is a sheet of plywood or fiberboard. Holes are made in it at the same distance, in the order in which the finishing material will be attached. In most cases, a checkerboard order is used.
Second layer
Next, the filler is taken, laid on the base in strips and secured with a stapler, also folded onto the inside and secured there. If you use padding polyester, it is best to do it in two layers. On average, the layer is from 5 to 8 centimeters.
Third layer
The upholstery material is secured to the filler on all sides with a stapler. The holding buttons are attached using nylon thread. It has increased strength and is not subject to rotting or stretching. The thread is attached to the button and passed through the covering, filling and hole in the base. It is secured with a stapler on the reverse side. It is best to place the thread in different directions for strength.
Carriage screed and important subtleties of its arrangement
I won’t lie to you, compared to the previous method, the instructions here are an order of magnitude more complicated, but if you really want to master it, you’d like to.
Sequence of arrangement
| Illustrations | Recommendations |
| Making a stencil. The stencil is made from ordinary Whatman paper; only the entry points of the puffs are marked here, in other words, the places where the buttons will be. Advice: do not try to tighten too often, the optimal distance between points is 100 - 150 mm, but the markings should be symmetrical and neat. When the stencil is ready, we transfer the tightening points to the base; here an MDF sheet about 10 mm thick is used as a base. | |
| Drilling the base. The optimal cross-section of the holes is 8 – 10 mm. Advice: for such work, it is advisable to build trestles (in the photo they are indicated by arrows), cover the upper strips on the trestles with fabric so as not to damage the panel upholstery. | |
| Homemade joker. In general, a joker is a special device designed for assembling furniture and it is sold in departments with furniture fittings. We will use a joker to make a kind of drill for making holes in the substrate. To do this, an adapter for a screwdriver is attached to one side, and the reverse side of the tube is sharpened around the circumference. | |
| Lubricate the base with glue. Ideally, it is advisable to apply the glue with a spray gun; the cross-section of the nozzle should be 1.5 - 1.7 mm. If you don’t have a spray gun, then take glue in a tube and lubricate the shield, especially around the holes. As a last resort, take a foam roller and apply glue with a solid ball; this is an acceptable option, but the glue consumption is greater. By the way, on the left side of the shield there is a sloping edge made of foam rubber, these are sold in furniture fittings stores. They are convenient for arranging a semicircular edge. | |
| Hole marking. The relief depends on the thickness of the substrate, but the thicker it is, the more difficult it is to drill it accurately. In order not to miss, it is very convenient to use Japanese wooden sticks. Simply pierce the foam rubber with them through the holes in the base. | |
| We drill the foam rubber . Now we take the homemade joker described above and drill out the foam rubber, with the sticks acting as the central center line. | |
| Marking the canvas. Next, we take the eco-leather and, attaching our paper stencil to it, mark the tightening points. Tip: it is better to use colored chalk for markings, because a marker or dark pencil may appear on the upholstery over time, especially if the upholstery is light. | |
| Firmware . Now we sew the button installation points with nylon threads, tighten them and fix the threads with a stapler on the back side on the shield. (We will insert buttons later). | |
| Forming bends. A real carriage tie is formed by folds. These folds are simply folded with your fingers. If you are offered a tie made from squares, you should know that they are selling you a low-quality product, because the seams will last a couple of years at most, but then they will begin to come apart. | |
| Bringing the folds to perfection . In order to bring the fold to perfection, take a blunt wooden stick and straighten it. The bending depth is about 10 mm. | |
| Landscaping of the region. The entire pattern is formed in stages, that is, 2 - 3 rows of puffs. When you reach the edge, wrap the leather around it and secure it with a stapler on the back side. Folds also form and go under the panel. | |
| It's button time . The main load is carried by the puffs; the buttons perform more of a decorative function, so pulling and securing the threads on the back side will not be difficult. | |
| Corner . Particular attention should be paid to the formation of corners. The hardest thing is to smooth out the folds, but the fastening itself is standard, using a furniture stapler. | |
| Classic carriage tie. |
Important nuances
| Illustrations | Recommendations |
| Cut out the foam . Thick foam rubber is cut with a long and sharp knife. The main thing here is that the knife cuts the foam rubber into one wire, because if you start to “saw” the sheet, you will end up with a “herringbone” edge, and it will appear on the exterior finish. | |
| How to make buttons with your own hands. Of course, you can buy buttons, but compared to homemade ones, they will cost 2 times more. Plus, homemade buttons do not need to be selected by color. First you need to buy blanks. Don’t skimp here, take blanks with a metal eye. Next, cut out “nickels” from the facing fabric to cover the buttons. The diameter of the “nickels” should be 2 times the diameter of the workpiece. | |
| Firmware . Now you need to take a needle and thread and sew a “penny” around the perimeter. | |
| We tighten the base . After stitching around the perimeter you will have a small basket. Insert the workpiece into this basket, tighten the thread and tie it. You should have a good button. | |
| Glue the foam sheets together. Stage 1 . To glue 2 thick sheets of foam rubber, a layer of glue is applied to the edge of the sheet, but not completely. Leave 5 mm to the edge clean. | |
| Stage 2 . Next we glue the sheets together. | |
| Stage 3 . Now we glue interlining to one side of the joint (a density of 40 denier is sufficient). | |
| Stage 4 . Next, lubricate the adjacent sheet with glue and, with a slight stretch, glue a strip of non-woven fabric to it. | |
| We arrange a rounded side. Stage 1 . To arrange a round side, you first need to cut a sheet of foam rubber slightly wider than the base. So if your foam rubber is 50 mm, then the overlap should be left at 40 mm. | |
| Stage 2. Now you smear the base with glue and, tucking the sheet, glue the end of the foam rubber to the base. Only the end does not need to be glued completely, the edge of the foam rubber, approximately 10 mm, should hang over the edge of the base, this overlap will subsequently protect the eco-leather when screwed on. | |
| Stage 3. It should look something like in the photo. If you don’t want to bother with the bend, then buy ready-made foam parts and glue them. Below in the video in this article you will find a number of very valuable tips on arranging a carriage screed with your own hands. |
By the way, if you are thinking about creating a business for the production of soft panels, then you can download a starting checklist with estimated prices and a description of everything necessary to create such a business “HERE” .
Soft upholstery for walls: how to attach
The finished panel is attached to the wall in several ways: using glue, a frame and fastening elements.
Glue
The glue method is the most common. Instructions:
- For better and more durable fastening, the wall must be plastered and primed.
- Make notes in the places where the panel will be.
- Apply glue to the panel, not to the wall. Zigzag lines.
- Glue the material from top to bottom and place it tightly to each other.
If you make the panel yourself, you can use glue as a filler material.
Frame
To form a soft surface, it is necessary to build a frame of slats on the surface.
The space inside is filled with filler and secured at the edges to the slats, and in the middle to the wall. The edge of the upholstery material is folded several times and attached to the top rail using furniture nails and a construction stapler. Next, you need to stretch it evenly and attach it to the sides and bottom. To avoid wrinkles, carefully stretch the fabric.
For a large room, it is recommended to divide the space and make separate frames, stretching each upholstery material one by one. For convenience, you can use ready-made plastic profiles to form the frame
Fastening elements
The optimal method of fastening is using liquid nails or dowels. When attaching the panels to the wall, you need to press them tightly against each other, do not leave large gaps, otherwise dirt and dust will accumulate in them.
General points for installing panels made of MDF, chipboard and plastic
Before finishing, you need to make a wooden sheathing on which the finishing material is placed. For lathing, wooden slats with a cross-section of at least 10 x 30 mm and no more than 25 x 50 mm are usually used. In addition to them, you will need: plastic corners, moldings and baseboards.
Before installation you need to prepare:
- Hammer, fastening materials, screwdriver;
- Pencil, building level, hacksaw or hacksaw;
- Construction stapler, glue, waterproofing materials or insulation.
- You can install it as follows:
- 6 staples and nails; only 7.6 staples; 7 6 with screws; 7 6 staples.
The work surface requiring cladding should be marked with a rectangle. Using a drill and screws, carefully attach the box to the wall surface.
On the prepared surface, you start the installation using one of the selected methods. The first panel usually begins to be installed from the corner so that it is secured to at least two parallel sheathing rails.
In the case of plastic, chipboard or MDF, after finishing it is necessary to use special frames that will give such finishing materials to the wall a more aesthetic appearance.
The final stage of finishing the room will be attaching the baseboards.
Surface care
Textile upholstery should be dry cleaned with a vacuum cleaner or a soft cloth, such as microfiber.
Leather and leatherette upholstery should be cleaned with a slightly damp soft cloth. Recommendations for caring for panels:
- remove dust promptly;
- if something is spilled, the area should be blotted with a cloth or sponge immediately;
- use special care products, but check the reaction initially;
- do not use chemicals;
- Do not use hair dryers or other heating devices.
Do not rub the upholstery with force, especially textile ones, as it can be damaged!
Wall panels are an excellent choice for decorating surfaces in a house or apartment. You just need to choose high-quality materials and follow the installation and maintenance recommendations. With their help it is easy to create a unique design, give the room comfort and a unique atmosphere.