Set of socks, Omsa socks
349 ₽ More details
Set of socks, Omsa socks
349 ₽ More details
Saws
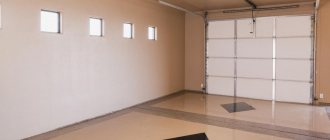
In most cases, in a country house there is a need to install a garage for a car. One of the most important parts of a garage is the door. They should not only protect the structure from burglary, but also be an element of the exterior of the summer cottage. The best option would be to install swing wooden garage doors. In addition, you can make them yourself.
Create a wooden gate for your garage
Advantages and disadvantages of wooden gates
Each material from which a garage door could theoretically be made has its pros and cons. Wood also has its advantages.
Namely, the advantages are:
- wood is an environmentally friendly material;
- it breathes and allows air into the room well;
- aesthetic and attractive appearance;
- easy processing.
There are also disadvantages:
- subject to rotting;
- affected by various insects and fungi;
- burns;
- the shape deforms over time (swells, shrinks, rotates).
According to statistics, wooden garage doors last from 4 to 8 years. You can also make combined options, for example, metal gates with wooden cladding.
In this video we will look at building a garage door with our own hands:
Advice from professionals
To make everything work out as best as possible, let’s take into account the opinions of professionals:
- You shouldn’t limit yourself to reading a couple of articles with instructions on making your own garage doors. Now on the Internet there are a lot of detailed video tutorials and reviews on this topic.
- When choosing materials for work, give preference to lighter and more modern ones. Then further operation of the finished structure will not be difficult and will not require effort.
To create a competent and readable drawing, you can use simple specialized programs, such as: KOMPAS-3D, AutoCAD, NanoCAD, FreeCAD, etc.
d. When welding parts of the frame frame, you should remember that for greater strength it is better to connect the edges of the corners laid overlapping. For comfortable operation of the garage door structure, smooth opening and closing of doors and smooth functioning of locks and latches, it is important to remember to lubricate them and monitor the cleanliness of the systems.
- In order to improve the thermal insulation qualities, you can first cover the seal with polyethylene, and only then cover it with clapboard.
- Garage doors do not have to be standard and banal. There are a lot of stylish and original solutions for their creation and design. It all depends only on your imagination and budget.
In conclusion, we invite you to look at several photographs of finished garage doors of different types.
Required materials and tools
The frame for the gate is usually made of 100x55 cm timber. For the frame, 45x45 cm timber is sufficient. The cladding is made of boards. Its thickness is 25 mm and its width is 10-15 cm. Also, for aesthetic appeal or protection against burglary, you can install metal gratings on top of wood or steel sheets. The frame does not have to be made of wood. You can use round or profile pipes. In this case, the frame must also be made of metal. The structure is covered with boards. They will look better, unlike a completely wooden one, especially if you add forged elements.
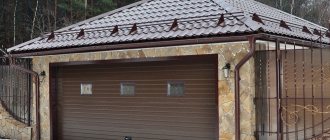
Use quality materials to create gates
Before construction, it is important to decide on the gate model and prepare the corresponding drawing. First of all, it is necessary to measure the dimensions of the opening: height and width. The scheme can be found ready-made on the Internet. In this case, it will only be necessary to correct all the dimensions for a certain opening. Or you can draw it yourself. There are special computer programs that make it easier to do this. And if you have experience, the drawing is drawn on paper.
When compiling it, you need to pay attention to the following points:
- The side supports and the upper lintel of the opening are located inside the wall.
- There should be at least 1.5 cm of free space between the sashes and the frame. This is necessary so that the doors can close unhindered, even if they swell from moisture and spin.
- The frame of the structure should have diagonal beams, as this greatly strengthens the structure.
- It is allowed for the sheathing to extend beyond the edges of the frame by 20-30 cm. Although this is not necessary and is designed at the discretion of the owner.
- When drawing up a drawing, it is necessary to accurately observe all dimensions. If you get something wrong, it can be difficult to correct the problem later.
Is it worth insulating the house from the inside?
Regulatory documents say the same thing, for example, SP 23-101-2004, dedicated to the design of thermal protection.
Typically, this method is considered justified only for residents of apartment buildings who cannot convince their neighbors to chip in to insulate the entire facade.
If external insulation is still possible, installing a heat insulator inside is a big mistake.
Why are experts so categorical? The inconvenience of interior work for residents and the reduction in living space have already been discussed. But there are also more serious negative effects. Here they are:
The service life of the wall is significantly reduced
If the wall is insulated from the outside, it is heated by the heating system and never freezes. If the insulation is placed inside, the wall will be in a zone of low temperatures and will either freeze or thaw as the weather changes.
Any building material contains a small amount of water, so this mode of operation is detrimental to it.
In the characteristics of a material indicating its frost resistance, for example, M100, the number indicates precisely the maximum permissible number of freeze-thaw cycles.
Condensation may form inside the wall
If air, usually containing a large amount of water vapor, penetrates into the wall from a room, the position of the so-called dew point is important. Before we talk about it in more detail, we remind the reader that the solubility of steam in air depends on the temperature of the latter
Before we talk about it in more detail, we remind the reader that the solubility of vapor in air depends on the temperature of the latter.
The warmer the air, the more steam it can hold. If the air cools, the excess steam turns into condensate.
It is obvious that in the thickness of the wall the temperature gradually decreases from the inside to the outside. The dew point corresponds to the temperature at which the relative humidity of the air entering from the room reaches 100% and excess steam in it begins to condense. Much depends on in what part of the wall the steam turns into water and in what quantities.
Under certain conditions, the result of internal insulation can be abundant release of condensation at the insulator-wall interface or inside the wall itself. In a damp zone, thermal conductivity increases sharply, and if it is on the surface of the wall, then mold also appears here. If moisture has condensed inside the supporting structure, it will cause cracks to appear when it freezes.
In order to insulate from the inside and not encounter the problem of dampness, you need to choose the right thermal insulation material.
Gate construction
Wooden gates consist of a frame, frame and casing. The weight of the sashes should not rest solely on the hinges (sides of the structure). It should be evenly distributed across the goal. This is why the support pillars and frame are made. The box must be rigidly fastened to the walls. The supports can be made either from pipes or from wooden beams with a thickness of at least 10 cm. The supports are mounted in pre-prepared holes, the depth of which should not be less than one meter, and the width should be 10 cm greater than the width of the support.
Before planting the pillar, a sand and crushed stone cushion is made at the bottom, after which it is compacted. Then you can install the support, align it vertically and horizontally, and fill it with concrete.
If you install wooden poles, it is better to lubricate the lower ends with bitumen mastic before installation so that the wood does not rot. The doors are subsequently hung on metal hinges. There is a wide variety of them on the market, there is plenty to choose from. It is better to buy arrow-shaped models, as they can withstand heavy loads well.
If the frame of a swinging wooden garage door is made from bars, then they must be prepared and cut in advance according to the drawings. If it is necessary to install diagonal beams, one end must be bored at an angle. All parts are processed with a plane and preferably with a grinding machine.
You can fasten all the parts together in several ways:
- The simplest option is to use self-tapping screws and corners.
- Can be fastened with dowels coated with construction adhesive. In this case, it is necessary to drill holes for the dowels.
- Mounting method: dovetail. Quite often used in furniture production. But a well-made tenon will very securely hold the gate structure.
It is important to assemble the frame on a flat surface, since in this case the spikes will not diverge, and it will be easier to assemble the structure together.
The outside of the structure must be painted with water-repellent paint. But before this, all wooden parts should be completely saturated with an antiseptic solution. Plywood is attached to the sashes using screws. It is better to do this while the paint layer is just applied. Thus, it will immediately be glued to the structure. After this, the sashes are turned over, painted on the other side and, if necessary, insulated. At the same time, if the paint has not yet dried, it will immediately stick the insulation.
Next you need to paint the frame and also attach a sheet of plywood to it while the paint is still wet. But if you plan to cover the top with another layer of metal sheet, then it is better to use hardboard instead of plywood. You can also attach a clapboard on top to the opposite side of the gate.
Well, if it is necessary to maintain a natural look, then the boards on the outside are not sealed with anything or painted. They must be sanded well and covered with two layers of varnish. If you combine this option with forged elements, you can get a work of art.
At least two people are required to install the gate on the hinges, as the gate is quite heavy. The frame must be perfectly level so that the gate does not open spontaneously, and it can be closed without much difficulty.
If the support pillars are made of metal, then the hinges are welded to them, and if they are made of wood, then they are attached with bolts. The bolt heads must be hidden inside the support. To do this, a small recess is made, the diameter of which is 1-2 millimeters larger than the diameter of the bolt head. After this, the holes are filled with putty. In this way, you can protect yourself from thieves, since the bolts cannot be unscrewed.
The metal frame can be made from a metal profile or a round pipe. The parts are welded together, and during operation they also need to be placed on a flat surface. In addition, the horizontal position is also checked with a building level.
Welding seams must be sanded and cleaned with a grinder so that the sheathing fits exactly against the frame.
Wooden sashes are attached to the frame using bolts. To do this, holes are made in the necessary places both in the metal frame and in the wooden doors.
Wood selection criteria
Wood raw materials are represented by a variety of species and varieties, differing in their inherent properties and characteristics. Therefore, you should not rely on a material that is often used because of its cheapness or chase an expensive type of wood; it is more advisable to opt for something average in price, but of high quality.
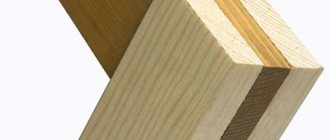
- Pine lumber is the most common and affordable type of wood. The soft-bodied material, on the one hand, is easy to process, on the other hand, it requires the use of products with a thickness of no less than 50 millimeters for the frame and 25 millimeters for cladding blanks. Such wood must have sufficient density, a specific resinous aroma and red veins.
- Spruce lumber is light in color and characterized by a uniform and dense structure that easily holds fasteners and joints. This type of wood does not dry out.
- Larch, a coniferous tree, has a more beautiful wood structure, which makes it popular; At the same time, it is affordable.
- Deciduous tree species - alder, birch, maple - are not so massive, are easy to process and are not subject to drying out. The only negative point is the fragility of the material due to its low resistance to weather conditions.
- Oak is a noble and textured wood species, most suitable for the construction of garage doors due to its durability, beauty and strength.
Locks and deadbolts
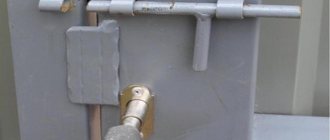
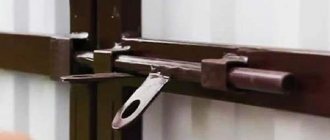
If you make wooden garage doors with your own hands, you need to take care of the deadbolts with a lock.
The following bolts can be installed:
- constipation with the need to make holes in the ground from below the garage;
- deadbolt barrier;
- pinwheel bolt;
- sliding
Such elements can be bought at hardware stores or made yourself (some of them). The location of the lock (internal or external) is determined depending on which side you need to enter the garage from. In most cases, only an external lock is installed.
You can additionally install a padlock on the “barrier” or “spinner” lock. This will strengthen the structure and make it safer.
A simple sliding lock can be made from a metal plate and a rod. You will also need brackets to secure the rod. It should be curved like the letter “G” or “T”. A safer option is to install a mortise lock. Although there should be both mortise and hinged ones. This design will have a high degree of safety.
How to do it yourself?
Gates are manufactured in stages. The process is divided into two steps:
- installation of racks for hanging the canvas;
- creation of swing gates.
Installation of supports
Supports can be made from:
- profile pipe;
- concrete pillars. You can buy a finished product or fill it yourself;
- brick or natural stone.
- wooden beam.
Installation of supports can be carried out using the following methods:
- stuffing. The driving depth should be about 1.5 meters. This method is considered the fastest and most economical. When choosing this method, you should carefully monitor the level so that the gate does not warp;
- concreting with reinforcement. You will need to strengthen the pillar with concrete.
Step-by-step instructions for installing supports:
- if you decide to do concreting, you will need to drill a pit with a minimum depth of 1 meter. Drilling must be done with a drill whose diameter is more than 200 mm.
- The depth of the pit will depend on the degree of soil freezing in your region. The width of the sides can be determined using the quality of the soil and the size of the support itself.
- create a concrete cushion 150-200 mm high. It should consist of sand and crushed stone. The cushion is used to prevent deepening of the racks;
- then you will need to mount the post and level it using a building level. After leveling the support, you can begin pouring;
- The concreted structure must last for a week. This is the minimum period required for concrete to harden. Do not forget to periodically moisten the concrete with water to prevent cracks from appearing;
- to increase the reliability of the supports, it will be necessary to make reinforcement and install a pair of reinforcing embeds under the hinges.
Creating sashes
Before you begin construction of the structure, you should decide on the location and appearance of the gate. The place where the products are installed can influence the appearance of all elements.
If you are planning to install a gate in your backyard, at the entrance to a garden area, or to create a fence for a future construction site, you will need to choose simple materials. For the front gate, you should choose more expensive and presentable products.
A universal guide for making gates with your own hands:
- prepare a drawing of the future structure. Using the diagram, you can make an accurate calculation of the required materials;
- The gate frame must correspond to the finishing dimensions. By observing this condition, you can simplify the entire work process and will not encounter connecting seams on the front part of the canvas;
- when making calculations, you should use the indicators of the working width of finishing materials;
- to create components for the frame, you will need to cut the pipe to the required length and sand it;
- Grinding is required to clean products from rust. If there is oil grease on the metal, it can be removed using solvents.
Welding
When interacting with welding, do not forget about safety precautions. If you do not have enough experience, contact specialists
Using this method, you can improve the quality of work and get an attractive design.
Joints should be made in such a way that water does not flow into the pipe. If the joints are welded incorrectly, snow or water will get into the pipe, which will begin to increase in volume in warm weather. This will lead to expansion of the walls of the product and deformation of the entire structure.
Stiffening ribs influence resistance to wind loads. If you are sewing a fence using finishing material, weld the pipe in the middle part of the outer seam. In this way you will mark the place where the sheathing material will be attached.
Welding of the loop should be done to the posts and to the frame. If you used bricks to make the pillars, but no reinforcement was removed, you will need to attach a channel to the brick, and then start welding the hinges.
Primer
No matter what material you use to create the frame, it will require priming. The primer extends the life of the paint and makes the application process more comfortable. Welding areas should be primed more thoroughly.
Painting the frame
Before painting, remove all dust from the frame. To paint the part, you can use any type of paint. Most people use a spray gun as it ensures a more even coat application. Using a brush delays the process, but reduces paint consumption.
To learn how to install a gate with your own hands, see the following video.
Swing gates with wicket
Making your own wooden gates with a wicket will allow you to create a unique part of the exterior of your summer cottage. The design will suit the individual needs of each owner.
At the design stage, the width and height of the opening, as well as the thickness of the walls, are measured. Select the type of construction, model (wooden or metal), etc. The correct choice of wood is important.
Next you will need drawings. You can make a wooden garage door with your own hands without them, but there is a risk that the structure will not meet the required dimensions after manufacturing.
Materials you will need:
- tree;
- loops;
- locks, handles, fasteners;
- metal parts, profiled or round pipe.
You also need to prepare a tool for the job:
- saw;
- drill;
- welding;
- plane;
- grinding machine;
- mallet;
- hammer;
- sets of fasteners.
The frame pieces and trim are cut to the appropriate length and, if necessary, the edges are curved for decoration.
Wooden gates are a good and economical way to secure your garage.
The wooden parts are processed with a plane and then sanded. To do this, you can use a grinder or a combination of a drill and a special attachment. You can also apply the first layer of antiseptic at this stage.
The frame in this design is made of wood or metal. Steel products will be more reliable, but such materials also cost a little more. Although it all depends on the choice of the dacha owner. The metal is fastened together by welding, and the wooden elements are bolted. In the wooden version, fasteners also include screws, fastening plates and nails.
Sheathing boards are mounted on the frame using pre-drilled holes. This is a very important stage in creating wooden gates with a wicket, since the appearance of the product is formed here.
There are 4 possible options for how to place the boards on the wicket and gate:
- horizontally;
- diagonally;
- vertical;
- pattern.
An antiseptic often acts as protection for wooden surfaces. But, in addition to this substance, you can use paint, varnish with stain, etc. The latter option is better, because after it the structure of the wood remains visible, which gives it an aesthetic appearance. If all the work is done efficiently, they will last for many years.
Stage 6. Covering the structure
The finished gate must be properly processed, which will require varnish and primer.
Step 1. The surface is sanded with sandpaper or a grinder with a special attachment. All discovered “shells” are sealed with a special wood putty, and after drying the structure is sanded again.
First, coarse-grained sandpaper is used, and after polishing, fine-grained sandpaper is used.
Step 2. The wood is tinted. This will create the texture and desired shade. After the tint has dried, the surface is sanded again (with 100-grit paper).
Step 3. Following the primer, the first layer of varnish is applied. The instructions should indicate drying time. After this time, a second layer is applied.
Varnishing of gates
Gates are often decorated with iron forging - this gives the product a rich appearance. If you plan to use such forging, then this should be taken care of even before painting and sanding. In this case, the tree is covered with thin tin during work to protect it from damage.
For better tightness, after applying the second layer of varnish, the joints between wood and metal are treated with sealant. Indeed, sometimes it is impossible to achieve a tight fit, and such measures will prevent moisture from penetrating through these holes.
That's it, the wooden gates are ready, all that remains is to equip them with a wooden gate.
Swing wooden gates
Antique gates
The retro style has today returned to its popularity and continues to grow. If you want to stand out among your neighbors, then you need to know a few tricks that will help you make a gate in a “retro” style.
Namely:
- stain is a good substance for giving wood the dark color characteristic of this style;
- fastening elements, for example, hinges, should also be purchased in antique style with various curved shapes and forged elements;
- Instead of a handle, you can put a metal ring, the design will be more beautiful.
The advantages of wood are that it is easy to process, which allows you to implement any design solution.
Wooden garage doors are not that difficult to make yourself. The main thing is to prepare properly. Make the appropriate calculations, prepare drawings, etc. It is also important to take correct measurements, and when installing and manufacturing wooden gates, follow a strict sequence and installation technology. It is important not to forget about proper care, repainting outdated elements, cleaning and preventing the occurrence of fungus and other pests.
This is interesting: homemade automatic gates.
How to make peaks
The manufacturing process begins with cutting square or diamond-shaped blanks from sheet metal. They are adjusted using a grinding machine to the required size and given the required shape.
The peaks should be voluminous; this property can be given to them by heating them over a high temperature fire. Heat until a white color appears on the metal. They take it with pincers and transfer it to an anvil, where they splash it with a large hammer.
It is advisable to carry out the cooling process in natural conditions, and if the product needs hardening, then it is immersed in cold water to cool sharply. To give the peaks their original shape, before hardening, simple or figured cuts and notches are made on the sides.
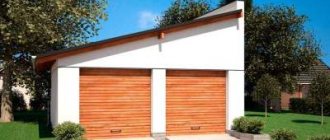
Wooden garage roof
Basically, roofs in garages are made gable or single-pitch. The first option is more complicated and more expensive, but it makes it possible to create an attic space where various tools, materials, car parts, and household utensils can be stored.
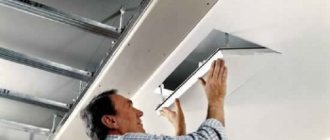
To build a roof, you need:
- Make a rafter system.
- Sheathe the roof slopes with plywood sheets or make sparse sheathing.
- Cover the roof with roofing material.
Gable roof
The installation of such a roof can be done in two ways:
- assemble the structure on the ground, and then mount it on the wall frame;
- Fix the floor beams directly in place.
The second option is more time-consuming and complex, so many people prefer to go with the first option.
Gable roof covering
If the roof is installed immediately on site, then at the very beginning it is necessary to install the ceiling beams using timber. Afterwards, rafters are installed along the front of the building.
In places where the rafter legs intersect with the front pairs, a ridge board is used for fastening. Then the remaining rafters are installed at a certain distance. For greater strength, the rafter system is reinforced with board sheathing using OSB or plywood.
Garage roof with ridge board
Lastly, the roofing material is installed. If the structure is metal, then for the most part the roof is assembled on the ground, then mounted ready-made on the walls. Moreover, it is screwed to the upper trim using bolts or self-tapping screws. To make the fastenings strong, welding can be used.
Shed roof
This is a more primitive design, so there is no need to assemble it on the ground, but it is installed immediately on site. It must be borne in mind that when installing a pitched roof, one wall must be higher in height than the other.
The most correct tilt angle should be 15-20 degrees. But more accurate data depends on the type of roofing material. These indicators also affect the height of the opposite walls. After finishing the top trim, the rafters are laid on the front and side walls. Rafters are made of boards or timber. The boards are attached at the end.
Such structural elements are installed at the same distance according to previously established markings. A sheathing is fixed on top of the rafters, either solid or sparse (either a board or OSB is used). The final stage is roofing.
Recoil
The minimum space in front of the car storage box is a reason for arranging sliding views. They are convenient and practical, they deserve a huge amount of positive feedback from most motorists, and in some cases they are irreplaceable. Their installation requires additional free space on the side of the opening, and this feature is taken into account at the stage of wall construction.
Homemade recoilers
You can increase the functionality of the device by choosing the most suitable assembly option in each individual case:
Suspended ones are mounted at the entrance to a room located on the territory of an industrial enterprise or in a warehouse hangar. Their mechanism does not have a high level of complexity. In the upper part there is a metal profile, which serves as the basis for the movement of roller bearings
It is important to ensure increased strength of the element (rails) in order to withstand a large load (heavy suspension system). Rail - assembled without the use of an upper beam When assembling, it is necessary to pay attention not only to the design features, but also to the amount of load that the base of the building will have to withstand. To increase strength and efficiency, 3 rollers are most often used. Two are installed directly on the sash, and the third serves to prevent the upper part from moving to the side. Cantilever ones are recognized as the most functional, as they are used in any type of structure, without restrictions on the size of entering vehicles
They can be found both in private garages and in boxes at industrial enterprises. Sliding garage doors enjoy the well-deserved trust of garage owners, as they are characterized by high functionality, long service life, and ease of use.
Advantages and disadvantages
Before making a decision, you should carefully study all the advantages and disadvantages. Among the positive qualities:
- Significant space savings and no need to provide additional free area in front of the entrance to the garage, designed for unhindered opening of doors.
- There is no danger of accidental damage to the vehicle when opening or closing.
- All working elements are hidden in the internal part and therefore are not subject to the negative (destructive effects) of moisture, high or low temperatures.
Advantages
There is no need to exert significant effort when opening, but the most important thing is that you can have any desired height.
Speaking about the disadvantages, we need to remind you that to ensure its functionality, you will have to take care of the presence of additional space to ensure free opening. Its size should be 1.5 times the width of the sliding door and, accordingly, the opening itself.