When using rigid roofing materials such as asbestos cement, metal tiles, etc., the problem of sealing the joints of planes and transitions naturally arises.
Any joint option creates a gap that must be securely covered, otherwise it will form an area of active leaks.
Since the roofing material itself is sheet, to solve the problems of joining planes, special elements are produced - extensions.
They are developed in such a way as to provide the necessary protection against water entering the under-roof space, and also to ensure that the appearance corresponds in all respects to the original type of material, creating a set of similar elements. One of them is the roof ridge.
Roof ridge
The ridge of the roof of a house is a useful element necessary to create the upper part of the roof. It unifies the roofing material and completes the entire “composition”.
The roof ridge serves several basic functions :
- Protection from water after rain or melting snow.
- Creating the necessary gap for ventilation of the space under the roof - so that the covering can dry out after rain.
These two problems can be solved at once if you choose the material wisely. Particular attention should be paid to the shape of the skate.
Adviсe
Determining nuances during installation
During the work, it is necessary to take into account that ensuring ventilation of the space under the roofing is achieved due to the gap left. Having finished with the lining of the slopes, you should begin laying ventilation material that will provide reliable protection for the support beam of the future ridge from the penetration of precipitation.
At the same time, the intermediate layer also solves another important problem - it prevents insects and birds from entering the attic. It is more advisable to use special sealants, mineral glass wool, etc. as the basis for this element.
When installing a ridge, the use of mounting foam and sealants is prohibited, as they impede air circulation under the roof.
Types of skates
Since there is a wide variety of roofing and how to install it on the market, it is obvious that the ridge models also differ.
Variety of roof ridges Source azh.kz
types of roof ridges are available for sale :
- Semicircular . This variety does not have ribs. After installation on the roof, an air cushion is formed from the inside of the dome, which provides high-quality ventilation of the space under the roof. The ends are equipped with plugs, which create a finished look and also prevent moisture from entering through the cut of the ridge.
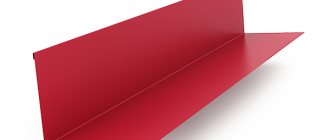
- Straight is the simplest type, which does not require end caps. The ridge is suitable for different types of roof coverings.
- Narrow . This skate plays the role of not only protection. It is often purchased as a decorative element that can be placed on a gazebo, the roof of a private house and similar structures.
- Curly or curved . This is the most difficult type of skate. The unique profile provides increased ventilation properties.
It is important to know that to connect straight skates, it is necessary to use T or Y-shaped elements, with the help of which the strength and tightness of the transitions are achieved.
Additional elements ensure the tightness of the transitions Source kabel-house.ru
All types of skates have only the two tasks described above, and the difference between them is solely in the installation methods, which are due to differences in shapes.
Self-production
You can try to make straight metal corners from thin steel, suitable for most types of pitched roofs, including metal tiles and soft roofs. The fastest way to get the job done is with a small profile bending machine:
- A sheet of metal is placed on the table.
- Marking in progress.
- The material is transferred to the machine and cut into several long strips of suitable width.
- The edges are bent on the machine to obtain the desired angle.
The use of automatic machines reduces the time for manufacturing strips from metal sheets , saving on the purchase of ready-made elements. And the products obtained after cutting and bending will last no less than those purchased.
But the method has a serious disadvantage - the need for profile bending and metal-cutting equipment. Although there are budget machines on sale, up to 20 thousand rubles, which can be useful in everyday life or for creating your own business. If you don’t have a machine, you should use other methods for making ridge strips yourself.
To make a ridge strip without special equipment, ready-made corners are used - galvanized and usually about 2 m long. You can buy such elements at any building materials store.
And the process of making skates from them involves changing the angle using a wooden mallet without damaging the galvanized coating. The production time for a skate is longer, but the costs are still lower than when purchasing an element and having it made to order by specialists.
The standard strip width is from 240 to 300 mm (120–150 mm on each side of the profile), to ensure an overlap with slopes of at least 5 cm.
Video on how to make a roof ridge with your own hands:
Basic elements of a skate
A roof ridge is a system of several parts. The composition may include waterproofing, bars for installation, or sealing parts.
The number of components depends on several factors :
- Dimensions of the roof where the equipment will be installed.
- Absence or presence of a ventilation system under the roof space.
- The roofing material itself , as well as design features.
The main element (in addition to the body), which is installed on all skates, includes a waterproofing layer that protects the roof from water ingress. If the house is located in a windy area, then manufacturers install sealing elements on the material that will prevent wind from entering the under-roof space.
Details that will help solve the problem with sealing roof joints Source chastnyjdom.ru
See also: Catalog of companies that specialize in roofing materials.
Installation work: features
Before installing the ridge, the sheathing in the under-ridge space must be ready. It is made from several boards, which are nailed without gaps. You should start installing the ridge on the opposite side to the wind on the terrain.
Note! The ridge needs to be installed in dry weather without wind. Safety devices should be used. Before starting work, you should not consume strong medications or alcoholic beverages. .
Installation of a straight ridge
Installation work should be carried out with high-quality tools, assistants, and insurance. The ladder must reach the installation site with a margin.
Roof ridge, installation procedure:
- The roof sheathing is covered with a polyethylene film for waterproofing. The film thickness should not be less than 200 microns.
- A sealant is installed on the waterproofing to ensure high-quality ventilation of the ridge space. The type of material depends on the roofing material.
- Installation of the ridge strip is carried out using self-tapping screws or slate nails. Be sure to use elastic pads. It is better to buy them, since homemade gaskets made from conveyor belts may not always match the color of the roof.
Special attention should be paid to the quality of screws. They must be sharp so as not to warp the material. When screwing, the head of the screw should fit snugly against the roofing material, but not deform it.
Round ridge strip
This type of ridge construction is used on metal roofing. In order to reliably cover the space between the slopes, they should not be separated from each other by a distance of more than 20 centimeters. Installation procedure:
- Install a seal made of fiberglass or mineral wool. The ventilated space should be covered with a counter-lattice.
- Secure the ridge parts using self-tapping screws with seals.
- Close the ends of the ridge with plugs.
The roof covering can be additionally fixed. To do this, use a block of 50 by 100 millimeters. Lay a metal tape 0.5 millimeters thick on top of it. The tape is secured to the edges of the ridge with self-tapping screws. This guarantees reliable fastening of the structure and no damage even in hurricane winds.
Note! The closer the two slopes are located to each other, the easier it will be to close the gap between them .
Skate length calculation
In order to correctly select the length of the roof ridge, it is necessary to determine the number of additional elements as well as all components - waterproofing system, sealing materials, fasteners. The basis of calculations is a construction plan, which indicates the entire projected length of the story, as well as the materials that will be used.
It is important to understand that all calculation data is an individual project, which depends on the supplier’s recommendations after studying a specific roof. Calculating materials is very simple - you need to start from the length of the entire roof, the number of ridge strips with a 5-centimeter overlap (this nuance is required).
Much more problems arise with the organization of substrates - ridge bars. They are necessary for correct and even fastening of the planks. When a stable system is ready for installation, it is necessary to accurately select the roofing material in order to then select substrates according to specific profile dimensions.
Ridge bars Source steelcap.ru
The problem may arise due to the varieties of pipit. It is also problematic to determine any general system for placing support strips. The fact is that the type of fastening and sealing of elements requires an individual approach, so in order to accurately calculate all the necessary nuances, it is advisable to carry out installation on a test strip. This will allow you to make some changes or adjustments to the substrate. This is exactly how roofing and ridge installation professionals work.
In order for the roof ridge to be installed without defects, it is necessary to choose the right construction company to install the equipment.
Height calculation
You can determine at what height the ridge should be above the bottom of the rafter system by knowing the angle of inclination of the roof. The value of this indicator should not be too large so as not to increase the wind load. However, a small angle can lead to snow accumulation and overload of the rafter system. The optimal option for the central zone of the Russian Federation is about 40 degrees.
To determine the height, the formula is used:
H = tg , where:
- L is the distance between the extreme points of the rafters;
- tg is the tangent of the roof inclination angle.
Therefore, for a building 5 meters wide, the roof of which is inclined at 45 degrees, H = 1.0 x 5/2 = 2.5 m. This is more than enough to provide through passage for a person to service communications passing through the attic.
If the roof is not gable, but attic, that is, pentagonal, the height of the ridge consists of two values:
- The first is the distance from the attic floor to the top of the bottom of the rafter legs, inclined 55–80 degrees.
- The second is to the highest point of the roof when this part is tilted at an angle of 12–30 degrees. To determine the height of the ridge, you should use special calculators.
Ridge installation steps
The ridge must be installed at the moment when the roofing covering is completely placed and secured to the roof. The last row should be completed in such a way that the ventilation gap between the slopes is not very large. And a ridge is needed to block it.
The ridge is placed on a fixed roof covering Source ar.decorexpro.com
Preparing and collecting supplies
Having weighed all the features of the material and decided on its choice, you should purchase the required number of skates, as well as its components and fasteners. As a rule, the ridge element includes a ventilation partition and tape, fasteners for a lightning rod and a seal.
To eliminate discrepancies in dimensions when joining, as well as to ensure high-quality connections, it is necessary to purchase all roofing materials from one supplier.
To successfully complete the task and reduce preparation time, you will need to assemble the required tools and accessories in advance, namely:
- sliding construction ladder;
- building level and tape measure;
- a screwdriver or drill with a set of drills and bits for working with roofing screws;
- nylon cord;
- metal scissors or grinder.
Using an electric tool greatly simplifies any installation, but in the absence of the appropriate equipment, it is easy to find an alternative from the tools available in everyday use.
Scheme
The diagrams show the intricacies of installing a roof ridge:
Drawing of the ridge of an attic roof
Slate roof drawing
Hip roof ridge
Installation of a metal roof ridge
Organization of ventilation through the ridge
Roof ridge structure
Did the article help you?
Fastening technology
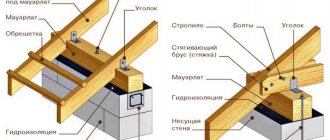
The construction of the ridge begins after the completion of the procedure for attaching the roof to the slopes. Decorative components are delivered to the location using a winch mechanism or rope. To fix the ridge element, it is necessary to install a beam with a cross-section of at least 80×100 mm on the outside between the slopes. Next, sheathing bars are attached to each of its sides and a ridge beam is installed.
To simplify the subsequent process of laying parts, it would be a good idea to attach special brackets to the central support beam and place walking bridges on them. In addition, for the tightest fit of the roofing material, it is most rational to use a ridge beam with a rounded edge.
Beam for fastening the ridge