Today, soffit manufacturers unanimously claim that installing their products is easy and simple. After all, such products already have all the necessary locks, holes and devices, and the accompanying technical documentation covers each step in detail.
And really, are there subtleties and nuances in this process that are better to know about in advance? Let's tell you this: competent installation of soffits is truly accessible to any craftsman, but in order for the roof lining to serve for a long time and look presentable, it is important to also be theoretically savvy.
Therefore, we have tried to compile for you clear and detailed instructions with illustrations that will help you be confident in every step.
Stage I. Pre-installation of sheathing
Let's start from the very beginning. So, it is necessary to hem the roof overhang before laying the roofing material. You should also first insulate the walls so that there are no unprotected areas between the walls and the roof.
And first of all, they calculate and install the sheathing. The simplest and most common way of lining a roof with soffits is horizontal. For this task, bars are pre-attached to the rafters or their continuation in the form of fillies, forming the frame of the box.
At this stage, it is extremely important to control the future plane of the filing using a level and plumb line. Here are several options for exactly how to place the sheathing bars on the overhang of a standard roof:
It cannot be said that the horizontal or diagonal arrangement of the sheathing is better. Here, it most likely depends on which overhang seems more aesthetically pleasing to you and whether you plan to place communication cables in the soffits and build in lamps. Then the horizontal option is more appropriate, of course.
The sheathing needs to be laid along the perimeter of the overhang, parallel to the wall, and the suitable material is a galvanized profile or wooden slats. If you prefer wood, then make sure that the bars are sufficiently dry, with a moisture content of no more than 15-18%, without knots and bends, and if metal, then choose either aluminum or anti-corrosion steel.
There should be a distance of no more than 30-40 cm between the slats. If it turns out that the overhang still exceeds 40 cm, you will need to install an additional rail - between the inner and outer ones.
Nail two boards on the side of the front board and the wall, onto which you will then fix the soffit strips and additional elements. For overhang lengths greater than 80 cm, use three attachment points. In this case, the boards must be of sufficient width for the installation of soffits and additional elements more than 100 mm wide.
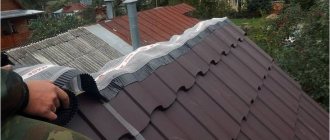
Step-by-step instructions for installing soffits yourself
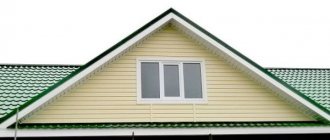
Hemming the roof overhangs is the final stage of roofing work, the essence of which is not only to protect the roof covering, but also to give it an aesthetic and finished appearance. One of the most common options for filing is the use of specially designed panels - soffit.
Soffit products appeared on the construction market relatively recently, but have become widespread and popular due to the presence of a large number of advantages, such as aesthetic appearance, affordable cost, long service life, and ease of installation under roof overhangs.
Types of spotlights
Soffit panels can be made from various materials, and depending on this they are divided into metal (galvanized, aluminum, copper) and plastic (vinyl). Each variety has its own characteristics, advantages and disadvantages. At the same time, the installation process is largely similar and does not differ much from each other.
Roof soffits have a perforated structure, which promotes free air circulation and protects the material from dampness, mold and putrefactive processes. Non-perforated soffits are not used for roofing, but are used for finishing indoor spaces.
If we talk about manufacturers, there are currently many companies that produce high-quality soffit panels. For example, Deke soffits for roofing, produced by the company Docke Extrusion, are very popular due to their high quality. Their warranty period is 50 years, which is certainly an excellent indicator for such products. Other well-known manufacturers of spotlights are companies such as Mitten, Grand Line, Holzplast, etc.
Tools and materials for installing soffits yourself
Fitting roof overhangs with soffit panels is not a difficult task, and therefore you can usually do without the help of specialists by installing the soffit yourself. Of course, this will still require a little skill and effort.
Before undertaking such work, you should read the instructions for installing roof soffits and prepare the necessary equipment.
The set of tools required for do-it-yourself installation of soffits includes the following:
- roulette,
- level,
- knife,
- carpenter's hammer,
- metal scissors,
- corner,
- hacksaw with fine teeth,
- electric drill,
- Circular Saw.
You can do without the last two tools, but they greatly facilitate the work and speed up the installation process.
Calculating the required amount of materials is quite simple: the eaves overhangs are conventionally divided into rectangular sections, and to calculate the area of each of them, the length is multiplied by the width. Next, based on the size of the soffit products themselves, the required number of panels for installation is calculated. Of course, when purchasing, it is advisable to take a little more material, providing some reserve - in case of errors in calculations and errors in work.
In addition to the soffit panels themselves, during the installation process certain additional elements are used: J-chamfers, J-profiles, H-profiles, sometimes external and internal corners. The necessary elements also include wooden blocks for constructing a frame frame (usually with a cross-section of 5 by 5 centimeters). Finally, installation requires fasteners: most often when installing soffits, dowels and galvanized self-tapping screws are used.
Instructions for installing soffit panels
To install soffit panels under roof overhangs, you must first build a frame or box to which they will be attached. For this purpose, one block with a cross-section of 5 by 5 centimeters is attached to the wall of the house using dowels. Another block is fixed on the inside of the cornice board, after which the transverse slats connecting these two bars are filled. Fixing the bars to the rafter structures can be done using self-tapping screws.
Next, the soffit panels themselves are attached. For this purpose, in accordance with preliminary measurements, the soffits are cut into pieces of the required sizes.
Soffits are attached to certain structures using additional elements. The eaves of the roof are hemmed with a J-chamfer. The function of H-profiles is to attach soffits in places where they turn at right angles. They can also be used to directly connect the panels themselves to each other. By means of J-profiles, lateral connections of soffits are made to cornices and other structures: soffit panels on the side sections are inserted into J-profiles and fixed in them.
In addition, the soffits are also attached to each other using hooks and holes located along the edges.
Depending on the type of panels and the configuration of the roof overhangs, the installation instructions for soffits may have certain differences, however, thanks to the use of locking elements and auxiliary devices, installing them in any case is not difficult.
Rules for filing spotlights
Despite the simplicity of the process, there are certain rules and recommendations, without which the installation of spotlights will not be correct and may lead to unpleasant consequences during operation.
The main nuances that require compliance during the installation process are as follows:
- Soffits, especially plastic ones, should be fastened carefully, without bending or tension.
- The fastening of the panels should not be too tight, but should be secured all the way.
- The parts are joined together until a characteristic “locking” click appears.
- For DIY installation, it is best for non-professionals to choose plastic soffits. Their installation is much simpler than other varieties, since the plastic is lightweight, flexible and easy to cut.
- Thermal insulation of the facade and all finishing work during the construction of the house must be completed before the installation of soffit panels begins.
Stage II. Preparing and trimming soffits
Now let's take care not to damage the panels themselves before installing them. So, newly purchased soffits must be laid on a smooth, flat surface. Packages with them are stored in stacks of packs, but no more than 15 together in one stack.
If the area is open, then it is better to open the packages. If you don’t listen to such advice, then you run the risk of getting not quite even parts, which then simply won’t be able to be inserted into the grooves. Imagine how unpleasant it will be to discover this defect during the installation process.
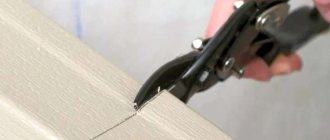
Next, the soffit panels need to be prepared so that their length is 50 mm less than the overhang from the wall to the front board. Trimming the soffits themselves is not difficult, just be sure to use safety glasses.
For a circular saw, use a fine-toothed reverse blade or other suitable tools:
A little advice: if you are more comfortable working with metal scissors, then try this: do not cut along the entire length of the scissors at once, but use only ¾ of the blade. A knife is also suitable for cutting. Use it to make a small groove in the desired location, and then bend and straighten the soffit several times until the panel breaks. There is no need to cut right through.
Remember that you can only cut panels starting from the fastening part. Here are the most convenient tools to use to adjust the length of vinyl soffits:
Here is the process for working with popular aluminum soffits:
Unfortunately, not everyone knows that working with metal soffits has its own peculiarities. So, they cannot be cut with an abrasive wheel, i.e. Bulgarian This leads to damage to the polymer coating and rapid corrosion of the metal.
To the point that even manufacturers do not provide a guarantee for soffits that were trimmed using a grinder. Nibblers, multifunctional cutters, or special drill attachments are much more suitable for this task.
Extension and rotation of the frontal bar
Extension of the Frontal bar can be done with a simple overlay. The overlap between the slats is 25-50 mm.
A more aesthetic option that allows you to hide the cut edge is an option with bends on the joining edges (Fig. 17).
| Fig.17 |
Prepare the planks as shown in the diagram. Bends are made 180° so that the planks fit tightly into the hook during installation. After joining, the joint can be tapped through the block with a mallet.
To create a turn, mark the fold line and make a cutout, as shown in Figure 18.
| Fig.18 |
Bend the Front Strip along the line so that the cut edge at 45° is on the outside, and fasten as described above.
Stage III. Fixing chamfers and profiles
Now we proceed directly to the installation of spotlights. Let's look at what tasks require special profiles and chamfers, which are always included:
- J-profile is the main hanging element. They frame the eaves overhang and join two panels of soffits along the length.
- The L-shaped panel is needed for the front trim. Available in sizes 15, 20 or 25 cm, less often - 45 cm. This strip allows you to hem the roof at an angle.
- A J-bevel is a windshield with a J-profile. It allows you to hem the overhang perpendicular to the wall, and is available in sizes 15, 20 and 25 cm, sometimes 40 cm.
Here's how to work the J-bar. It needs to be installed parallel to the wall of the house, and to do this, measure the distance between these planks and subtract 6 mm for temperature changes in the size of the panels. Next, install the cut panel into the grooves and nail the strip so that later the fasteners do not interfere with the free expansion of the material. Connect the panels together in a lock.
Lay the panels in a horizontal or inclined position. Keep the distance between the fastening points at 30 cm. And at rotation angles of 45°, install two J-bars, which will be connected by the rear walls and H-profiles.
Here's where all these elements are specifically recorded:
The J-bevel method is more aesthetically pleasing, because all the fasteners are hidden so well. Here's how to work with it:
- Step 1. From the wall side, install the J-profile directly on the board using self-tapping screws in increments of 50-60 cm.
- Step 2. Next, fix the finishing strip along the top line of the front board. If necessary, trim off the excess by adjusting the length of the flat part.
- Step 3. The J-bevel should then be inserted into the finishing strip and secured. This will avoid waviness of the chamfer itself.
As for the finishing strip, you can do without it if you use short gutter hooks. Such hooks are attached directly to the front board, and the J-chamfer is fixed with self-tapping screws. If the end or front board will remain open for decorative purposes, then use two J-profiles.
Also, if the J-bevel needs to be rotated, then follow these instructions:
- Step 1. Start installing the soffits on the roof eaves from the corner, and to do this, mark the fold line in advance where the strip will be bent at the turn where 150 mm remains from the edge.
- Step 2. Now cut the groove to the fold and leave only the folding at the bottom shelf.
- Step 3. Make a 45° cut on the bottom shelf. Now bend the chamfer so that the edge of the bottom shelf is on the outside. Now the short edge of the plank does not need to be attached to the sheathing, because it will be pressed to the front board by the next bar.
If you will then additionally run holders or cables, then in such casing you need to leave a hole 5 mm larger than needed for the drill. This is also necessary for contraction and expansion.
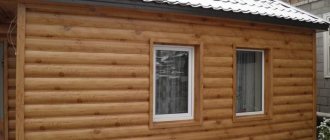
How to make a roof lining
The roof, installed correctly, usually retreats from the walls by 0.5–0.7 m, protecting the façade of the building from precipitation. Such indentations are called overhangs. They perform a protective function - they protect the under-roof space from moisture during rain and snow and guarantee normal ventilation under the roof. But in order for the overhangs to fully fulfill their purpose, they also need finishing - lining, which will significantly extend the service life of the entire roof.
The effectiveness of lining roof overhangs is closely related to the quality of the finishing materials used and the degree to which technological requirements are met during the work.
Lining the roof with clapboard
Cladding with clapboard is often done with the remaining cladding material after construction. It seems like it’s no longer needed anywhere, but it’s a shame to throw it away. It can be used to finish overhangs, as long as there is enough material. But since the lining is an unperforated material, you need to provide an air gap (10–15 mm) between the wall and the lining, and also carefully treat the wood with an antiseptic, otherwise it will begin to absorb moisture, and after a while it will turn black and rot.
For outdoor use, choose moisture-resistant lining and treat it with antiseptics
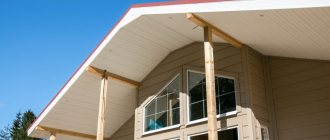
Roofing with PVC siding
If the siding is not completely used up when finishing the facade, the remains can be used for filing eaves or gable overhangs. The advantages of this solution are that the finishing of the roof will be in harmony with the facade, and siding is cheaper than PVC soffits, so it is profitable to hem overhangs with them. But there is also a minus - the siding does not have perforations for ventilation, so its installation must be carried out very competently, in compliance with all standards. Only then will a good result be ensured.
Video: installation of cornices, leveling and finishing with siding
Roofing with metal siding
Metal siding also does not have perforations and requires good treatment with anti-corrosion compounds. It is necessary to make holes in it or insert ventilation grilles. In addition, metal siding must be cut correctly, otherwise rust will appear in problem areas. It is better to do this with special roofing electric shears. Therefore, working with metal siding requires skills and abilities.
The facade of the house and the roof overhang, covered with contrasting metal siding, look very harmonious
Roofing with boards
It is better to use planed softwood boards with a thickness of 17–22 mm and a width of 50–250 mm. It should be coated with an antiseptic, covered with varnish or paint and allowed to rest for at least a month in the yard under a canopy so that it does not warp during work. When sheathing, leave a gap of 10–15 mm between rows of boards for ventilation. When hemming the overhangs with boards, the first 2 rows are reinforced on both sides, the subsequent ones are additionally fixed in the middle.
When choosing a board, special attention should be paid to its humidity - it must correspond to the humidity level of the environment
Recently, decking (a board made of wood-polymer composite) is increasingly being used to decorate overhangs due to the perfect environmental friendliness of this material, a large selection of colors and sizes, as well as a considerable 10-year warranty.
Decking is a new modern cladding material based on domestic wood species (larch and Siberian cedar) or wood-polymer composite
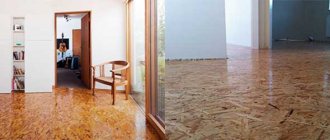
Roofing with plywood and OSB
When working with OSB or plywood, choose a rigid, moisture-resistant material so that it can be installed in large slabs. First, they knock down a box of wooden blocks and attach slabs to it, cutting in ventilation grilles. This kind of hem needs to be painted, otherwise it doesn’t look very nice.
Video: plywood and OSB, what to choose
Roofing with corrugated sheets
Corrugated sheets made of galvanized steel are characterized by durability, strength, low cost and the ability to choose any desired shade of the working surface. They resist corrosion well and are practically not susceptible to temperature changes and atmospheric-mechanical influences.
Ventilation of the under-roof space is carried out thanks to the gap between the wall and the sheathing, equal to the height of the corrugated sheet wave. Installing the binder is easy to do yourself, which saves time and money.
Video: filing roof overhangs with corrugated sheets
Please note that ventilation gaps are left only when finishing eaves overhangs (horizontal). With frontal (vertical) hemming, the overhangs are hemmed tightly.
Table: comparison of the cost of materials for filing overhangs
| Type of roofing material | Price 1 m² |
| Edged board | ≈ 2–2,5$ |
| Wooden lining | ≈ 6$ |
| PVC siding | ≈ 4$ |
| Sheet metal | ≈ 5$ |
| Plywood | ≈ 6–7$ |
| OSB | ≈ 4$ |
| Corrugated sheet | ≈ 9$ |
| Soffits | ≈ 10–12$ |
As you can see from the table, soffit lining is the most expensive. But, as we will see later, it is the most reliable. In addition, all the work can be done easily and quickly yourself.
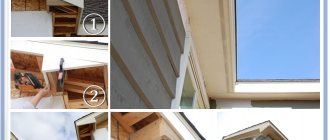
Stage IV. Inserting and fixing soffit panels
Let us note a few more important points. To install the soffit yourself, you will need to arm yourself with a screwdriver, roofing pliers, a tape measure, a level and a jigsaw with a metal file.
Don’t forget to also purchase a special corrector to remove scratches for metal panels (if you are installing just such panels), because anyway the surface will be damaged somewhere, and you will need to protect the coating in this place.
Insert the panels themselves into the J-profiles with a small gap:
Secure the soffits with self-tapping screws and a special rivet. It is advisable to use fasteners with a painted head. The panels are also allowed to be fixed using self-tapping screws with a press washer.
For open overhangs you need to use an F-profile:
- Step 1. Using a level, make a mark parallel to the roof belt at the edge of the wall and nail the profile to the back wall of the house.
- Step 2: Step back 2 cm from these vertical marks and draw a chalk line.
- Step 3. Install the F-profile along this line so that the top edge is on the line. It is very important to do everything correctly here, because it is this profile that forms the rear support for the spotlights.
But for a closed overhang you also need a J-profile:
- Step 1: Measure the distance between the J-profile and the F-profile, from the front to the back edge.
- Step 2. Cut the panels to the measured length and subtract 3-5 cm to account for possible expansion. For this purpose, it is better to use solid panels, except for those places where ventilation will be installed - perforated soffit is also suitable there.
- Step 3. Cut the panels to length and insert them at one end into the wall support you installed - F-profile or J-profile. Align the profile and secure it.
- Step 4. Once the first panel is installed, secure the lock with the second one. Close the slotted edge.
- Step 5. Manually adjust the panels to each other. If the width is at least 45 cm, no additional intermediate supports are needed.
Corners are made using a J-profile or H-profile. Place both profiles with their back edges facing each other to create additional support for the soffits.
Next, carefully ensure that the soffit panels are not stretched too tightly, otherwise their shape may become distorted. Therefore, try not to pull the horizontal sheathing panels when installing, it is better to simply press on the bottom and pull them up until they are fully engaged.
In practice, you will immediately understand what and how, and this video will help you prepare for the process:
If everything works out, the nailed panels will hang without tension. If the panels are still stretched, friction will arise in the locks, and the profile risks changing shape, deforming, in a word.
Types of overhangs
Pitched (eaves) overhangs are located horizontally. This is how they differ from vertical gable overhangs. Hemming gable elements is more difficult; a separate technique is used for them.
Cornice overhangs are divided into simple and with extension. The first ones have a simple design and are easier to equip. But with strong gusts of wind, they produce a booming sound that causes discomfort.
The ventilation system can be installed in both types of eaves overhangs; removal in this case does not interfere. But you need to choose a method for lining the roof overhangs at the stage of designing the house.
The choice of method depends on the type of roof. It can be two- or four-slope, flat, attic, etc. For flat and hipped roofs, only eaves overhangs are needed. The gable one also has pediments.
Stage V. Important subtleties of using fasteners
Let's look at which mount is best suited for this task. So, to install soffits you need anti-corrosion screws or nails (but only anti-corrosion ones). The fact is that the spotlights will have direct contact with the open atmosphere 365 days a year. And on particularly rainy days, the air humidity is quite high.
The diameter of the head of nails and screws should be no narrower than 8 mm, and the stem – 3 mm. The movement of the panel during the installation process must be free. Whether you did everything correctly can be checked by using an ordinary penny coin, which, if done correctly, will fit between the cap and the panel. And leave at least 1 mm between the fasteners and the surface of the panel:
Try not to drive the nail deep - you need to leave 1 mm between the siding and the bottom of the nail head. It is better to nail the nails at a distance of 40-60 cm from each other - so that the panels can move freely.
Hammer them right in the center of the slot, and never at the end, otherwise you will ruin the trim panel. At all joints and stops at the end of the profiles, be sure to leave a minimum gap of 5 mm, and if you work in cold weather, then all 6 mm.