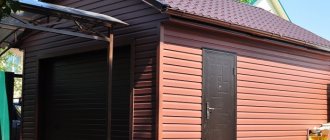
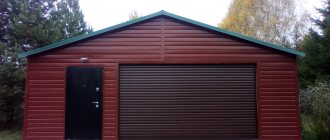
Cinder block garage: what is it good and what is bad
Cinder blocks are made from a pressed mixture of concrete, slag and ash.
The standard length-width-height of such blocks is 380x190x190 mm. The main differences between cinder blocks are the size of the voids. There are also blocks without voids, called solid ones. The main advantage of this material is its low cost - a cubic meter of slag concrete blocks costs less than the cheapest sand-lime brick. That is why it has become a very attractive alternative to other materials in the construction of sheds, garages and other outbuildings.
The next advantage of cinder block is ease of installation. In terms of its dimensions, one such block is equal to six “classic” bricks, and this, coupled with the savings in binding mortar, significantly simplifies the process of building walls.
Due to the relatively low mass (500-2000 kilograms per cubic meter), construction from slag concrete blocks does not require a powerful foundation, which significantly reduces the cost of any construction. But at the same time, cinder block is quite durable and can last up to 50 years with proper installation and waterproofing.
Now let's look at the disadvantages of this material.
Due to their structure, cinder concrete blocks absorb moisture well, so they definitely require external and internal finishing and increased attention to the issue of waterproofing and drainage
Another disadvantage of this material is toxicity - some, especially low-quality cinder blocks, can release harmful substances. Therefore, when purchasing, you should be careful and do not hesitate to ask the seller to show a certificate that guarantees the high quality and safety of cinder concrete blocks. Another disadvantage is poor sound insulation, but in a garage this is a minor drawback.
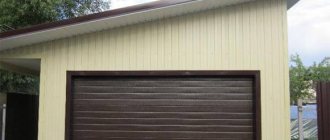
Cinder block garages - photo:
Choosing a place to build
If you were going to make a garage in your country house, then a cinder block could be a good choice - although it is cheap, it will give you a permanent structure, which is clearly better than a polycarbonate canopy or profiled sheet in terms of safety and durability. A cinder concrete garage would also be the best option for a plot with a private house.
The next question we will consider is where exactly on the site to build a cinder concrete garage? There are two options - as an extension to the main house and as a separate building. Both of these options are available and have their advantages.
The good thing about the annex is that you don’t have to go outside in the rain or cold to get into the garage - it’s now one of the rooms in your cottage, only bigger and with a car inside. In addition, it is easier to connect electricity, plumbing and heating to it. But at the same time, you and your household may be disturbed by engine noise, the smell of exhaust, gasoline and oil.
A detached garage combines exactly the opposite pros and cons: it is more expensive to connect to it, but you will be spared unpleasant odors and noises.
IMPORTANT: It is worth taking a special look at a garage made of cinder blocks as an extension if you are just planning to start building your own house and will make it from the same material.
Finishing
Finishing most often serves as the final stage of construction work. Finishing a cinder block garage does not require any special skill, skill or type of action to create a good, good looking finish. The cladding and decoration of walls, both indoors and outdoors, may be different. If desired, the walls can be plastered, whitewashed, covered with cement or covered with clapboard. The room is insulated with fiberglass or foam plastic.
Your garage can be protected from moisture with film or another method - for this you can make a plasterboard patch. Building a garage from a cinder block can be called a very good idea; such a building is in no way inferior to the out-of-fashion brick garage. The material is also quite acceptable and can withstand high loads. The quality of the blocks allows you to use the garage for a long time. The entire structure is durable and safe. If you choose the right color scheme, choose the material and install it, then the interior and exterior decoration of the room can make your garage comfortable, cozy and beautiful.
Books on the topic:
Construction materials and products - Isaac Nanazashvili - 200 rubles - link to book review
Handbook of a construction technologist - Gennady Badin - 239 rubles - link to book review
Modern work on the construction of walls and partitions - Galina Serikova - 45 rubles - link to book review
We prepare estimates for construction and repairs - Vadim Ponomarenko - 352 rubles - link to book review
Concrete and concrete structures - Anatoly Zotkin - 205 rubles - link to book review
Cinder concrete blocks appeared on the construction market a long time ago. Already at the beginning of the last century, buildings were erected from them. However, the material became widely known and in demand relatively recently. It goes to outbuildings, utility buildings or residential buildings. Let's understand the intricacies of cinder block laying in order to build a house ourselves.
Where to build?
A separate discussion is the question of where to build a garage. There are two main options: as an extension to a house and as a separate building. Let's look at the advantages and disadvantages of the first solution.
The main advantage of having a garage attached to your home is that you don’t have to go outside to get into it, especially if it’s raining, snowing or cold.
In addition, electricity and water supply are nearby, there is no need to conduct communications through half of the plot and spend money on it (and it is much easier to equip such a garage and your house with a single alarm system).
Another important advantage of such an extension is that you can store all your tools in the garage and, in addition, make a small workshop.
As for the disadvantages, these include noise, smells of gasoline and oils, and the fact that building such an extension is not always convenient.
The alternative option of placing the garage as a separate building has opposite pros and cons.
Another question about placing a garage made of foam blocks or cinder blocks - is it worth placing it on a summer cottage? It should be understood that construction from these materials is the cheapest; only a canopy made of tarpaulin or corrugated sheets, which are not very resistant to bad weather and intruders, can cost less. Therefore, if you spend a lot of time at the dacha, build a garage from building blocks.
You can read about how to choose the optimal size of a garage for one car in the article.
Advantages and disadvantages of building a cinder block garage
The advantages of using cinder blocks to build a garage include the following points:
- the material has a relatively low cost;
- cement is consumed in smaller volumes than in the case of brickwork;
- laying cinder blocks is not difficult, and construction is carried out quickly;
- durability - the minimum service life of the material is 50 years;
- high fire-resistant properties.
Minuses:
- poor sound insulation;
- presence of toxic substances in the composition;
- some types of material are very heavy.
The video below explains more about the advantages of cinder block:
Network engineering
Those car enthusiasts who have not had to deal with the interior decoration of a garage very often believe that such decoration is only needed to make the room more spacious, comfortable or bright. However, in fact, interior decoration is also very practical. Building materials used by experienced builders can absorb dirt and odors. They are also unaffected by chemicals, moisture, temperature, and do not burn. There are many methods of interior decoration, but at this stage it is also worth thinking about how utility networks will be installed in the room.
Such networks are a combination of equipment and communications that will provide the garage with heat, communications, electricity and even sewerage. It is the leading fragment of networks that is considered to be the sewerage system. It is most convenient to use a connection to a centralized system. If this is not possible, a borehole or well can be used
Lighting and power supply are very important - no garage can be imagined without light and electricity. The wiring should be planned in advance; after it is installed, you can begin finishing without fear that you missed or forgot something
Heating and ventilation are very important - they guarantee comfort and convenience from living, both in the house and in the garage. A natural ventilation system may be the most convenient. You can install simple utility networks yourself. However, if the work turns out to be too complex, the source for the wiring is confusing or distant, just like for the sewerage system - construction, design plans, calculations and work on this issue can be left to specialists, engineers and professionals.
How to insulate a house?
To make your home comfortable in cold weather, you need to take care of the insulation of the building.
Experts say that it is better to insulate a building from the outside, as this guarantees 70% of the effect; sometimes internal insulation is not even required. Before internal insulation, a vapor barrier layer is installed on the walls and ceiling of the building, after which mineral wool or expanded polystyrene can be used. Vapor barrier is not needed for finishing external walls.
If you want to save on insulation, then use polystyrene foam. This is the cheapest material; later it is plastered and painted. You can also buy expanded polystyrene, which has a low level of water absorption, so there is no need to install a vapor barrier layer.
Wall insulation with foam plastic and decorative work are carried out in 5 stages:
- The walls are being plastered.
- Styrofoam is attached.
- Reinforced mesh is being installed.
- Work is underway to level and finish the walls.
- The building is being painted.
For painting, it is better to choose acrylic or silicone plaster. And if you are not limited in finances, then for insulation it is better to purchase polyurethane foam - a modern material that is applied to the walls by pouring or spraying. The result is a coating without seams; it does not allow cold air and moisture to pass through.
You will learn how to properly cover a roof with corrugated sheeting by reading the following article.
And this article tells you how to cover a roof with roofing felt.
Getting ready for winter
If you do not want to expose your car to temperature changes or plan to be in the garage more often or even live for some time in the attic or second floor, you need to solve the heating issue. It is worth noting that many people use the voids of cinder blocks as “natural” channels for communication, so take note of the idea.
If the garage is adjacent to the house, which in turn is connected to a centralized heating system, then it makes sense to install several radiators and connect them like any other room. Otherwise, you should use a gas or electric water heater.
If you do not want to deal with radiators, you can use thermal convectors. And the most radical and simplest option to warm the garage from the inside is a simple stove, but here you need to pay attention to safety and not start a fire in pursuit of heat.
Read the article about how to make a wood-burning stove for your garage with your own hands.
As you can see, a cinder block garage is a very attractive option for a “home for a car.” All you need to build it is material, a small set of easily accessible tools and desire. Have fun, and good luck in your work!
Should you use cinder blocks?
Cinder block is one of the cheapest building materials .
In addition to its excellent thermal insulation, strength and weight characteristics, it can also be made independently on site. To do this, you need a special vibrating machine that will compact the mass from the solution into molds.
If a house on a site is built from cinder block, then it would be more expedient to make a garage with a shed from this material. In this case, the owner can save a lot on construction work. If the house is being built from a different material, then you can use cinder block, but this will not bring much benefit.
Article on the topic: Is it possible to build a garage close to the fence?
Since cinder block is a fire-resistant material, it is perfect for domestic and commercial buildings : owners do not need to fear for the integrity of the building in case of possible fires. But it is worth considering that cinder blocks do not absorb sounds, so if you do not want to hear everything that happens in these rooms, you will have to finish them and additionally insulate them, which will entail expenses.
Floor screed
The floor is built at the basement level; the work process includes surface preparation. The screed should be ten centimeters. The surface for laying the floor needs to be prepared - remove debris, level the surface, cover the bottom with sand or crushed stone as necessary. There are several types of building concrete, and of all of them, preference for building a floor is given to ready-made M200.
I recommend pouring the mixture for floor screed in several layers, and when the surface becomes strong enough, you can start rubbing it
When installing the floor at the plinth level, you need to pay attention to its strength. After all, not only people will be in the garage, but also a car
That is why the material for the floor will be concrete. Its thickness is from eight to ten centimeters. Before laying begins, the ground is leveled and cleaned.
We build a roof, install doors and windows
A fairly important and responsible undertaking would be to install a roof yourself, which is best made from wood. A wooden roof can easily be insulated with various heat-insulating materials, the cracks can be sealed with resin, and then slate can be laid on the surface. It is worth inserting small frames, also made independently, into the openings made for windows. It is worth noting that for a barn there is no need to purchase expensive doors; it is enough to take a used structure, which will serve as a natural barrier from bad weather, various other manifestations that are harmful to living creatures, and allow moisture to pass through.
The construction of such a structure will take relatively little time and effort, which is important to take into account when starting this project. Exterior finishing may not be carried out, there is no need for it
Step-by-step guide to building a garage
Let's start building our own cinder block garage.
The first stage is the foundation
Schematic diagram of a shallow foundation
We start with arranging the foundation. A cinder block structure will have a relatively light weight. A shallow strip base is quite enough.
We dig a trench in accordance with the markings. Ideally, the depth of the structure should exceed the freezing level of the soil. Most often they are buried by 60-80, and sometimes by 100 cm. At the same stage, we prepare recesses for the cellar and inspection hole, if their presence is provided for by the project.
Soil freezing level
We attach plastic film or roofing felt to the walls of the pit for waterproofing.
We fill the bottom of the trench with a 20-30 cm layer of a mixture of crushed stone and gravel, followed by careful compaction.
We install the formwork so that the height of the finished concrete structure is approximately 100 mm higher than the ground level.
Let the concrete mixture harden. According to the regulations, concrete gains strength within 28 days. We lay roofing material on top of the frozen tape in two layers for waterproofing.
Trench for a foundation for a garageFormwork with reinforcementFillingStrip foundation for a garage
Stage two - walls
Scheme for laying cinder blocks
Determine the height and length of the walls individually. Laying blocks is done like bricks. The most popular methods are the following:
- half a stone;
- into stone;
- one and a half stones;
- two stones.
The thickness of the masonry directly affects the resistance of the finished walls to wind loads, temperature changes, etc.
Sequence of laying cinder blocks
Most often, as noted, builders use the “brick” masonry method, in which the next laid row overlaps the seams of the underlying one. First we lay out the corners, then we stretch ropes between them to make the masonry even and continue working.
In the process of arranging walls, we adhere to the following important rules:
we lay the blocks with bandaging of the seams; if walls are built without further insulation or other cladding, we carefully control the quality of the seams at each stage. It is recommended to do jointing; We measure each block with a building level
We pay special attention to the starting row; Before laying out the blocks on the side of the gate, we install at least their frame for better orientation. We do this by checking the level and temporarily fixing the structure with spacers; maintain a slope to the front of at least 0.3 m.
In the upper part of the walls we leave nests for installing floor beams. Recommended dimensions – 200x200x150 mm. You can then fill in or blow out the gaps. The optimal step for placing nests is 100 cm.
The beams are located at the same distance and filling elements are laid on them, which perform the enclosing function. Ceilings. Ceilings and sheathing. Garage ventilation scheme. Installation of ventilation.
Third stage - roof
We make the base of the roof from I-beams - this is the best option. We select the length of the elements so that it exceeds the width of the building by 250 mm.
Garage roof diagramGarage roof
We lay the beams across in increments of about 1 m. We fasten the beams in a suitable way, for example, using anchors.
After this, we sew up the base with beams 4 cm thick. We lay the beam as tightly as possible. We put roofing felt on top of the beams, insulation on it (mineral wool, slag or expanded clay), fill in 2 cm of screed and finish the “pie” with aquazol, rubemast or other suitable material. If you wish, you can choose a different finishing coating at your discretion.
Laying roofing felt on the sheathing Laying insulation Laying reinforcement Concreting the floor Concreting the floor Bicrost flooring is done using a torch Waterproofing a flat roof
Stage four - floor
We make the floor level with the plinth. As a standard, a screed with a thickness of at least 100 mm is poured. We first clean the surface of debris, level it and, if necessary, fill the bottom with sand or fine gravel.
Diagram of a floor in a garagePouring floors in a garageHow to make a concrete floor in a garageHow to make a concrete floor in a garageHow to pour a floor in a garage with your own handsConcrete floor in a garage
We make the screed from concrete grade M200. We pour the material continuously, slowly, in several layers. Let the concrete set and rub the surface.
To make it convenient to enter the garage, we are installing a ramp in the front part of the building. Be sure to make a 50-70 cm blind area around the entire perimeter of the building. It will ensure timely drainage of water from the base.
An option for making a floor in a garage from concrete and blocks. We lay out concrete slabs, and fill the space between them with concrete and rubble stone. We lay out concrete slabs, and fill the space between them with concrete and rubble stone.
Walling
In order to build walls, it is not necessary to use special rules. Brick laying can be done in several ways - half a stone, one stone, one and a half or two. The strength of the wall depends on this. The wall is also able to withstand gusts of wind and temperature changes - high and low. One of the most common methods of building walls is called “brick”. The last row lies down and breaks the seams of the previous one.
First, the corners are placed, and after re-upholstering, the laying of cinder blocks continues. Laying a garage using cinder blocks is not much different from laying bricks. First, the corners are set; they must be the vertices of a regular rectangle. A cord or rope is stretched between them, which will control the level of the masonry, both horizontal and vertical. If you use modern materials for masonry, your garage will be magnificent. It will also be distinguished by durability, quality and safety. And slag blocks are much more economical than ordinary bricks.
Start of construction
Before you begin building a garage, you need to take some preparatory measures, namely:
- Develop a garage project taking into account all the details.
- Calculate the required number of cinder blocks.
- Decide on the method of laying the blocks.
Creating a Project
Behind this loud and perhaps frightening name for some lies a relatively simple procedure.
All that is needed here is to decide on the design of the building and draw a sketch on paper, taking into account the dimensions of all elements of the structure, approximately as shown in the photo above.
When developing a drawing, you should think about the purposes for which the garage will be used - only for car storage or also for repairs, whether an inspection hole or cellar will be needed, etc.
After this, based on the schematic drawing, you can make an estimate and purchase the amount of required material.
Detailed development of the project will help to avoid serious mistakes during construction and will serve as a guide at all stages of work.
Calculation of the number of cinder blocks
To calculate the number of blocks, you can use the following scheme, considered using the example of building walls half a block thick. First, you should calculate the area of the outer edge of the cinder block, the dimensions of which are usually 19x39 cm.
The multiplication results in 741 cm2, which is approximately 0.0741 m2. To find out how many blocks will be used to build 1 m2, you need 1/0.0741. The result will be approximately 13.49.
Thus, to build a square meter of wall you will need 14 cinder blocks (rounded value).
Next, you need to calculate the perimeter of the garage by adding its length and width and multiplying the result of the addition by two. The resulting value is multiplied by the height of the walls, after which the total number of cinder blocks is calculated. In this case, it is necessary to exclude the gate area from the calculations.
Example:
- garage size – 6x8;
- wall height – 2.5 m;
- gate area – 8.5 m2;
- the perimeter will be: 6+8*2 = 28 meters;
- 28*2.5 (wall height) = 70 m2;
- 70 – 8.5 (gate area) = 61.5 m2;
- 61.5*14 (number of blocks for 1 m2) = 861 cinder blocks.
According to these calculations, you can already roughly imagine how much such a garage costs if you have already decided on the dimensions for your building.
Laying method
There are the following methods for laying cinder block walls that are suitable for building a garage:
- Half a block. It is used for the construction of partitions between rooms and other structures that are not subject to excessive loads. Suitable for building garage walls, but the structure may be flimsy.
- Masonry 1 block thick. It is used for the construction of utility rooms, including garages. The best choice in terms of price/strength ratio.
- The masonry is one and a half blocks thick. Suitable for the construction of load-bearing walls subject to additional load. Suitable for a garage, but will be more expensive.
- In two blocks. This is an inappropriate method of laying the block, since a similar method is used for 2-3-story buildings. A simple garage built in this way will cost a decent amount of money.
Preparatory activities
Self-construction of a cinder block garage begins with a number of important preparatory activities. Follow the given sequence.
Selecting a location
First of all, we choose a suitable place to build our motorhome. It’s convenient when the garage is located next to the house - in bad weather you won’t have to get wet in the rain and wade through snowdrifts.
Selecting and preparing a garage location
It is better that the garage is located at a minimum distance from the exit from the site. The number of turns should be minimal. It is not recommended to build a cinder block garage in a low-lying area, because... this threatens flooding with atmospheric and groundwater.
Be sure to make sure that there are no communication lines at the planned construction site, such as:
- water pipes;
- power lines;
- sewerage and heating pipes.
If the listed communications break down in the future, the presence of a garage will significantly complicate their repair.
Layout of a garage made of foam blocks Layout of a garage made of foam blocks
Make sure that when constructing a garage in the chosen location there will be enough space for opening the gate. It would be useful to have a free space to park your car during washing and other work.
Construction site marking
Marking the area for the foundation
Having chosen a suitable place to build a garage from cinder blocks, we proceed to marking the site. At this stage you will need a small set of auxiliary tools, namely:
- reinforcing bars or other similar devices;
- hammer for driving rods;
- dense thread for pulling between pegs;
- tape measure for measurements.
Before starting marking work, you need to accurately determine the dimensions of the future structure. At this point, focus on the following factors:
- available free space on the site;
- financial opportunities;
- individual preferences and needs.
If a cinder block garage will be used as a place to store a standard-sized car, a structure measuring 6x4 m and a height of 2.5-3 m will be enough for you.
The six-meter length is due to the dimensions of the car (on average 4-5 m) with a half-meter margin for unhindered passage. The width of the car is on average 200-250 cm. Approximately 70 cm should be left for passage, installation of shelving and storage of various types of materials used in the garage.
Approximate garage dimensions
If you wish, you can adjust the dimensions of the building at your discretion. There are no strict restrictions or standard dimensions for cinder block garages.
Marking the site for the foundation
Calculation of cinder block
Having chosen a place for construction and determined the optimal dimensions of the garage, we begin to calculate the materials. Treat this stage of work with maximum responsibility. Due to errors at the calculation stage, you may simply not have enough materials, or you may waste money on unnecessary blocks.
cinder block
The calculation will be considered using the example of a garage with dimensions of 6x4 m and a height of 250 cm. The masonry is carried out according to the most common method - half a block. Gate dimensions – 300x230 cm.
The dimensions of one block are standardized - 39x19x18.8 cm. Based on this, 13.6 blocks will be needed to lay 1 m2. You will build the entire building from 586 elements. Typically about 5-10% of the material is added “for reserve”. If the design provides for additional doors and window openings, take this into account when performing the calculation.
You will also need to buy rubble stone for arranging the base, several beams made of metal or wood (in the case of a garage of the specified dimensions, five 430-centimeter beams will be enough).
Rubble stone
Don’t forget to buy concrete for pouring the foundation or components (cement, sand and crushed stone) to prepare it yourself.
Concrete
You will also need material for the finishing coating of the roof. When choosing it, be guided by your preferences.
Metal tilesOndulinTechnical characteristics of ondulinRoof sheetingRoof sheeting
Buy concrete or prepare it yourself. Standard proportions:
- part of the cement;
- three parts sand;
- 4-5 parts of crushed stone.
Is it worth building with this material?
Anyone can build a garage from foam blocks if they wish and have the tools. Working with this material is not difficult or expensive. Therefore, if the car owner does not have a lot of money, but a garage needs to be built, this is the optimal solution. During operation, special equipment and a large number of people are not needed.
But if the climate of the area is very humid and rainy, then it is better not to use foam block elements when building a garage. The material has the ability to absorb moisture well. If it rains infrequently, then the blocks will have time to dry out, and if there is prolonged exposure to rain or snow, the moisture will constantly be inside the block and will not dry out. The result is a shrinkage of the garage by 1-3 mm per 1 m of wall.
In other cases, the use of the material has many advantages:
- Light weight. The foam block has a low density, so the constructed garage will not weigh very much compared to other building materials (concrete or brick). Thanks to this, there is no need to lay a heavy and deep foundation. It is enough to get by with a strip foundation with a shallow depth.
- Foam block is a non-toxic material; it does not emit toxic substances during operation. The foam block is made from cement, sand, foaming agent and water, so from the environmental point of view it is safe for health (4th class of environmental friendliness).
- Foam blocks have closed pores, so walls can be laid directly from ground level without filling a high base, since the material will not freeze in winter.
- The characteristics of a foam block product are similar to wood, but unlike it, this material does not burn, is not susceptible to rotting, mold and mildew, is resistant to temperature changes and is much more durable. The material can be exposed to open fire for 4 hours without burning or losing its characteristics.
- The low weight of each element allows you to independently lift and lay out the blocks without resorting to the help of machinery. In addition, foam blocks are easy to transport.
- A garage made of foam blocks has a high level of thermal insulation and sound insulation. The thermal conductivity of the foam block is 3 times less than that of brick. This means that the garage can be easily heated and the heat will not quickly escape through the walls. And the many air cells in the blocks dampen sounds well.
- The elements are easy to process, trim, saw, drill. And this work does not require special tools. An ordinary drill, grinder and emery will easily cope with this.
- Foam blocks have smooth edges, so walls are erected without differences.
- The cost of foam blocks is several times lower than that of other materials.
But for the sake of objectivity, it is worth mentioning a few disadvantages:
fragility and fragility of blocks
Improper transportation, careless handling, and careless actions will easily lead to the material becoming chipped and cracked; the material has low vapor permeability, so good ventilation must be ensured in the garage; ordinary nails or dowels will not hold in foam blocks. To secure shelves or wall cabinets, you need to buy special fastenings for foam concrete; Due to low moisture resistance, it is advisable to decorate the garage walls with an additional layer of plaster or other protective material.
Floor screed
The floor is built at the basement level; the work process includes surface preparation. The screed should be ten centimeters. The surface for laying the floor needs to be prepared - remove debris, level the surface, cover the bottom with sand or crushed stone as necessary. There are several types of building concrete, and of all of them, preference for building a floor is given to ready-made M200.
I recommend pouring the mixture for floor screed in several layers, and when the surface becomes strong enough, you can start rubbing it
When installing the floor at the plinth level, you need to pay attention to its strength. After all, not only people will be in the garage, but also a car
That is why the material for the floor will be concrete. Its thickness is from eight to ten centimeters. Before laying begins, the ground is leveled and cleaned.
The backfill is carried out with sand or small crushed stone, after which the coating is compacted. The evenness of the surface is checked with laces. You can also use pipe beacons. When placing concrete in portions, this is done continuously, and even between beacons. Then the installed concrete is rubbed down, and in order to prevent dust from appearing on it over time, an ironing process can be carried out. There are several methods for this procedure, and each of them is aimed at increasing the strength of the concrete coating, giving it an aesthetically acceptable appearance and removing the ubiquitous dust.
Marking and preparing a trench for the foundation
Construction begins with marking the site. The contours of the future structure correspond to its external dimensions. At the same time, the landmarks of the internal walls of the garage, which are equal to the thickness of the cinder block, also indicate.
The procedure for laying cinder blocks.
The markings must be carried out accurately, since the quality of the masonry and the strength of the entire building structure depend on this.
Particular attention should be paid to the corners, they must be strictly 90º
Along the marked lines of the outer and inner contours of the garage, ropes should be pulled, the distance between which is the width of the future foundation.
The trench is usually dug manually, but this process is much easier to carry out using an excavator with a bucket width of 20 cm. The bottom of the finished trench is covered with a sand cushion. This process is carried out in two stages. First, pour a layer of sand 15-20 cm thick, moisten it with water and compact it. Then the procedure is repeated.
A very important point when building a foundation is the production of reinforcement strapping. The rods create rigidity and prevent the walls from breaking.
The reinforcement is first laid at the bottom of the trench, securing the metal ends at the corners. To make the structure rigid, the rods are twisted with wire or plastic clamps. To prevent corrosion, the metal structure is suspended at a height of 5 cm above the bottom. Next, vertical rods 200-300 mm high are attached to the reinforcement harness at a distance of 1 m from each other. Vertical reinforcement creates a single structure with the walls of the garage.
Construction of a garage
Foundation arrangement
To build a garage from a cinder block with your own hands, as with any construction, first of all we equip the foundation.
For this structure, a strip foundation is sufficient, which greatly facilitates its creation.
We arrange the foundation as shown in the photo
- We dig a trench under the foundation according to our markings. Ideally, the foundation should correspond to the depth of soil freezing, but for central Russia 60 cm is sufficient. The instructions require that the width of the foundation be at least 300 mm.
- We waterproof the trench walls using roofing material or polyethylene film. This point is necessary to prevent water from leaking out when pouring the foundation.
- We fill the sand and gravel and compact it. The backfill height can be up to 300 mm.
- We directly fill the foundation with mortar. To save mortar, you can use rubble stone, pieces of cinder block and other similar materials.
- Since the foundation must be 100 mm above ground level, we create formwork and pour it to this height.
- We waterproof the upper part of the foundation using two layers of roofing material.
Wall masonry
If we are building a cinder block garage without the help of professional masons, then be sure to watch the video at the end of the article.
The remaining mandatory masonry conditions are as follows:
Insert the gate frame in front of the front part
- The masonry is carried out with bandaging of the seams.
- You should start laying by creating corners, from which you will then build when laying a wall of foam blocks with your own hands.
- If we do not provide insulation or other facade cladding, check the quality of the facade seams. It is best to carry out masonry with jointing.
- Take the time to measure each cinder block with a level, especially the first row.
- Before masonry on the gate side, install the gate or at least its frame. Moreover, this must be done level and securely fixed using spacers.
- In the upper part, it is necessary to slope from the back to the front. It must be at least 300 mm.
- Leave nests for laying roof beams. Make them 20x20x15 cm, the excess can then be stored. Nests must be made every meter.
Roof and floor installation
To arrange the roof, we insert prepared beams into the equipped sockets. For this it is better to use iron beams, but their price is higher. Therefore, after special treatment, wooden beams can be used. The next steps depend on the type of roof you want to create.
The photo shows a practical roof optionIt is better to install the floor by pouring concrete. At the same time, for reliability it must be reinforced. It would also be a good idea to make a slight slope from the back wall to the entrance to avoid water accumulation.
How to attach a garage to a house
https://youtube.com/watch?v=Lwdwjsk35dQ
For convenient entry into the garage, a ramp must be installed in the front part. And to drain water from the foundation, a concrete blind area of 50 - 70 cm along the entire perimeter of the garage.
Base design
The foundation for a cinder block garage does not have to be very solid and serious, because the weight and design of such blocks is not too large. Therefore, the basis depends on many factors. Among them is the laying depth, which depends on soil freezing. The presence of groundwater underground, the direction of its passage, and the type of soil - sand, clay, rocks - can be very important. Having decided on these factors, having found out which of them are most suitable for building a high-quality and reliable foundation, you can begin to work, but even for construction there are several methods, each of which differs in its level of convenience.
First of all, the first top layer of soil is removed. Next, a trench is dug. The trench is filled with sand, stones or broken bricks in several rows. Each layer is impregnated with cement mortar. What is it for? Such delamination can protect the foundation from destruction that can be caused by groundwater. Digging a trench 40 centimeters wide and 50 centimeters deep. The bottom is covered with sand, filled with water and must be compacted. This approach makes the foundation strong and strong.
Also, the bottom is strengthened with reinforcements; they are laid so that the directions of their location are different. Such a foundation is concreted and cured for thirty days. The last method is the simplest. It's called rubble concrete. A trench is dug into which rubble stone is placed in layers. Next, the trench is filled with cement. It is important to know that the quality of cement for a garage should not cross the line of grade 150. Cement is mixed with sand, 1 part cement to 2.5 parts sand. Water is added until a mobile mixture appears. In order for the newly built foundation to be properly waterproofed, it is covered with roofing felt. This must be done a few centimeters wider than the construction area. The gate is installed on the spacer.
Step-by-step instructions for building a garage from foam blocks with your own hands: foundation-finishing
The construction of a building begins with the foundation. Be sure to ensure that a layer of waterproofing is laid, which reduces the likelihood of dampness. Material - monolithic reinforced concrete slabs of strip or slab type.
Strip foundations are used more often, are cheaper and better raise the building above the ground. Tile is used on clay types of soil. The first option is laid on sand-gravel or non-heaving sandy soils, or in buildings where a basement level is needed.
An example of how to assemble a frame for pouring a foundation
For the foundation, a trench is dug 50 cm wide and 70 cm deep. After this, compact the soil in the trench itself and fill it with sand to a depth of 30 cm, fill it with water and compact it. To strengthen the foundation for the garage, the foundation is reinforced. To do this, you need to weld the frame and insert it into the trench.
Then the trench is covered with roofing felt for waterproofing. Prepare the concrete and pour it over the reinforcement mesh. You can proceed to the next stages only after it has completely hardened.
To install the gate, a reinforced concrete lintel is laid in the wall made of foam blocks. As an option, a double-sided frame made of steel angle is installed. When erecting a building, the craftsman places blocks around the frame. To give them the desired look, a hacksaw is used, and the blocks are cut to height. For a garage, a gate of a design is selected that will suit both an aesthetic and financial point of view.
The jumper is made from a metal corner
At the first stage, weld the reinforcement rods (40 cm in length and 12 mm in diameter), four (or more) in height, to the gate frame. It is desirable that the mesh of reinforcement passes through the joints of the blocks. This will strengthen the structure.
The next stage is priming and painting the gate. This can also be done in advance to speed up the garage construction process. The last stage is to install the gate in the opening strictly vertically. The position is checked according to the building level and fixed on both sides using wooden braces.
The walls are erected on the basis of two types of compositions. This is either ordinary cement mortar or construction adhesive. Using the first material is cheaper, but the joint width reaches up to 1 cm. The second material is consumed less and the joint width is only 2–5 mm. Glue is used only if the exact geometric dimensions of the block are met.
The first thing to do is set the corners. A rope is stretched between them, along which the laying is carried out.
Reinforcing mesh should be laid every two layers, this will prevent the appearance of cracks
We start laying walls. After the first two rows, install a reinforced mesh. Then lay 2 more rows and repeat until the roof.
In order to strengthen the walls of the garage, they should be reinforced. This must be done every two layers of masonry.
The rods, welded to the gate frame during installation, are lined with foam blocks. At the next stage, a lintel is mounted above the gate. In its manufacture, 5 cm angles are used, from which a frame is welded to the size of the gate. It is installed on the inside of the walls and secured with cement. A beam is laid on top and the construction of the wall continues.
First the beam is laid, and only then the laying continues.
The roof is built on a pre-prepared foundation. If it is made of wood, then a mauerlat made of timber is placed on the walls and tightened with anchor bolts. This strengthening distributes the load from the roof to the garage walls made of foam blocks. An armored belt under the Mauerlat increases the reliability of the structure, so its use is desirable, but not necessary.
The roof is built on a pre-prepared base
The first step is to install I-beams at equal distances of 80 cm and embed them into the walls. The protruding part is at least 20 cm. This is done in order to protect the foam blocks from unwanted moisture.
Boards (40 mm thick) are tightly laid along the lower flanges of the beams. For waterproofing, roofing felt is laid, on top of which slag or expanded clay is poured.
At the next stage, a concrete screed is carried out. Prepare the mixture and pour a 2-3 cm layer of insulation. Wait until it dries completely and waterproof it with bitumen mastic. The final stage is the external covering of the roof with roofing felt. The layers are laid from bottom to top with a slight overlap.
The exterior decoration of the garage will protect it from moisture and external influences. Hanging façade devices are suitable for this purpose. Gypsum vapor-proof plasters are used on foam block walls, but taking into account the microclimate inside, it is more advisable to use cement material. Before applying it over the mesh, the surface must be thoroughly primed.
Possible difficulties and errors in work
In the process of building a garage or shed made of cinder block, beginners and experienced builders may encounter errors and difficulties :
- lack of preliminary geodetic assessment;
- the project has not been developed;
- the foundation is not laid out correctly;
- the number of blocks for construction is incorrectly calculated;
- defective stone was used;
- the solution was made incorrectly;
- masonry of walls is not according to the rules;
- The wrong type of block was used for different types of walls.
To avoid all these problems, you can initially carefully study the issue of construction, stick to the strategy and listen to the instructions.