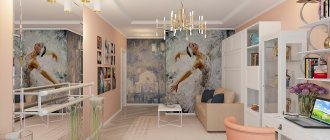
The interior decoration of a house made of timber (photos are provided) includes all the improvement of the interior premises of a private or country residential building, built from timber of various types. Wooden houses of this type are very popular, and many people are interested in the peculiarities of their interior design. In principle, the interior decoration of a frame house with imitation timber (photo 1) or the interior decoration of a house made of profiled timber (photo 2) in terms of the materials used differs little from landscaping, for example, a brick building. However, certain specificities are observed, and these nuances should be taken into account when carrying out work on your own.
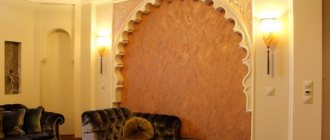
Interior decoration of a frame house with imitation timber
When to start
On a “fresh” log house, you can begin finishing work no earlier than the main shrinkage has passed. If the log house is made of laminated timber, it should take 3-4 weeks. For all other types of wooden houses, the period is calculated in months, and sometimes years. The exact shrinkage time depends on the initial moisture content of the raw materials, climate zone and construction time. That's how difficult it is. In any case, it’s not worth starting finishing sooner than a year later, or at least 10 months later. During this period of time, active shrinkage of the wood occurs, logs and beams decrease in size, and the insulation laid between the crowns is crushed. If you attach the trim before the main processes have completed, it will fall off or become warped. Everything will have to be removed and redone. So there's no need to rush. Moreover, there will be enough work: you need to achieve tightness of the joints, and this is not easy. Careful competent caulking is needed.
Before starting finishing work, it is tedious to caulk a log or timber frame
Typically, the main caulking of a log house takes place in two stages. Primary - a few weeks after installing the log house, and secondary - after about six to eight months. Each time the cracks are clogged with insulation - jute, tow, sometimes moss. It is done immediately both outside and inside, otherwise the house will warp. Therefore, they walk around the perimeter of the building, caulking alternately, each crown, now from the outside, now from the inside. Work begins from below, from the lowest row of logs or beams.
With each caulking, the frame rises by 5-7 cm. Then, under the force of gravity, it gradually settles. The compacted inter-crown insulation reliably covers the cracks. The quality of this work is very important: it not least determines how warm the house will be.
Finishing work begins inside the wooden house after the frame has settled after the second caulking. To determine whether the process is completed or not, the height of the walls is periodically measured. If there are no significant changes within two to three months, we can assume that the main processes have passed. It's time to start decorating the inside and outside of the house.
Read how to build a house from timber here.
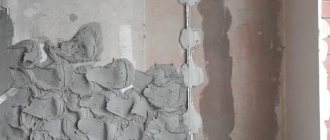
Decorative plaster
This general term refers to a layer of construction and decorative mixture applied to the surface of the walls. It levels the walls, insulates them, insulates them, and is also, of course, one of the most ancient methods of beautifying a home inside and out.
Plaster mixtures can be divided according to two criteria - according to the composition of the mixture and according to artistic qualities.
Mineral plaster
Mineral plaster is the most economical type of plaster.
This is due to the base of the mixture - cement, which is “seasoned” with chemical additives that provide increased moisture resistance. To this we can add environmental safety, vapor permeability, resistance to fungi and mold, temperature changes, as well as fire safety. Among the disadvantages are the not very diverse color palette and the complexity of application. But the average period of operation of a mineral coating does not exceed 15 years.
In addition to mineral, there is also: silicate, based on liquid glass; silicone, which is based on silicone resins; polymer - with acrylic resin in the composition. Silicone and mineral plasters have the longest service life.
Textured plaster
Textured (structural) decorative plaster is a way of decorating walls that can be called an unfading classic. Due to the fact that the plaster mixture contains various additives (pebbles, fibers, marble chips or ground bricks), this finish can look like rock, valuable wood, cork bark, sand patterns, cracked clay, dug velvet.
Textured types of plaster include the famous “fur coat”, as well as bark beetle plaster, a method of finishing halls and hallways that has been popular for many decades.
Textured plaster is an excellent solution for those who want to get a unique interior. It will definitely provide picturesqueness and sophistication. And at the same time, strength, durability, and fire resistance. Plaster will help hide small defects on the walls, and its price is not bad at all. Textured plaster will not put to shame any of the palace, classical interior styles; it will be a good find for the hall, living room, and dining room.
Judging by the reviews, this design has one drawback - it is difficult to remove when the need for new repairs arises. The time during which textured plaster will not lose its attractiveness is 15-20 years.
Venetian plaster
It's hard to believe that this type of coating is over 500 years old. “Venetian” creates the impression of a noble stone - marble, granite, onyx, jasper, opal, malachite, amber. Such a sophisticated type of decoration literally asks for the walls of spacious living rooms, where there are fireplaces, hanging canvases in lush frames and the spirit of the Renaissance is in the air. Venetian plaster is unique: there are no two identical copies of it in the world! It is precisely this that can be seen inside the palaces of the Venetian doges and the villas of Italian aristocrats. “Venetian” is not only enchantingly beautiful, but also safe, moisture-resistant, durable and capable of pleasing the eye not for years, but for centuries! But the price also matches it.
Types of wall decoration for a wooden house
If the log house itself has an attractive appearance, it is rarely sheathed. In this case, it makes sense to reduce the cost of interior finishing: sand the log or timber and tint it. Only the floors should be varnished: the varnish will prevent abrasion of the wood. It is best to cover the walls and ceiling with tinting antiseptics or water-based paints. They do not paint over the texture of the wood, but only give it a tint, better showing the pattern. You will still have to use antiseptics to maintain the attractive appearance of the wood.
You will most likely have to use antiseptics, you can take them with a coloring pigment, at the same time highlight the beauty of the wood pattern
If the log or beam is normal, the caulking seam looks bad, it is sealed with a twisted cord, and the walls are finished in the same way - sanded and tinted. Everything also looks good, and the cord in the groove serves as an additional guarantee against drafts.
Ugly seams from caulk can be sealed with cord - it looks attractive, and even prevents drafts
How to cover the walls of a wooden house inside
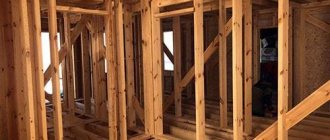
If the frame is so crooked or old that sanding will not help, you will have to make the interior decoration of the wooden house from lining, wall panels, drywall or other material.
For any of these materials, it is better to make a lathing: this way you can level the surface of the walls. In addition, behind the sheathing there is space for free air circulation. In a wooden house, this is important, since only dry wood does not rot or blacken. Free air circulation between the finishing material and the wall will maintain their normal condition.
The sheathing in a house made of timber or logs is done in the same way: you need to remember that it must “float” so that the finishing does not fly off
The space behind the sheathing is also used for laying communications - electrical wiring, for example. In a wooden house it should be made in non-flammable pipes, so you need a fair amount of space for it. If necessary, you can put insulation there if your house is cold. If you spend little on heating and the house is warm, it is better not to use any additional materials: neither insulation nor vapor barrier. Wood itself does an excellent job of maintaining stable humidity in the house, and extra layers only upset the balance.
Not everyone likes attaching trim to the sheathing: if an animal or insects settle behind the sheathing, it is difficult to get rid of them. In this case, you can level the surface of the logs by removing the protruding parts and nail the finish to this surface. A perfectly flat surface is difficult to achieve, but possible. The gaps between the finishing material and the wall, which in this case still exist, were once covered with clay. It will both provide thermal insulation and protect against drafts. Technologically this is incorrect, but they do it too.
Whatever materials are used for cladding the walls of a wooden house inside, there should be a gap of at least 2-4 cm to the ceiling. For a “young” log house, this is insurance against shrinkage. For the old one - a gap to compensate for changes in the geometry of the wood. She breathes all her life: sometimes she gains moisture and swells, sometimes she dries out. The gap under the ceiling will allow the wood to easily expand or shrink, without consequences for the finish. If this is not done, then either cracks will appear or the finishing will bend/rip out. To prevent the gap from “hurting the eye,” it is covered with a ceiling plinth. It is only nailed to the stream, it is only leaned against the wall. In this case, all movements will be invisible.
Read about the interiors of a wooden house and methods of interior decoration in the article “Design of a wooden house inside in photos and videos”
Custom brutal design
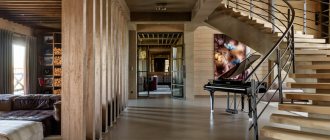
To create a truly non-standard interior, bold designers recommend highlighting all the flaws of the timber. Dark shades will add special charm to the design. However, do not overdo it, otherwise the room will look gloomy. Unprocessed hand-cut logs with a superbly painted texture are suitable for these purposes. The texture is painted with water-based paints. The result is a log house in a brutal rustic style.
A feature of the house will be a Russian stove made of untreated stone. You can complement the interior with a table and chairs made of the same rough wood. All textiles (chair covers, curtains, blankets) are designed in cool colors. Folk ornaments and soft carpets in a rustic style are welcome. To play with contrasting textures, add an antique leather chair. An unexpectedly bright terracotta spot in the form of a sofa blanket can refresh the interior.
In such a wooden house you should not strive for an ideal surface. But there is no need to be deceived. Any carelessness added to modern design requires strict calculation, as well as scrupulous selection of colors. It will take a lot of time to experiment, since each type of timber requires its own tone and finishing application technique. Before you create such a rustic interior, you should practice on scraps to choose colors. Plus, you need to do the same procedure on another piece of wood to consolidate the skill. And only then start decorating the inside of the house to get the design as in the photo.
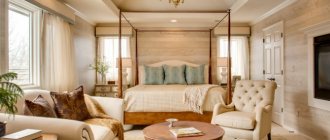
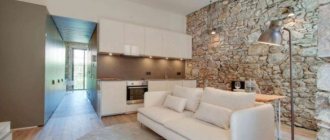
As for what the interior of a bedroom inside a wooden house should be like, it certainly seems cozy and intimate. Everything in this room should set you up for relaxation. As a rule, in a house made of timber, these rooms are decorated in light pastel shades. And only the details help to place a couple of color accents. A whitewashed log house and contrasting dark furniture may predominate here.
Wooden house bedroom design
Russian hut as an interior style for a wooden house
If you decorate the interior of wooden houses with a massive fireplace and an abundance of antique objects, it will turn into a Russian hut, as you can see in the photo.
The Russian hut is an abundance of ancient objects. Pots, large ornaments, scarves, towels, a large massive fireplace. Windows must certainly be wooden. It is better to exclude plastic ones. Furniture is made of unpolished wood, preferably artificially aged. All pots, cabinets and shelves are carved. The dining table is massive, large, and next to it there are long benches. You can put strong wooden simple chairs. Beds with carved headboards, chests instead of bedside tables and wardrobes. The sofa is upholstered in natural colored linen. It is better to buy lamps in the form of lamps and candles. Decorate the walls with embroidered panels, embroidered bags with spices and herbs.
Solid furniture, not polished or painted, would look ideal in the kitchen. Let the kitchen set have rough wooden facades, perhaps carved or decorated with paintings with folk motifs.
Eliminate glossy facades, all reflective surfaces, suspended ceilings, aluminum frames and glass inserts. Order built-in equipment. In order not to negate the whole impression, install it in antique furniture. Do not buy any plastic, metal or glass items.
For decoration, buy wicker baskets, a samovar, barrels, wood products from craftsmen, and pottery. You can hang a wooden wheel on the wall. There should be round home-woven rugs on the floor. Fishing gear, a spinning wheel and an antique foot-operated sewing machine will not be out of place in this house. Embroidered linen fabrics will also look great.
Design of a wooden house in the style of a Russian hut
Design of a wooden house in the style of a Russian hut
Cladding inside the house
Lining is a leader among finishing materials. It is used both inside and outside the house, only with different treatments (impregnations and paints are used for external or internal work). It comes in different types. It's not just about different types of wood or different board widths. There are also different profiles: smooth, wavy, imitating timber or log house. There are several options in the photo below.
The most popular types of lining for interior decoration of a wooden house inside
The interior decoration of a wooden house can also be made from lining with a non-standard profile
To decorate the inside of the house, use thin lining: 1.5-2 cm is enough. It costs less and will perform its functions. The slats can be placed horizontally, vertically, or at an angle. From combinations of all these directions you can get amazingly beautiful panels, but this is a labor-intensive task.
When nailing the sheathing or planks, you need to remember about the shrinkage of the log house and the ability of the wood to swell and shrink. Near the floor and ceiling, do not nail the trim and sheathing tightly; leave 2-4 cm to compensate for these expansions.
Both the walls and the ceiling are finished with lining. In both cases it looks more than decent, and such finishing is relatively inexpensive. It’s cheaper (and easier to do) to just cover it with plywood and stick wallpaper. This, by the way, is a popular option for decorating a country house inside an economy class home. With a sufficient level of execution, this method can be used to decorate premises not only in the dacha version. The only objection is the glue that is used to make plywood. But if you take it in emission class I (approved for use in children's institutions), then probably nothing terrible will happen.
Read how and with what to paint lining indoors here.
Mounting methods
Previously, they were not particularly worried and nailed the lining into the face (into the front surface) right through. At best, they used nails without heads or finishing nails (their heads are very small). Sometimes the caps were covered with wood putty and sanded, sometimes the screw holes were covered with pins. This is for the most fastidious and demanding of quality finishes.
Ways to fasten the lining
Today, even this method is considered not the most aesthetic: the traces can still be seen. To make sure nothing is visible, secret methods are used:
- nails or screws are driven at an angle into a tenon or groove;
- using clamps (clasps).
Both of these methods require patience and accuracy: thin, small nails are used, and they must be nailed in such a way as not to damage the front surface. To make it easier, you can hit not with nails, but with staples from a construction stapler. Staples are taken with a narrow back and long legs, made of stainless steel with sharpening. Although there are models of staplers that “shoot” nails with a very small head. For fastening the lining - just right. Self-tapping screws are also used. A comparison of the two methods is made in the video.
There is one caveat. If you bought the lining that was not chamber dried (its humidity is 7-8%), it will gradually dry out. Gaps will appear between the planks and you will either have to put up with them or re-nail all the planks. Sometimes two or three times. There is no way to avoid this. You can only choose a profile in which the cracks will be invisible (the “Softline” and “Standard” profiles in the figure in the previous section). In this regard, you need to think carefully about how best to secure the lining for the first time: it will have to be removed. Therefore, it is advisable to make it so that it is not difficult and so that it does not collapse. Here everyone decides for themselves: for some it is more convenient to work with self-tapping screws, for others with nails. Both methods are not ideal (it is difficult to pull out nails, and you need to drill a hole under the head of the screw), but both are acceptable.
Sometimes it becomes necessary to connect the lining to a wall made of logs. Difficulty may arise due to the fact that the wall has a non-linear shape. You can outline it using a small piece of lining, to which a simple pencil is attached. Having placed the plank and moving it along the wall with a piece of clapboard with a pencil, transfer the shape of the log onto the plank. By carefully cutting along the intended line, you can achieve an almost perfect match.
You might be interested in reading about how to lay laminate flooring.
Installation technology
If you decide to line the walls with MDF panels, you should choose an algorithm for carrying out the work.
Installation can be carried out using glue or on a frame made of metal or wood. This type of finishing can also be made in an antique style, everything will depend on the texture of the products. At the first stage, marking is performed. By choosing wooden lathing, you get the benefits of easy installation and environmental friendliness of the material. Installation begins with corner vertical slats. They are placed in pairs to form an angle. The parts are attached horizontally using the same algorithm. Window and door openings deserve special attention. The slats are installed along the perimeter without taking into account whether there is a step mark on them.
The wood finish is installed from the corner. It is necessary to saw off the ridge of the panel, attaching the next one to this element using a lock. The cladding is fixed with small nails. Under the set, if we are talking about kitchen walls, MDF panels are not installed. The gaps formed between the floor and the wall are closed with corners or decorative skirting boards, which can be installed with glue.
When installing wood-look MDF panels, you can additionally insulate the walls with sheet materials or polyurethane foam. If pipes are located behind the cladding, the height of the profile is calculated taking into account the thickness and margin.
Wall panels for interior decoration
Decorating the inside of a wooden house with wall panels gives a completely different stylistic result. This finishing material is made from different materials with different textures:
- wood;
- bamboo;
- MDF (laminated and veneered);
- glass (smooth with photo printing, embossed, colored, transparent, matte);
- plastics and plastics;
- skin.
They come in typesetting or panel form. Stacked - long thin elements connected to each other according to the tongue-and-groove principle. Lining is essentially also wall panels. It’s just that it has long been used as an independent category of finishing materials. Panel wall panels differ in geometry - they have comparable length and width.
Everything is usually assembled onto a sheathing (like lining), the bars of which are filled taking into account the dimensions of the chosen finish. This material is loved by designers: the materials, texture and color solutions allow you to realize a variety of ideas. Such interior decoration of a wooden house can be very expensive - made of leather - or cheap - MDF panels. But the appearance is quite decent.
If, according to the technology, wall panels must be laid with glue (gypsum, for example), then backing boards - plywood, gypsum fiber board, etc. - are attached to the sheathing (you remember that in a wooden house it needs to be made floating). The slabs are installed on this substrate with glue. An example is shown in the video.
Read about the interior design features of a wooden house here.
We decorate the ceiling
As for the ceiling, its option also largely depends on the overall style of the room. In some interiors it is even left in its original form, because the sloping slope brings a certain charm to the room. The wood is treated with antiseptics, covered with stain and varnish, preserving the natural beauty of the finish.
Like the walls, the ceiling can be lined with wooden clapboard or covered with plasterboard sheets, which are then subject to decoration (painting, wallpapering, painting).
An original and fashionable solution can be called coffered ceilings. This unique design is based on the arrangement of many rectangular-shaped recesses by connecting transverse and longitudinal beams, with decoration with various decorative rosettes, cornices, and caisson cells, which together form a spectacular decor.
How to sheathe the inside of a wooden house with plasterboard
The technology for working in a house made of wood or another material is no different: the frame is assembled, and drywall is attached to it. Only, as in the case of sheathing for lining, you need to leave gaps near the floor and ceiling. The only condition: this type of interior finishing of a wooden house is possible only after complete shrinkage (at least several years must pass and the house must be heated). Gypsum is a fragile material and with significant changes it will simply tear. The only option that will allow you to ignore them to some extent is to make a floating frame, attaching the profiles to the walls not rigidly, but leaving freedom of movement. Then the frame will settle on its own, and the drywall will remain in place.
Using what and how to make a floating sheathing for fastening hard finishing materials (plasterboard, base for ceramic tiles, etc.), see the video.
Another feature of finishing a wooden house with plasterboard: all joints, seams and corners must be glued with a polymer reinforcing mesh. It will prevent the formation of cracks in the most problematic areas (or slow down their formation). If you need to line a house made of timber with plasterboard inside, but you really don’t want to lose precious centimeters of space due to the installation of profiles, you can do it as in the next video. There are some good tips.
The interior layout of a country house is described here.
2 Designing a booth - how to calculate the dimensions?
To correctly calculate the size of a booth for an adult German Shepherd, you need to take into account the standard dimensions of a male dog of this popular breed. In most cases, its length from tail to nose does not exceed 75 cm. That is, the length of the housing itself should be 10–20% greater. The width of the dwelling should be approximately equal to its height. To do this, take the height of the withers of an adult male and add another 15% to it. Most often, with a dog length of 75 cm, its height is no more than 70 cm. The size of the hole must also be taken into account in the diagram. It can be done flush with the ground surface.
When calculating the size of the booth, you need to know the standard dimensions of an adult dog
If desired, the hole can be made a little higher, but as a result the water will come out of the booth more slowly. The dimensions of this part of the Alabai booth should be equal to the height of the dog’s withers minus 5%. The width of the hole must be calculated based on the parameters of the pet’s sternum. Here, each representative of the breed has its own dimensions, so you need to measure the width of your dog’s chest right on the spot. If your pet is still small, then add another 10 cm to the size. When making a drawing of the booth, take into account the amount of material consumed and the installation features of the home. All this is necessary to ensure that there are no protruding nails or drafts in the booth.
Features of the interior decoration of an old wooden house
If a house made of timber or logs has stood for several decades, first of all you need to assess the condition of the wood. To do this, remove all the trim and “pick” at all suspicious spots - darker or lighter in color, different in structure or texture. This can be done with a screwdriver, chisel, even a knife. If the wood is dense throughout, there are no signs of destruction, everything is fine, you can begin finishing. You may need to first impregnate walls and other structures with a protective impregnation to protect the wood for several more decades. But not all owners of wooden houses agree to chemical treatment, so it’s up to you to decide.
If the wood crumbles due to your efforts, you need specialist advice. It is necessary to determine what caused the damage - insects, fungi or microorganisms - and what measures need to be taken. Then the damaged pieces or elements are replaced, paying special attention to treating the adjacent areas with antiseptics and protective impregnations.
After assessing or “treating” the wood, you can begin to update its appearance. The interior decoration of an old wooden house is no different from those described above. The only reason is that shrinkage is not worth taking into account: there is no longer any significant progress. So from this side everything is somewhat simpler.
Material characteristics
A house can be sheathed using the variety of materials available.
A log house can be sheathed using the following products:
- lining;
- drywall;
- block house;
- PVC panel;
- MDF panel;
- wood material: OSB, chipboard or plywood.
Now let’s look at each cladding material in more detail.
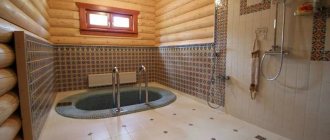
Using lining
The lining consists of simple boards with built-in special grooves, due to which the wood fits tightly together
The lining consists of simple boards with built-in special grooves, due to which the wood fits tightly together. The photo shows the floor and walls finished with clapboard
The disadvantage of using lining is that it is stereotyped; such an internal design looks good, but it is unlikely to be possible to give some individuality to the premises. The advantages of lining include:
- huge selection of wood species;
- various types of product processing;
- environmental friendliness of the material;
- pleasant aroma inside the house.
Using a block house
If you like rounded logs, a block house will be an ideal option
If you like rounded logs, but you don’t know how to cover the inside of a house made of timber, a block house would be an ideal option. This material is widely used in the decoration of cottages; wood can not only decorate a room, but also provide maximum comfort and coziness. Among the advantages of this material it is worth noting:
- high environmental friendliness, products are made from natural types of wood that undergo special drying;
- mechanical strength allows the product not to lose its appearance and positive characteristics;
- has an aesthetic appearance and can decorate any home;
- easy way to attach.
The disadvantages include:
- low vapor permeability;
- high flammability of the material.
Block house looks great inside a wooden house
Using drywall
Recently, plasterboard is often used to decorate wooden buildings.
Recently, plasterboard is often used to decorate wooden buildings. However, experts do not recommend using gypsum, because... it has a number of disadvantages. If you carry out interior work immediately after building a house, drywall may crack or become deformed during shrinkage. It is also worth noting that after attaching the gypsum sheets, they must be plastered and painted. The joints are sealed, which makes the space in the house clogged.
PVC panel
If you want to save money, but don’t know how to cover the inside of a timber house, a plastic panel is the most economical option
If you want to save money, but don’t know how to cover the inside of a timber house, a plastic panel is the most economical option. The advantages include:
- ease of installation;
- high resistance to moisture;
- large selection of panel color palettes.
The disadvantages of the material include:
- low environmental friendliness;
- the panels are not capable of passing steam and air;
- When ignited, they quickly melt and release dangerous and harmful substances to human health.
According to reviews from home owners, the main area of application for plastic panels is non-residential or utility premises.
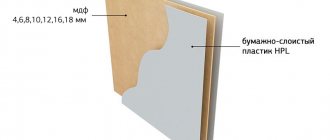
Using MDF panels
MDF panels are made from a more environmentally friendly material than plastic
MDF panels are made from a more environmentally friendly material than plastic. The surface of the product is quite smooth and does not require complex finishing. The panels can be fastened either directly to the wall or using a frame. Manufacturers produce MDF panels of various designs, colors and textures, with their help you can decorate any room in the house.
It is worth noting that the MDF panel can additionally insulate and soundproof the walls.
Interesting colors can make rooms unique and stylish. The photo shows a room covered with MDF
Use of wood material
All products made from wood material (OSB, plywood and chipboard) are used for rough work, but they are practically not used for final finishing work.
All products made from wood material (OSB, plywood and chipboard) are used to perform rough work, but they are practically not used for final finishing work. In addition, during the production process, wood products are treated with special adhesives and impregnations, which evaporate and negatively affect human health.
Choose wisely
Jute or linen fabric. When purchasing, look for insulation made from primary natural fibers of jute and flax. “Which fabric is considered natural? The one that is obtained after primary processing of plants and without third-party additives.”
We noticed that the fibers are very short or contain thread trimmings of a different color - a product made from recycled materials (usually recycled sack containers or rags). Don’t be shy to ask for a certificate, which should indicate the raw materials, the presence of impurities and additives, and most importantly, their proportions (in %).
For information: all jute and linen fabrics are produced using the same technology, which, by and large, has not changed for the last hundred years. Equipment and costs are also comparable. Therefore, a reduction in the price of finished products is possible due to low-quality raw materials (for example, recycled) or due to a decrease in the total mass of raw materials (this means lower density, strength and durability). This will affect the quality parameters of the insulation, and therefore the comfort of life in the future home.
“When there are several options for purchasing jute or linen, do not try to buy cheaper. A low price is usually a sign of unnaturalness or low quality.”
Moss. Moss insulation is perhaps the oldest. The ancestors noticed that, unlike tow, birds do not pluck it for nests. In addition, it is a natural antiseptic, “not friendly” with fungus, does not rot, and rodents and insects do not revere it. But there are three "Don'ts".
- Not all moss is applicable. Preference is given to long-fiber flax (red flax, cuckoo flax, sphagnum).
- Not all builders know how to lay correctly. It is better to attract those who work with him constantly.
- Fragility. Moss dries out over time, turning into dust of little use.
The qualifications of the hewer are of great importance
If a worker who undertakes to build a log house does not handle the hatchet skillfully, gaps on the paw are inevitable and the assembly of the corners itself will have negative consequences. After some time, the tree will dry out, the house will shrink and warp, or even...
The only budget option is to notice in time, insert wedges (cut from wood of the same species) and caulk the cracked areas. This does not guarantee a beautiful exterior, but it will help resist drafts and dampness.
Cutting corners with a chainsaw
“Modern technology” of chopping with the paw. Very often, today's “masters” cut their paws with a chainsaw. And here there is a negative point that not many people know about. The saw cuts off the densest “old” wood on four sides. What remains is the core, which is always looser and therefore less durable.
The result is that the log sections going into the paw lock are open to the atmosphere and are subject to faster rotting. Conclusion: when choosing an ax or a saw, choose an ax. But it’s much more difficult to do the job with this “flying” tool; it will take a long time to get used to it... A chainsaw is without a doubt easier and faster.
Let's move on to the topic of how to insulate a log house, or more precisely, its corners. Without delving into the physics of the processes, I’ll say right away that proper insulation is always done from the outside, that is, from the outside. Moreover, it doesn’t matter what the house is built from (wood, brick, types of concrete, etc.). Any experienced heating engineer will confirm this. Let's move on to reviewing the materials.
Traditional - jute or linen, tow, moss. What to choose? Canvas based on jute or flax in the form of a twisted ribbon began to be used relatively recently. It is easy to install, and its twisted structure ensures strength. In addition, the seam looks aesthetically pleasing.
Application of dowels
If wooden dowels are used in the construction of timber buildings, it is important to make them from the same type of wood as the timber itself. It happens that for greater reliability, the timber is tightened with metal dowels
In this case, such a solution will be significantly more expensive, which may affect the overall cost of construction
It happens that for greater reliability, the timber is tightened with metal dowels. In this case, such a solution will be significantly more expensive, which may affect the overall cost of construction.
Installation of dowels occurs by analogy with brickwork. A hole several centimeters in diameter is drilled for the pins so that they can be inserted without effort. The installation of dowels should be done at a distance of one and a half meters from each other.
What happens if you don't close the corners
If you ignore the stage of insulating the corners of the log house, in addition to the lack of comfort during your stay, there is guaranteed to be a distortion of the shape of the structure, which will become askew over time, dampness and elements of rotting wood will appear. What happens if you don't close the corners from the outside? External insulation allows you to more effectively maintain comfort in the house compared to internal insulation, and therefore is more important. If you cut a corner of logs or beams without sufficient experience, then there is a high probability of defects appearing after construction, in particular large gaps during shrinkage. The situation is corrected with the help of wedges. They are cut from the same type of wood as the log house. Mistakes when sealing corners will also lead to serious problems. For external insulation, you cannot use polyurethane foam, which will accumulate moisture over time and cause dampness in the wood. When choosing sealants, you should not use silicone or acrylic types due to the high likelihood of peeling or cracking. You should pay close attention to the internal and especially external corners, since they become the paths for cold penetration if the insulation is improper.
Insulation of a wooden house using Warm seam technology
Our website presents a number of log house projects, for example: Or you can see all prices for log houses. You can calculate the house or bathhouse you need with maximum accuracy using our log house cost calculator. To order and buy a log house, call:
Comments
No comments yet.
Electrical and communications
Options for the location of utility networks are chosen based on the architectural design and interior solutions. All the nuances are thought out long before the start of construction - even at the design stage. It is important to foresee in advance how you will maintain electrical and water supply networks and plan access points to nodes. For example, it is better to lay electrical wiring in a semi-closed way, in which most of the wires are pulled under the baseboard, trim and other interior elements. This will allow you to easily reach the desired area at any time.
Wiring can also be laid in a completely open way, using wires without overall insulation: this is a safe option for electrical wiring that looks very impressive in the interior. Hidden wiring is performed during the assembly stage of the house kit. Channels are drilled inside the timber into which the cable enclosed in steel pipes is laid. After laying closed electrical wiring, the gating areas are sealed flush with the surface of the walls and become invisible, so the walls can be left unfinished if desired.
Heating and water pipes are laid as close to the floor as possible. Here it is also important to provide access to nodes and arrange places for passage through walls.
To insulate or not?
Scheme for installing siding on the sheathing.
- In the summer, the siding will begin to absorb all the sunlight, and an air cushion will appear between the log house and the cladding, which will be well ventilated. The house will be cool and comfortable.
- In winter, if this is a country house where you visit only once a week, insulation is probably not advisable. And even if you permanently live in a house, but it is heated with network gas, the effect of insulation will be insignificant, and the costs will be considerable. Moreover, if you use mineral wool as insulation, then over time it will begin to deteriorate, and the smallest particles will enter the house through the cracks in the logs. Mineral wool contains phenols, which do not add health to the body.
If the log house is assembled “in a paw”, then it is necessary to insulate the corners of the house.