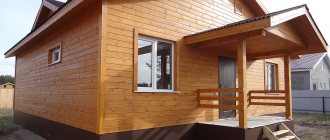
The residential building, made of rounded logs, looks very natural and has a special charm. When choosing this construction option, it is usually assumed that the interior decoration of houses made of rounded logs will be minimal. Noble wood does not require any special decorations, and therefore, when decorating the inside of this type of country house, owners should choose mainly natural, environmentally friendly materials, avoiding modern “synthetics”. Enhancing the attractiveness of wood trim is the most important thing you need to do.
It is best to start finishing no earlier than 12 months from the date of completion of the construction of the log house - during this time the main shrinkage of the house will occur.
Finishing a house from rounded logs is a responsible and multi-stage process. It is extremely important to decide from the very beginning what you want the interiors of your country home to look like in the end. It is hardly worth decorating the premises in a log house using a huge number of non-wooden structures - wooden buildings are erected primarily in order to subsequently enjoy a special microclimate and be closer to nature. This means that our attention should be directed, first of all, to finishing materials made specifically from natural wood.
Activities for arranging the interiors of a log house can be divided into several stages. It is important to follow the specified sequence of actions in order to carry out all the necessary work in the shortest possible time and avoid possible problems.
Features of interior decoration of a wooden house
Wood is a special building material. Its value lies in its ability to naturally “self-regulate” the room microclimate due to two factors:
- gas permeability of wood - breathing properties (air exchange between indoors and outdoors);
- absorbing excess moisture when air humidity is high, and releasing it back when humidity is low.
When choosing materials and technologies for interior finishing of a log house, you must try to preserve these advantages as much as possible. Otherwise, there will be a need to arrange complex supply and exhaust ventilation with recovery and air humidification/dehumidification. And such systems of “artificial” microclimate regulation are expensive.
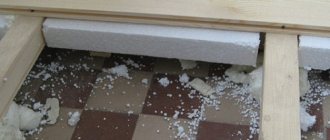
But besides its advantages, wood also has disadvantages. The peculiarity of wooden structures is that they practically do not change their size when temperature fluctuates, but they react “sharply” to changes in humidity. For other building and finishing materials, everything is exactly the opposite. And if there is a need to decorate wooden walls and floors with stone or ceramic tiles, special technologies must be used.
Ceramic tiles in the bathroom of a log house Source uk.aviarydecor.com
Moreover, this does not depend on the nature of the room - be it rooms with a wet regime (kitchen, bathroom, toilet, home pool) or a fireplace area in the living room.
And a completely separate topic is internal electrical networks. Compared to brick and stone buildings, wooden houses have very stringent PUE requirements. Wiring or cables must be laid either in an open way (using additional insulating elements) or in a closed way, but in metal pipes and boxes.
What do you need?
As a rule, finishing work is carried out after installation of communication and wiring systems. When finishing, preliminary preparation of the floors is important. In the first year after construction, it is necessary to ensure tightness of the joints. You need to take care of laying waterproofing.
Before you decorate the walls, ceiling and floor, you need to take care of insulating your home. This will reduce heat loss, which will be especially noticeable in the cold season
It is important to use fire-resistant and environmentally friendly materials. When closed, they will prevent the spread of open flames
The absence of harmful components in the composition will eliminate the release of toxins during the operation of the finish.
Thanks to them, you can level the height of the ceilings and hide the electricity and water supply inside. They will also allow you to lay insulation. Only after the window and door openings have been completed should we begin interior decoration.
Since wood can support combustion, light sources are selected that are safe
It is important to choose the right finishing material so that it does not melt from the heating of lamps and other lighting. For ceilings and walls, they try to purchase options with a minimum gap between the frame system and the enclosing ceiling
This will save valuable centimeters of usable space.
Indoors you must:
- properly plan every corner of the space;
- choose different finishes to suit the desired style;
- prepare each base for finishing;
- zone the space of each room into separate functional zones;
- use contrast in decoration;
- select the desired background color;
- add light spots to the interior;
- choose a finish that is compatible with any type of lighting;
- choose coatings with different textures;
- use durable materials;
- choose an easy-to-maintain finish.
It is necessary to think over the ventilation system, otherwise the materials used for interior decoration will deteriorate at double the speed. At the same time, condensation or even mold may form on their surface.
When to start
Unlike laminated veneer lumber or kiln-dried timber, before starting the interior decoration of a log house, you need to wait long enough for the main stage of drying to take place:
- for rounded logs at least six months;
- for ordinary - at least a year.
Note! Many people confuse shrinkage with shrinkage. Shrinkage is a change in the size of a structure due to a decrease in the intrinsic moisture content of the materials. Shrinkage is the “subsidence” of the soil under load. All materials dry out, even concrete, but this process is critical only for wood with natural moisture. In the same way, all buildings are subject to shrinkage, but wooden houses are lighter than stone ones, and it practically does not affect them. Especially after six months or a year of shrinkage.
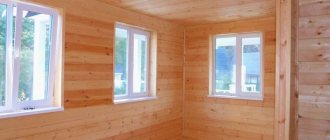
Before finishing work begins, the walls just need to stand for some time. Source cocinandote.com
The end of drying is not the only condition for starting finishing work. Moreover, physically this process does not end after the specified time, but only the active phase ends.
During the pause period, you need to caulk the walls twice:
- the first time within a month after the construction of the walls;
- the second time two to three months before the completion of house shrinkage.
The insulation of the seams is carried out for each crown alternately from the inside and outside, moving from bottom to top. After caulking is completed, the logs will move slightly apart, so you need to give them time to fall back. And only after the walls stop settling, and the crown seal completely blocks their “blowing”, can you begin finishing the house.
See also: Catalog of log house projects from construction companies
Surface preparation and vapor barrier
Preparatory activities are associated mainly with the treatment of wooden surfaces using special protective emulsions. They will prevent the appearance and development of fungi, insect pests, etc. Such procedures are mandatory because after finishing work carried out on the outside of the building, the wood becomes inaccessible - and, accordingly, various negative processes can begin here.
The vapor barrier layer for a wooden house can be either a special vapor barrier, or polyethylene film, aluminum foil, or, for example, bitumen roofing felt. Polyethylene film is used more often than other options because it is affordable and highly effective in solving all necessary problems. Initially, to install a vapor barrier in a house, holes with a diameter of about 20 cm are made for ventilation. Next, the vapor barrier is fixed to the frame. Then the joints need to be glued using special tape.
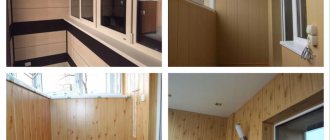
Options for interior finishing of a log house
Typically, the variety of materials and technologies for interior decoration of a log house concerns the walls. The floor and ceiling, with the exception of service areas, are finished with wood - only the types of coverings differ.
Wood is predominantly used for finishing the floor and ceiling Source m.2gis.ru
What are the options for finishing log walls :
- Do not use any wall panels. And the surface of the logs is covered with oil, varnish, transparent or translucent wood paint. This is why they choose a log as a building material in order to get aesthetic pleasure from a classic log house. This method is most often used when building a house from rounded logs, which requires minimal modification for such a finish.
- Wall decoration with clapboard, imitation timber and block house. The first two types align the profile of the walls, making it more modern and familiar. The block house fully preserves the decorative qualities of the house's interior. The advantages of cladding are the possibility of hidden installation of all internal communications, improvement of the heat and sound insulation characteristics of the enclosing surfaces. This option can also be considered as an opportunity to restore old log houses, the walls of which have darkened and cracked.
- Plasterboard covering for finishing with wallpaper, decorative plaster, for painting and tiling.
See also: Catalog of companies that specialize in finishing and insulating houses
HAVE QUESTIONS? WE WILL HELP!
If you have any questions
about our projects, technologies and capabilities,
call right now on multi-channel numbers:
8 (800) 333-91-91 (free from mobile)
8.
Send us a request
PYZHOV VYACHESLAV Construction Director
Kadrova Ekaterina Architect
Stages of finishing work
First, it is necessary to carry out the preparatory stage.
Preparation for finishing may include sanding of logs Source color-kostroma.ru
Preparing for decoration in a new house
Clean surfaces from dust and dirt and treat them with antiseptics.
Utility lines are installed:
- water and sewer pipes - to the connection points for plumbing fixtures in bathrooms and toilets, to the kitchen sink and washing machine;
- electrical cables and wires - to the installation sites of lamps, switches, sockets and stationary consumers (kitchen and air conditioning equipment, boiler, boiler, heated floors);
- heating pipes - to radiators or convectors;
- gas pipes - to the furnace, boiler, boiler (if the village is connected to a natural gas main or there is a gas holder for liquefied gas);
- air ducts - to the kitchen hood, ducted air conditioner (if available), convection oven (if an air heating system is used).
Note! If open wiring of electrical communications to points of consumption is carried out, then the cables are pulled between the floor joists or along the ceiling, and laying along the wall is carried out after finishing. The same algorithm of actions is used for other networks.
Preparing for finishing in an old house
Clean surfaces from old finishes. If necessary, caulk the walls. They let the house “settle.” Remove dust and dirt and treat with an antiseptic.
Wall treatment is one of the mandatory operations Source ultra-term.ru
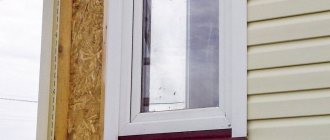
Cutting out openings
When forming window or door openings, the integrity of the prefabricated structure is compromised. In the process of shrinking the house, significant pressure from the upper layers is exerted on the cut logs that are located in the areas of windows and doors. Over time, they can bend into an arc, and straightening them will be quite difficult.
To prevent such an incident from happening, the openings must be secured with additional boards, timber or beams during shrinkage. There are 3 options for forming openings:
Cutting down a shrunken integral structure .
It is considered ideal, but expensive and problematic from the point of view of getting into a person’s home. In addition, the entire frame of windows and doors is poorly ventilated and may become covered with fungus during shrinkage- Securing cut-out openings using bars inserted into grooves cut in the openings. The second option is considered a rough opening. Window frames or frames are not inserted into it until the house has completely settled.
- Creating a finishing opening from lamellas . And the third option is, in fact, creating a finished window or door frame from boards in a groove or tenon.
The doorway can be secured by creating a U-shaped box that will hold the logs until they shrink completely. But here it is impossible to say for sure whether cracks will form after this or not. Such a box can lift the logs resting on it during the process of subsidence.
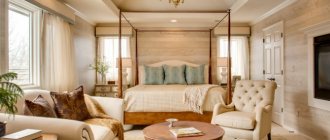
Interior design tips
There are no clear recommendations when interpreting the characteristics of an interior style for a wooden house. Many people prefer a mixture of “neighboring” or even different design directions. Moreover, this equally applies to finishing materials, color schemes, furniture, textiles and decorative accessories. For such a mixture they even came up with their own name “fusion”. And many professional designers and their clients, using this technique, develop their own “individual” style.
Thickness
On average, for a room designed for year-round use, a material thickness of 220-300 mm is chosen . Additional insulation adds a few more millimeters to the detriment of living space.
However, since wood itself has low thermal conductivity, a spruce frame with a wall thickness of up to 22 cm is equivalent in heat retention to a wall made of clay brick 84 cm thick, silicate brick more than 1 m thick, and a wall made of expanded clay concrete 55 cm thick.
Video description
How engineering communications look in the interior, see the following video:
But most interiors of log country houses still have the features of “dedicated” areas of rustic style in decoration:
- Russian . The interior decoration is made exclusively of wood, fully preserving the aesthetics of a log house.
- Country . The same rustic style, but in an “American” design, when the walls are covered with boards, clapboard or imitation timber.
- Rustic . Characterized by a “rough” surface finish of walls, floors and ceilings. These can be untreated logs or boards. But there are also elite finishing options with clapboard and parquet boards with a brushed surface (often such materials are described in catalogs as “vintage” or “aged”).
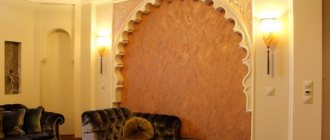
- Provence . "French country" style, in which the logs are clad and painted in pastel colors. Combined finishing is often used - a combination of plastered and painted walls.
- Chalet . This house is in the style of a rustic Swiss shepherd's hut, combining wood with raw natural stone finishes.
Color solutions
For the interior decoration of a modern cottage, the most natural color scheme is preferred. The favorites should be:
1. Beige.
2. Gray.
3. White.
4. Brown.
5. Green.
For the interior decoration of a country house, natural colors are preferred.
You can dilute the tranquility of the main background with juicy berry shades and splashes of turquoise. Monochrome black and white decors have not lost their relevance, the contrast of which is emphasized with any bright color:
- blue;
- wine;
- lilac, etc.
Bright furniture will dilute the neutral colors of the finish
Disassembly
Such work may be required in the case of complete demolition of an old house, transportation of a good log house to another location, or when reconstructing certain sectors of the building. If there is enough space on the site and other buildings do not interfere, then you can invite special equipment, a manipulator, who will dismantle the house in a few hours and take away all the garbage .
If this is not possible, then the house will have to be dismantled manually. You immediately need to determine the places where to store garbage and good material that will be used in the future. Analysis of the structure begins with the roof, removing the ceilings and rafter system. The work must involve at least 3 people capable of lifting and carrying logs.
Before starting work, you may need a certificate from the BTI about the demolition of the house and the closure of communications, which is carried out by special services. It is at this stage that large time delays occur.
Before dismantling the walls, it is necessary to remove the doors and window frames. If the house is old, it is imperative to identify critical, rotten areas that may collapse during dismantling.
You need to immediately remove nails from the boards so as not to accidentally step on a lying log with a nail. The most important thing in dismantling walls made of logs is compliance with safety precautions.
There is even more information about disassembly in this article.
How much wood does it take to build?
On the Internet you can find special calculation algorithms on sites like this calculator, which will help you calculate, based on the length, width, height of walls and logs, the required cubic capacity, the number of logs and their approximate cost. You can do this yourself as follows.
Initial data:
- length, width, height of the wall;
- number of walls, including interior walls;
- diameter and length of the log.
First you need to calculate the area of the walls. To do this, multiply the length by the width of each wall, then add the results obtained. This indicator is needed to calculate 1 crown around the circumference of the house, including interior floors.
Next you need to find out the number of logs that will be required in height. To do this, the working length of the wall is calculated. If the diameter of the log is 300 mm, you need to subtract a few cm from it, which will go to the inter-crown groove, this is approximately 3 cm. That is, each log will be 270 mm in length. We multiply this by the required meters in height. Thus, you will be able to find out the number of logs needed for the log house.
Then multiply the number of crowns by the total length around the circumference of the entire house, including interior walls. This is how the total length of all crowns is calculated. This figure must be divided by the length of 1 commercially available log. The cubic capacity of logs is determined according to a special table for calculating round timber.
Learn more about calculating the amount of material here.
Life time
With proper care and regular diagnostics, a log house can last 100 years or more .
History is full of architectural monuments of Russian architecture that are several centuries old. But this is provided that the house is regularly treated with antiseptics and checked for rot, fungus and insects.
If the house is not taken care of, moisture and microorganisms can destroy the log house in 2-3 decades, and if white house fungus grows on the logs, the log will be eaten in a few months.
Full article on the lifespan of log walls here.