Published: , Category: Articles
Since wood has many advantages over other building materials, many people continue to use it to build their homes today.
But it should be understood that a wooden house must be equipped in a special way. For example, there are some serious differences in the process of laying the floor. In a wooden house, the floors are usually made of wood.
How to make a subfloor
Only the principles of their creation can vary greatly.
Much is determined by whether the house has a basement. If it is missing, the floor can be laid directly on the ground. But before this, support columns are created, the material for which is made from the same wood, brick or concrete.
The holes into which the pillars will sink are first filled with a cushion of sand and crushed stone.
There should be a distance of no more than 100 cm between adjacent posts. The most difficult thing is to accurately level the surfaces of the posts horizontally, since without this it will not be possible to achieve the evenness of the floor itself. Logs are mounted on the poles, which then act as supports for the wooden flooring.
Another option is to install a floor in a wooden house with a basement. In this case, you can increase the distance between the pillars. But it will not be possible to do without the use of auxiliary concrete and metal jumpers. If you cannot find such ones, then you can fasten the boards to each other in such a way as to create a structure with an I-section.
It is quite durable. Whatever option is implemented, it is necessary to remember that before installing the logs on the pillars, it is necessary to lay roofing material. It will serve as a waterproofing material. It is important when both wood and metal are used to make poles. After all, both of these materials deteriorate from water.
In principle, installing a subfloor in a wooden house is no different from installing a subfloor in brick or monolithic houses. The main difference is in the fastening of logs (or beams) to walls made of timber or logs.
Beam arrangement
If foundation repair begins with laying beams, first of all, it is necessary to determine the degree of load created on the floor
. Beams are supporting elements that are laid in the foundation of the structure during the construction stage. Some private house projects do not provide for laying beams. In this case, the repair of the rough foundation begins with the arrangement of brick pillars - supports on which the logs will subsequently be attached. In both cases, the difference lies only in the method of installing the supports; all subsequent stages of work are identical.
If foundation repair begins with laying beams, first of all, it is necessary to determine the degree of load created on the floor. The following indicators will depend on this parameter:
- section (thickness) of beams;
- distance between bars;
- type of wood used.
It is worth noting that the cross-section of the material must be impressive to ensure sufficient rigidity of the coating. Most developers, when installing floors in modern buildings, choose logs with a cross-section of at least 150 by 150 mm. In this case, the maximum distance between the beams is 70-80 cm.
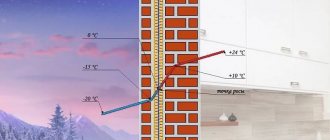
It is also necessary to take into account the fact that the installation of beams in brick and wooden houses occurs differently. In brick buildings, logs are tightly embedded in the wall, so even at the stage of building a house, special “nests” are made in the walls for laying logs.
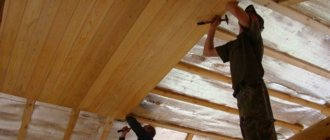
Attaching joists to the walls of a wooden house
It is advisable not to attach floor joists to the wooden walls of the house and not crash into them.
It is better to attach the logs to the grillage or base of the foundation with a distance of 2-3 cm from the walls. But at the same time, the distance of support on the foundation should be at least 10 cm on each side of the log. Before laying the logs, a lower frame of thin long boards is laid on the foundation, to which the logs are attached using metal corners (anchors).
There is no need to rigidly attach the logs to the frame: they just need to be fixed so as not to move when laying the remaining layers of the subfloor. The resulting structure will have a distance of 2-3 cm from the walls on each side, into which it is better to install thin insulation.
If the distance of support of the logs on the foundation is less than 10 cm, then it is better to cut into the walls of a wooden house. But for this, first of all, you need to lay the logs on the foundation, then attach a beam or log to them, mark the contours of the cutouts and cut grooves in the wood with a depth of missing support distance (plus 2 cm to expand the joists).
If you want the logs to completely pass through the walls of the house (for example, if the length of 1 log allows you to support 2 adjacent rooms), then you first need to lay them over the entire floor area of the first floor. But you need to cut into the outer load-bearing walls only halfway so as not to disrupt the appearance of the facade.
We remember that logs and beams are laid on a grillage or plinth only after a waterproofing layer.
The pitch (distance) between the logs depends on the load and the width of the insulation (although the insulation, if necessary, can be trimmed).
The traditional lag pitch is 40-60 cm. The cross-section of the lag depends on the load: light load - 15x10 cm, medium load - 15x15 cm, heavy load - 15x20 cm. If you have beams of small cross-section and the load is not light , then just place them at a distance of 30-40 cm.
Nuances of technology
The subfloor allows the use of decorative floor covering material that does not have self-supporting properties, rigidity and resistance to bending loads. The main difficulties arise with the installation of partitions and remote consoles.
Partitions and walls
To ensure the operational life of the partitions, their installation should be carried out along the floor beams. If an internal non-load-bearing wall passes between the beams, they must be reinforced with jumpers made of boards or bars according to the diagram below. In order for the subfloor wood to withstand the loads, the following conditions must be met:
- jumper spacing within 1.2 m;
- The minimum section of the bar is 40 x 90 mm.
Important! Jumpers are not needed if the partitions run perpendicular to the beams.
The internal main wall of a wooden cottage must rest on the lower wall or floor purlin. It can be shifted by 0.6 m in any direction relative to the support unit of the floor beam between floors and by 0.9 m in the attic.
Reinforcement under partitions.
Installation of a subfloor in a wooden house
After installing the joists, the standard installation of subfloor layers on the joists occurs, which we described in one of the previous articles. Briefly, the installation process is as follows:
Fastening the cranial bars. The cranial bars have a small cross-section (approximately 4x4 cm) and are attached to the side of the lag in the lower part. Instead of cranial bars, you can use boards 4 cm wider than the joist on each side, nailed to the joist from below and along it. Laying subfloor boards. The boards are laid on the cranial bars, but are not attached either to them or to the joists - they must lie freely , since they simply hold the insulation on themselves. Waterproofing. The waterproofing layer is laid on top of the joists and subfloor boards, hugging them. The waterproofing should extend onto the walls to the full height of the future floor.
It is better to use film waterproofing materials. The fastening between the films is done with a stapler. Thermal insulation. The insulation is laid on the waterproofing between the joists. If the height of the log allows, you can lay 2 layers of insulation. Vapor barrier. The vapor barrier layer is laid on all of the above and, like waterproofing, extends onto the walls to the remaining floor height.
The vapor barrier is attached to the joists using a stapler, and the film is glued together with tape. Ventilation. If the height of the laid insulation is equal to the height of the joist, counter battens are nailed on top of the vapor barrier along the joists to create a ventilation gap. Plank covering of the subfloor. These can be either boards or chipboard sheets , OSB. The plank floor, like the logs, should be 2 cm away from the walls. Insulation can be laid in the gap. Sound insulation. CSP boards are excellent for sound insulation.
Important! Logs, cranial bars and subfloor boards that are laid on them must be treated with an antiseptic (preferably 2 times with an interval of several hours). This will prevent damage to the wood by insects and fungi.
For a ventilated underground, you need to make several holes in the base or grillage (for example, one on each side of the house) and cover them with a fine mesh. If you have a lot of snow in winter, and its level is higher than the level of the mesh, you need to provide a pipe outlet along the wall.
The longevity and excellent aesthetic characteristics of the final floor covering are ensured by the subfloor in a wooden house, which is made using different methods.
Why is such a design needed, and what is it like?
A rough base is understood as a special structure necessary to form the most level area for the finishing floor covering. Its second task is to ensure uniform distribution of the load on the floor. The rough foundation can be arranged in two ways:
- Dry - logs are used. Wet - a leveling structure is created using a concrete screed.
Rough subfloor
Among other things, the subfloor in a wooden house is installed in order to increase the thermal insulation performance of the home. In wooden buildings, the wet method of arranging a leveling base is used very rarely.
Usually it is created using lag. In this case, the rough floor area is mounted on the base or on the floors (their function is performed by thick beams or reinforced concrete slabs). Next, we’ll talk about how to properly make a preliminary floor using wooden elements.
Gypsum fiber boards (GVL, GVLV)
This material, like no other, allows you to create an even base for a finished floor. It is laid in two layers with glue or with ready-made elements. Gypsum fiber board can be recommended for the method of leveling over expanded clay backfill or over sound and heat insulating boards. It is also suitable for leveling an existing old “sub-floor”: it is laid on top. However, insufficient strength to local loads (for example, from furniture legs) does not allow it to be used in combination with joists: it can break.
If you take into account possible leaks (from the upper floor or water supply failure), then you should choose only moisture-resistant brands of this material and be sure to cover it with a water-repellent composition. But even in this case, we would not recommend it for rooms with high humidity. This base is suitable for any floor covering: parquet, laminate, linoleum, carpet, cork and ceramic tiles.
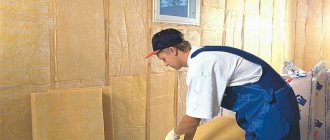
An important stage of work is the preparation and processing of materials
Before you begin arranging the rough foundation, you must choose the method by which it will be installed and determine the amount of materials required. After this, you should make a series of round holes in the corners of the residential building made of wood.
They will ensure effective ventilation of the subfloor and increase the service life of both the subfloor and the finishing floor. The holes will not spoil the appearance of your home. Upon completion of all the planned work, you will simply disguise them with decorative ventilation grilles.
Then it is necessary to treat the entire underground space and the logs directly with an antiseptic composition.
Laying a subfloor on an untreated site is not allowed. It must be understood that various microorganisms may appear on the elements of the subfloor during the operation of the building. If wooden logs are not treated, they will very quickly be destroyed by mold and mildew. And it is almost impossible to repair the preliminary foundation - access to it is either completely impossible or very difficult.
Wood processing is recommended to be done with the following compositions:
- hot resin - it protects both from the negative effects of moisture and from various insect pests; solutions of VVK-3, HCP or MCHC; ammonium silicofluoride; chlorophos - it is most often used as protection against insects; sodium fluoride.
Wood processing products
All these compounds are safe for humans. They do not emit harmful substances and at the same time have the required waterproofing properties for wood. Processing with their help should be carried out strictly according to the manufacturer’s instructions.
Note! Boards for the subfloor need to be processed only on the back side. But on the logs themselves, crowns and beams, protective compounds are applied from all sides.
Additionally, it is recommended to treat the rough base with fire retardants. Specialized stores now sell universal compounds that simultaneously protect wood from fire, moisture and the effects of microorganisms.
Base structure
Diagram for installing a wooden floor on a columnar foundation
What is the diagram for installing a rough foundation on beams? The floor base is a cake, which consists of the following layers:
- Beams and/or joists. Installation of wooden elements is carried out on the base of the foundation or support pillars when arranging the floor on the ground;
- Skull bars. They are fixed to the bottom of the beams and serve as support for rough boards;
- Draft boards. Sheets of plywood, OSB, chipboard and other wood-based materials are often used as cladding for a wooden frame;
- Waterproofer. Coatings with water-repellent properties are laid on the layered cake to protect the base from moisture;
- Thermal insulator. Installation of insulation involves laying material between beams and sheets of plywood;
- Vapor barrier. Membrane coatings prevent the accumulation of condensation under the floor, which prevents the development of fungus;
- Counterrail. Installation of the counter batten ensures the presence of a technological gap under the coating necessary for floor ventilation;
- Soundproofer. Sound-absorbing materials are often installed in multi-story buildings;
- Finish coating. At the final stage of repair, the layered cake is covered with finishing material - solid boards, decorative plywood, parquet, etc.
It is worth noting that the base pie may consist of fewer layers. The diagram discussed above gives an idea of the possibility of laying certain materials in the process of arranging the rough foundation. The “correct” layered cake scheme is presented in the video.
What is required to arrange a rough foundation?
To install the platform under the finishing floor covering, stock up on the following materials:
Wooden blocks of the third or second grade - logs. In most cases, such products are characterized by a not very smooth surface. Therefore, they need to be slightly corrected.
Your task is to make their front side (the one on which laminate, parquet boards or other covering will then be laid) more or less even. This operation is performed with an ax. Naturally, nothing needs to be done with logs made from first grade wood.
Such products themselves are very smooth. Bricks for the construction of support pillars. The height of the finished supports should be at the level of 20–25 cm, and their dimensions are usually 40x40 cm. The number of brick pillars is determined by the geometric parameters of the wooden house and its floor base.
The supports are mounted on cement mortar. Plywood or boards. With their help, the first and second rough layers are laid. A film of polyethylene or other waterproofing material. It is needed to protect logs from rotting. Heat and vapor barrier material.
Installation of a platform for finishing floor covering
Also, laying the structure we describe is impossible without the use of fasteners. Wooden logs are most often connected to brick supports with 4x5, 5x5 cm bolts and steel corners.
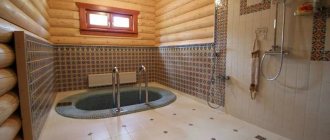
Waterproofing is an important stage of a warm home
Waterproofing in rooms with high humidity, such as bathrooms, requires special attention. The choice of technologies is quite wide. For example, coating waterproofing using special penetrating compounds, or waterproofing with synthetic components such as polyurethane, epoxy resin and others. Coating polymer-cement waterproofing with either quick-setting elements or synthetic additives is considered the most effective. The latter are especially relevant for houses with an unstable foundation.
© 2022 prestigpol.ru
How to make a floor correctly - instructions for beginners
The design discussed in the article can have two or one layer.
If beams are attached to the walls of a wooden residential building, the installation of logs is mandatory. In such a situation, the distance between the individual beam products is quite large. If the distance between the beams is minimal, the leveling base can be made directly on them.
The scheme for independently performing installation work is as follows:
Install brick pillars (they serve as supports for the black base) or make a frame of boards around the perimeter of the room. If supporting elements made of bricks are used, roofing felt must be laid on top of them. Attach the logs to the base of the house. Fix them with metal bolts and angles (to brick supports) or universal self-tapping screws (to wood frames). When installing joists, leave 20 mm gaps near all wall surfaces.
Heat-insulating material can be placed in these cracks. If the support distance of the logs to the base of the house is short (less than 10 cm), they are installed in the same way. And then they press it with a fairly massive beam.
It is fixed tightly in the walls of the building. The walls of the house and the sections of timber joints are measured, after which the corresponding cut is made. It is advisable to take its dimensions a couple of centimeters larger than those that you get as a result of measurements.
Do not forget that the logs will expand slightly when exposed to moisture. Install cranial blocks at the bottom of the supports for the rough foundation. Then connect them to the joists on the sides. The geometric parameters of such bars are always taken to be smaller than the dimensions of the main elements. Mount boards on the bars.
There is no need to attach them. Wood will expand during use. Free placement of the boards will not interfere with this natural process. Place a layer of waterproofing on the floor base.
The selected moisture-proof material (for example, polyethylene film) should be fixed to the wall surfaces. On them, the waterproofing agent extends to a height that is equal to the height of all existing levels of the feasible floor base (this figure also includes the finishing of the floor). Fasten the areas connecting the pieces of film together with a construction stapler. Lay a layer of thermal insulation.
The height of the logs should be slightly greater than the thickness of the heat-shielding material. For wooden buildings, it is allowed to use any materials for floor insulation. When block heat insulators with small thickness are used, they can be laid in several layers.
Subfloor thermal insulation layer
Next, cover the made pie with a vapor barrier material. It is also fixed to the walls of the building with a stapler. The joints of vapor barrier products are glued together using construction tape.
If the thermal insulation material was laid exactly according to the height of the logs, thin slats should be mounted on their sides. They will hold the insulation in place. As a result, you will have a gap under the floor for ventilation.
The final work is laying plywood, boards, OSB boards on the rough base. Installation of the second layer of the base is carried out in the same way as you installed the first part of the structure (leave gaps at the walls, place heat-insulating material in them, and so on). Fastening of boards, slabs and sheets is done in increments of 10–14 cm using stainless self-tapping screws.
As you can see, it is not difficult to arrange a rough foundation with your own hands. Good luck in this matter!
- Author: Mikhail MalofeevPrint
When building a new house or installing an old one, an important part of the renovation work is laying the subfloor in accordance with the rules. In the article we will look at the features of folding the base and the use of insulating and insulating materials.
Floating floor
A floating floor is a foundation laid on a structure that does not have load-bearing beams built into the walls. In other words, the floating floor is not connected to the supporting walls in any way. A similar design is used when finishing the base in houses with strip foundations.
How to make a floating floor?
- First of all, the soil is removed from the underground;
- Then crushed stone or gravel is backfilled;
- After compacting the gravel cushion, supporting brick pillars are installed around the perimeter of the room;
- The dimensions of brick columns should not be less than 40 by 40 mm;
- A layer of roofing material is laid on the base for waterproofing;
- Before installing the beams, pre-treatment of the wood with an antiseptic is required;
- At the next stage, the repair involves fastening the beams, the distance between which can be a maximum of 60-70 cm;
- At the final stage, it is planned to cover the insulated floor with sheets of chipboard, OSB or plywood.
You can see how to make a floating floor in the video.
Features of laying subfloors along joists
Most builders recommend installing a subfloor as additional insulation and a guarantee of strength and reliability.
The installation features are not difficult, and therefore anyone can do all the work themselves. One disadvantage of this floor is poor insulation of impact noise, which is indicated by strong fastening of the elements. Experts do not recommend doing such arrangement in toilets, saunas, baths or baths, because high room humidity is not suitable for boards.
The subfloor in a wooden house on joists consists of bars that form a frame for laying and leveling. In this variation, boards that are not planed are used, of the second and third grade, preferably from coniferous or soft hardwood. In country houses, logs can be used as logs, which creates a more durable and reliable structure. At the beginning of work, all logs must be processed to level the material.
In fact, the part of the beams that will be fastened to the boards must be leveled and hewn, but achieving a high level is almost impossible. The logs are placed in grooves that are prepared at the beginning of construction, and the distance between the logs and the wall should be approximately 2 to 3 mm. This is explained by the method of laying the subfloor in a wooden house, which will not creak during operation. The boards are treated with antiseptic agents or bitumen to prevent the penetration of pests, mold and mildew. The grooves are not the only object of fastening, and therefore must have other supporting elements, for example, brick pillars.
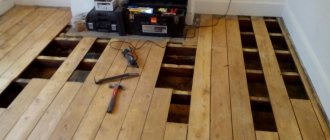
Laying the joists correctly
Before starting work, the base must be thoroughly cleaned and treated with primers. Wooden parts are dried and treated with an antiseptic. It could be bitumen. The soundproofing layer can be made of slag or sand.
Wood before and after treatment with an antiseptic.
It is better to install the logs from the window. The gap between the wall is made up to 40 cm. After the logs are laid, the plane must be checked against the rule. If you don’t see any gaps, it means everything was done efficiently.
Laying logs: installation
1. The distance between the logs should be 60 cm; when using boards of greater width or logs of significant diameter, the distance can increase to 1 meter.
2. After laying the logs, move on to the next step. We use beams with a section of 50x50, which acts as a support, and fasten them with self-tapping screws on each side of the log.
3. It is recommended to carry out the fastening procedure carefully, since the structure may turn out to be fragile and fall apart during the work. To do this, we fasten all fasteners carefully and securely to avoid harm to ourselves.
Some home-made builders purchase boards measuring 15x40, and then divide them into several parts, since the resulting beams are 50x40 in size, which is a good alternative to the previous process.
Wood selection
Repairing the foundation along beams involves using only high-quality and durable wood that can withstand large static and dynamic loads over a long period. That is why in the process of choosing logs you need to take into account the following parameters:
- Section. The minimum cross-section of logs for floors in private houses is 15 by 15 cm;
- Dimensions. In the process of laying beams into “sockets”, it is desirable that the distance between them and the wall is at least 10-15 mm;
- Tree species. For installation of floors, larch of the 2nd or 3rd grade is suitable;
- Humidity. The maximum moisture content of materials can only be 12-15%. Since wood absorbs moisture, additional treatment of the logs with antiseptics will be required when laying the floor.
Fastening bars and laying subfloors: features of the work
The peculiarity of fastening the bars to the logs should be designed for additional space for the use of insulating materials. With an insulation thickness of 10 cm and a board thickness of 2.5 cm, the distance between the bars and logs should be 12.5 cm. Of course, all the data given may vary depending on the material you use.
The installation of a subfloor in a wooden house is the next stage of work.
There are some points that can complicate the installation process. For example, the structure of logs is an uneven building material with various knots and depressions, so it will be difficult to finish boards of the same size and thickness. In this case, you will have to carefully process each element.
In the presence of beams, the work process is greatly simplified, especially when filing and dividing the material into boards. They are attached to bars that are attached to the logs on different sides. For fastening, you can use self-tapping screws and nails.
Such a preparatory floor is quite unstable and cannot support a person’s weight of more than 80 kg. With more weight, the boards may fail, which will have unpleasant consequences for workers. To avoid such incidents, it is recommended to put thicker boards on the joists and then proceed with the process of installing the subfloor in a wooden house.
Material requirements
The following materials are usually chosen for flooring :
- edged board;
- waterproof plywood;
- Fiberboard or chipboard with waterproof treatment;
- OSB plate;
- cement particle board (CSB) or GVL.
Recommended ratio between board thickness and joist layout Source semanticscholar.org
Plywood is stronger due to its multi-layer structure, and it is much thinner for a subfloor.
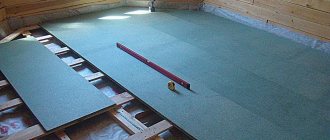
Instructions for constructing sheathing for insulation inserts
After laying the boards, you can begin work on floor insulation using various insulating materials. Construction stores offer a wide selection of products with different prices and features. Therefore, choosing insulation is not difficult; for example, manufacturers offer mineral materials, as well as fiberglass or basalt, styrene boards and sprayed products.
If necessary, the insulation can be easily adjusted to the size of the repair area using construction knives. Some owners prefer to use environmentally friendly materials, such as expanded clay or slag. In wooden houses, insulating the subfloor with natural materials will preserve the ecology of the room and create more comfort.
Step-by-step instructions for installing sheathing for insulation:
1.
We lay the logs in the grooves prepared for this. All elements must be fastened tightly. Leveling the floor is carried out using a level, which affects the entire plane of the base.
2. Lay rough material on the joists following the previous recommendations.
3. Since wood absorbs moisture, the surface must be covered with a special film or rubber.
4.The material is attached to the surface using a stapler.
It is important to ensure that the laid raw material is not swollen or has depressions. Thus, the subfloor in a wooden house is waterproofed, which ensures that excess moisture does not get inside. 5. The next step is to fill slats with a width of 5 cm, however, this parameter may vary depending on the type of insulation purchased. As in façade sheathing, the slats should be laid in the same direction horizontally or vertically.
In a wooden house, such installation is especially important, since a schematic presentation of the boards will save the wood from rotting.6. Insulation materials are placed in the formed spaces. When using expanded clay, it is carefully poured into the openings and a few centimeters are left from the surface. It is important that the sizes of the granules be different, because this will allow the base to be more compacted. Styrenes or mineral wool are also not laid to the very top, and this allows you to create a certain layer free of materials, which will serve to ventilate the floor and retain heat.7. After this, a vapor barrier layer is laid on top of the bars, which is very important when installing a heated floor. In wooden houses, as a rule, they use a water floor heating system, and therefore there is a possibility of condensation.
To avoid this phenomenon, it is recommended to use a vapor barrier material; it perfectly absorbs all fumes, preventing them from damaging the base. The last step is laying the finished floor. To do this, use tongue-and-groove boards or special plywood that can absorb moisture. This material is used for further finishing of the floor using linoleum or laminate. All surfaces must be carefully sanded to avoid unevenness or imperfections in the floor.
Moisture-resistant chipboard
This material is capable of withstanding very high mechanical loads and can be laid both on frame joists and on leveling backfill. It has a slight variation in thickness and allows you to create a fairly even base. Please note that this must be high-density chipboard (used in furniture countertops or window sills). Chipboard has good sound and heat insulating characteristics.
In Europe, ready-made tongue-and-groove panels are made from chipboard (including those with additional insulating layers). If you use these slabs, then, like plasterboard, they are laid in two layers with glue and coated with a water-repellent compound. If you have special requirements for soundproofing the floor, then you can lay a layer of technical cork on top (on glue). It is recommended to use chipboard only in dry rooms under parquet, linoleum or carpet.
Do-it-yourself method for dry screeding a subfloor in a wooden house
If there is a concrete floor in a wooden house, the owners want to convert it into special floors.
Of course, there is a conversion method using dry screed or a self-ventilated floor system. The first option is more affordable in construction. To install a subfloor with your own hands, it is recommended to use the following materials and tools:
- expanded clay; polyethylene film; gypsum fiber board or chipboard; damper tape; PVA glue; electric jigsaw; self-tapping screws; screwdriver; marker, ruler and tape measure.
All work is carried out in stages in accordance with the requirements and recommendations proposed below.
1.
A polyethylene film is laid on the concrete floor, which is used as waterproofing. The flooring on the wall should be about 10-15 cm, and between the joints of the material there should be an overlap of 20 cm. To ensure reliable fastening of the elements, it is important to seal all seams with tape.
2. The next element is gluing the damper tape around the entire perimeter. The height of the tape at the edges should be slightly greater than the layer of expanded clay poured in as an insulating material.
3.
Experts recommend using beacons when installing subfloors in a wooden house, a video of which can be viewed at the end of this article. They serve as a building level for pouring granules and placing them evenly on the film. With the use of bars, the height can be increased or decreased to create the plane you need.
4.
Next, pour out the expanded clay and level it, focusing on the installed beacons. It is not recommended to simultaneously pour out the insulation over the entire area of the room. First, process one part and cover it with a sheet of plywood, and then the second, and so on. Such work is carried out in order to better move around the repair area, while the expanded clay layer must be at least 2 cm, otherwise the plywood will slide underfoot.
Necessary tools and building materials
Tools for screeding
There are several different technologies for laying subfloors. This requires different materials, but the same tools. The main list includes:
- devices for removing the old floor if repairs are being made;
- construction or laser level, tape measure, corner;
- shovels, trowels, wood hacksaws, jigsaws;
- screwdriver, drill, grinder;
- beacons and rules for leveling the screed;
- concrete mixer for preparing concrete;
- thermal insulation materials – the latter are recommended to be kept indoors for about a day before installation;
- waterproofing – roofing felt, films, membranes, coating compounds;
- vapor barrier - not always required;
- materials for dry screed - chipboard, waterproof plywood, GPV sheet.
Other tools may be required to install the subfloor.
Laying materials on expanded clay
The process of laying sheets of plywood or GLV on expanded clay is quite an important stage, because upon installation you will immediately understand how reliably the work has been done. To do this, it is important to walk on them, which is why you will feel the material sagging. For beginners, this situation may cause bewilderment, but the main test is to firmly subsidence the sheets, which should not move in the future.
It is important to remember that flooring sheets have a large weight of approximately 15-17 kg, and the movement of such slabs on the expanded clay layer can cause its deformation.
You can connect the material using self-tapping screws, but they should be located closer to each other, the approximate distance between them should be 10-12 cm. To ensure that all parts of the sheets are securely fastened, it is recommended to glue them using PVA. The application process should occur in waves, and it is important not to exaggerate with the thickness of the layer, because the parts are already connected with self-tapping screws.
As a result, all joints of plywood or GLV sheets must be puttied with special mixtures. After drying, the surface is sanded and rubbed so that the entire base is level. To answer the question: how to make a subfloor in a wooden house using dry screed in a bathroom or other room where there is high humidity, it is recommended to use waterproofing materials with different solutions with a cement component.
Moisture-resistant plywood
Multilayer plywood has high mechanical strength and good thickness geometry. It can be laid on frame leveling joists. Many finishers lay it directly on concrete floors under parquet or laminate: the floor becomes warmer, but plywood does not solve the problem of sound insulation. This material is quite expensive, and many, trying to save money, take a non-moisture resistant brand. Such plywood (even without leaks) can begin to delaminate after just a few years. This material is not used in wet areas. Suitable for parquet, carpet and linoleum.