Material such as plywood is increasingly being used to cover floors. However, if we are talking about wooden flooring, then laying plywood on a wooden floor is not so easy; there are certain nuances that need to be taken into account.
First of all, you need to understand what plywood is. This is a material consisting of 3 layers of wood, but it often happens that there are more such layers. There are several types of such material, so if the question arises about what kind of plywood to lay on the floor, it is recommended to opt for a waterproof option, which is impregnated with a special adhesive solution.
Plywood is great for subfloors because it is durable and does not warp.
Covering a wooden floor with such material is a very good solution, as it has a number of advantages.
First of all, it should be noted that plywood is the most practical subfloor for a living space. When such a floor is in use, it cannot be deformed, since there is no doubt about the strength and reliability of such a coating. This material can be used not only as a rough coating, but also as a base one.
But you should know that before laying plywood on a wooden floor, there must be a certain gap between its sheets, which does not have the best effect on the appearance of the floor. To avoid this, the plywood laid on the floor must be sanded (for this it is recommended to use fine-grained sandpaper), then everything is varnished and the result is a very attractive and prestigious appearance. For all this you need to use the following tools:
- Hammer. Nails. Self-tapping screws. Screwdriver. Building level. Hacksaw.
Plywood comes in 1-4 grades.
Using moisture-resistant plywood will allow you not to fear the consequences of a flood, which can always be caused by neighbors above. If we talk about the advantages of such a material, we should note its excellent thermal insulation qualities, which allow it to retain heat 20% more than other materials.
Laying plywood on a wooden floor is especially recommended in cases where it has completely become unusable (either dried out or loosened).
Using this material, you can put everything in order very quickly and inexpensively, and it will be very reliable. But if there are significant temperature changes in the room, then it is best to avoid using plywood; the same applies to apartments where there is high humidity. That is, there is no need to lay plywood in the bathroom or in a room where there is no heating.
How are plywood sheets installed?
Scheme for laying plywood flooring parquet.
When the question arises of how to lay plywood on the floor, the most difficult thing is laying it on the joists. They must be installed so that the upper ends are in the same horizontal plane. The plywood should be attached to the joists so that the sheets meet on them.
If necessary, a heat and sound insulation layer can be installed between the logs, and communication networks can be installed. It is recommended to use plywood sheets that are approximately 1.5 cm thick.
If you use moisture-resistant plywood, the thickness of which is 1.2 cm, then you need to drill 6-8 holes with a diameter of 1 square meter using a feather drill. mm.
Then you need to insert plastic bushings that have internal threads into such holes. These holes are needed to screw bolts into them (they are also plastic). Such bolts are used as racks.
Now the sheets are installed on the wooden floor, the surface of the plywood should be horizontal.
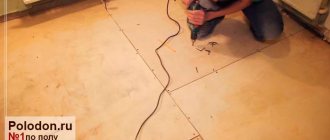
The plywood is laid on the joists and nailed down with nails or self-tapping screws every 15-20 cm.
Before you start laying plywood sheets, you need to check whether there are any deflections in the wooden base along the joists. If there are such deflections, then the floor covering will need to be removed, and the floor will need to be repaired. If this is not the case, then the plywood can be laid directly on the base.
Before starting work, be sure to check the moisture level of the surface of the base. This is done quite simply: a piece of plastic film, the size of which is 1 by 1 m, is spread for a period of 72 hours; the film should be pressed as tightly as possible to the surface. If, after the specified time, the inner side of the polyethylene is not covered with condensation, then you can begin work.
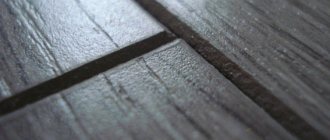
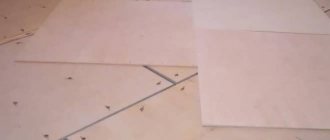
The plywood is laid offset so that the seams do not converge in one place.
Sheets of plywood should be laid with a slight offset; more than 3 seams should not meet in one place. The sheets should not become tangled during the laying process; they should be numbered. As for the gaps between the sheets, there should not be more than 3 mm, and between the plywood sheet and the wall there should be a distance not exceeding 1.5 cm.
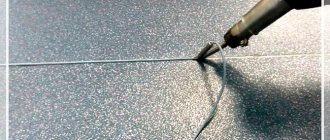
Squares measuring 60 by 60 cm are carefully cut out of plywood sheets. In this way, a large number of damper seams are obtained, which makes it possible to very effectively identify existing plywood delaminations, since on solid sheets they can simply go unnoticed.
It is very important to clean the plywood with a construction vacuum cleaner before installation; dust and dirt are unacceptable.
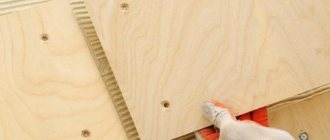
Plywood can be laid in many ways, but the best way is to use glue. Nevertheless, you can completely safely do without it. The sheets must be laid taking into account the numbering; they must be fixed diagonally with self-tapping screws, the distance between which should be from 15 to 20 cm.
You can make an indent from the edge of the sheets, but it should not exceed 2 cm. It must be remembered that the self-tapping caps must be completely recessed in the plywood sheets, and the holes in the fasteners must be countersunk. After the plywood sheets are laid, they must be sanded as thoroughly as possible.
Thus, it becomes clear that this type of flooring does have many advantages. And, first of all, it should be noted that the cost of such work is relatively cheap, and the work process itself is not complicated. So we lay plywood on a wooden floor ourselves, without fear for the quality of the final result.
All photos from the article
Plywood is a material strong enough to withstand the load of furniture, so plywood sheets are often used to level any type of floor. In addition, this allows it to be insulated, which is especially important for the first floor with an unheated basement. The work of laying plywood on a wooden floor cannot be called too difficult; even a beginner in the construction business can cope with this task.
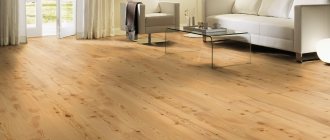
Plywood on the floor
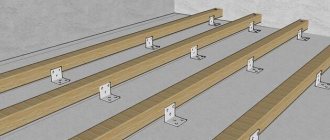
What are lags
The bars that form the sheathing when installed are called lags. With their help, the surface in the room is leveled, and they also serve as a basis for attaching sheets. They can be made of metal or concrete, but the use of plywood requires the use of wooden blocks.
The construction of the floor will not be practical enough without lathing, since it gives the necessary rigidity to the sheets. Of course, there is a way to lay plywood without lathing, but this type of fastening can only be used if the room has a flat base. Without this, leveling the floor with plywood without joists will not be done well.
Laying joists on the street. First, they build a frame and connect the sections together.
For logs, timber with a cross section of 50×100 mm is usually used. The rectangular shape is necessary so that the sheets can be joined on the wide side. In other words, if you don't have a support pad, attaching the sheet will be difficult.
Also, before the logs are installed, they must be treated with antifungal and fireproofing agents.
Advantages of plywood on the floor
Using plywood for flooring has a number of advantages:
- It is easy to level the plank floor. Moreover, it is possible to eliminate both local defects, such as slight unevenness, and more serious defects, for example, the curvature of the floor;
Plywood on the floor will allow you to cope with various defects
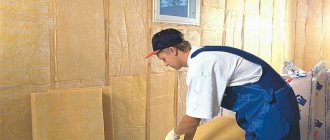
- insulate it. If the flooring is done on joists, then insulation (bulk or rolled) can be laid in the spaces between them; heat loss through the floor will be reduced significantly;
Insulation will reduce heat loss significantly
The main thing is to properly treat the surface
- You can do the installation yourself, you don’t even need assistants. All you need to do is mark the room and fix the sheets on the floor in accordance with the layout plan, attaching them to the base with self-tapping screws.
Materials such as fiberboard cannot be considered as a replacement due to poor flexural performance and lower durability in general. While plywood sheets can bend without any problems, resting on a ribbed floor, fiberboard simply cannot withstand such a load.
Please note! Fiberboard should not be used even to eliminate small defects on the floor surface. Any unevenness will be reflected on the surface over time.
Another advantage of plywood sheets is their low cost. Especially if you compare their cost with the price of flooring boards in a room of the same size. So the relatively low price of plywood for flooring can also be considered a significant factor when choosing flooring material.
Conclusion
These instructions can be used not only for leveling the floor with plywood in a wooden house with your own hands. In a similar way, with minor additions to laying technology, surfaces in brick buildings are leveled. Follow the publications on our website and you will learn a lot more new things from our specialists.
To make it clearer for you, we have presented a video in this article, watch and do it.
Which plywood to choose
When choosing, you will have to take into account factors such as:
- dimensions of plywood, attention should be paid to the thickness, deflection under load depends on this, this is especially important when laying on joists;
When laid in 1 layer, the thickness should be about 20 mm
Please note! It is also worth considering the width and length; these parameters are important simply based on ease of transportation. If the work is carried out in a city apartment, then transporting sheets a couple of meters high will be, to put it mildly, inconvenient.
type of plywood. The FC type (based on urea adhesives) is suitable for residential premises.
You can also find options on sale using adhesives based on phenolic compounds, but they are more dangerous to human health, although they are highly resistant to moisture. Bakelite and especially laminated plywood sheets are definitely not suitable for the floor; as for surface treatment, if linoleum, laminate or any other type of floor covering is laid on top of it, then you can take the simplest one - the unsanded type; depending on the presence of defects in the external layers of veneer, plywood can be divided into grades. For flooring, we can recommend grades 3 and 4, since the floor covering will still be placed on top of it, the number of defects does not matter at all.
Appearance does not play a special role, so we choose grade 3 or 4
As for what thickness of plywood to lay on a wooden floor, we can recommend not using sheets less than 18-20 mm thick for single-layer flooring. Also, to increase the rigidity and strength of the plywood layer, you can lay it in 2 layers.
Material calculation
To correctly determine the quantity of products, you must follow the step-by-step instructions:
- The floor surface is measured and all data is transferred to paper. You should get a detailed diagram of the foundation with a lag laying system. This allows you to immediately calculate the order of placement and adjustment of all parts, which is especially important in rooms with ledges and niches.
- The appropriate sheet size is determined and a layout plan is drawn up.
- According to the data obtained, the required number of slabs is calculated.
When installing a floor using joists, first of all, you need to draw up a diagram for installing joists, and then plan the laying of plywood according to it
. If the room has the correct shape, it will be easier to calculate the consumption: for this, the size of the object and the dimensions of the sheet are converted into area, the data in square meters is divided.
On a note! To make the task easier, you can use a table with the exact sheet area provided by the manufacturer.
Laying directly onto boards
This method is used when the old plank floor is still quite strong, but the gaps between the floorboards and the unsightly appearance do not allow it to be left as is. It is too expensive to completely re-cover it, and it is impossible to lay laminate or linoleum directly on such a base. In such situations, the question arises, how to lay plywood on an old wooden floor?
The boards themselves are still very strong, but the floor looks ugly
If the flooring is also done to level the base, then a two-layer coating would be ideal; for each layer you can use sheets 9-10 mm thick. In this case, the seams of the top layer should fall in the middle of the underlying sheet, this will smooth out the unevenness of the base caused by different thicknesses of the floorboards.
Sheets are laid in the following sequence:
First you need to check the boards for strength and deflections. It may well turn out that the joists are rotten, in which case they will have to be replaced.
You should not try to save money at this stage; the stronger the wooden base, the longer the floor will last. Before laying plywood, the floor is thoroughly cleaned; further instructions suggest laying out sheets of plywood on the floor. It is forbidden to lay them close to each other, the thickness of the seam should be about 3-5 mm, and the distance between the wall and the sheet is 15-20 mm (then it will be covered with a plinth);
Sheet layout diagram
Please note! Humidity in the room plays a special role. To check, you can lay polyethylene on the floor and after a couple of days see if there is condensation on it. If not, then the plywood is guaranteed not to become damp.
- when laying, each subsequent row should be shifted by approximately 1/3 of the width from the previous one (approximately the same way as bandaging seams in brickwork). More than 3 seams should not meet at one point;
Dressing sutures
- Plywood sheets can be attached to the base using glue, self-tapping screws, or both. As practice shows, self-tapping screws are quite sufficient; the sheet must be secured around the perimeter and diagonally with equal spacing between the screws. To ensure that the heads do not protrude above the surface of the sheet, it is mandatory to countersink all holes for self-tapping screws;
Sheet fastening scheme
- After this, the question of how to lay plywood on a wooden floor can be considered closed; all that remains is to check whether the sheets are sagging due to unevenness of the plank floor, and you can proceed to laying linoleum, laminate or other flooring.
Pros and cons of choosing plywood
To the question: why is this particular material chosen to make an even coating indoors? The answer can only be given if you know its characteristics. The first positive quality is durability.
Compared to chipboard and USB boards, plywood will last much longer. The reason for this is the technology of its manufacture. Unlike other types of wood boards, plywood is glued with veneer, which gives it strength. Three types of adhesives are used for gluing veneer, two of them are moisture resistant, so plywood can withstand moisture for a long time without destruction or rotting.
When using this design, additional communications can be installed underneath it without resorting to cutting niches in the walls.
Plywood is stronger than other floor coverings and will last much longer
The negative nuance is that this material is the most expensive of the entire group of wood boards. But, the opinions of experts always agree on one thing: it is better to do it once and for a long time than to redo it due to the use of low-quality materials.
Aligning the curvature of the base
Laying plywood on joists can be used when it is necessary to insulate the floor, as well as in cases where the old floor has significant curvature.
In this case, we can recommend:
- for logs, use ordinary square bars; if the floor has a slope, then using bars of different sections for different rows you can eliminate the curvature. Instead, it is permissible to place scraps of wooden boards under a row of blocks;
Scheme for eliminating curvature
- In the question of how to properly lay plywood on wooden floors on joists, it is important to ensure the rigidity of the coating. To do this, it is necessary to take a small step between the lags (about 40-50 cm), and for greater rigidity, lay the bars also in the transverse direction. Thanks to this, the sheets will be supported along the entire perimeter and the deflections will be less than when supported only along the edges;
In the photo, the bars under the sheets are laid in 2 directions
- When attaching plywood in this way, clear markings are especially important. The edge of the sheet should be clearly in the middle of the block; it is attached to the joists using the same self-tapping screws; you can additionally apply a layer of glue to the joists.
Instead of logs, it is possible to install point supports under the plywood flooring. The whole difference is that instead of logs, point supports of the required height are installed on the old foundation. They should create a dense grid on the old wooden floor, the step between supports is 35-50 cm.
Please note! With this method of flooring, the edges of the sheets should under no circumstances sag.
As for what kind of plywood to lay on a wooden floor on joists, the same sheets are used as for laying directly on the floor. The degree of surface treatment of the sheet is selected depending on whether the floor covering will be laid on top of the plywood.
Installation of logs under plywood
Thus, installation of plywood on joists can begin immediately after marking and securing the pads. The beams are laid parallel to the wall with window openings in order to be perpendicular to the sunlight entering the room. For the distance between floor joists under plywood, it is best to choose an interval of 40-50 centimeters (read: “What is the distance between floor joists when installing a floor”). Only the two outer beams at opposite walls should be installed at a distance of 30-40 centimeters.
All other logs should be fixed at the same distance, strictly parallel to each other. The height can be checked using the horizon line previously drawn along the walls. Closer to the center of the room, such a tool will usually help determine how smooth the surface is. Naturally, all beams should have the same linear dimensions, but for the outermost logs near opposite walls it is best to use beams that are larger in width than those located between them.
The logs are secured to the prepared linings using screws. The fastener must be recessed into the beam so that the head does not protrude on the surface. It will probably not be very aesthetically pleasing if the laid floor covering is damaged. In the photo and upon visual inspection, such a floor can no longer be called high-quality.
To increase the strength of the lag in the places where the pads are located, you can additionally fix the beam using a special wooden profile (crossbar), which will also be fixed to the pad, enhance the adhesion effect and increase the stability of the base.1
The design becomes even more reliable if, after installation, each wooden element is coated with parquet glue or a similar mixture. It is advisable to fill the space between the joists with insulating or soundproofing material. Most often, mineral wool, expanded clay or polystyrene are used for these purposes. Various communications are also laid in the voids. From above, the contents of such areas are covered with parchment or bitumen paper (more details: “Laying plywood on a wooden floor - which one to choose and how to lay it”).
An alternative way to secure the joists does not require the use of spacers. In this case, the logs are also leveled with pieces of roofing material, and secured with long anchors or dowels, the length of which exceeds the thickness of the beam by 5-6 centimeters.
Working parameters of plywood
One of the most economical and fairly well-established methods of adjusting wooden floors in various buildings is the use of plywood. Such a dry screed using a wood-laminated board will not require much effort and material costs. But those who want to do this operation on their own need to know some subtleties. This material has advantages that are extremely important for leveling a wooden floor:
- a thin wooden plate bends perfectly and has no through gaps;
- plywood is very durable;
- its sheets can be large, so it is practical to cover even large areas;
- plywood is easy to transport and unpretentious;
- indispensable when performing repair work;
- its processing and installation is not difficult;
- high quality grinding;
- plywood has no unpleasant odors;
- the surface is hard and the leaf mass is small;
- demonstrates good reliability under load;
- moisture and water resistant (if impregnated with solutions).
Plywood has a layered structure. It consists of carefully pressed veneer and glued between layers. The thickness of the material depends on the number of these layers. And the strength of plywood and its durability depend on it. The veneer layers are distributed in such a way that each subsequent row is placed perpendicular to the previous one. In any type of plywood, the number of rows is always odd. But when purchasing this material in order to level wooden floors, you must also take into account its thickness, brand, type of wood, etc.
Plywood fastening methods
During leveling, plywood can be secured in various ways, depending on the requirements for the operation:
- sticking to concrete floor;
- stiletto heel adjustment;
- installation on a frame;
- wood floor covering;
- screwing sheets;
- gender regulation.
Plywood can be laid in different ways
Key characteristics of plywood
When planning the finishing of a subfloor, you should take into account not only the thickness, moisture-repellent qualities and strength of plywood, but also its grade.
Based on the number of existing defects per 1 m2 of slab, there are 5 quality levels:
- E is a standard of quality, characterized by the absence of any damage to the surface of the slab.
- Grade 1 – sheets of good quality with minor defects no longer than 18 mm.
- Grade 2 – on this plywood, minor glue leaks and microcracks up to 20 mm may be visible. Often, such plywood is purchased for laying laminate flooring (for more details: “What is the optimal thickness of plywood for laminate flooring”).
- Grade 3 – less than 10 small knotty defects up to 5 mm in size can be detected on one square meter.
- Grade 4 is a poor quality material that can be used in extreme cases, for example, for subsequent laying of laminate flooring.
The rough flooring can be made using sanded or unsanded plywood. According to this parameter, such slabs can be divided into the following types:
- Ш1 – plywood with one-sided grinding;
- Ш2 – plywood with double-sided sanding;
- NS – without polishing.
Most often, the preparation of the subfloor for laminate is carried out using NSh and Sh1 plywood. Due to the fact that an additional substrate is laid under the laminate, the roughness of the material can be neglected.
Plywood innovations
Plywood flooring is a branch of construction equipment that appears to be far from over. In the age of composites and nanotechnology, good old plywood does not retreat and finds new applications.
Adjustable floors
These floors are used as a base for wood inlays and other fine, exclusive work. Plywood flooring – double, made of high quality plywood. The sheets of the bottom layer have threaded sockets for bolts. The bolts are shaped: above the thread there is a flat widening in the form of a press washer, and above it there is a neck 3/4 high of the thickness of the sheet for a hexagon or with a Phillips slot.
Adjustable plywood floors
The top sheet with holes for the necks of the bolts is placed on the bolts screwed into the bottom sheet, and adjusted with an open-end wrench or a screwdriver. When using bakelized plywood, the accuracy of the overall surface is quite machine-building.
Plywood parquet
But plywood parquet is an invention of craftsmen. It revived the forgotten skill of artistic cutting from plywood at a new level. The technology of plywood parquet is simple and accessible to anyone:
- The required amount of FC or improved plywood, preferably birch, but pine will also work, painted with stains in the desired tones.
- The pattern is first modeled on a computer, then, based on the printout, an applique is made in full size or to scale from cardboard and checked for coherence of the parts.
- Using a hand-held circular saw or a jigsaw with “clean cut” saws, the sheets are cut into the desired shapes; in the simplest case - squares, rectangles, stripes.
plywood parquet
- Lay out the pattern on the rough plywood floor using liquid nails and gluing the joints. Any drips that appear are immediately removed with a rag lightly moistened with solvent.
- The laid out pattern is coated with acrylic varnish in two or three layers, each subsequent after the previous one has completely dried.
- What results from simple geometric shapes can be seen in the figure. Some aces of plywood craftsmanship, having rummaged through old books on artistic cutting, create compositions that you will not see in the mansions of oligarchs. For example, a portrait of his wife in the bedroom. In the living room there is a bouquet of chrysanthemums, and in the nursery there is Cheburashka conducting a Pokemon orchestra. By the way, the Japanese call Cheburashka a Russian Pokemon and consider it their ancestor.
Bottom line
Plywood is suitable for use in suitable premises - warm and dry. But there, with skillful hands, you can create miracles from it: plywood is suitable not only for subfloors or wall coverings, but also as a material for decorative interior compositions.
Laying technology
Before you begin laying the lathing for the flooring, you need to prepare the concrete floor for further work. The correct sequence of work is to first clear the floor of debris, and then inspect the surface for minor defects - chips, cracks, dents. All these shortcomings must be eliminated before the sheathing is completed.
In some cases, depending on the purpose of the room, before the frame structure is made and the floor can be covered with plywood, the concrete surface is waterproofed. These works can be done with your own hands. It is necessary to insulate not only the floor surface, but also part of the wall, up to the level of the finished floor.
Preparation
Having prepared the surface for laying lags, do not forget about possible unevenness of the walls. An uneven wall will not allow you to lay an even sheet of plywood. There are two ways out of the situation: either level the walls before starting the floor repair, or cut the plywood sheets based on the curvature of the wall.
Trimming is done as follows:
- a sheet of plywood is moved in a lying position to the wall so that its opposite edge is placed strictly parallel to the joist on the floor;
- a separate rail is placed parallel to the wall on top of the sheet;
- draw a line along which they cut the plywood sheet.
Before starting flooring work, you need to prepare the material. It is cut into the required length and width elements in accordance with a previously drawn up schematic work plan.
Frame formation
The next stage of work, when the wooden blocks are cut to size, is the sheathing itself. The sheathing structure should not be made close to the wall; there should be a distance of 10-15 mm between them.
Log installation sequence:
- select the point that protrudes the most above the floor level; all other logs will be aligned along it;
- to speed up the installation process, you need to stretch the cord along the sides of the room, checking its position using a building level;
- a backing made of a piece of thin plywood is laid under each joist; it increases the contact area of the support;
- the logs are secured to the concrete base with anchor hardware;
- the spacing of the wooden blocks must correspond to your schematic plan, a range from 35 to 60 cm is allowed;
- The beams are fastened together with screws and metal jumpers.
When performing the sheathing design according to the drawing, you should end up with an even horizontal structure. The logs are placed with a uniform spacing and distance from the walls. The gap between the wall and the sheathing is made so that, under the influence of moisture, the expanded wood does not lift the plywood flooring and cause deformation of the laminate or other floor covering.
Floor insulation
To insulate the floor, mineral wool or polystyrene foam is used, which is placed in cells formed by the intersection of the joists in the sheathing. Before installation, mineral materials should be given 24 hours to adapt to the conditions of your room, so that after installation no gaps or voids are formed. Sheets of foam plastic or insulation are cut so that they fit tightly into the sheathing cell. The top part of the insulation should not reach the edge of the joists by 1 cm.
Fastening sheets
Prepared and cut plywood sheets are laid on the sheathing as follows:
- the installation begins from the far corner of the room and moves along the direction of the solid wall;
- the distance from the wall to the plywood sheet should remain 10 mm;
- Attachment points are marked on plywood sheets, retreating from the edge of the sheet by 2 cm;
- the interval between screws is 20-30 cm;
- The heads of the screws must be completely recessed into the plywood material; to do this, before installing them, a hole is made in the sheet using a wood drill with a countersink.
- after installing the 1st row, the surface is cleared of chips and the 2nd row is laid out;
- When fixing a sheet of plywood, you need to start working from the center to the periphery - this makes it possible to place the sheet more evenly on the sheathing structure;
- When laying plywood in 2 layers, the seams of the joints are broken in a checkerboard pattern.
After the flooring is completed, you need to sand the floor surface with a grinding machine. For this purpose, choose a nozzle with an abrasive of 120 units. After sanding is completed, the floor is cleaned of shavings and dust, and then the joint seams and screw holes are filled with sealant. Instead of sealant, you can use wood putty. When the material hardens, the seams are treated with sandpaper. After completing these works, you can begin laying linoleum, tiles or laminate.