How to avoid mistakes during installation
A common mistake when installing interior partitions is their incorrect location.
An apartment owner may incorrectly estimate the dimensions of a room (for example, a dressing room), an architect may not understand the customer’s wishes, a foreman may misread the plan, workers may see the “wrong mark.” The wall has to be dismantled and rebuilt, wasting time and increasing costs. Therefore, it is highly advisable for the apartment owner, together with the architect (designer), to come to the site, armed with a plan and a tape measure, to check the laying of the first rows. Materials for masonry
| Material | Solid red brick | Red slot brick | Porous ceramic block | Aerated concrete block | Hollow expanded clay concrete block | GGP hydrophobized |
| Minimum possible partition thickness, mm | 65 (brick on edge) | 120 | 80 | 50 | 90 | 80 |
| Optimal thickness of the interior partition, mm | 120 (half a brick) | 120 | 120 | 100 | 120 | 100 |
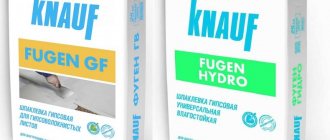
| Masonry mortar | Cement-sand grade not lower than M200 | Cement-sand grade not lower than M200 | From a ready-made cement mixture, for example Porotherm | From ready-made cement mixture (KNAUF LM2, Blockstar FIX, etc.) | Cement-sand grade not lower than M200 | Ready-made gypsum (KNAUF-Perlfix, Volma Montazh, Ivsil-Plast, etc.) |
| Density, kg/m3 | 1600–1900 | 1000–1400 | 750–900 | 400–600 | 950–1000 | 1100–1250 |
| Water absorption,% | 6–14 | 6–14 | 14–18 | 50 | 10 | 6–8 |
Step-by-step plan for constructing a partition from foam blocks with your own hands
How to build a partition from foam blocks? In order for the partition to turn out smooth and of high quality, when constructing it, it is important to follow the sequence of construction technology and be extremely careful. For more dense installation, foam blocks should be wetted
- First of all, for the strength of the partition being built, reinforcement pins must be installed in the load-bearing floors at intervals - one pin for 2-3 rows.
- Draw the lines of future masonry on the floor and walls, mark the doorway, if one is planned.
- Strengthen a metal profile along the marked lines, which will ensure even laying of the blocks.
- Before laying out the first row of partitions made of foam blocks, it is necessary to clean the base from construction dust and debris, then apply a primer.
- After the primer has dried, you can begin diluting the glue, following the instructions. The glue should be thick enough so that the mixer does not fall off when left in it, and at the same time thin enough so that the remaining glue falls freely from the mixer.
- The first row of blocks along the metal profile is strengthened in two ways:
- if the base is concrete, the blocks are laid on a cement mortar;
- On the finished flooring, the blocks are fixed using self-tapping pins.
Each even row must begin with half a block so that the rows are staggered and the vertical seams do not coincide (banding masonry). Before applying the glue, the surface of the rows is leveled with a plane or trowel, after which the cement dust is swept away with a wide brush. Subsequent rows are laid on the prepared adhesive solution, which is applied in such an amount that after installing the blocks, it is slightly squeezed out on both sides. Then you need to grind the block to the upper edge of the previous row and to the adjacent blocks; this technique will avoid shrinkage of the wall in the future.
Do not forget to periodically check the vertical position using a plumb line or level. If it is necessary to form a doorway, a ceiling is made in its upper part from a wooden beam or 2-3 steel reinforcement rods, on which foam blocks are laid out “staggered”. The parts of the foam blocks protruding from the sides of the opening are cut off with a hacksaw after the masonry has dried. (The window opening is formed in the same way, if necessary). After erecting the partition, it must dry for 48 hours, during which time it is left alone, then the guide profiles can be dismantled. After the masonry has dried, the small gap remaining between the last row of the partition and the surface of the ceiling is filled with mounting foam in an unbroken line along the entire perimeter on both sides of the partition. Excess foam is carefully cut off after it dries. To cover the wall with decorative tiles, there is no need to prepare the wall surface; the tiles are easily attached to the porous structure of the foam block with a special tile adhesive. Before wallpapering, the partition is primed, plastered and leveled with several layers of putty.
So, to summarize: interior partitions made of foam blocks are a simple, economical, fast and very convenient way to divide an office, industrial or residential space into separate boxes.
Foam block is an excellent building material with excellent characteristics.
For clarity, we suggest watching a video about the installation (installation) of interior partitions made of foam blocks and masonry.
https://youtube.com/watch?v=SEo1E9OBwSA
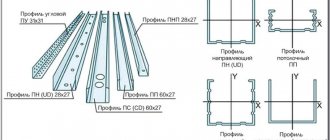
KNAUF profiles
MARKETPLACE “BUY KNAUF”
The entire range is in one click!
A new KNAUF service that will help you place an online order and purchase KNAUF products through official dealers.
The service provides a wide range of KNAUF products, protection against counterfeiting and automatically selects the best offers from dealers for the product items selected in the catalog.
Modernization of rack profile production
KNAUF is pleased to announce the modernization of the production of rack profiles. From June 1, 2022, KNAUF enterprises in Russia will begin production of rack-mount metal profiles with triangular notches KNAUF-profile PS 50x50, 75x50 and 100x50.
The innovation will provide improved quality characteristics and additional protection of original KNAUF products from counterfeiting.
Main advantages:
A high-quality PROFILE is a guarantee of design reliability!
The “dry construction” system, of which KNAUF is a recognized leader, is used everywhere, on almost every construction site.
One of the foundations of KNAUF complete systems are profiles used in all categories of buildings to form the frames of prefabricated partitions, cladding or suspended ceilings.
The frames, in turn, are filled with mineral wool if necessary and provide a rigid base for fastening various sheet materials.
And just like any house needs a reliable foundation, a frame-cladding structure needs a high-quality profile.
Many manufacturers supply profiles of insufficient quality, unsuitable for use in dry construction systems. The low price attracts a buyer who either believes that problems will be invisible behind the cladding, or has no idea about the consequences of using such products.
Meanwhile, due to poorly secured sheathing and instability of the structure, cracks appear in the joints of sheets and seams of tiles. A flimsy frame can impair sound insulation performance. Cases of collapse of suspended ceilings with frames made of similar profiles have become more frequent.
The KNAUF company has clear requirements for metal profiles, based on many years of experience in the construction and operation of these structures in Europe.
One of the primary requirements is the thickness of the steel, which directly affects the rigidity of the profile and, as a consequence, the rigidity of the entire structure.
Moreover, the thickness of the steel affects the strength of the screw in the profile - this is a very important parameter that ensures reliable fastening of the sheathing to the frame. So, with a force of up to 45 kg, the screw must be held in the profile. Knauf profiles with a thickness of 0.6 mm provide this condition. If the steel is thinner, then this requirement is no longer met. Therefore, all European suppliers of such systems have switched to a single standard for steel thickness - 0.6 mm.
On the shelves of hardware stores, as a rule, you can find profiles with a steel thickness of 0.4-0.45 mm or even less. A reliable layer of zinc coating in accordance with GOST 14918 protects Knauf profiles from corrosion.
A wide range of
Metal Knauf profile UA reinforced
Arched metal KNAUF profile (PA)
Metal KNAUF beacon profile (PM)
Metal KNAUF profile corner protection (PU)
KNAUF profile MW
Metal KNAUF profile Sinus
Metal KNAUF guide profile (PN)
Knauf‑ceiling profile (PP)
Manufactured in accordance with TU 24.33.11-012-04001508-2020
Metal KNAUF-profile guide (PN) ceiling
Knauf LED profile (Z)
KNAUF profile LED (P)
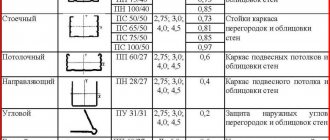
KNAUF rack profiles (PS)
Rack profiles are C-shaped and serve as vertical posts for partition frames and wall claddings. The PS profile is used in conjunction with the corresponding PN guide profile.
PS profiles are available in wall sizes of 50, 75 and 100 mm. The PS profile wall has two longitudinal corrugations designed to increase rigidity. There are three pairs of holes on the wall of the PS profile, which allow installation of utilities inside the frame.
Metal KNAUF profile rack (PS)
Manufactured in accordance with TU 24.33.11-012-04001508-2020
It is a long element made by cold rolling on modern roll forming equipment from thin steel strip.
Guide KNAUF profiles (PN)
The guide profiles are U-shaped and serve as guides for rack profiles, as well as for the installation of jumpers between the racks of the frame of partitions and claddings. Mounted in pairs with PS profiles of appropriate size.
Profiles are available with wall sizes of 50, 75 and 100 mm, which ensures reliable joining with the PS profile, the wall dimensions of which are slightly smaller. The wall of the PN profile has two longitudinal corrugations designed to increase rigidity.
Metal KNAUF guide profile (PN)
Metal KNAUF-profile guide (PN) ceiling
Ceiling KNAUF profiles (PP 60x27)
Ceiling profiles have a C-shape and are intended for the construction of suspended ceiling frames and wall claddings. Another important factor is the compatibility of hangers and connectors with the profile, i.e. the shapes of the grooves must correspond to the supporting bends.
So, during testing, a suspension with a clamp and rod inserted into a PP profile must withstand a load of 25 kg. At the same time, the bends on the profile shelves should not bend.
Poor quality connection of untested elements can be one of the factors in the collapse of suspended ceiling structures.
To provide the construction market with high-quality profiles for complete “dry construction” systems, KNAUF produces profiles at its enterprises and supplies them under the KNAUF-Profile brand. Each profile has special markings and an imprint of the KNAUF logo.
This product fully satisfies all of the above requirements. The quality of the KNAUF profile is constantly monitored during its production at the enterprises of the KNAUF group.
Metal ceiling profile KNAUF (PP)
Manufactured in accordance with TU 24.33.11-012-04001508-2020
It is a long element made by cold rolling on modern roll forming equipment from thin steel strip.
Partition C112 (installation of doorway)
How to properly arrange a doorway in a partition made of KNAUF sheets? This is in our film!
Construction of a doorway using reinforced KNAUF profile UA
Step 1. Attaching the lower corners for the doorway profiles
To install doorway profiles, we use special corners.
Step 2. Installation of a reinforced doorway profile
We insert reinforced profiles into the corners with the upper corners put on them and fasten them to the ceiling with dowels.
Largus driver's door opens while driving
Step 3. Installing the jumper from the guide profile
Between the reinforced profiles of the doorway we install a jumper from the guide profile.
We fasten the jumper using a screwdriver and screws.
Step 4. Installing an additional profile
Above the jumper we install an additional rack profile with a given pitch.
Step 5. Fastening KNAUF sheets
We do not allow sheets to join together on support posts and in the corners of the doorway.
Step 6. Trimming KNAUF sheets
We cut the Knauf sheet to the size of the doorway using a saw.
Step 7. Arrangement of the doorway
The doorway installation is complete!
The structure is ready for further finishing work!
Related Products
KNAUF-list (GSP-A)
KNAUF-superlist (GVL)
KNAUF self-tapping piercing screw LN
Sales organizations
Where can I buy?
TRAINING AT THE ACADEMY – DRY CONSTRUCTION
Finishing of premises using KNAUF sheet and slab materials (installation of partitions, suspended ceilings, wall cladding, prefabricated floor subfloors).
After completing the program, students will be able to understand the range of Knauf products, understand the purpose and conditions of use of Knauf dry construction products and complete systems. They will know the design features of frame-cladding structures and use this knowledge in real situations that arise during construction.
Source
Types of frame partitions
Depending on the degree of purpose and the material used, partitions in a frame house come in several types. In a wooden house, the function of a wall can be performed by frame-panel, solid, paneled frame partitions.
Frame-panel partitions
The name of this design suggests the presence of a frame and a panel panel. The frame function is almost always performed by a wooden beam. In some cases, a metal profile is used. Finishing materials such as plasterboard, fiberboard, chipboard, and other panels intended for wall cladding are used as panels.
Such walls can consist of several layers. For sound insulation purposes, polystyrene foam or mineral fiber is used. The material is placed in the space between the panels.
Solid designs
Solid partitions consist of a frame and thin boards that are installed in a vertical position. To fill the niches with sound insulation, the structure is made double. The frame is built from timber, it is mounted on special spikes, and then attached to the base using wooden triangles.
Paneled interior partitions
Paneled partitions for frame-type houses are made from panels with a width of 0.8 to one meter. Shields are assembled from strapping, mullions and panels. The technology for manufacturing panel panels is similar to the production of frame doors.
Advantages of lightweight interior structures
Frame walls have many advantages, among which the following are worth noting:
- excellent thermal insulation properties;
- there is no need for a strong foundation;
- no need to wait for the house to shrink;
- speed of assembly of the structure;
- relatively low cost;
- environmentally friendly materials.
It is also worth noting that the process of erecting walls using frame technology is quite simple and does not require special skills.
Frame-type partition device
Frame partitions are installed in houses of any type; materials for assembling structures can also be different. The installation method is chosen based on the design features of the building and the desired layout. As a rule, the frame is attached to beams.
There are three installation methods in total:
- On the beam, securing it on all sides with bars.
- Between the beams, using grooves and lags.
- Across the beams with the partition resting on the joist.
The frame for the future wall is assembled using screws or nails; in rare cases, polyurethane foam is additionally used. In addition to the wooden frame, metal profiles are used to construct interior partitions.
Typically, such a frame is sheathed with plasterboard, after which the surface of the wall is puttied and covered with other finishing materials. As a sheet material, you can use ordinary lining.
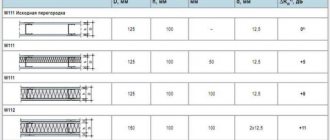
Partition W118
The partition has 3 layers of drywall. But, a galvanized sheet 0.5 mm thick is mounted between the drywall. This type of partition should be installed in strict accordance with the technical characteristics of the material, as well as the installation instructions.
Diagram of the partition W118
The metal frame of the partition is reinforced with PS 100 profile. Its thickness is 0.6 mm.
Types of partitions and their manufacturing technology
Partitions in a wooden house made of timber or galvanized logs, as well as frame buildings, can be of the following types:
- frame and frame-panel;
- panel and carpentry;
- frameless.
All the above types refer to wood structures. As additional options, you can make fences from plasterboard or tongue-and-groove. They are also fairly lightweight and easy to install.
Diagram for assembling a plasterboard partition
To understand how to make interior elements for a house from timber or rounded logs with your own hands, you need to consider each type separately.
Frame partitions
Such partitions in a wooden house made of timber or logs can be used at the request of the future owner, and for frame buildings they will be the most optimal option.
The manufacturing technology is as follows:
Installation of a frame partition
- Measurements of the room and markings on the floor where the interior structures will be located.
- The bars of the lower trim are made, guided by the obtained dimensions. The elements are secured to the floor with screws or self-tapping screws.
- Next, the racks and transverse elements of the frame are cut out according to measurements. Installing them in the design position with your own hands can be done in two ways: individually or installing the frame after assembling it on the floor. Fastenings are made with screws or self-tapping screws. The end posts are fixed directly to the wall.
- The frame is wedged at the top and secured with fasteners.
- Afterwards, insulation is laid between the frame elements (if it is needed for sound insulation) and the sheathing is performed. It can be sheathed with plasterboard or clapboard. In this case, the sheets and sheathing elements are cut so that their joint falls in the middle of the frame post.
Panel and carpentry
To make interior fencing of this type for a house made of timber or logs with your own hands, you need to follow the following procedure:
Wooden partitions in the house
- Room measurements and markings.
- Production of plank panels (solid) from boards 20-40 mm thick.
- Bars are nailed to the surface of the floor and ceiling, which form grooves for installing shields. The shield can be two-layer or three-layer. When making a three-layer structure, thinner boards are used for the inner layer.
- Assemble a partition from panels in height. By inserting them into the grooves formed by the bars.
- Soundproofing material can be laid between the layers.
They are made both to the entire height of the room and with a gap of 30-50 cm from the top edge to the ceiling.
Frameless
When making simple structures of this type with your own hands, work is done in the following order:
Scheme of the simplest frameless partition
- Room measurements and markings.
- Fastening the bottom trim.
- Making a groove trim on a beam by nailing two bars. The groove should be equal to the thickness of the partition boards.
- A triangular beam is attached to the ceiling. It will be an integral part of the groove for fastening from above, so the location should correspond to the lower fastening.
- Install vertical boards, starting with the one located near the wall. It is pressed and nailed to the triangular bar on top.
- Install all the boards one by one. The space between the individual elements is filled with tow, polyurethane foam or insulating cord.
- After the installation of the boards is completed, the second triangular groove element is nailed to the ceiling.
- The partition is sheathed.
Instead of bars, metal corners can be used for fastening to the floor and ceiling.
In order to competently make partitions for a house from timber or other wooden elements with your own hands, you need to choose the right type, install them without deviations vertically and horizontally, and securely fasten the parts of the structure together. For manufacturing, it is recommended to choose first or second grade coniferous wood. All wood is necessarily treated with antiseptics to prevent rotting. If desired, the elements can be treated with fire retardants to increase fire resistance.
Advantages of using Knauf technology
Knauf prefabricated plasterboard partition systems are used both in apartments and in public places. They differ in types and sizes. With their help, walls and partitions are created.
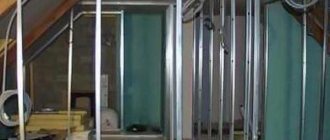
Assembling the Knauf partition frame
The main advantage is the Knauf material. Tongue-and-groove gypsum slabs are created using lithium technology.
Required amount of materials for installing the partition
They do not burn and are fire resistant. Composite boards do not contain toxic impurities harmful to humans and animals. Such slabs are easy to install and can be processed.
- This system uses high quality components. For this purpose, there is a special Knauf department that monitors the quality of products.
- Calculation of the material is easy, without difficult preparation of mathematical formulas and their subtraction.
- For each system, detailed instructions are issued for assembling a plasterboard partition.
- To create a plasterboard partition yourself, you need to purchase a lot of materials. The finished system does not require the separate purchase of drywall profiles or fasteners.
Knauf plasterboard partitions are fully equipped, which is important in the installation of the partition and its further use.
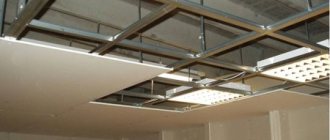
Sheathing with plasterboard sheets
After creating a wooden frame and running electrical wires, one side of the partition should be sheathed with plasterboard in a checkerboard pattern. The joints should not match, so we will use a checkerboard spread.
Sheathing the frame base with plasterboard
On the other hand, you should put mineral wool in the partition and, if desired, make sound insulation. Polystyrene foam is also used. Then the second side of the frame base is sheathed. Without reinforcing the joints, the plasterboard partition is sheathed with a second layer of sheets.
Laying soundproofing material in the space between the profiles
KNAUF ceilings
KNAUF ceilings with gypsum fiber sheets
Knauf supersheets can be used to create suspended ceilings. Knauf ceiling systems allow you to achieve a flat ceiling and disguise communications with minimal time and labor. The finished ceiling structure is not a load-bearing element of the building, which allows you to implement almost any design idea.
Systems with GVL
P 131
Self-supporting suspended ceiling made of KNAUF sheets (KNAUF super sheets) on a single frame. Complete KNAUF system. More details
P 212
Suspended ceiling made of KNAUF supersheets on a two-level metal frame P 212. Complete KNAUF system. More details
P 213
Suspended ceiling made of KNAUF supersheets on a single-level metal frame P 213. Complete KNAUF system. More details
Based on the matryoshka principle
Room within a room
Architect and visualizer: Natalya Tarasova
In this interior, with the help of a canopy and thick drapery, it was possible to create a “room within a room” - an isolated space for sleeping, reading and psychological relief.
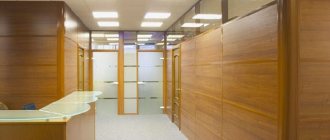
Translucent partitions
Design and visualization: Natalia Grishchenko and Anna Kashutina
A bathroom with partitions made of lime-colored translucent tempered glass is a bold decision that presupposes a high degree of trust between the residents of the apartment. However, it has thick drapes for privacy.
Futuristic cube
Studio zi-design interiors, visualization Created in Space
The fastenings of frameless glass panels are hidden in an L-shaped niche with lighting, which in the evenings will turn the sleeping area into a futuristic object. And with the help of translucent curtains along the inner perimeter of the cube, you can create a private space.
Lightbox
Architect and photographer: Artemy Saranin
The boundaries of the sleeping area, located in the center of the apartment, marked by a thin welded metal frame with glass screens, will practically dissolve in space. And with the white textile curtains closed, the room turns into a kind of lightbox.
Interior partitions made of plasterboard
A special system for installing frame partitions made of plasterboard sheets (GKL), which contains all the necessary elements, allows the work to be completed especially quickly.
Application area
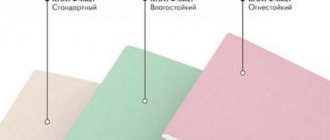
Lightweight gypsum plasterboard partitions can be used in houses made of any designs and materials and in any rooms, even with high humidity (special moisture-resistant sheets are provided for such objects).
Materials and designs
The system includes metal frame profiles - horizontal guides and vertical racks (section 50-100 * 50 mm), as well as gypsum board sheathing 1.25 cm thick and 120 x 200-300 cm in size and soundproofing material. They use structures with one-, two- and three-layer cladding, as well as on a double metal frame (with space for utilities). The level of sound insulation of a partition depends on the number of sheathing sheets, the thickness of the internal soundproofing layer, and the presence of an air gap. Depending on this, the thickness of a partition with a single skin can range from 7.5-12.5 (single) to 17.5-22.5 cm (double), and with a double skin and an air gap - correspondingly greater.
Installation
The structures are installed during finishing work, before laying floor coverings, on a screed or ceiling. Polyurethane or foam rubber soundproofing tape is glued onto the horizontal profiles and secured to the floor and ceiling using dowels and screws (in increments of about 1 m). Rack profiles are installed in increments of 30, 40 or 60 cm. The frame sheathing on one side is secured with self-tapping screws, and soundproofing material is placed between the profiles. Then the sheathing is installed on the other side of the partition. Irregularities in the cladding and screw heads are sealed with putty.
Control zones
- To improve sound insulation, partitions are mounted to the supporting structures of the ceiling and only then plasterboard is installed.
- The seams between the gypsum boards should be puttied in two steps.
- To protect against cracks, the joints between gypsum boards and adjacent structures should be puttied with reinforcing tape.
Interior partitions made of plasterboard
This video guide clearly demonstrates all the stages of building interior partitions from small plasterboard sheets (small size):
KNAUF claddings
Knauf cladding with gypsum fiber sheets
Single-layer or two-layer cladding made from KNAUF supersheets (GVL) allows you to create a smooth surface for painting, wallpapering or tiling. Wall cladding is done much faster due to the elimination of wet technological processes - the walls do not need to be plastered.
Systems with GVL
C 663
Single-layer or two-layer cladding made of gypsum-fiber KNAUF supersheets (GVL) on a metal frame fixed to the base wall C 663. Complete KNAUF system. More details
C 665
Single-layer cladding made of gypsum-fiber KNAUF supersheets (GVL) on a metal frame spaced from the base wall C 665. Read more
C 666
Two-layer cladding made of gypsum-fiber KNAUF supersheets (GVL) on a metal frame spaced from the base wall C 666. Complete KNAUF system. More details
M 682
Single-layer or two-layer cladding of attics made of gypsum-fiber KNAUF supersheets (GVL) on a metal frame. More details
Installation of a wooden partition frame
Frame-type partition elements usually consist of racks, trim, insulation, sheathing and a decorative layer. Frames can be either single or three-dimensional. They are not “tightly” mounted to the main walls. They can be disassembled without destroying the entire structure. The simplest and easiest way would be to assemble the frame and sheathe it with gypsum board; installing plasterboard partitions in a wooden house is also allowed.
The main methods of attaching partitions:
- On the beam. The element is mounted to the beam and secured on both sides with bars, the cross-section being equal to the thickness of the floor boards. Then the fastening points are covered with plinths.
- Between the beams. You will need to cut wooden blocks between the beams, on which to lay the joist, and then attach the partition to it.
- Across the beams. They are covered with a lag, under which a diaphragm is attached.
The latter method is considered the most effective for improving sound insulation. But the choice of fastening method should depend on the structural characteristics of the building and its layout.
Installation of frame partitions in block or brick structures is carried out on construction foam immediately after construction. And in houses made of wood, it is better to carry it out after the erected building has settled down.
If there is a need to install structures in a new log house, you need to leave space - horizontal or vertical gaps by the amount of expected shrinkage plus 1 cm.
Installation of frame posts
Racks are made of wooden beams or metal profiles. They are usually made from timber with a cross section of 50 x 100 mm or 50 x 60 mm.
They are attached to the guide bars with four steel corners or by notching. Rack elements are most often placed in increments of 60 cm.
Do-it-yourself installation of frame-sheathing partitions is quite possible if you follow the step-by-step instructions:
- We place a beam at the base of the structure so that it rests on the floor beams.
- We fix two guides horizontally on the harness.
- We attach boards vertically between them. At the top of the structure they should be held in place by a fastening beam.
- On one side we sheathe the structure. We fill the internal space of the future partition with a layer of insulating material.
- We mount the frame installation to the walls using metal spikes, and secure the second side of the sheathing with self-tapping screws.
- Where the partition element will be joined to the adjacent structure, we lay a reinforcing mesh to protect the wall from cracking.
As a frame, you can use not only a wooden beam, but also a metal profile. The technology for constructing the partition will be almost identical. The simplest version of such a partition element, accessible even to a beginner: a single frame made of metal profiles 50 x 50 mm is sheathed on both sides with plasterboard in one layer.
Construction of a doorway in a frame partition
Internal partitions in any frame house can be either solid or with openings. When erecting a blank wall, no difficulties arise, but arranging a place for a double-glazed window or door frame requires certain skills. What a novice builder needs to consider:
- Frame partitions consist of vertical posts mounted at equal distances from each other. Inserting an opening will destroy the integrity and require reinforcement of the structure.
- The part of the frame located under the opening will be weakened. It will be necessary to distribute the load - install horizontal crossbars - additional strapping boards.
- The location of the opening for a window or door should be chosen so as to preserve the integrity of the partition as much as possible. Ideally, its width should be a multiple of the pitch of the racks. If this does not work out, the opening must at least start from the rack (or end at it).
Indoor walls with windows and doors have high sound permeability. Decorative windows or thin interior doors perfectly conduct noise, especially low-frequency noise. Therefore, there is no point in spending money on soundproofing such partitions.
Fastening horizontal jumpers
These parts are attached to the partition posts using either metal corners or self-tapping screws. It is possible to use the method of fastening on notches.
The distance between the jumpers can be any, but not more than a meter. Fastening with a large pitch will reduce the rigidity of the installation of the vertical posts of the frame and, accordingly, the entire structure as a whole.
C 112
Partition with two-layer cladding made of KNAUF sheets on a single metal frame.
*Depending on the standard size of the frame profiles and the pitch of the racks.
Composition of the complete system - quantity per 1 m 2:
*Position not shown in figure.
**According to customer needs.
( ) Options for components are given in brackets.
[ ] Values in parentheses are given for the case when the height of the partition exceeds the length of the gypsum building board.
Data on the quantity of materials are approximate, do not take into account cutting losses and require clarification according to the project.
More details
Description
The complete KNAUF C 112 system is a complete set of specially selected materials necessary to create a partition with two-layer sheathing from KNAUF plasterboard sheets (GKL) on a single metal frame.
Element-by-element partitions covered with KNAUF plasterboard sheets (GKL) are non-load-bearing structures.
Main building elements of the partition:
The full composition of the complete system and the required amount of materials per 1 sq. meter of ceiling, see the “Technical Specifications” section.
Distinctive features of this system:
In addition to the main elements, the complete system includes the technical solutions necessary to solve a specific construction problem, recommendations for the work, as well as tools and devices.
All elements of the complete system C 112 are manufactured using modern technologies, undergo strict quality control, are functionally oriented and, as part of a complete system, ensure the reliability of the entire structure during long-term operation.
Application
The installation process includes the following stages of work.
Installation of partitions should be carried out during the finishing work (in winter with heating connected), before the installation of clean floors, when all “wet” processes are completed and the wiring of electrical and plumbing systems has been completed, under dry and normal humidity conditions in accordance with SP 50.13330.2012 Thermal protection of buildings. Updated version of SNiP 02/23/2003. At the same time, the room temperature should not be lower than 10°C.
Samsung washing machine blocked the door
In conditions of high humidity (bathrooms, kitchens, bathrooms), it is recommended to use moisture-resistant KNAUF plasterboard sheets (GKLV), while it must be taken into account that in places where water directly hits the walls (bathrooms), the surface of the sheets should be covered with KNAUF-Flechendicht waterproofing.
The location of electrical wiring in the space of the partition frame should exclude the possibility of damage to them by sharp edges of frame elements or screws during fastening of KNAUF plasterboard sheets (GKL).
Source
Functionality and advantages of timber partitions
The design of timber partitions is considered one of the most durable. The block used as a support can withstand high pressure and does not bend, as it rests on the flooring or joists. If you don’t make openings in the partitions, then you don’t even need additional supports.
Installing such a partition with your own hands takes a minimum amount of time. And if you follow all the instructions, the timber device will last for decades. If necessary, it can be easily dismantled and moved to another location.
The main advantages include:
- Thermal insulation and sound insulation. Since the timber has good thermal insulation and sound insulation properties.
- Does not require additional insulation.
- There is no need for expensive finishing, since the wall itself is aesthetically pleasing (with the exception of frame assembly).
- Easy to assemble.
- The device can withstand heavy loads (for example, you can hang heavy cabinets or shelves).